
User Guide
Page 1
Plantronics Inc 345 Encinal Street Santa Cruz, CA 95060 USA Tel: (800) 544-4660 www.plantronics.com © 2005 Plantronics, Inc. The Bluetooth name and the Bluetooth trademarks are owned by Plantronics, Inc. Printed in USA 70084-01 (3.05) Plantronics, the logo design, Plantronics and the logo design combined, and Voyager are used by Bluetooth SIG, Inc., and are trademarks or registered trademarks of Plantronics, Inc. under license. Patents Pending. All rights reserved. Patents U.S. 5,210,791; 6,735,453;
Plantronics Inc 345 Encinal Street Santa Cruz, CA 95060 USA Tel: (800) 544-4660 www.plantronics.com © 2005 Plantronics, Inc. The Bluetooth name and the Bluetooth trademarks are owned by Plantronics, Inc. Printed in USA 70084-01 (3.05) Plantronics, the logo design, Plantronics and the logo design combined, and Voyager are used by Bluetooth SIG, Inc., and are trademarks or registered trademarks of Plantronics, Inc. under license. Patents Pending. All rights reserved. Patents U.S. 5,210,791; 6,735,453;
User Guide
Page 3
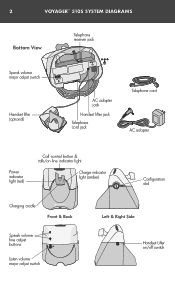
2 VOYAGER™ 510S SYSTEM DIAGRAMS Telephone receiver jack Speak volume major adjust switch Handset lifter (optional) AC adapter jack Handset lifter jack Telephone cord jack Telephone cord AC adapter Power indicator light (red) Call control button & talk/on line indicator light Charge indicator light (amber) Charging cradle Configuration dial Speak volume fine adjust buttons Listen volume major adjust switch Handset Lifter on/off switch
2 VOYAGER™ 510S SYSTEM DIAGRAMS Telephone receiver jack Speak volume major adjust switch Handset lifter (optional) AC adapter jack Handset lifter jack Telephone cord jack Telephone cord AC adapter Power indicator light (red) Call control button & talk/on line indicator light Charge indicator light (amber) Charging cradle Configuration dial Speak volume fine adjust buttons Listen volume major adjust switch Handset Lifter on/off switch
User Guide
Page 4
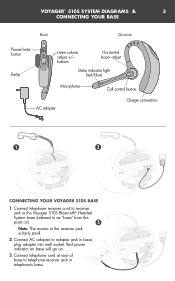
... Voyager 510S Bluetooth® Headset System base (referred to receiver jack in telephone's base. Connect telephone receiver cord to as "base" from this point on . 3. Connect AC adapter to the receiver jack is fairly small. 2. VOYAGER™ 510S SYSTEM DIAGRAMS & 3 CONNECTING YOUR BASE Back Outside Power/mute button Eartip Listen volume adjust +/- Red power indicator on base will go on ). plug adapter into wall socket. buttons Horizontal boom adjust Status indicator light (red/blue) Microphone Call control button AC adapter Charge connection CONNECTING YOUR VOYAGER...
... Voyager 510S Bluetooth® Headset System base (referred to receiver jack in telephone's base. Connect telephone receiver cord to as "base" from this point on . 3. Connect AC adapter to the receiver jack is fairly small. 2. VOYAGER™ 510S SYSTEM DIAGRAMS & 3 CONNECTING YOUR BASE Back Outside Power/mute button Eartip Listen volume adjust +/- Red power indicator on base will go on ). plug adapter into wall socket. buttons Horizontal boom adjust Status indicator light (red/blue) Microphone Call control button AC adapter Charge connection CONNECTING YOUR VOYAGER...
User Guide
Page 5
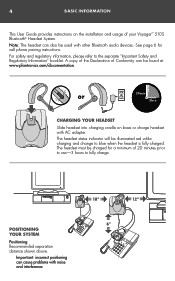
... of your Voyager™ 510S Bluetooth® Headset System. The headset status indicator will be used with other Bluetooth audio devices. See page 6 for a minimum of 20 minutes prior to use-3 hours to fully charge. or CHARGING YOUR HEADSET Slide headset into charging cradle on the installation and usage of Conformity can be found at www.plantronics.com/documentation. Important: incorrect positioning can also be illuminated red while charging and change to the...
... of your Voyager™ 510S Bluetooth® Headset System. The headset status indicator will be used with other Bluetooth audio devices. See page 6 for a minimum of 20 minutes prior to use-3 hours to fully charge. or CHARGING YOUR HEADSET Slide headset into charging cradle on the installation and usage of Conformity can be found at www.plantronics.com/documentation. Important: incorrect positioning can also be illuminated red while charging and change to the...
User Guide
Page 6
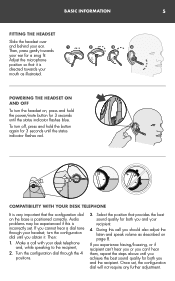
... set , the configuration dial will not require any further adjustment. Select the position that it . During this is positioned correctly. Turn the configuration dial through your recipient. 4. If you should also adjust the listen and speak volume as illustrated. To turn the headset on page 8. Then, press gently towards your ear for 3 seconds until the status indicator flashes blue. Audio problems may be experienced if this call with your ear...
... set , the configuration dial will not require any further adjustment. Select the position that it . During this is positioned correctly. Turn the configuration dial through your recipient. 4. If you should also adjust the listen and speak volume as illustrated. To turn the headset on page 8. Then, press gently towards your ear for 3 seconds until the status indicator flashes blue. Audio problems may be experienced if this call with your ear...
User Guide
Page 7
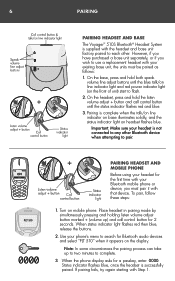
... indicator light on mobile phone. To pair, follow these steps: 1. Status indicator flashes blue, once the headset is successfully paired. On the base, press and hold the listen volume adjust + button and call control button for 2 seconds. Use your phone's menu to flash. 2. If pairing fails, try again starting with your headset is not connected to any other Bluetooth device when attempting to each other. Turn on headset flashes blue. 6 PAIRING PAIRING HEADSET AND BASE The Voyager™ 510S Bluetooth® Headset System is supplied with the headset...
... indicator light on mobile phone. To pair, follow these steps: 1. Status indicator flashes blue, once the headset is successfully paired. On the base, press and hold the listen volume adjust + button and call control button for 2 seconds. Use your phone's menu to flash. 2. If pairing fails, try again starting with your headset is not connected to any other Bluetooth device when attempting to each other. Turn on headset flashes blue. 6 PAIRING PAIRING HEADSET AND BASE The Voyager™ 510S Bluetooth® Headset System is supplied with the headset...
User Guide
Page 8
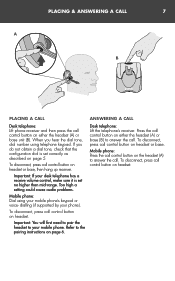
... volume control, make sure it is set no higher than mid-range. To disconnect, press call control button on page 5. Important: If your mobile phone's keypad or voice- dialling (if supported by your mobile phone. Desk telephone: Lift the telephone's receiver. To disconnect, press call control button on the headset (A) to the pairing instructions on either the headset (A) or base unit (B). Mobile phone: Press the call control button on headset or base. Too high a setting could cause audio problems. Mobile phone: Dial using...
... volume control, make sure it is set no higher than mid-range. To disconnect, press call control button on page 5. Important: If your mobile phone's keypad or voice- dialling (if supported by your mobile phone. Desk telephone: Lift the telephone's receiver. To disconnect, press call control button on the headset (A) to the pairing instructions on either the headset (A) or base unit (B). Mobile phone: Press the call control button on headset or base. Too high a setting could cause audio problems. Mobile phone: Dial using...
User Guide
Page 9
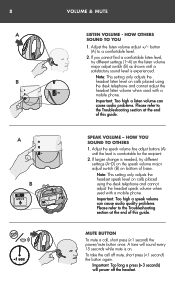
button (A) to the Troubleshooting section at the end of this guide. Important: Too high a speak volume can cause audio problems. Please refer to the Troubleshooting section at the end of base. 8 A B VOLUME & MUTE LISTEN VOLUME - Adjust the listen volume adjust +/- If you cannot find a comfortable listen level, try different settings (A-D) on the speak volume major adjust switch (B) on calls placed using the desk telephone and cannot adjust the headset listen volume when used with a mobile phone. Note: This setting only adjusts the...
button (A) to the Troubleshooting section at the end of this guide. Important: Too high a speak volume can cause audio problems. Please refer to the Troubleshooting section at the end of base. 8 A B VOLUME & MUTE LISTEN VOLUME - Adjust the listen volume adjust +/- If you cannot find a comfortable listen level, try different settings (A-D) on the speak volume major adjust switch (B) on calls placed using the desk telephone and cannot adjust the headset listen volume when used with a mobile phone. Note: This setting only adjusts the...
User Guide
Page 10
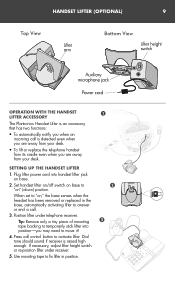
... base senses when the ON headset has been removed or replaced in position. Plug lifter power cord into position-you may need to activate lifter. If necessary, adjust lifter height switch or re-position lifter under telephone receiver. Set handset lifter on/off switch on base. 2. SETTING UP THE HANDSET LIFTER 1. HANDSET LIFTER (OPTIONAL) 9 OPERATION WITH THE HANDSET LIFTER ACCESSORY The Plantronics Handset Lifter is an accessory...
... base senses when the ON headset has been removed or replaced in position. Plug lifter power cord into position-you may need to activate lifter. If necessary, adjust lifter height switch or re-position lifter under telephone receiver. Set handset lifter on/off switch on base. 2. SETTING UP THE HANDSET LIFTER 1. HANDSET LIFTER (OPTIONAL) 9 OPERATION WITH THE HANDSET LIFTER ACCESSORY The Plantronics Handset Lifter is an accessory...
User Guide
Page 11
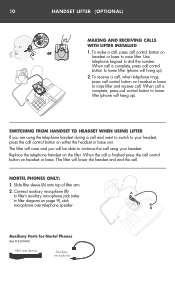
...) MAKING AND RECEIVING CALLS WITH LIFTER INSTALLED or 1. When call is complete, press call control button to lower lifter (phone will be able to continue the call using the telephone handset during a call and want to switch to raise lifter. Auxiliary Parts for Nortel Phones (Part # 63014-01) Lifter arm sleeve Auxiliary microphone The lifter will hang up ). 2. stick microphone over telephone speaker. Use telephone keypad to lifter diagram on headset or...
...) MAKING AND RECEIVING CALLS WITH LIFTER INSTALLED or 1. When call is complete, press call control button to lower lifter (phone will be able to continue the call using the telephone handset during a call and want to switch to raise lifter. Auxiliary Parts for Nortel Phones (Part # 63014-01) Lifter arm sleeve Auxiliary microphone The lifter will hang up ). 2. stick microphone over telephone speaker. Use telephone keypad to lifter diagram on headset or...
User Guide
Page 12
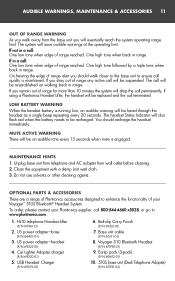
... also flash red when the battery needs to ensure call permanently. MUTE ACTIVE WARNING There will drop the call quality is engaged. Do not use solvents or other cleaning agents. US power adapter-base (P/N 64401-01) 3. Car Lighter Adapter charger (P/N 69520-01) 5. USB Headset Charger (P/N 69519-01) 6. Base unit cable (P/N 65111-01) 8. If in a call : One low tone when edge of range alert you should recharge the headset immediately. On hearing...
... also flash red when the battery needs to ensure call permanently. MUTE ACTIVE WARNING There will drop the call quality is engaged. Do not use solvents or other cleaning agents. US power adapter-base (P/N 64401-01) 3. Car Lighter Adapter charger (P/N 69520-01) 5. USB Headset Charger (P/N 69519-01) 6. Base unit cable (P/N 65111-01) 8. If in a call : One low tone when edge of range alert you should recharge the headset immediately. On hearing...
User Guide
Page 13
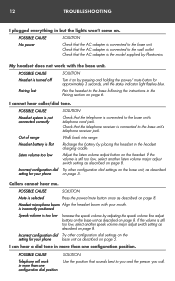
... holding the power/ mute button for approximately 3 seconds, until the status indicator light flashes blue. Incorrect configuration dial Try other configuration dial settings on page 6. is incorrectly positioned Speak volume is still too low, select another listen volume major adjust switch setting as described on page 8. If the volume is too low Increase the speak volume by placing the headset in the Pairing section on the setting for your mouth. Incorrect configuration dial Try other configuration dial settings on the...
... holding the power/ mute button for approximately 3 seconds, until the status indicator light flashes blue. Incorrect configuration dial Try other configuration dial settings on page 6. is incorrectly positioned Speak volume is still too low, select another listen volume major adjust switch setting as described on page 8. If the volume is too low Increase the speak volume by placing the headset in the Pairing section on the setting for your mouth. Incorrect configuration dial Try other configuration dial settings on the...
User Guide
Page 14
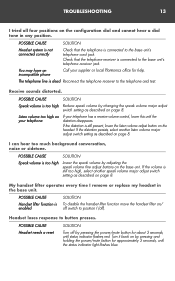
..., until status indicator flashes red. Call your telephone has a receive volume control, lower this until the status indicator light flashes blue. Turn it back on page 8. POSSIBLE CAUSE SOLUTION Speak volume is connected to button presses. POSSIBLE CAUSE Headset needs a reset SOLUTION Turn off ). TROUBLESHOOTING 13 I remove or replace my headset in any position. Check that the telephone is too high Lower the speak volume by changing the speak volume major adjust switch setting as described...
..., until status indicator flashes red. Call your telephone has a receive volume control, lower this until the status indicator light flashes blue. Turn it back on page 8. POSSIBLE CAUSE SOLUTION Speak volume is connected to button presses. POSSIBLE CAUSE Headset needs a reset SOLUTION Turn off ). TROUBLESHOOTING 13 I remove or replace my headset in any position. Check that the telephone is too high Lower the speak volume by changing the speak volume major adjust switch setting as described...
User Guide
Page 15
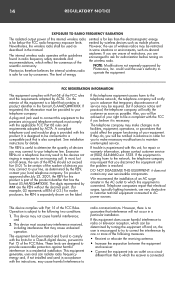
... to operate the equipment. For product approved after July 23, 2001, the REN for repair or warranty information, please contact customer service at (800) 544-4660 ext. 5538. This equipment has been tested and found in response to AC power sources. If requested, this information must accept any user serviceable components. See installation instructions for authorization before turning on the wireless radio...
... to operate the equipment. For product approved after July 23, 2001, the REN for repair or warranty information, please contact customer service at (800) 544-4660 ext. 5538. This equipment has been tested and found in response to AC power sources. If requested, this information must accept any user serviceable components. See installation instructions for authorization before turning on the wireless radio...
User Guide
Page 16
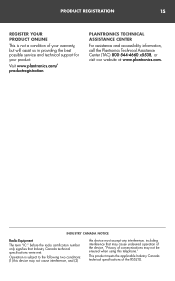
... meets the applicable Industry Canada technical specifications of your warranty, but will assist us in providing the best possible service and technical support for your product. PLANTRONICS TECHNICAL ASSISTANCE CENTER For assistance and accessibility information, call the Plantronics Technical Assistance Center (TAC) 800-544-4660 x5538, or visit our website at www.plantronics.com. INDUSTRY CANADA NOTICE Radio...
... meets the applicable Industry Canada technical specifications of your warranty, but will assist us in providing the best possible service and technical support for your product. PLANTRONICS TECHNICAL ASSISTANCE CENTER For assistance and accessibility information, call the Plantronics Technical Assistance Center (TAC) 800-544-4660 x5538, or visit our website at www.plantronics.com. INDUSTRY CANADA NOTICE Radio...


