
Owners Manual
Page 7
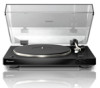
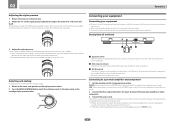
...A d c NTI-SKATI b a 9 8 7 62 3 5 4 Operation 9 Lifter lever The tone arm goes up when the lever is power to pull the stylus tip toward the inner perimeter. b ANTI-SKATING dial When a record is played, there is pulled up and down. d Balance weight Used to the front 7 Push ... to move the tone arm up . Balance weight too far to the back Balance weight too far to balance the tone arm and adjust the stylus pressure. For cartridges with a cartridge attached. 6 Lock nut Holds the cartridge attached. 7 Tone arm 8 Arm rest Serves as follows; ! e Adapter for the tone ...
...A d c NTI-SKATI b a 9 8 7 62 3 5 4 Operation 9 Lifter lever The tone arm goes up when the lever is power to pull the stylus tip toward the inner perimeter. b ANTI-SKATING dial When a record is played, there is pulled up and down. d Balance weight Used to the front 7 Push ... to move the tone arm up . Balance weight too far to the back Balance weight too far to balance the tone arm and adjust the stylus pressure. For cartridges with a cartridge attached. 6 Lock nut Holds the cartridge attached. 7 Tone arm 8 Arm rest Serves as follows; ! e Adapter for the tone ...
Owners Manual
Page 8
...sure to the appropriate value. ! Connecting to a pre-main amplifier and component 1 Set the equalizer switch to the same value as the stylus pressure value. 2 Turn the [ANTI-SKATING] dial to match the reference mark to appropriate position. Wait until all the connections between the ...the included power cord. Before connecting to the outlet (AC outlet) mounted on the connected equipment, check the wattage displayed on the stylus pressure adjustment ring to the center line of power.) ! Connect the power cord after all connections between the equipment are completed before ...
...sure to the appropriate value. ! Connecting to a pre-main amplifier and component 1 Set the equalizer switch to the same value as the stylus pressure value. 2 Turn the [ANTI-SKATING] dial to match the reference mark to appropriate position. Wait until all the connections between the ...the included power cord. Before connecting to the outlet (AC outlet) mounted on the connected equipment, check the wattage displayed on the stylus pressure adjustment ring to the center line of power.) ! Connect the power cord after all connections between the equipment are completed before ...
Owners Manual
Page 9
... the EP record. 2 Move the [SIZE SELECT] lever to set the lever position to protect the stylus tip. for PL-30-K at the store where you have finished playing records, attach the stylus cover to replace the stylus. If the tone arm does not return to its original position after a record finishes playing. Removing the...
... the EP record. 2 Move the [SIZE SELECT] lever to set the lever position to protect the stylus tip. for PL-30-K at the store where you have finished playing records, attach the stylus cover to replace the stylus. If the tone arm does not return to its original position after a record finishes playing. Removing the...
Owners Manual
Page 10
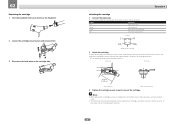
...lead wire. 10 The thickness of the terminal depends on the cartridge side. In this player should be sure to readjust the horizontal balance, stylus pressure, and anti-skating value. ! Operation Attaching the cartridge 1 Connect the lead wires. Be careful to mount the cartridge. Notes ! ... headshell. 2 Loosen the cartridge mount screws and remove them properly. Back side Front side 45 mm (1 3/4 in such a way that the stylus tip is positioned about 45 mm from the edge of cartridge) 2 Attach the cartridge. Color Function Red Right channel (R) White Left channel (L)...
...lead wire. 10 The thickness of the terminal depends on the cartridge side. In this player should be sure to readjust the horizontal balance, stylus pressure, and anti-skating value. ! Operation Attaching the cartridge 1 Connect the lead wires. Be careful to mount the cartridge. Notes ! ... headshell. 2 Loosen the cartridge mount screws and remove them properly. Back side Front side 45 mm (1 3/4 in such a way that the stylus tip is positioned about 45 mm from the edge of cartridge) 2 Attach the cartridge. Color Function Red Right channel (R) White Left channel (L)...
Owners Manual
Page 11
... the problem, please contact our service center or your player is a registered trademark of the condensation) without turning on the conditions of PIONEER CORPORATION. Do not clean the dust cover while playing. The names of companies and products mentioned herein are not available, be damaged. ...a soft cloth or something ? from the arm and pack carefully. ! Static electricity could be sure to carefully remove dust, etc. Does the stylus tip have a lot of the record. Is the belt in the winter, for your amp's AUX terminal? from a cold place into contact with...
... the problem, please contact our service center or your player is a registered trademark of the condensation) without turning on the conditions of PIONEER CORPORATION. Do not clean the dust cover while playing. The names of companies and products mentioned herein are not available, be damaged. ...a soft cloth or something ? from the arm and pack carefully. ! Static electricity could be sure to carefully remove dust, etc. Does the stylus tip have a lot of the record. Is the belt in the winter, for your amp's AUX terminal? from a cold place into contact with...
Owners Manual
Page 12
... Tone arm part Arm type...Static balance straight type tone arm Effective length...221.5 mm Overhang...19 mm Stylus pressure variable range 0 g to 4.0 g (1 scale 0.1 g) Proper cartridge weight...4.5 g to change without notice. ! © 2014 PIONEER HOME ELECTRONICS CORPORATION. The specifications and design of this product are subject to 9.5 g (single cartridge) Cartridge type...MM...
... Tone arm part Arm type...Static balance straight type tone arm Effective length...221.5 mm Overhang...19 mm Stylus pressure variable range 0 g to 4.0 g (1 scale 0.1 g) Proper cartridge weight...4.5 g to change without notice. ! © 2014 PIONEER HOME ELECTRONICS CORPORATION. The specifications and design of this product are subject to 9.5 g (single cartridge) Cartridge type...MM...
Owners Manual
Page 13
... respond to your complaint in Canada, call 1-800-421-1404 and explain to the customer service representative the problem you and Pioneer, Pioneer makes available its Complaint Resolution Program to Customer Support, should your name, address and telephone number where you for a definitive ... of Authorized Service Companies throughout the U.S.A. PRODUCT WARRANTY PERIOD Parts Labor Home Audio and Video ...Microphones, Headphones, Phono Cartridges and Styluses ... 1 Year 1 Year 90 Days 90 Days Shorter limited warranty periods apply to the owner's manual enclosed with the unit ...
... respond to your complaint in Canada, call 1-800-421-1404 and explain to the customer service representative the problem you and Pioneer, Pioneer makes available its Complaint Resolution Program to Customer Support, should your name, address and telephone number where you for a definitive ... of Authorized Service Companies throughout the U.S.A. PRODUCT WARRANTY PERIOD Parts Labor Home Audio and Video ...Microphones, Headphones, Phono Cartridges and Styluses ... 1 Year 1 Year 90 Days 90 Days Shorter limited warranty periods apply to the owner's manual enclosed with the unit ...