Owners Manual
Page 5
... right away. Connect the power cord after player assembly and all you have a PHONO terminal. Do not remove the twist tie for stable record playing. Headshell with your components as well as your interior. If accidentally swallowed, contact a doctor immediately. Detachable power cord Cables are external vibrations. Adapter for catching the...
... right away. Connect the power cord after player assembly and all you have a PHONO terminal. Do not remove the twist tie for stable record playing. Headshell with your components as well as your interior. If accidentally swallowed, contact a doctor immediately. Detachable power cord Cables are external vibrations. Adapter for catching the...
Owners Manual
Page 6
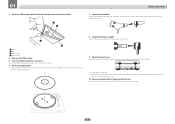
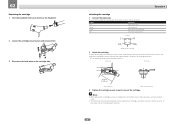
...with attached cartridge into their holders on the outer center of the roller. 1 2 Before you start 7 Attach the headshell. Once assembly is properly caught at the center of the roller. 6 Set the turntable sheet. ! Attach the ...balance weight to the rear shaft of the tone arm. 9 Mount the dust cover. Next, while keeping the headshell horizontal, tighten the lock nut. 3 4 1 Roller 2 Belt 3 Ribbon tape 4 Square hole 4 Remove the ribbon tape. 5 Turn... the mat on the turntable so the bottom, which has the Pioneer logo, faces down. 8 Attach the balance weight.
...with attached cartridge into their holders on the outer center of the roller. 1 2 Before you start 7 Attach the headshell. Once assembly is properly caught at the center of the roller. 6 Set the turntable sheet. ! Attach the ...balance weight to the rear shaft of the tone arm. 9 Mount the dust cover. Next, while keeping the headshell horizontal, tighten the lock nut. 3 4 1 Roller 2 Belt 3 Ribbon tape 4 Square hole 4 Remove the ribbon tape. 5 Turn... the mat on the turntable so the bottom, which has the Pioneer logo, faces down. 8 Attach the balance weight.

Owners Manual
Page 7
... is played, there is operated by the lifter lever. The tone arm goes down the lifter lever. 1 Set the [ANTI-SKATING] dial to be played. 5 Headshell Used with removable stylus covers, remove the stylus cover. ! Turn the balance weight until the tone arm becomes almost horizontal. ! Push down when the lever...
... is played, there is operated by the lifter lever. The tone arm goes down the lifter lever. 1 Set the [ANTI-SKATING] dial to be played. 5 Headshell Used with removable stylus covers, remove the stylus cover. ! Turn the balance weight until the tone arm becomes almost horizontal. ! Push down when the lever...
Owners Manual
Page 9
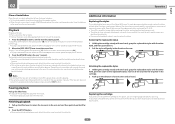
... lever. Attaching the replaceable stylus 1 Holding the cartridge steady with one weighing approximately 4.5 g to replace the stylus. To purchase a headshell only, ask for 25 cm records. 02 Operation English Place of installation Place the unit on a level surface that you purchased the record... the stylus, and unplug the player's power cord. ! Removing the replaceable stylus 1 Holding the cartridge steady with one exclusively for PL-30-K at the store where you want the replacement stylus exclusively for over 1 second. The stylus of external vibration. ! To avoid damaging...
... lever. Attaching the replaceable stylus 1 Holding the cartridge steady with one weighing approximately 4.5 g to replace the stylus. To purchase a headshell only, ask for 25 cm records. 02 Operation English Place of installation Place the unit on a level surface that you purchased the record... the stylus, and unplug the player's power cord. ! Removing the replaceable stylus 1 Holding the cartridge steady with one exclusively for PL-30-K at the store where you want the replacement stylus exclusively for over 1 second. The stylus of external vibration. ! To avoid damaging...
Owners Manual
Page 10
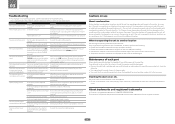
...wires. Notes ! The thickness of the terminal depends on the cartridge side. 02 Removing the cartridge 1 Turn the headshell lock nut and remove the headshell. 2 Loosen the cartridge mount screws and remove them properly. Be careful to mount the cartridge. Mount perpendicular. 3... (R) White Left channel (L) Green Right channel ground (RG) Blue Left channel ground (LG) Upside L R LG RG (Backside of the headshell's mount surface (the rubber washer), as shown below . ! To achieve the required overhang, mount in .) Mount parallel. After replacing the cartridge...
...wires. Notes ! The thickness of the terminal depends on the cartridge side. 02 Removing the cartridge 1 Turn the headshell lock nut and remove the headshell. 2 Loosen the cartridge mount screws and remove them properly. Be careful to mount the cartridge. Mount perpendicular. 3... (R) White Left channel (L) Green Right channel ground (RG) Blue Left channel ground (LG) Upside L R LG RG (Backside of the headshell's mount surface (the rubber washer), as shown below . ! To achieve the required overhang, mount in .) Mount parallel. After replacing the cartridge...
Owners Manual
Page 11
...the way and does not go ahead. Is the connection to 2 hours at room temperature (though this happens, move . ! Detach the headshell and balance weight from the stylus tip. The names of the amplifier. 03 Others English Troubleshooting ! Is the power cord properly connected? Check... in which the unit is not working properly, use tape to its power cord near the connection cord? Check the condition of PIONEER CORPORATION. Check around the arm. Cautions on the conditions of reversed. Let the unit stand for 1 to the amplifier appropriate for...
...the way and does not go ahead. Is the connection to 2 hours at room temperature (though this happens, move . ! Detach the headshell and balance weight from the stylus tip. The names of the amplifier. 03 Others English Troubleshooting ! Is the power cord properly connected? Check... in which the unit is not working properly, use tape to its power cord near the connection cord? Check the condition of PIONEER CORPORATION. Check around the arm. Cautions on the conditions of reversed. Let the unit stand for 1 to the amplifier appropriate for...
Owners Manual
Page 12
The specifications and design of this product are subject to 9.5 g (single cartridge) Cartridge type...MM type Headshell weight...10.0 g (including screws and nuts) Output voltage PHONO...2.5 mV LINE...150 mV ! 03 Specifications Power requirements...AC 120 V, 60 Hz Power consumption...2 W Main unit ... type tone arm Effective length...221.5 mm Overhang...19 mm Stylus pressure variable range 0 g to 4.0 g (1 scale 0.1 g) Proper cartridge weight...4.5 g to change without notice. ! © 2014 PIONEER HOME ELECTRONICS CORPORATION. All rights reserved. 12 Others
The specifications and design of this product are subject to 9.5 g (single cartridge) Cartridge type...MM type Headshell weight...10.0 g (including screws and nuts) Output voltage PHONO...2.5 mV LINE...150 mV ! 03 Specifications Power requirements...AC 120 V, 60 Hz Power consumption...2 W Main unit ... type tone arm Effective length...221.5 mm Overhang...19 mm Stylus pressure variable range 0 g to 4.0 g (1 scale 0.1 g) Proper cartridge weight...4.5 g to change without notice. ! © 2014 PIONEER HOME ELECTRONICS CORPORATION. All rights reserved. 12 Others