
Owner's Manual
Page 3
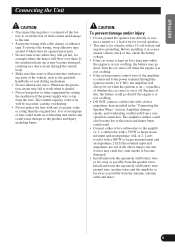
...and the electrical wiring from contact with another one of greater value or rating than the original fuse. Also, do not touch the amplifier when it down on file to help you use of a long, commercially available hexagonal wrench can still hear normal traffic sound. ...entities to protect all cables and important equipment such as loss or theft. 2 Receive updates on this amplifier is a class D amplifier for example, the location where the amplifier is a mono amplifier. Otherwise you cannot detect the cause. • To prevent an electric shock or short-circuit during connection...
...and the electrical wiring from contact with another one of greater value or rating than the original fuse. Also, do not touch the amplifier when it down on file to help you use of a long, commercially available hexagonal wrench can still hear normal traffic sound. ...entities to protect all cables and important equipment such as loss or theft. 2 Receive updates on this amplifier is a class D amplifier for example, the location where the amplifier is a mono amplifier. Otherwise you cannot detect the cause. • To prevent an electric shock or short-circuit during connection...
Owner's Manual
Page 4
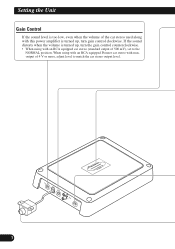
output of 500 mV), set to match the car stereo output level. 3 If the sound distorts when the volume is turned up , turn gain control clockwise. When using with max. Setting the Unit Gain Control If the sound level is too low, even when the volume of the car stereo used along with this power amplifier is turned up , turn the gain control counterclockwise. • When using with an RCA equipped Pioneer car stereo with an RCA equipped car stereo (standard output of 4 V or more, adjust level to the NORMAL position.
output of 500 mV), set to match the car stereo output level. 3 If the sound distorts when the volume is turned up , turn gain control clockwise. When using with max. Setting the Unit Gain Control If the sound level is too low, even when the volume of the car stereo used along with this power amplifier is turned up , turn the gain control counterclockwise. • When using with an RCA equipped Pioneer car stereo with an RCA equipped car stereo (standard output of 4 V or more, adjust level to the NORMAL position.
Owner's Manual
Page 5
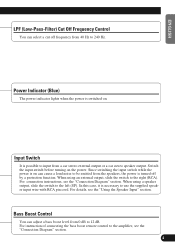
... ITALIANO NEDERLANDS LPF (Low-Pass-Filter) Cut Off Frequency Control You can select a cut off by a protection function. Input Switch It is necessary to the amplifier, see the "Connection Diagram" section.
... ITALIANO NEDERLANDS LPF (Low-Pass-Filter) Cut Off Frequency Control You can select a cut off by a protection function. Input Switch It is necessary to the amplifier, see the "Connection Diagram" section.
Owner's Manual
Page 6
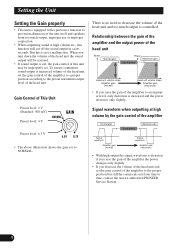
...proper position according to time, contact the nearest authorized PIONEER Service Station. 5 Signal waveform when outputting at high volume by the gain control of the amplifier Normal gain Equal power Maximum gain Signal waveform Amplifier gain (normal) Signal waveform Amplifier gain (maximum) • With high output the signal... the proper position but still the sound cuts out from too much output is not a malfunction. When you raise the gain of the amplifier to NORMAL. Gain Control of This Unit Preout level: 2 V (Standard: 500 mV) Preout level: 4 V Preout level: 6.5 V • ...
...proper position according to time, contact the nearest authorized PIONEER Service Station. 5 Signal waveform when outputting at high volume by the gain control of the amplifier Normal gain Equal power Maximum gain Signal waveform Amplifier gain (normal) Signal waveform Amplifier gain (maximum) • With high output the signal... the proper position but still the sound cuts out from too much output is not a malfunction. When you raise the gain of the amplifier to NORMAL. Gain Control of This Unit Preout level: 2 V (Standard: 500 mV) Preout level: 4 V Preout level: 6.5 V • ...
Owner's Manual
Page 7
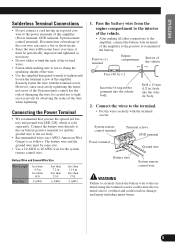
...the battery could result. • Connect either of an improper fuse could result in a short-circuit through the ignition switch (12 V DC), the amplifier will be on when the ignition is at rest or idling. • DO NOT connect a subwoofer with a 12-volt battery and negative grounding. ...overheating and smoke and could also become damaged. • Install and route the separately sold battery wire, ground wire, speaker wires and the amplifier as far away as possible from the antenna, antenna cable and tuner. 6 Install and route the separately sold battery wire as far away ...
...the battery could result. • Connect either of an improper fuse could result in a short-circuit through the ignition switch (12 V DC), the amplifier will be on when the ignition is at rest or idling. • DO NOT connect a subwoofer with a 12-volt battery and negative grounding. ...overheating and smoke and could also become damaged. • Install and route the separately sold battery wire, ground wire, speaker wires and the amplifier as far away as possible from the antenna, antenna cable and tuner. 6 Install and route the separately sold battery wire as far away ...
Owner's Manual
Page 8
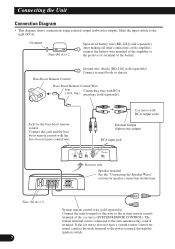
... (SYSTEM REMOTE CONTROL). Grommet Fuse (40 A) × 2 Special red battery wire [RD-228] (sold separately) Connect to the positive (+) terminal of the amplifier to metal body or chassis. Bass Boost Remote Control Ground wire (black) [RD-228] (sold separately) After making all other connections at the... amplifier, connect the battery wire terminal of the battery. Car stereo with the bass boost remote control wire. If the car stereo does not have...
... (SYSTEM REMOTE CONTROL). Grommet Fuse (40 A) × 2 Special red battery wire [RD-228] (sold separately) Connect to the positive (+) terminal of the amplifier to metal body or chassis. Bass Boost Remote Control Ground wire (black) [RD-228] (sold separately) After making all other connections at the... amplifier, connect the battery wire terminal of the battery. Car stereo with the bass boost remote control wire. If the car stereo does not have...
Owner's Manual
Page 9
...NEDERLANDS Solderless Terminal Connections • Do not connect a cord having an exposed core wire to tighten and loosen the terminal screw of the amplifier. Connecting the Power Terminal • We recommend that you use the special red battery and ground wire [RD-228], which is as ...making sure to not to clamp the insulating sheath of the wire. • Use the supplied hexagonal wrench to the power terminals of this amplifier (Power terminal, GND terminal, System remote control terminal). Battery Wire and Ground Wire Size Wire Length Wire Size less than 4.5 m less ...
...NEDERLANDS Solderless Terminal Connections • Do not connect a cord having an exposed core wire to tighten and loosen the terminal screw of the amplifier. Connecting the Power Terminal • We recommend that you use the special red battery and ground wire [RD-228], which is as ...making sure to not to clamp the insulating sheath of the wire. • Use the supplied hexagonal wrench to the power terminals of this amplifier (Power terminal, GND terminal, System remote control terminal). Battery Wire and Ground Wire Size Wire Length Wire Size less than 4.5 m less ...
Owner's Manual
Page 10
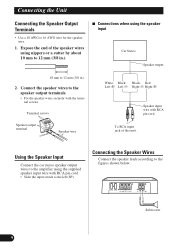
... when using the supplied speaker input wire with the terminal screws. Subwoofer 9 Using the Speaker Input Connect the car stereo speaker output wires to the amplifier using the speaker input Car Stereo Speaker output 10 mm to the left (SP). Expose the end of this unit.
... when using the supplied speaker input wire with the terminal screws. Subwoofer 9 Using the Speaker Input Connect the car stereo speaker output wires to the amplifier using the speaker input Car Stereo Speaker output 10 mm to the left (SP). Expose the end of this unit.
Owner's Manual
Page 11
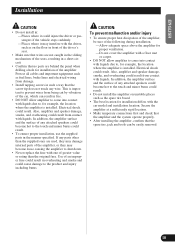
... tapping screws in overheating and smoke and could cause damage to the product and injury including burns. Electrical shock could result. In addition, the amplifier surface and the surface of any parts other than the original fuse. If any attached speakers could become hot to the touch and minor burns...install in: -Places where it could injure the driver or passengers if the vehicle stops suddenly. -Places where it may become loose causing the amplifier to shut down. • Never replace the fuse with one of greater value or rating than the supplied ones are behind the panel when ...
... tapping screws in overheating and smoke and could cause damage to the product and injury including burns. Electrical shock could result. In addition, the amplifier surface and the surface of any parts other than the original fuse. If any attached speakers could become hot to the touch and minor burns...install in: -Places where it could injure the driver or passengers if the vehicle stops suddenly. -Places where it may become loose causing the amplifier to shut down. • Never replace the fuse with one of greater value or rating than the supplied ones are behind the panel when ...
Owner's Manual
Page 12
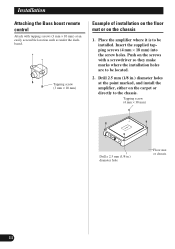
... or chassis 11 Installation Attaching the Bass boost remote control Attach with tapping screws (3 mm × 10 mm) at the point marked, and install the amplifier, either on the screws with a screwdriver so they make marks where the installation holes are to be installed. Insert the supplied tapping screws (4 mm ×...
... or chassis 11 Installation Attaching the Bass boost remote control Attach with tapping screws (3 mm × 10 mm) at the point marked, and install the amplifier, either on the screws with a screwdriver so they make marks where the installation holes are to be installed. Insert the supplied tapping screws (4 mm ×...
Owner's Manual
Page 13
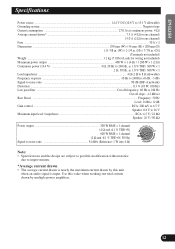
... current drawn • The average current drawn is nearly the maximum current drawn by this value when working out total current drawn by multiple power amplifiers. 12 Use this unit when an audio signal is input.
... current drawn • The average current drawn is nearly the maximum current drawn by this value when working out total current drawn by multiple power amplifiers. 12 Use this unit when an audio signal is input.

