Owner's Manual
Page 3
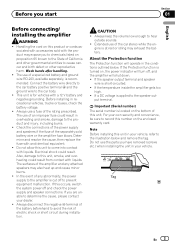
... burns. ! Always keep the volume low enough to the car body. ! If the Protection function is at rest or idling may expose you start Section 01 English Before connecting/ installing the amplifier WARNING ! If the temperature inside the amplifier gets too high. ! Check the connections of the power ...the risk of the car stereo while the en- If a DC voltage is recommended. Important (Serial number) The serial number is cut off and check the power supply and speaker connections. The surfaces of the amplifier and any abnormality, the power supply to the amplifier is located on ...
... burns. ! Always keep the volume low enough to the car body. ! If the Protection function is at rest or idling may expose you start Section 01 English Before connecting/ installing the amplifier WARNING ! If the temperature inside the amplifier gets too high. ! Check the connections of the power ...the risk of the car stereo while the en- If a DC voltage is recommended. Important (Serial number) The serial number is cut off and check the power supply and speaker connections. The surfaces of the amplifier and any abnormality, the power supply to the amplifier is located on ...
Owner's Manual
Page 4
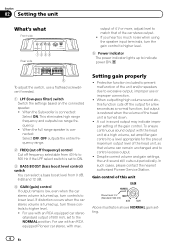
... of the head unit, so that of the unit and/or speakers due to excessive output, improper use with an RCA equipped car stereo (standard output of 500 mV), set amplifier gain control to a level appropriate for a few seconds as a normal function, but output is turned up to indicate power ON. ... higher level. 5 Power indicator The power indicator lights up , turn these controls to higher level. ! To adjust the switch, use with an RCA equipped Pioneer car stereo, with the head unit at a high volume, set to the NORMAL position. Protective function included to prevent malfunction of the...
... of the head unit, so that of the unit and/or speakers due to excessive output, improper use with an RCA equipped car stereo (standard output of 500 mV), set amplifier gain control to a level appropriate for a few seconds as a normal function, but output is turned up to indicate power ON. ... higher level. 5 Power indicator The power indicator lights up , turn these controls to higher level. ! To adjust the switch, use with an RCA equipped Pioneer car stereo, with the head unit at a high volume, set to the NORMAL position. Protective function included to prevent malfunction of the...
Owner's Manual
Page 6
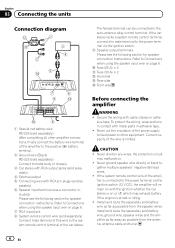
...wrap sections in contact with RCA pin plugs (sold se- Refer to metal body or chassis. 3 Car stereo with RCA output jacks (sold battery wire, ground wire, speaker wires and the amplifier as far away as possible from the antenna, antenna cable and tuner. 6 En CAUTION ! Never shorten... diagram The female terminal can be connected to the power terminal via the ignition switch (12 V DC), the amplifier will remain on with cable clamps or adhe- If the car stereo lacks a system remote control terminal, connect the male terminal to the auto-antenna relay control terminal. parately)...
...wrap sections in contact with RCA pin plugs (sold se- Refer to metal body or chassis. 3 Car stereo with RCA output jacks (sold battery wire, ground wire, speaker wires and the amplifier as far away as possible from the antenna, antenna cable and tuner. 6 En CAUTION ! Never shorten... diagram The female terminal can be connected to the power terminal via the ignition switch (12 V DC), the amplifier will remain on with cable clamps or adhe- If the car stereo lacks a system remote control terminal, connect the male terminal to the auto-antenna relay control terminal. parately)...

Owner's Manual
Page 8
...Attach lugs to the terminal. Section 03 Connecting the units Connections when using the speaker input wire Connect the car stereo speaker output wires to the amplifier using the terminal screws, there is a risk of overheating, malfunction and injury, including minor burns. 1 ...Route battery wire from engine compartment to the vehicle interior. WARNING If the battery wire is recommended. of the amplifier to wires. Use pliers, etc., to crimp lugs to the positive (+) battery terminal. 1 Car Stereo 2 Speaker output 3 White/black: Left * 4 White: Left + 5 Gray/black: Right * 6...
...Attach lugs to the terminal. Section 03 Connecting the units Connections when using the speaker input wire Connect the car stereo speaker output wires to the amplifier using the terminal screws, there is a risk of overheating, malfunction and injury, including minor burns. 1 ...Route battery wire from engine compartment to the vehicle interior. WARNING If the battery wire is recommended. of the amplifier to wires. Use pliers, etc., to crimp lugs to the positive (+) battery terminal. 1 Car Stereo 2 Speaker output 3 White/black: Left * 4 White: Left + 5 Gray/black: Right * 6...
Owner's Manual
Page 10
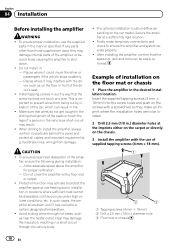
...Protection function may damage internal parts of the car, which can be dissipated, continuous use of installation on the floor in the vehicle as short-circuit may interfere with a floor mat or carpet. ! Allow adequate space above the amplifier for proper ventilation. - This is important to...) into the screw holes and push on the screws with the use under high-volume conditions, etc. Secure the amplifier at the imprints either on the carpet or directly on the car model. Example of supplied tapping screws (4 mm × 18 mm). 1 Tapping-screws (4 mm × 18...
...Protection function may damage internal parts of the car, which can be dissipated, continuous use of installation on the floor in the vehicle as short-circuit may interfere with a floor mat or carpet. ! Allow adequate space above the amplifier for proper ventilation. - This is important to...) into the screw holes and push on the screws with the use under high-volume conditions, etc. Secure the amplifier at the imprints either on the carpet or directly on the car model. Example of supplied tapping screws (4 mm × 18 mm). 1 Tapping-screws (4 mm × 18...


