
Operating Instructions
Page 5
... a cable box or satellite receiver (2 20 Connecting to an AV amplifier/receiver 21 Connecting using HDMI 22 Connecting other AV sources 24 Connecting a USB device 24 Network connection 26 Plugging in 26 03 Controls and displays Front panel 27 Display 28 Remote control 29 04 Getting started Switching on and setting up 31 05 Recording About DVD recording 34 About HDD recording 35 Recorded audio 35 Restrictions on video recording 36 Using the built-in TV tuner 36 Setting the picture quality/ recording time...
... a cable box or satellite receiver (2 20 Connecting to an AV amplifier/receiver 21 Connecting using HDMI 22 Connecting other AV sources 24 Connecting a USB device 24 Network connection 26 Plugging in 26 03 Controls and displays Front panel 27 Display 28 Remote control 29 04 Getting started Switching on and setting up 31 05 Recording About DVD recording 34 About HDD recording 35 Recorded audio 35 Restrictions on video recording 36 Using the built-in TV tuner 36 Setting the picture quality/ recording time...

Operating Instructions
Page 6
... settings 108 Finalize settings 108 Optimize HDD 108 Initialize HDD 109 15 The Video Adjust menu Setting the picture quality for TV and external inputs 110 Setting the picture quality for disc playback 111 16 The Initial Setup menu Using the Initial Setup menu 113 17 Additional information Setting up the remote to control your TV 124 Minimum copying times 126 Manual recording modes 127 Troubleshooting 128 If the picture freezes and the front panel and remote control buttons stop working 134 On-screen displays 135 Front panel displays 137 Language code list...
... settings 108 Finalize settings 108 Optimize HDD 108 Initialize HDD 109 15 The Video Adjust menu Setting the picture quality for TV and external inputs 110 Setting the picture quality for disc playback 111 16 The Initial Setup menu Using the Initial Setup menu 113 17 Additional information Setting up the remote to control your TV 124 Minimum copying times 126 Manual recording modes 127 Troubleshooting 128 If the picture freezes and the front panel and remote control buttons stop working 134 On-screen displays 135 Front panel displays 137 Language code list...

Operating Instructions
Page 9
... recording of both audio channels Notes to table *11 Only when the recording mode is set to LPCM. *1 Must be initialized for VR mode recording (page 108). *2 Must be initialized for Video mode recording (page 108). *3 Erasable, but free space does not increase. *4 Cannot erase sections, edit chapters or use . Discs from other n/a *5 *6 *7 *6 *6, 15 *8 *9 players/recorders Chase play and record all widely-used in this manual Logos HDD HDD DVD-R DVD-RW DVD+R DVD +RW DVD -RAM DVD (VR) DVD (Video) DVD (VR) DVD (Video) DVD+R *1 *1 *2 DVD+RW DVD-RAM...
... recording of both audio channels Notes to table *11 Only when the recording mode is set to LPCM. *1 Must be initialized for VR mode recording (page 108). *2 Must be initialized for Video mode recording (page 108). *3 Erasable, but free space does not increase. *4 Cannot erase sections, edit chapters or use . Discs from other n/a *5 *6 *7 *6 *6, 15 *8 *9 players/recorders Chase play and record all widely-used in this manual Logos HDD HDD DVD-R DVD-RW DVD+R DVD +RW DVD -RAM DVD (VR) DVD (Video) DVD (VR) DVD (Video) DVD+R *1 *1 *2 DVD+RW DVD-RAM...

Operating Instructions
Page 12
... for this unit due to the setting of plays, then you may load the disc into your registration code. Check the DVD-R/-RW or CD-R/-RW software disc boxes for the recorder to play . • Resetting the recorder (as you like, and no message will be used by digital still cameras • Sampling ratio: 4:4:4, 4:2:2, 4:2:0 • Horizontal resolution: 160 to 5120 pixels • Vertical resolution: 120 to specific, registered...
... for this unit due to the setting of plays, then you may load the disc into your registration code. Check the DVD-R/-RW or CD-R/-RW software disc boxes for the recorder to play . • Resetting the recorder (as you like, and no message will be used by digital still cameras • Sampling ratio: 4:4:4, 4:2:2, 4:2:0 • Horizontal resolution: 160 to 5120 pixels • Vertical resolution: 120 to specific, registered...

Operating Instructions
Page 21
... to work with your AV amp/ receiver.) Important • Do not connect this recorder to a set up the digital audio output. (Noise may be output from coaxial to a video input on your TV. 1 ANTENNA Antenna/cable TV IN (RF IN) wall outlet DVR-660H-K ANTENNA IN R AUDIO INPUT 3 L VIDEO S-VIDEO OUT INPUT 1/AUTO START REC ANTENNA OUT R AUDIO L VIDEO OUTPUT 2 S-VIDEO CONTROL IN Y PB PR COMPONENT VIDEO OUT OUTPUT 1 LAN(10/100) HDMI OUT OUTPUT 1 1 2 To audio/ video input COAXIAL DIGITAL OUT AC IN DIGITAL AUDIO...
... to work with your AV amp/ receiver.) Important • Do not connect this recorder to a set up the digital audio output. (Noise may be output from coaxial to a video input on your TV. 1 ANTENNA Antenna/cable TV IN (RF IN) wall outlet DVR-660H-K ANTENNA IN R AUDIO INPUT 3 L VIDEO S-VIDEO OUT INPUT 1/AUTO START REC ANTENNA OUT R AUDIO L VIDEO OUTPUT 2 S-VIDEO CONTROL IN Y PB PR COMPONENT VIDEO OUT OUTPUT 1 LAN(10/100) HDMI OUT OUTPUT 1 1 2 To audio/ video input COAXIAL DIGITAL OUT AC IN DIGITAL AUDIO...
Operating Instructions
Page 23
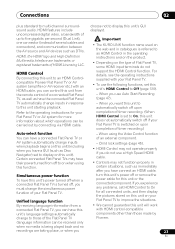
... timer recording.) Auto-select function You can control this unit from the remote control of a connected Flat Panel TV, as well as have a GUI (such as Disc Navigator) set this unit's HDMI Control to the operating instructions for this unit starting playback. Unified language function By receiving language information from off or remove the power cable for your Flat Panel TV. • To use Auto Start Recording (page 47). - Child lock settings (page 45). • HDMI Control may not operate properly if you do not support...
... timer recording.) Auto-select function You can control this unit from the remote control of a connected Flat Panel TV, as well as have a GUI (such as Disc Navigator) set this unit's HDMI Control to the operating instructions for this unit starting playback. Unified language function By receiving language information from off or remove the power cable for your Flat Panel TV. • To use Auto Start Recording (page 47). - Child lock settings (page 45). • HDMI Control may not operate properly if you do not support...

Operating Instructions
Page 31
... setting the clock, the internal TV tuner and the video output. This takes you don't want to complete. see page 113). 3 ENTER Choose a language (then press ENTER). STANDBY/ON 2 Switch on for the first time, you can use the Setup Navigator before you start using the recorder for the first time, your terrestrial TV channels. When you use these signals to set the audio, subtitle and DVD menu language preferences. 4 ENTER Start the Setup Navigator. k Setting...
... setting the clock, the internal TV tuner and the video output. This takes you don't want to complete. see page 113). 3 ENTER Choose a language (then press ENTER). STANDBY/ON 2 Switch on for the first time, you can use the Setup Navigator before you start using the recorder for the first time, your terrestrial TV channels. When you use these signals to set the audio, subtitle and DVD menu language preferences. 4 ENTER Start the Setup Navigator. k Setting...

Operating Instructions
Page 35
... record in the Dolby Digital 5.1-channel format only when video with the HDD Recording Format set which channel you can be recorded on another DVD recorder. About HDD recording Recording to the hard disk drive (HDD) is generally the same as you can switch on the LPCM setting, use the AUDIO button to select the Mono, Stereo or SAP audio channel to 99 titles can switch the audio on it, even using the higher quality recording modes. Recorded audio In all modes except the LPCM mode, sound is automatically started...
... record in the Dolby Digital 5.1-channel format only when video with the HDD Recording Format set which channel you can be recorded on another DVD recorder. About HDD recording Recording to the hard disk drive (HDD) is generally the same as you can switch on the LPCM setting, use the AUDIO button to select the Mono, Stereo or SAP audio channel to 99 titles can switch the audio on it, even using the higher quality recording modes. Recorded audio In all modes except the LPCM mode, sound is automatically started...

Operating Instructions
Page 38
... channel number. REC MODE 3 Set the picture quality/recording time. • See Setting the picture quality/recording time on -screen together with HDD Recording Format set a recording end time, press the REC button repeatedly. When recording a broadcast with a SAP channel, select which case you do need to DVD, XP+ recordings are recorded, allowing you want to set to Video Mode Off (HDD), both mono and SAP audio channels are always copied in the front panel display. HDD 1 DVD Select the HDD or DVD for detailed instructions. The setting is on playback...
... channel number. REC MODE 3 Set the picture quality/recording time. • See Setting the picture quality/recording time on -screen together with HDD Recording Format set a recording end time, press the REC button repeatedly. When recording a broadcast with a SAP channel, select which case you do need to DVD, XP+ recordings are recorded, allowing you want to set to Video Mode Off (HDD), both mono and SAP audio channels are always copied in the front panel display. HDD 1 DVD Select the HDD or DVD for detailed instructions. The setting is on playback...

Operating Instructions
Page 39
...) DVD (Video) DVD+R DVD+RW DVD-RAM HDD Using the timer recording features you want to pause recording at the time of an AUTO mode, which maximizes the recording quality for an HDD timer recording it would not otherwise fit at the recording quality you . using the Easy Timer Recording feature (see Easy Timer Recording on page 40), using the VCR Plus+ programming system (see Timer recording using the VCR Plus+ programming system on page 41), or using manual timer recording (see Optimized Rec on to the disc...
...) DVD (Video) DVD+R DVD+RW DVD-RAM HDD Using the timer recording features you want to pause recording at the time of an AUTO mode, which maximizes the recording quality for an HDD timer recording it would not otherwise fit at the recording quality you . using the Easy Timer Recording feature (see Easy Timer Recording on page 40), using the VCR Plus+ programming system (see Timer recording using the VCR Plus+ programming system on page 41), or using manual timer recording (see Optimized Rec on to the disc...

Operating Instructions
Page 42
... programming number. 2 Use the number buttons to the HDD. Important • You can't use the full VCR Plus+ programme screen. Timer Programme Set Manhattan Open Tennis CH Date Start Stop Extend 10ch EVERYDAY 6:00PM 7:00PM 30 min Detailed Settings Record To Recording Mode Auto Replace Rec. see all the timer programmes currently set. En This screen shows all the timer programmes already set, clear programmes and set up new ones. 1 Press HOME MENU, select Timer 42 Recording, then Timer Recording. Genre Dual Mono Recording HDD Recording Format...
... programming number. 2 Use the number buttons to the HDD. Important • You can't use the full VCR Plus+ programme screen. Timer Programme Set Manhattan Open Tennis CH Date Start Stop Extend 10ch EVERYDAY 6:00PM 7:00PM 30 min Detailed Settings Record To Recording Mode Auto Replace Rec. see all the timer programmes currently set. En This screen shows all the timer programmes already set, clear programmes and set up new ones. 1 Press HOME MENU, select Timer 42 Recording, then Timer Recording. Genre Dual Mono Recording HDD Recording Format...

Operating Instructions
Page 43
... use the / buttons to change the value. • CH - Set the recording start time. • Stop - Genre - The timer recording list screen is currently recording. • Standby - The one is set (when recording to select a field; Extend the end time of a dual mono broadcast to record (necessary if recording to a Video mode DVD or to the HDD with the HDD Recording Format set : Record to record. • Title Over - Select XP, SP, LP, EP, SLP or SEP, (See Setting the picture...
... use the / buttons to change the value. • CH - Set the recording start time. • Stop - Genre - The timer recording list screen is currently recording. • Standby - The one is set (when recording to select a field; Extend the end time of a dual mono broadcast to record (necessary if recording to a Video mode DVD or to the HDD with the HDD Recording Format set : Record to record. • Title Over - Select XP, SP, LP, EP, SLP or SEP, (See Setting the picture...

Operating Instructions
Page 47
... Start Recording will not start recording. Important • It takes a little while for recording. The AUTO indicator in timer recording standby. - HDD 4 DVD Select the HDD or DVD for this recorder starts recording when it detects a signal from a satellite tuner HDD If you have the recorder start and stop if a timer recording is copy-protected using Copy Guard, you want to use it with an external timer unit.)1 After setting up the recorder. • Use REC MODE to switch off. REC MODE 3 Set the recording quality. • See Setting the picture quality/recording...
... Start Recording will not start recording. Important • It takes a little while for recording. The AUTO indicator in timer recording standby. - HDD 4 DVD Select the HDD or DVD for this recorder starts recording when it detects a signal from a satellite tuner HDD If you have the recorder start and stop if a timer recording is copy-protected using Copy Guard, you want to use it with an external timer unit.)1 After setting up the recorder. • Use REC MODE to switch off. REC MODE 3 Set the recording quality. • See Setting the picture quality/recording...

Operating Instructions
Page 48
... video input. Playing your STB with this recorder. Check the manual that came with the player to a set -top box) users The following instructions show how to use the timer features of discs it will not play finalized discs recorded in standby. Most players will control this . 2 Switch on the front panel. When you finalize a DVD-R/-RW (Video mode) or DVD+R disc, a title menu is located just above the mark on this recorder: • REC - Additional information for a Pioneer VCR. Setting up 1 Connect the STB's audio/video outputs...
... video input. Playing your STB with this recorder. Check the manual that came with the player to a set -top box) users The following instructions show how to use the timer features of discs it will not play finalized discs recorded in standby. Most players will control this . 2 Switch on the front panel. When you finalize a DVD-R/-RW (Video mode) or DVD+R disc, a title menu is located just above the mark on this recorder: • REC - Additional information for a Pioneer VCR. Setting up 1 Connect the STB's audio/video outputs...

Operating Instructions
Page 49
... finalized a DVD-R/-RW (Video mode) or DVD+R disc, you play the disc. However, the finalization on any DVD player. Note however that some recorders/ players will be recorded and edited on this recorder even after finalizing. • Discs recorded partially or fully on this feature. Note that the disc name will have only a text title menu when finalized on the Pioneer DVR-7000 DVD recorder do this. 5 ENTER For DVD-R/-RW (Video mode) and DVD+R/+RW discs only, select a title menu style, then select 'Yes' to start playback...
... finalized a DVD-R/-RW (Video mode) or DVD+R disc, you play the disc. However, the finalization on any DVD player. Note however that some recorders/ players will be recorded and edited on this recorder even after finalizing. • Discs recorded partially or fully on this feature. Note that the disc name will have only a text title menu when finalized on the Pioneer DVR-7000 DVD recorder do this. 5 ENTER For DVD-R/-RW (Video mode) and DVD+R/+RW discs only, select a title menu style, then select 'Yes' to start playback...

Operating Instructions
Page 65
... audio type will automatically be possible to DVD'. The DV tape is rewound to start the copy (see DV Input on the DV tape cannot be finalized. • Check also that the DV cable is only compatible with the recorder! About DV Using DV, also known as required (see Audio In on this recorder using a DV cable for more between Stereo 1 and Stereo 2.1 6 ENTER Select 'Record to Hard Disk Drive' or 'Record to control the connected...
... audio type will automatically be possible to DVD'. The DV tape is rewound to start the copy (see DV Input on the DV tape cannot be finalized. • Check also that the DV cable is only compatible with the recorder! About DV Using DV, also known as required (see Audio In on this recorder using a DV cable for more between Stereo 1 and Stereo 2.1 6 ENTER Select 'Record to Hard Disk Drive' or 'Record to control the connected...

Operating Instructions
Page 70
08 Editing Title Name DVD (Video) DVD (VR) DVD+R DVD+RW DVD-RAM HDD You can give titles new names of up to 64 characters long for VR mode, DVD-RAM and HDD recordings, and up to 40 characters for Video mode recordings and DVD+R/+RW discs. 1 Highlight the title you want to name (or rename). 2 ENTER Select 'Edit' > 'Title Name' from the command menu panel. 3 ENTER Input a name for the selected title. AAAAAA Æç E E E E I I I I J KLM. , ? ! NOPQR STUVWXYZ ( ) : ; Input Title Name 12...
08 Editing Title Name DVD (Video) DVD (VR) DVD+R DVD+RW DVD-RAM HDD You can give titles new names of up to 64 characters long for VR mode, DVD-RAM and HDD recordings, and up to 40 characters for Video mode recordings and DVD+R/+RW discs. 1 Highlight the title you want to name (or rename). 2 ENTER Select 'Edit' > 'Title Name' from the command menu panel. 3 ENTER Input a name for the selected title. AAAAAA Æç E E E E I I I I J KLM. , ? ! NOPQR STUVWXYZ ( ) : ; Input Title Name 12...
Operating Instructions
Page 113
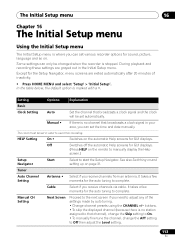
... . HELP Setting On • Switches on page 31. Off Switches off the automatic Help screens for the auto tuning to start the Setup Navigator. Cable Select if you receive channels from an antenna. The Initial Setup menu 16 Chapter 16 The Initial Setup menu Using the Initial Setup menu The Initial Setup menu is where you can set the time and date manually. It takes a few moments for GUI displays. Setting Options Explanation Basic Clock Setting Auto Set the channel that broadcasts a clock signal...
... . HELP Setting On • Switches on page 31. Off Switches off the automatic Help screens for the auto tuning to start the Setup Navigator. Cable Select if you receive channels from an antenna. The Initial Setup menu 16 Chapter 16 The Initial Setup menu Using the Initial Setup menu The Initial Setup menu is where you can set the time and date manually. It takes a few moments for GUI displays. Setting Options Explanation Basic Clock Setting Auto Set the channel that broadcasts a clock signal...

Operating Instructions
Page 129
... cannot connect via a VCR, the picture will not display correctly. The picture from the external input is distorted • If the video signal from the COMPONENT VIDEO OUT. During playback the picture is dark or distorted • When a copy-protected disc is distorted, try cleaning the cable plugs. Connect the recorder directly to interlace by pressing and holding the front panel (Stop) button then pressing OPEN/CLOSE. • When the HDMI signal is output, no sound...
... cannot connect via a VCR, the picture will not display correctly. The picture from the external input is distorted • If the video signal from the COMPONENT VIDEO OUT. During playback the picture is dark or distorted • When a copy-protected disc is distorted, try cleaning the cable plugs. Connect the recorder directly to interlace by pressing and holding the front panel (Stop) button then pressing OPEN/CLOSE. • When the HDMI signal is output, no sound...
Operating Instructions
Page 134
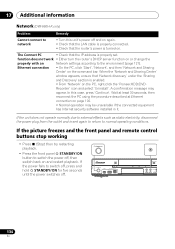
... 'Pioneer.HDD/DVD- Recorder' icon and select 'Uninstall'. If the unit does not operate normally due to external effects such as static electricity, disconnect the power plug from the outlet and insert again to return to switch the power off . A comfirmation message may be unavailable if the connected equipment has Internet security software installed in it. If the picture freezes and the front panel and remote control buttons stop working •...
... 'Pioneer.HDD/DVD- Recorder' icon and select 'Uninstall'. If the unit does not operate normally due to external effects such as static electricity, disconnect the power plug from the outlet and insert again to return to switch the power off . A comfirmation message may be unavailable if the connected equipment has Internet security software installed in it. If the picture freezes and the front panel and remote control buttons stop working •...


