
Owner's Manual
Page 7
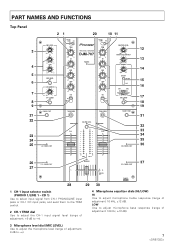
... 1 CD 1 PHONO 2 /LINE 2 CD 2 TRIM - +9 HI PROFESSIONAL 2CHANNEL MIXER DJM-707 POWER TRIM - +9 HI -26 +6 MID -26 +6 MID -26 +6 LOW -26 +6 LOW -26 +6 EQ OFF ON -26 +6 EQ OFF ON MASTER LEVEL - 0 BOOTH/SESSION OUT - 0 PHONES - 0 SELECT MASTER CUE CH-1 CH-2 CH-2 SEND TRANSFORM TRANSFORM FADER START REVERSE MASTER LEVEL REVERSE CH-1 10 9 8 7 6 5 4 3 2 1 0 L 14...
... 1 CD 1 PHONO 2 /LINE 2 CD 2 TRIM - +9 HI PROFESSIONAL 2CHANNEL MIXER DJM-707 POWER TRIM - +9 HI -26 +6 MID -26 +6 MID -26 +6 LOW -26 +6 LOW -26 +6 EQ OFF ON -26 +6 EQ OFF ON MASTER LEVEL - 0 BOOTH/SESSION OUT - 0 PHONES - 0 SELECT MASTER CUE CH-1 CH-2 CH-2 SEND TRANSFORM TRANSFORM FADER START REVERSE MASTER LEVEL REVERSE CH-1 10 9 8 7 6 5 4 3 2 1 0 L 14...

Owner's Manual
Page 8
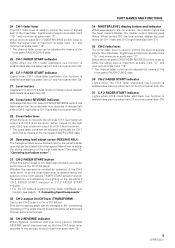
...jacks. 9 CH-1 EQ ON/OFF switch and indicator When set to [ON], the indicator lights and CH-1 equalizer is indicated by an authorized Pioneer service technician). 23 CH-1 REVERSE indicator When lighted, indicates that the front panel's FADER REVERSE switch has been set to [OFF], the indicator goes...the monitor SELECT switch (15) is bypassed. 10 CH-2 input selector switch (PHONO 2/LINE 2 - Connecting Input Components". 22 CH-1 output On/Off lever (TRANSFORM) Use to set to On, the indicator lights, and CH-1 signals are output at the BOOTH/ SESSION OUT jacks (range of the front panel's FADER...
...jacks. 9 CH-1 EQ ON/OFF switch and indicator When set to [ON], the indicator lights and CH-1 equalizer is indicated by an authorized Pioneer service technician). 23 CH-1 REVERSE indicator When lighted, indicates that the front panel's FADER REVERSE switch has been set to [OFF], the indicator goes...the monitor SELECT switch (15) is bypassed. 10 CH-2 input selector switch (PHONO 2/LINE 2 - Connecting Input Components". 22 CH-1 output On/Off lever (TRANSFORM) Use to set to On, the indicator lights, and CH-1 signals are output at the BOOTH/ SESSION OUT jacks (range of the front panel's FADER...
Owner's Manual
Page 9
...at scale mark "10". * The channel fader curve can be changed in 45° increments (changing of the angle should be adjusted by an authorized Pioneer service technician). 33 CH-2 REVERSE indicator When lighted, indicates that the CH-2 fader lever operates in reverse (left side is CH-2, right side is ... to [ON], the signal level is maximum at scale mark "10," and minimum at minimum. Connecting Input Components". 32 CH-2 output On/Off lever (TRANSFORM) Use to the right side, CH-2 is at maximum output and CH-1 is at minimum. * The cross fader curve can be performed on the CH...
...at scale mark "10". * The channel fader curve can be changed in 45° increments (changing of the angle should be adjusted by an authorized Pioneer service technician). 33 CH-2 REVERSE indicator When lighted, indicates that the CH-2 fader lever operates in reverse (left side is CH-2, right side is ... to [ON], the signal level is maximum at scale mark "10," and minimum at minimum. Connecting Input Components". 32 CH-2 output On/Off lever (TRANSFORM) Use to the right side, CH-2 is at maximum output and CH-1 is at minimum. * The cross fader curve can be performed on the CH...
Owner's Manual
Page 14
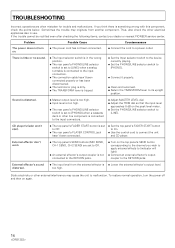
...247; Connect the cord to its upright position. If the trouble cannot be rectified even after checking the following items, contact your dealer or nearest PIONEER service center. Sound is distorted. ÷ Master output level is too high. ÷ Input level is too high. ÷ The rear ...currently playing. ÷ Set the PHONO/LINE selector switch to [PHONO]. ÷ Connect it properly. ÷ Clean and reconnect. ÷ Return the TRANSFORM lever to a power outlet. too high. Thus, also check the other line component is connected to the input connectors. ÷ Adjust MASTER LEVEL dial....
...247; Connect the cord to its upright position. If the trouble cannot be rectified even after checking the following items, contact your dealer or nearest PIONEER service center. Sound is distorted. ÷ Master output level is too high. ÷ Input level is too high. ÷ The rear ...currently playing. ÷ Set the PHONO/LINE selector switch to [PHONO]. ÷ Connect it properly. ÷ Clean and reconnect. ÷ Return the TRANSFORM lever to a power outlet. too high. Thus, also check the other line component is connected to the input connectors. ÷ Adjust MASTER LEVEL dial....