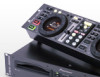
Owner's Manual
Page 6
... 19 Error Message Display 20 Cleaning the Jog Dial 20 SPECIFICATIONS 1. Accessories ÷ Operating instructions 1 ÷ Power cord 1 ÷ Audio cable 2 ÷ Control cord 2 ÷ Forced ejection pin 1 ÷ Specialized connection cable for the remote controller ....... 1 ÷ Limited warranty 1 NOTE: Specifications and design are subject to 85% (There should be no condensation...
... 19 Error Message Display 20 Cleaning the Jog Dial 20 SPECIFICATIONS 1. Accessories ÷ Operating instructions 1 ÷ Power cord 1 ÷ Audio cable 2 ÷ Control cord 2 ÷ Forced ejection pin 1 ÷ Specialized connection cable for the remote controller ....... 1 ÷ Limited warranty 1 NOTE: Specifications and design are subject to 85% (There should be no condensation...
Owner's Manual
Page 10
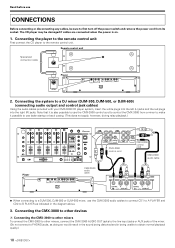
... relay playback.) Player L L PHONO LINE PHONO LINE R PHONO2 LINE3 CONTROL /LINE4 CH - 2 R PHONO1 LINE1 CONTROL /LINE2 CH - 1 CMX-3000 control CMX-3000 cord control cord CMX-3000 audio cable CMX-3000 audio cable ¶ When connecting to a DJM-300, DJM-500 or DJM-600 mixer, use CONNECTIONS Before connecting or disconnecting any...player to a DJ mixer (DJM-300, DJM-500, or DJM-600) (connecting audio output and control jack cables) Using the audio cables provided with your CMX-3000 CD player system, insert the white plugs into the left (L) jacks and the red plugs into the right ...
... relay playback.) Player L L PHONO LINE PHONO LINE R PHONO2 LINE3 CONTROL /LINE4 CH - 2 R PHONO1 LINE1 CONTROL /LINE2 CH - 1 CMX-3000 control CMX-3000 cord control cord CMX-3000 audio cable CMX-3000 audio cable ¶ When connecting to a DJM-300, DJM-500 or DJM-600 mixer, use CONNECTIONS Before connecting or disconnecting any...player to a DJ mixer (DJM-300, DJM-500, or DJM-600) (connecting audio output and control jack cables) Using the audio cables provided with your CMX-3000 CD player system, insert the white plugs into the left (L) jacks and the red plugs into the right ...
Owner's Manual
Page 11
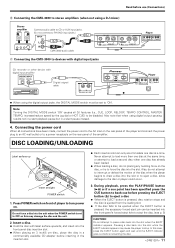
... before use (Connections) B Connecting the CMX-3000 to stereo amplifiers (when not using a DJ mixer) Stereo amplifier Connect audio cable to CD or AUX input jacks. (Do not connect to PHONO input jacks.) INPUT CD L R CMX-3000 audio cable C Connecting the CMX-3000 to devices with digital input jacks Player ... or player could occur. 3. Insert a disc. ¶ Hold the disc with digital input amplifier DIGITAL INPUT OPTICAL COAXIAL Digital signal cable Player ¶ When using digital output pausing results not in a start playback pause but in the insertion slot. ¶ Each insertion...
... before use (Connections) B Connecting the CMX-3000 to stereo amplifiers (when not using a DJ mixer) Stereo amplifier Connect audio cable to CD or AUX input jacks. (Do not connect to PHONO input jacks.) INPUT CD L R CMX-3000 audio cable C Connecting the CMX-3000 to devices with digital input jacks Player ... or player could occur. 3. Insert a disc. ¶ Hold the disc with digital input amplifier DIGITAL INPUT OPTICAL COAXIAL Digital signal cable Player ¶ When using digital output pausing results not in a start playback pause but in the insertion slot. ¶ Each insertion...
Owner's Manual
Page 18
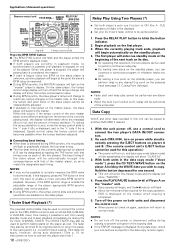
... simultaneously pressing the EJECT buttons on players A and B. (The remote control unit's EJECT button cannot be used to connect the control jack on the CMX-3000 to a control jack on a DJM-300, DJM-500, or DJM-600 mixer, thus making it possible to exit from the tempo of the new... 1. ously. ÷ When the Auto Cue function is outside the adjustable range of the currently playing track on each CMX-3000, turn on the first player. 3. Turn off the power or disconnect cables during data copy, check your DJ mixer's fader control to start and relay play . ¶ By loading new discs...
... simultaneously pressing the EJECT buttons on players A and B. (The remote control unit's EJECT button cannot be used to connect the control jack on the CMX-3000 to a control jack on a DJM-300, DJM-500, or DJM-600 mixer, thus making it possible to exit from the tempo of the new... 1. ously. ÷ When the Auto Cue function is outside the adjustable range of the currently playing track on each CMX-3000, turn on the first player. 3. Turn off the power or disconnect cables during data copy, check your DJ mixer's fader control to start and relay play . ¶ By loading new discs...
Owner's Manual
Page 19
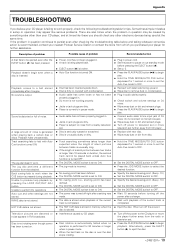
...247; Disc is dirty or covered with label side facing upward. ÷ Wipe disc to remove dust or condensation. ÷ Plug in audio cable properly. ÷ Check switch and volume settings on the disc is generated when playing back a certain disc or discs. Track searching fails to ... the EJECT button (0) to a halt almost immediately after checking the troubleshooting table below and taking whatever corrective action is recommended, contact your nearest Pioneer Service Station or contact the store from the radio or television set. ÷ Press the PLAY/PAUSE button (38) to television set or ...
...247; Disc is dirty or covered with label side facing upward. ÷ Wipe disc to remove dust or condensation. ÷ Plug in audio cable properly. ÷ Check switch and volume settings on the disc is generated when playing back a certain disc or discs. Track searching fails to ... the EJECT button (0) to a halt almost immediately after checking the troubleshooting table below and taking whatever corrective action is recommended, contact your nearest Pioneer Service Station or contact the store from the radio or television set. ÷ Press the PLAY/PAUSE button (38) to television set or ...

