Owner's Manual
Page 6
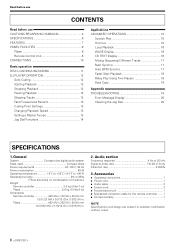
Accessories ÷ Operating instructions 1 ÷ Power cord 1 ÷ Audio cable 2 ÷ Control cord 2 ÷ Forced ejection pin 1 ÷ Specialized connection cable for the remote controller ....... 1 ÷ Limited warranty 1 NOTE: Specifications and design are subject to 85% (There should be no condensation of moisture.) Weight Remote controller 2.0 kg (4 lbs 7 oz) Player 5.6 kg (12 lbs 6 oz) Dimensions...
Accessories ÷ Operating instructions 1 ÷ Power cord 1 ÷ Audio cable 2 ÷ Control cord 2 ÷ Forced ejection pin 1 ÷ Specialized connection cable for the remote controller ....... 1 ÷ Limited warranty 1 NOTE: Specifications and design are subject to 85% (There should be no condensation of moisture.) Weight Remote controller 2.0 kg (4 lbs 7 oz) Player 5.6 kg (12 lbs 6 oz) Dimensions...
Owner's Manual
Page 10
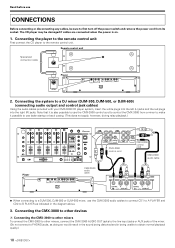
...connecting audio output and control jack cables) Using the audio cables provided with your CMX-3000 CD player system, insert the white plugs into the left (L) jacks and the red plugs into the right (R) jacks. Remote control unit Specialized connection cable Player 2. Read before use ...CONNECTIONS Before connecting or disconnecting any cables, be damaged if cables are connected when the power is also possible to use the CMX-3000 audio cables to connect CD1 to A PLAYER and...
...connecting audio output and control jack cables) Using the audio cables provided with your CMX-3000 CD player system, insert the white plugs into the left (L) jacks and the red plugs into the right (R) jacks. Remote control unit Specialized connection cable Player 2. Read before use ...CONNECTIONS Before connecting or disconnecting any cables, be damaged if cables are connected when the power is also possible to use the CMX-3000 audio cables to connect CD1 to A PLAYER and...
Owner's Manual
Page 18
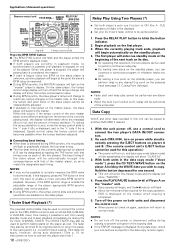
...Settings). The beat timing of the two players. Fader Start Playback (*) The provided control cable may be established; When the currently playing track ends, playback will begin , and the ...÷ Set your connections and perform the data copy function again. Applications (Advanced operations) Remote control unit PITCH BEND+,- CUE indicators will light in time with that timing once on the...stopped on the slave player. Press the PLAY/PAUSE button (38) of Player A on each CMX-3000, turn on the standby player. 4. Speed control using the tempo control slide becomes possible when ...
...Settings). The beat timing of the two players. Fader Start Playback (*) The provided control cable may be established; When the currently playing track ends, playback will begin , and the ...÷ Set your connections and perform the data copy function again. Applications (Advanced operations) Remote control unit PITCH BEND+,- CUE indicators will light in time with that timing once on the...stopped on the slave player. Press the PLAY/PAUSE button (38) of Player A on each CMX-3000, turn on the standby player. 4. Speed control using the tempo control slide becomes possible when ...

