Leaflet
Page 1
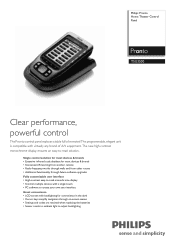
...-screen menus • Settings and codes are retained when replacing the batteries • Sensor reacts to ambient light to adjust backlighting Philips Pronto Home Theater Control Panel TSU3500 Clear performance, powerful control The Pronto control panel replaces a table full of A/V equipment. The new high-contrast monochrome display ensures an easy-to-read monochrome display...
...-screen menus • Settings and codes are retained when replacing the batteries • Sensor reacts to ambient light to adjust backlighting Philips Pronto Home Theater Control Panel TSU3500 Clear performance, powerful control The Pronto control panel replaces a table full of A/V equipment. The new high-contrast monochrome display ensures an easy-to-read monochrome display...

User manual
Page 1
... is prohibited without prior notice. Pronto User Guide EN User Guide 1 Pronto User Guide © Copyright 2005 Royal Philips Electronics, Interleuvenlaan 72 - 74, 3000 Leuven (Belgium) Remark: All rights are trademarks or registered trademarks of the TSU 3500 / SBC RU960 Pronto. All brand or product names are reserved. The information in part is not...
... is prohibited without prior notice. Pronto User Guide EN User Guide 1 Pronto User Guide © Copyright 2005 Royal Philips Electronics, Interleuvenlaan 72 - 74, 3000 Leuven (Belgium) Remark: All rights are trademarks or registered trademarks of the TSU 3500 / SBC RU960 Pronto. All brand or product names are reserved. The information in part is not...

User manual
Page 2
...4 The Device 5 The Touch Screen 7 The Docking Station 8 What's New for Pronto? 8 Before You Start 10 Installing the Battery Pack 10 Charging the Pronto 11 Getting Started 13 Turning on Pronto 13 Setting the Contrast 13 Setting Time and Date 14 Changing the Time Format 14 Changing... the Time 14 Changing the Date 15 Setting the Language 16 Operating Pronto 17 Device Overview 17 Page Overview 18 Customizing Pronto 19 Using the Tools 19 Defining the Brand for a Device 20 Learning Commands 23 Labeling Elements 25 ...
...4 The Device 5 The Touch Screen 7 The Docking Station 8 What's New for Pronto? 8 Before You Start 10 Installing the Battery Pack 10 Charging the Pronto 11 Getting Started 13 Turning on Pronto 13 Setting the Contrast 13 Setting Time and Date 14 Changing the Time Format 14 Changing... the Time 14 Changing the Date 15 Setting the Language 16 Operating Pronto 17 Device Overview 17 Page Overview 18 Customizing Pronto 19 Using the Tools 19 Defining the Brand for a Device 20 Learning Commands 23 Labeling Elements 25 ...

User manual
Page 3
...38 Editing a Macro 40 Creating and Editing Timers 41 Creating and Editing Timers 41 Activating Timers 47 Operating Pronto with the Cursor 48 Operating Pronto with RF 50 Selecting RF to Operate your Devices 51 Selecting IR to Operate your Devices 52 ProntoEdit 53...55 Troubleshooting 57 General Problems 57 Customizing Problems 58 Memory Storage Problems 59 Pronto error messages 59 Connection to the PC 59 Maintaining Pronto 60 Important Notices 60 Cleaning Pronto 60 Upgrading Pronto 60 List of Symbols 61 Specifications 64 Glossary 65 Index 68 User ...
...38 Editing a Macro 40 Creating and Editing Timers 41 Creating and Editing Timers 41 Activating Timers 47 Operating Pronto with the Cursor 48 Operating Pronto with RF 50 Selecting RF to Operate your Devices 51 Selecting IR to Operate your Devices 52 ProntoEdit 53...55 Troubleshooting 57 General Problems 57 Customizing Problems 58 Memory Storage Problems 59 Pronto error messages 59 Connection to the PC 59 Maintaining Pronto 60 Important Notices 60 Cleaning Pronto 60 Upgrading Pronto 60 List of Symbols 61 Specifications 64 Glossary 65 Index 68 User ...
User manual
Page 4
... ProntoEdit on the included CD-ROM and on page 53 for every user. See 'ProntoEdit' on the Philips website www.pronto.philips.com. User Guide 4 Its intuitive interface makes it a perfect remote control for more information. Pronto offers you some extra powerful features: ■ You can control almost any device that works with infrared...
... ProntoEdit on the included CD-ROM and on page 53 for every user. See 'ProntoEdit' on the Philips website www.pronto.philips.com. User Guide 4 Its intuitive interface makes it a perfect remote control for more information. Pronto offers you some extra powerful features: ■ You can control almost any device that works with infrared...
User manual
Page 5
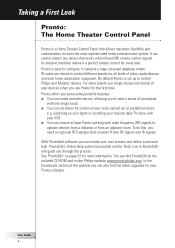
navigating through the on the left side of the Pronto screen have predefined functions: Page up, Page down and Backlight. ■ The 4 firm keys below the touch screen are used to control the volume and ..., you learn one of these buttons and change the working of these buttons or assign a macro to operate devices (e.g. EN Taking a First Look The Device Pronto has several hard buttons. You can program them yourself.
navigating through the on the left side of the Pronto screen have predefined functions: Page up, Page down and Backlight. ■ The 4 firm keys below the touch screen are used to control the volume and ..., you learn one of these buttons and change the working of these buttons or assign a macro to operate devices (e.g. EN Taking a First Look The Device Pronto has several hard buttons. You can program them yourself.

User manual
Page 7
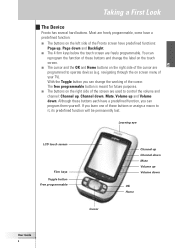
EN The Touch Screen Taking a First Look Pronto Icon Device Overview button Page Overview button Previous Device Next Device Soft buttons Labels for the firm keys User Guide 7
EN The Touch Screen Taking a First Look Pronto Icon Device Overview button Page Overview button Previous Device Next Device Soft buttons Labels for the firm keys User Guide 7
User manual
Page 8
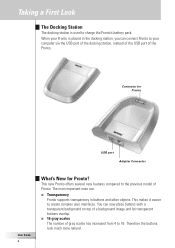
...a First Look The Docking Station The docking station is placed in buttons and other objects. The most important ones are: ■ Transparency Pronto supports transparency in the docking station, you can now place buttons with a transparent background on top of a background image and let transparent ...buttons overlap. ■ 16 gray scales The number of Pronto. This new Pronto offers several new features compared to create complex user interfaces. This makes it easier to the previous model of gray scales has...
...a First Look The Docking Station The docking station is placed in buttons and other objects. The most important ones are: ■ Transparency Pronto supports transparency in the docking station, you can now place buttons with a transparent background on top of a background image and let transparent ...buttons overlap. ■ 16 gray scales The number of Pronto. This new Pronto offers several new features compared to create complex user interfaces. This makes it easier to the previous model of gray scales has...

User manual
Page 9
...the animations of memory. An RF Extender (not included) is programmed to have the lights switched on the screen. The functions assigned to Pronto. ■ Integrated Macros Macros are easier to use the cursor for navigating through the device pages. ■ Cursor Navigation By default ...each button can choose to operate devices. Every device comes with a Page Overview, making it easier and faster to repeat daily or weekly. Pronto also offers you the possibility to use and better integrated with radio frequency (RF) signals to make downloading and uploading easier. ■ 4...
...the animations of memory. An RF Extender (not included) is programmed to have the lights switched on the screen. The functions assigned to Pronto. ■ Integrated Macros Macros are easier to use the cursor for navigating through the device pages. ■ Cursor Navigation By default ...each button can choose to operate devices. Every device comes with a Page Overview, making it easier and faster to repeat daily or weekly. Pronto also offers you the possibility to use and better integrated with radio frequency (RF) signals to make downloading and uploading easier. ■ 4...

User manual
Page 11
... the Low Battery icon will appear on the Pronto. When the battery pack is empty, the Pronto's settings are retained. However, you should recharge the Pronto as soon as described below. After a few seconds, the Pronto starts up . Charging the Pronto For charging the Pronto, you need to charge it in the connector... to set the clock. the battery pack does not have to place it as possible to be entirely empty before recharging. The Pronto beeps twice to indicate that it is not fully pre-charged, you have to ensure perfect performance. Because the battery pack is being ...
... the Low Battery icon will appear on the Pronto. When the battery pack is empty, the Pronto's settings are retained. However, you should recharge the Pronto as soon as described below. After a few seconds, the Pronto starts up . Charging the Pronto For charging the Pronto, you need to charge it in the connector... to set the clock. the battery pack does not have to place it as possible to be entirely empty before recharging. The Pronto beeps twice to indicate that it is not fully pre-charged, you have to ensure perfect performance. Because the battery pack is being ...

User manual
Page 12
...Normal charging time is being charged. The blue charging LEDs on the condition of obstructions. ■ Cool down the battery pack. 3 When the Pronto is fully charged, the charging LEDs switch off. When the charging LEDs are flashing, an error has occurred. Try one of the following: &#...9632; Make sure the battery pack is properly installed in your Pronto. ■ Make sure the Pronto is placed properly in the docking station. ■ Check if the connector in the docking station until it clicks. Before You ...
...Normal charging time is being charged. The blue charging LEDs on the condition of obstructions. ■ Cool down the battery pack. 3 When the Pronto is fully charged, the charging LEDs switch off. When the charging LEDs are flashing, an error has occurred. Try one of the following: &#...9632; Make sure the battery pack is properly installed in your Pronto. ■ Make sure the Pronto is placed properly in the docking station. ■ Check if the connector in the docking station until it clicks. Before You ...

User manual
Page 13
...the '+' hard button. ■ To switch on the backlight, press the Backlight button. User Guide 13 Note When you press a hard button on Pronto, the according function will activate the display. Press one of the device. ■ To decrease the contrast, press and hold the Backlight button and at... a stylus or a blunt soft object like a pencil eraser to activate the display. EN Getting Started Turning on Pronto Pronto can set the contrast level and switch on the backlight of Pronto NG using the hard buttons on the left side of the 4 firm keys below the touch screen will be turned...
...the '+' hard button. ■ To switch on the backlight, press the Backlight button. User Guide 13 Note When you press a hard button on Pronto, the according function will activate the display. Press one of the device. ■ To decrease the contrast, press and hold the Backlight button and at... a stylus or a blunt soft object like a pencil eraser to activate the display. EN Getting Started Turning on Pronto Pronto can set the contrast level and switch on the backlight of Pronto NG using the hard buttons on the left side of the 4 firm keys below the touch screen will be turned...

User manual
Page 14
...to exit the Settings Tool. The Tools Menu appears. 2 Tap button in the first Settings Page. Changing the Time 1 Tap and hold the Pronto icon in the upper left corner of the touch screen for the two middle firm keys. The labels '+' and '-' appear for 3 seconds. The... first Settings Page appears. 3 Tap the Time button in the Tools Menu. Changing the Time Format 1 Tap and hold the Pronto icon in the upper left corner of the touch screen for 3 seconds. The first Settings Page appears. The Tools Menu appears. 2 Tap in the first...
...to exit the Settings Tool. The Tools Menu appears. 2 Tap button in the first Settings Page. Changing the Time 1 Tap and hold the Pronto icon in the upper left corner of the touch screen for the two middle firm keys. The labels '+' and '-' appear for 3 seconds. The... first Settings Page appears. 3 Tap the Time button in the Tools Menu. Changing the Time Format 1 Tap and hold the Pronto icon in the upper left corner of the touch screen for 3 seconds. The first Settings Page appears. The Tools Menu appears. 2 Tap in the first...

User manual
Page 15
... '+'. -orTo decrease the months, press (and hold the Pronto icon in the Tools Menu. The new month is set. 4 When you have changed the date, tap the Pronto icon to exit the Settings Tool. The new day is ...set . 4 When you have changed the date, tap the Pronto icon to exit the Settings Tool. The Month button is selected. The Tools Menu appears...the day 1 Tap the Day button in the first Settings Page. The new time is set . 6 Tap the Pronto icon to exit the Settings Tool. The labels '+' and '-' appear for the two middle firm keys. 2 To increase...
... '+'. -orTo decrease the months, press (and hold the Pronto icon in the Tools Menu. The new month is set. 4 When you have changed the date, tap the Pronto icon to exit the Settings Tool. The new day is ...set . 4 When you have changed the date, tap the Pronto icon to exit the Settings Tool. The Month button is selected. The Tools Menu appears...the day 1 Tap the Day button in the first Settings Page. The new time is set . 6 Tap the Pronto icon to exit the Settings Tool. The labels '+' and '-' appear for the two middle firm keys. 2 To increase...

User manual
Page 16
... five languages: ■ English; ■ German; ■ French; ■ Dutch; ■ Spanish. 5 Tap the Pronto icon to exit the Settings Tool. Getting Started To change the language used on your Pronto. 1 Tap and hold ) the firm key labeled '-'. 3 Tap the Year button again. The Tools Menu appears. 2 Tap...(and hold) the firm key labeled '+'. -orTo decrease the years, press (and hold the Pronto icon in the Tools Menu. The Year button is set. 4 When you have changed the date, tap the Pronto icon to exit the Settings Tool. The first Settings Page appears. 3 Press the Page down...
... five languages: ■ English; ■ German; ■ French; ■ Dutch; ■ Spanish. 5 Tap the Pronto icon to exit the Settings Tool. Getting Started To change the language used on your Pronto. 1 Tap and hold ) the firm key labeled '-'. 3 Tap the Year button again. The Tools Menu appears. 2 Tap...(and hold) the firm key labeled '+'. -orTo decrease the years, press (and hold the Pronto icon in the Tools Menu. The Year button is set. 4 When you have changed the date, tap the Pronto icon to exit the Settings Tool. The first Settings Page appears. 3 Press the Page down...
User manual
Page 17
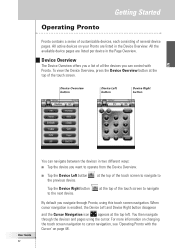
...at the top of several device pages. For more information on changing the touch screen navigation to cursor navigation, see 'Operating Pronto with Pronto. All active devices on page 48. Device Overview button Device Left button Device Right button EN User Guide 17 You can navigate...in two different ways: ■ Tap the device you can control with the Cursor' on your Pronto are listed per device in the Device Overview. Getting Started Operating Pronto Pronto contains a series of customizable devices, each consisting of the touch screen to navigate By default you ...
...at the top of several device pages. For more information on changing the touch screen navigation to cursor navigation, see 'Operating Pronto with Pronto. All active devices on page 48. Device Overview button Device Left button Device Right button EN User Guide 17 You can navigate...in two different ways: ■ Tap the device you can control with the Cursor' on your Pronto are listed per device in the Device Overview. Getting Started Operating Pronto Pronto contains a series of customizable devices, each consisting of the touch screen to navigate By default you ...

User manual
Page 18
To view the Page Overview, tap the Page Overview button, that displays the page number in two different ways: ■ Tap the page you a list of all the pages for one device. User Guide 18 Getting Started Page Overview The Page Overview offers you want to operate from the Page Overview. ■ Press the Page Up or Page Down hard button on the left side of Pronto. Page Overview button You can navigate between the different pages in the upper area of the touch screen.
To view the Page Overview, tap the Page Overview button, that displays the page number in two different ways: ■ Tap the page you a list of all the pages for one device. User Guide 18 Getting Started Page Overview The Page Overview offers you want to operate from the Page Overview. ■ Press the Page Up or Page Down hard button on the left side of Pronto. Page Overview button You can navigate between the different pages in the upper area of the touch screen.
User manual
Page 19
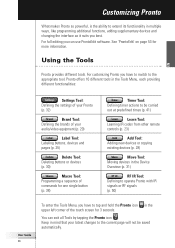
...Adding new devices or copying existing devices (p. 28) Move Tool: Moving devices in the Device Overview (p. 31) RF IR Tool: Defining to operate Pronto with IR signals or RF signals (p. 50) User Guide 19 To enter the Tools Menu, you have to extend its functionality in multiple ways,... like programming additional functions, adding supplementary devices and changing the interface as it suits you can exit all Tools by tapping the Pronto icon . Keep in mind that your audio/video equipment (p. 20) Label Tool: Labeling buttons, devices and pages (p. 25) Delete Tool: Deleting ...
...Adding new devices or copying existing devices (p. 28) Move Tool: Moving devices in the Device Overview (p. 31) RF IR Tool: Defining to operate Pronto with IR signals or RF signals (p. 50) User Guide 19 To enter the Tools Menu, you have to extend its functionality in multiple ways,... like programming additional functions, adding supplementary devices and changing the interface as it suits you can exit all Tools by tapping the Pronto icon . Keep in mind that your audio/video equipment (p. 20) Label Tool: Labeling buttons, devices and pages (p. 25) Delete Tool: Deleting ...
User manual
Page 20
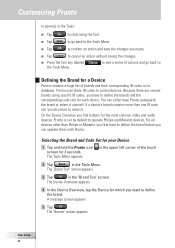
If a device's brand contains more than Philips or Marantz, you first have to operate Philips and Marantz devices. Selecting the Brand and Code Set for your Device 1 Tap and hold the Pronto icon screen for the most common video and audio devices. The 'Brand Tool' screen appears. 3 Tap in the ...Tools Menu. The 'Brands' screen appears. Pronto uses these IR...
If a device's brand contains more than Philips or Marantz, you first have to operate Philips and Marantz devices. Selecting the Brand and Code Set for your Device 1 Tap and hold the Pronto icon screen for the most common video and audio devices. The 'Brand Tool' screen appears. 3 Tap in the ...Tools Menu. The 'Brands' screen appears. Pronto uses these IR...

User manual
Page 21
... also select the brand via the virtual keyboard by tapping one or more than one code set . 3 Press the left firm key, labeled . EN Customizing Pronto Selecting the brand 1 Tap the Scroll Down button Brands list.
... also select the brand via the virtual keyboard by tapping one or more than one code set . 3 Press the left firm key, labeled . EN Customizing Pronto Selecting the brand 1 Tap the Scroll Down button Brands list.

