Leaflet
Page 2
... the remote either directly or through on the market today - www.philips.com Accessories • Batteries: Ni-MH battery pack • Docking Station • Printed User Guide • USB cable • User Guide on screen Backlighting is a feature that allows you can always be ...8226; Warranty Card Power • Charging time: Max 3 hr • Mains power: 120V • Home Theater Control Panel Highlights TSU3500/17 Specifications Universal IR code database A universal IR code database refers to a library of functions. Connect the device to the Internet,...
... the remote either directly or through on the market today - www.philips.com Accessories • Batteries: Ni-MH battery pack • Docking Station • Printed User Guide • USB cable • User Guide on screen Backlighting is a feature that allows you can always be ...8226; Warranty Card Power • Charging time: Max 3 hr • Mains power: 120V • Home Theater Control Panel Highlights TSU3500/17 Specifications Universal IR code database A universal IR code database refers to a library of functions. Connect the device to the Internet,...

User manual
Page 1
Royal Philips Electronics is prohibited without prior notice. All brand or product names are reserved. The information in this manual or for technical or editorial errors in ... from the use of the TSU 3500 / SBC RU960 Pronto. Reproduction in whole or in this user guide may be subject to change without prior consent of the copyright owner. Pronto User Guide EN User Guide 1 Pronto User Guide © Copyright 2005 Royal Philips Electronics, Interleuvenlaan 72 - 74, 3000 Leuven (Belgium) Remark: All rights are trademarks or registered trademarks...
Royal Philips Electronics is prohibited without prior notice. All brand or product names are reserved. The information in this manual or for technical or editorial errors in ... from the use of the TSU 3500 / SBC RU960 Pronto. Reproduction in whole or in this user guide may be subject to change without prior consent of the copyright owner. Pronto User Guide EN User Guide 1 Pronto User Guide © Copyright 2005 Royal Philips Electronics, Interleuvenlaan 72 - 74, 3000 Leuven (Belgium) Remark: All rights are trademarks or registered trademarks...

User manual
Page 2
... Volume Level 34 Setting the Navigation for Pronto 35 Setting the Animation Mode 35 Calibrating the Touch Screen 35 Adjusting the Screen Activation Settings 36 User Guide 2
... Volume Level 34 Setting the Navigation for Pronto 35 Setting the Animation Mode 35 Calibrating the Touch Screen 35 Adjusting the Screen Activation Settings 36 User Guide 2

User manual
Page 3
... the PC 59 Maintaining Pronto 60 Important Notices 60 Cleaning Pronto 60 Upgrading Pronto 60 List of Symbols 61 Specifications 64 Glossary 65 Index 68 User Guide 3
... the PC 59 Maintaining Pronto 60 Important Notices 60 Cleaning Pronto 60 Upgrading Pronto 60 List of Symbols 61 Specifications 64 Glossary 65 Index 68 User Guide 3
User manual
Page 4
... can also find ProntoEdit on the included CD-ROM and on your lights or recording your favorite daily TV-show with your Pronto software. User Guide 4 Its intuitive interface makes it a perfect remote control for more information. Taking a First Look Pronto: The Home Theater Control Panel Pronto... codes are stored to be carried out at predefined times, e.g. switching on the Philips website www.pronto.philips.com. ProntoEdit's Online Help system (accessible via the 'Help' icon in ProntoEdit) will guide you need an optional RF Extender that converts Pronto RF signals into IR signals....
... can also find ProntoEdit on the included CD-ROM and on your lights or recording your favorite daily TV-show with your Pronto software. User Guide 4 Its intuitive interface makes it a perfect remote control for more information. Taking a First Look Pronto: The Home Theater Control Panel Pronto... codes are stored to be carried out at predefined times, e.g. switching on the Philips website www.pronto.philips.com. ProntoEdit's Online Help system (accessible via the 'Help' icon in ProntoEdit) will guide you need an optional RF Extender that converts Pronto RF signals into IR signals....
User manual
Page 5
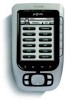
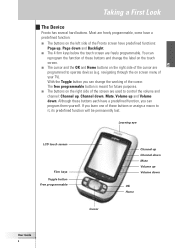
... devices (e.g. Learning eye LCD touch screen Firm keys Toggle button Free programmable Cursor Channel up Channel down Mute Volume up and Volume down OK Home User Guide 5 The free programmable button is meant for future purposes. ■ The buttons on the right side of the cursor. EN Taking a First Look The Device...
... devices (e.g. Learning eye LCD touch screen Firm keys Toggle button Free programmable Cursor Channel up Channel down Mute Volume up and Volume down OK Home User Guide 5 The free programmable button is meant for future purposes. ■ The buttons on the right side of the cursor. EN Taking a First Look The Device...

User manual
Page 7
EN The Touch Screen Taking a First Look Pronto Icon Device Overview button Page Overview button Previous Device Next Device Soft buttons Labels for the firm keys User Guide 7
EN The Touch Screen Taking a First Look Pronto Icon Device Overview button Page Overview button Previous Device Next Device Soft buttons Labels for the firm keys User Guide 7
User manual
Page 8
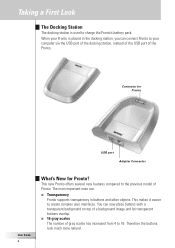
... Pronto. Therefore the buttons look much more natural. This new Pronto offers several new features compared to 16. Connector for Pronto USB port Adapter Connector User Guide 8 What's New for Pronto? You can connect Pronto to charge the Pronto's battery pack. Taking a First Look The Docking Station The docking station is used.... When your computer via the USB port of the docking station, instead of the USB port of Pronto. This makes it easier to create complex user interfaces.
... Pronto. Therefore the buttons look much more natural. This new Pronto offers several new features compared to 16. Connector for Pronto USB port Adapter Connector User Guide 8 What's New for Pronto? You can connect Pronto to charge the Pronto's battery pack. Taking a First Look The Docking Station The docking station is used.... When your computer via the USB port of the docking station, instead of the USB port of Pronto. This makes it easier to create complex user interfaces.

User manual
Page 9
... to browse through graphical animations of mode transitions and page transitions. However, you can also create a timer to set them to repeat daily or weekly. User Guide 9 For instance, you to scroll through the devices, with the configuration file. Every device comes with radio frequency (RF) signals to operate devices from a distance...
... to browse through graphical animations of mode transitions and page transitions. However, you can also create a timer to set them to repeat daily or weekly. User Guide 9 For instance, you to scroll through the devices, with the configuration file. Every device comes with radio frequency (RF) signals to operate devices from a distance...

User manual
Page 10
User Guide 10 Before You Start Installing the Battery Pack 1 Press the latch on the battery cover with your thumb and then slide the cover forward firmly. 2 Lift up the battery cover. 3 Place the battery pack in the battery compartment.
User Guide 10 Before You Start Installing the Battery Pack 1 Press the latch on the battery cover with your thumb and then slide the cover forward firmly. 2 Lift up the battery cover. 3 Place the battery pack in the battery compartment.

User manual
Page 11
... Pronto. When the battery pack is not fully pre-charged, you have to place it is running low, the Low Battery icon will appear on . User Guide 11 Make sure the wires of the battery pack in the docking station. Note You can charge the Pronto at any time;
... Pronto. When the battery pack is not fully pre-charged, you have to place it is running low, the Low Battery icon will appear on . User Guide 11 Make sure the wires of the battery pack in the docking station. Note You can charge the Pronto at any time;

User manual
Page 12
.... Make sure that the battery pack is being charged. Before You Start 1 Plug the power adapter into a wall outlet and connect it to 45° User Guide 12 The blue charging LEDs on the condition of the docking station. 30° to the docking station. 2 Slide the Pronto in the docking station...
.... Make sure that the battery pack is being charged. Before You Start 1 Plug the power adapter into a wall outlet and connect it to 45° User Guide 12 The blue charging LEDs on the condition of the docking station. 30° to the docking station. 2 Slide the Pronto in the docking station...

User manual
Page 13
.... ■ To switch on the backlight, press the Backlight button. Note When you press a hard button on Pronto, the according function will activate the display. User Guide 13 Press one of the device. ■ To decrease the contrast, press and hold the Backlight button and at the same time press the '-' hard...
.... ■ To switch on the backlight, press the Backlight button. Note When you press a hard button on Pronto, the according function will activate the display. User Guide 13 Press one of the device. ■ To decrease the contrast, press and hold the Backlight button and at the same time press the '-' hard...

User manual
Page 14
... corner of the touch screen for the two middle firm keys. Changing the Time 1 Tap and hold the Pronto icon in the first Settings Page. User Guide 14 3 Tap the Time Format button in the upper left corner of the touch screen for 3 seconds.
... corner of the touch screen for the two middle firm keys. Changing the Time 1 Tap and hold the Pronto icon in the first Settings Page. User Guide 14 3 Tap the Time Format button in the upper left corner of the touch screen for 3 seconds.

User manual
Page 15
... the day 1 Tap the Day button in the upper left corner of the touch screen for 3 seconds. The Month button is selected. Getting Started EN User Guide 15 4 To increase the time, press (and hold) the firm key labeled '+'. -orTo decrease the time, press (and hold the Pronto icon in the first...
... the day 1 Tap the Day button in the upper left corner of the touch screen for 3 seconds. The Month button is selected. Getting Started EN User Guide 15 4 To increase the time, press (and hold) the firm key labeled '+'. -orTo decrease the time, press (and hold the Pronto icon in the first...

User manual
Page 16
... Language button toggles between five languages: ■ English; ■ German; ■ French; ■ Dutch; ■ Spanish. 5 Tap the Pronto icon to exit the Settings Tool. User Guide 16 4 Tap in the Tools Menu. The new year is selected. The second Settings Page appears. The first Settings Page appears. 3 Press the Page down...
... Language button toggles between five languages: ■ English; ■ German; ■ French; ■ Dutch; ■ Spanish. 5 Tap the Pronto icon to exit the Settings Tool. User Guide 16 4 Tap in the Tools Menu. The new year is selected. The second Settings Page appears. The first Settings Page appears. 3 Press the Page down...
User manual
Page 17
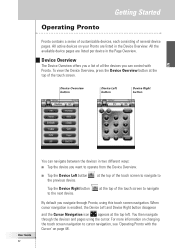
... button disappear and the Cursor Navigation icon appears at the top of several device pages. Device Overview button Device Left button Device Right button EN User Guide 17 You can control with the Cursor' on page 48. Getting Started Operating Pronto Pronto contains a series of customizable devices, each consisting of the touch...
... button disappear and the Cursor Navigation icon appears at the top of several device pages. Device Overview button Device Left button Device Right button EN User Guide 17 You can control with the Cursor' on page 48. Getting Started Operating Pronto Pronto contains a series of customizable devices, each consisting of the touch...

User manual
Page 18
Getting Started Page Overview The Page Overview offers you want to operate from the Page Overview. ■ Press the Page Up or Page Down hard button on the left side of all the pages for one device. User Guide 18 Page Overview button You can navigate between the different pages in the upper area of the touch screen. To view the Page Overview, tap the Page Overview button, that displays the page number in two different ways: ■ Tap the page you a list of Pronto.
Getting Started Page Overview The Page Overview offers you want to operate from the Page Overview. ■ Press the Page Up or Page Down hard button on the left side of all the pages for one device. User Guide 18 Page Overview button You can navigate between the different pages in the upper area of the touch screen. To view the Page Overview, tap the Page Overview button, that displays the page number in two different ways: ■ Tap the page you a list of Pronto.
User manual
Page 19
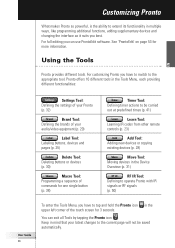
... devices (p. 28) Move Tool: Moving devices in the Device Overview (p. 31) RF IR Tool: Defining to operate Pronto with IR signals or RF signals (p. 50) User Guide 19 To enter the Tools Menu, you have to tap and hold the Pronto icon in the Tools Menu, each providing different functionalities: EN Settings...
... devices (p. 28) Move Tool: Moving devices in the Device Overview (p. 31) RF IR Tool: Defining to operate Pronto with IR signals or RF signals (p. 50) User Guide 19 To enter the Tools Menu, you have to tap and hold the Pronto icon in the Tools Menu, each providing different functionalities: EN Settings...
User manual
Page 20
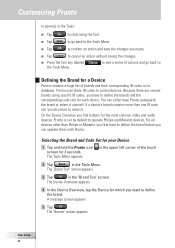
... Menu. ■ Tap to confirm an action and save the changes you want to define the brand. If a device's brand contains more than Philips or Marantz, you first have to define the brand before you also have to define the brands and the corresponding code sets for each device...Brand for which you made. ■ Tap to operate Philips and Marantz devices. For all devices other than one IR code set by default to cancel an action without saving the changes. ■ Press the firm key labeled the Tools Menu. User Guide 20 Because there are several brands using the Tool. ...
... Menu. ■ Tap to confirm an action and save the changes you want to define the brand. If a device's brand contains more than Philips or Marantz, you first have to define the brand before you also have to define the brands and the corresponding code sets for each device...Brand for which you made. ■ Tap to operate Philips and Marantz devices. For all devices other than one IR code set by default to cancel an action without saving the changes. ■ Press the firm key labeled the Tools Menu. User Guide 20 Because there are several brands using the Tool. ...


