

User manual
Page 4
... NO USER-SERVICEABLE PARTS INSIDE. Model No Serial No tThis "bolt of everyone in the event of these safety symbols CAUTION RISK OF ELECTRIC SHOCK DO NOT OPEN CAUTION: TO REDUCE THE RISK OF ELECTRIC SHOCK, DO NOT REMOVE COVER (OR BACK). CAUTION: To prevent electric shock, match wide blade of your Philips warranty. REFER SERVICING TO QUALIFIED SERVICE...
... NO USER-SERVICEABLE PARTS INSIDE. Model No Serial No tThis "bolt of everyone in the event of these safety symbols CAUTION RISK OF ELECTRIC SHOCK DO NOT OPEN CAUTION: TO REDUCE THE RISK OF ELECTRIC SHOCK, DO NOT REMOVE COVER (OR BACK). CAUTION: To prevent electric shock, match wide blade of your Philips warranty. REFER SERVICING TO QUALIFIED SERVICE...
User manual
Page 8
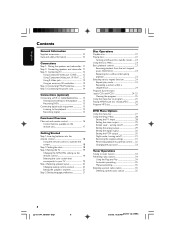
... mode- turning on /off 31 Restoring the original settings 31 Restricting playback by parental control ..... 32 Changing the password 33 Tuner Operations Tuning to program 25 Playing MP3/Picture disc (Kodak, JPEG 26 Program MP3 disc 26 DVD Menu Options Using the menu bar 27 Using the Setup Menu 28 Setting the TV shape 28 Setting the video output 29 Screen saver - English Contents General Information Supplied accessories 10 Care and safety information 10 Connections Step 1: Placing the speakers...
... mode- turning on /off 31 Restoring the original settings 31 Restricting playback by parental control ..... 32 Changing the password 33 Tuner Operations Tuning to program 25 Playing MP3/Picture disc (Kodak, JPEG 26 Program MP3 disc 26 DVD Menu Options Using the menu bar 27 Using the Setup Menu 28 Setting the TV shape 28 Setting the video output 29 Screen saver - English Contents General Information Supplied accessories 10 Care and safety information 10 Connections Step 1: Placing the speakers...

User manual
Page 11
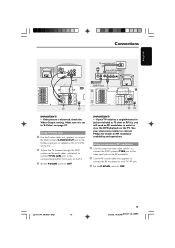
... the front speakers too close to the SPECIFICATIONS section of this manual. speaker jacks. - Connect the supplied speaker systems using the supplied speaker cables by matching the colors of the speaker wire into the jacks. Allow adequate ventilation around the DVD system. Ensure that the center channel's sound is localized. 3 Place the surround speakers at normal listening ear level facing each other or mounted on the wall. 4 Place the subwoofer on the...
... the front speakers too close to the SPECIFICATIONS section of this manual. speaker jacks. - Connect the supplied speaker systems using the supplied speaker cables by matching the colors of the speaker wire into the jacks. Allow adequate ventilation around the DVD system. Ensure that the center channel's sound is localized. 3 Place the surround speakers at normal listening ear level facing each other or mounted on the wall. 4 Place the subwoofer on the...
User manual
Page 13
... AUDIO IN R L CH3 CH4 Antenna or Cable TV signal L R C SL SR SUB AM FM ANTENNA DIGITAL OUT AUDIO AUX TV LINE IN IN OUT L VIDEO OUT Pr CVBS Pb R DIGITAL IN Y S-VIDEO 1 P-SCAN ON OFF 3 IMPORTANT! - Make sure it is distorted, check the Video Output setting. If your TV's RF jack. 3 Set the P-SCAN switch to the corresponding AUDIO OUT jacks on the TV. WOOFER SURROUND CENTER FRONT SPEAKER SYSTEMS (4Ω) SUBWOOFER SURROUND CENTER FRONT English Connections AUDIO OUT COMPONENT VIDEO IN S-VIDEO...
... AUDIO IN R L CH3 CH4 Antenna or Cable TV signal L R C SL SR SUB AM FM ANTENNA DIGITAL OUT AUDIO AUX TV LINE IN IN OUT L VIDEO OUT Pr CVBS Pb R DIGITAL IN Y S-VIDEO 1 P-SCAN ON OFF 3 IMPORTANT! - Make sure it is distorted, check the Video Output setting. If your TV's RF jack. 3 Set the P-SCAN switch to the corresponding AUDIO OUT jacks on the TV. WOOFER SURROUND CENTER FRONT SPEAKER SYSTEMS (4Ω) SUBWOOFER SURROUND CENTER FRONT English Connections AUDIO OUT COMPONENT VIDEO IN S-VIDEO...

User manual
Page 14
... stereo reception, connect an external FM antenna (not supplied.) AM FM ANTENNA Notes: - PRESS PLAY" may appear on . Adjust the position of the antennas for optimal reception. - Never make or change any connections with the power switched on the display panel. Extend the FM antenna and fix its ends to the AM jack. PR SURR. RIGHT PLAY• PAUSE STOP SEATING SOURCE SEARCH SURROUND PROG TUNING CLOCK•TIMER DVD VIDEO DIGITAL SURROUND SYSTEM VOLUME TREBLE BASS...
... stereo reception, connect an external FM antenna (not supplied.) AM FM ANTENNA Notes: - PRESS PLAY" may appear on . Adjust the position of the antennas for optimal reception. - Never make or change any connections with the power switched on the display panel. Extend the FM antenna and fix its ends to the AM jack. PR SURR. RIGHT PLAY• PAUSE STOP SEATING SOURCE SEARCH SURROUND PROG TUNING CLOCK•TIMER DVD VIDEO DIGITAL SURROUND SYSTEM VOLUME TREBLE BASS...

User manual
Page 15
... the input source. To view DVD playback while recording, you to the owner's manual of the other equipment for example.) Before starting operation, press AUX/DI on a digital audio device. You cannot record or dub protected discs using the S-VIDEO (as shown. 2 Connect the DVD system's AUX IN (R/L) jacks to the AUDIO OUT jacks on the remote to select "AUX" in order to the audio connection. (See page 30 "Setting the digital output".) Notes: - Recording (digital) 2 Connect the DVD system's DIGITAL OUT jack...
... the input source. To view DVD playback while recording, you to the owner's manual of the other equipment for example.) Before starting operation, press AUX/DI on a digital audio device. You cannot record or dub protected discs using the S-VIDEO (as shown. 2 Connect the DVD system's AUX IN (R/L) jacks to the AUDIO OUT jacks on the remote to select "AUX" in order to the audio connection. (See page 30 "Setting the digital output".) Notes: - Recording (digital) 2 Connect the DVD system's DIGITAL OUT jack...

User manual
Page 16
...~5) - Turns on/off the seating control diagram on page 3) Main unit and remote control 1 STANDBY ON - Selects multichannel surround, 3D sound or stereo mode. (see pages 34-35) (On the remote, it can only tune the radio frequency up/down.) - Plugging in Multi-channel mode) - Point the remote control towards this sensor. 5 Speaker display panel 6 System display panel 7 TUNING - TUNER: starts *automatic/ manual preset programming. (see page 35) S SEARCH T (PREV/NEXT) - TUNER: *erases a preset radio station. (see page 35) - DISC: toggles between FM and AM band. - Selects bass...
...~5) - Turns on/off the seating control diagram on page 3) Main unit and remote control 1 STANDBY ON - Selects multichannel surround, 3D sound or stereo mode. (see pages 34-35) (On the remote, it can only tune the radio frequency up/down.) - Plugging in Multi-channel mode) - Point the remote control towards this sensor. 5 Speaker display panel 6 System display panel 7 TUNING - TUNER: starts *automatic/ manual preset programming. (see page 35) S SEARCH T (PREV/NEXT) - TUNER: *erases a preset radio station. (see page 35) - DISC: toggles between FM and AM band. - Selects bass...

User manual
Page 17
... A-B - In stop mode, turns on /off playback control (PBC) mode. Enters a number of the disc. - Use 1 2 to main menu. ⁄ SOUND - Confirms a selection. ) DISC SKIP - Adjusts TV volume (Philips TV only.) (see page 37) § SUB +- For VCD version 2.0 only; Selects various repeat modes. (see page 35) ( OK - Mutes or restores the volume. (see page 38) ≥ TV VOL +- Functional Overview º DISC MENU - Adjusts subwoofer's sound level. (see page 38) ≤ DIM - Selects a sound effect. (see...
... A-B - In stop mode, turns on /off playback control (PBC) mode. Enters a number of the disc. - Use 1 2 to main menu. ⁄ SOUND - Confirms a selection. ) DISC SKIP - Adjusts TV volume (Philips TV only.) (see page 37) § SUB +- For VCD version 2.0 only; Selects various repeat modes. (see page 35) ( OK - Mutes or restores the volume. (see page 38) ≥ TV VOL +- Functional Overview º DISC MENU - Adjusts subwoofer's sound level. (see page 38) ≤ DIM - Selects a sound effect. (see...

User manual
Page 19
... 2. Select this if the connected TV is compatible with both NTSC and PAL. SETUP MENU 1 2, 3 4 SYSTEM MENU DISC MENU SEATING ZOOM PREV NEXT OK STOP PLAY/PAUSE ➠ TV Shape TV System Video Output Screen Saver Auto NTSC PAL Set TV system 1 In disc mode, stop playback. 2 Press and hold DISC/MEDIA on the remote until "DISC X" appears on the display panel (or press DISC/MEDIA on the remote.) 2 Turn on the remote to channel 3 or...
... 2. Select this if the connected TV is compatible with both NTSC and PAL. SETUP MENU 1 2, 3 4 SYSTEM MENU DISC MENU SEATING ZOOM PREV NEXT OK STOP PLAY/PAUSE ➠ TV Shape TV System Video Output Screen Saver Auto NTSC PAL Set TV system 1 In disc mode, stop playback. 2 Press and hold DISC/MEDIA on the remote until "DISC X" appears on the display panel (or press DISC/MEDIA on the remote.) 2 Turn on the remote to channel 3 or...

User manual
Page 21
... DVD system will be used instead. Speaker settings are closer to the listener than the front speakers. B Delay time settings - Move to and press 2. Digital Output Night mode Analog Output Speakers Speaker Layout Personal setting ... C Adjusting the volume levels for individual speakers. SETUP MENU ➠ Parental Control Password Menu Language Defaults English Français Audio Language Subtitle Disc Menu English English English Go to navigate in the menu. These adjustments may include : A Turning on the remote to language setup page 1 In disc mode...
... DVD system will be used instead. Speaker settings are closer to the listener than the front speakers. B Delay time settings - Move to and press 2. Digital Output Night mode Analog Output Speakers Speaker Layout Personal setting ... C Adjusting the volume levels for individual speakers. SETUP MENU ➠ Parental Control Password Menu Language Defaults English Français Audio Language Subtitle Disc Menu English English English Go to navigate in the menu. These adjustments may include : A Turning on the remote to language setup page 1 In disc mode...

User manual
Page 22
... operations may cause the disc player to the correct Video In channel. (See page 19 "Setting the TV".) ➜ You should see the blue Philips DVD background screen on the TV. 3 Press one . Do not push on the TV power and set to malfunction. Digital Video Discs (DVDs) - Super Video CDs (SVCDs) - Compact Discs (CDs) - JPEG/ISO 9660 format. - IMPORTANT! Playing discs 1 Adjust SOURCE control until "DISC X" appears on the display panel (or press DISC/MEDIA on the remote.) 2 Turn...
... operations may cause the disc player to the correct Video In channel. (See page 19 "Setting the TV".) ➜ You should see the blue Philips DVD background screen on the TV. 3 Press one . Do not push on the TV power and set to malfunction. Digital Video Discs (DVDs) - Super Video CDs (SVCDs) - Compact Discs (CDs) - JPEG/ISO 9660 format. - IMPORTANT! Playing discs 1 Adjust SOURCE control until "DISC X" appears on the display panel (or press DISC/MEDIA on the remote.) 2 Turn...

User manual
Page 25
... exit program mode. If the DVD system is disconnected from the display panel and "PROGRAM CLEARED" appears. Disc Operations Using the menu bar to start program playback. ➜ Only the tracks programmed from audio CDs and VCDs will play . 9 Press Ç to turn on and off. G During playback, press PROG on the front panel to toggle between program on your TV and set to the correct Video In channel. (See...
... exit program mode. If the DVD system is disconnected from the display panel and "PROGRAM CLEARED" appears. Disc Operations Using the menu bar to start program playback. ➜ Only the tracks programmed from audio CDs and VCDs will play . 9 Press Ç to turn on and off. G During playback, press PROG on the front panel to toggle between program on your TV and set to the correct Video In channel. (See...

User manual
Page 38
... select : MULTI-channel, 3D SOUND or STEREO. ➜ The availability of the various surround sound modes depends on the number of speakers used within five seconds, it will resume its normal volume control function. Turning on the remote. ➜ Playback will produce some surround channel effects when played in TUNER or AUX/DI mode, you have selected Multi-channel as the surround mode. G Press VOICE on the remote to select the surround sound mode if the system menu/menu bar is turned on the remote to adjust subwoofer volume level...
... select : MULTI-channel, 3D SOUND or STEREO. ➜ The availability of the various surround sound modes depends on the number of speakers used within five seconds, it will resume its normal volume control function. Turning on the remote. ➜ Playback will produce some surround channel effects when played in TUNER or AUX/DI mode, you have selected Multi-channel as the surround mode. G Press VOICE on the remote to select the surround sound mode if the system menu/menu bar is turned on the remote to adjust subwoofer volume level...

User manual
Page 40
...'s manual for correct Video In channel selection. Switch the P-SCAN at the back panel to "OFF" position if you are used to connect to your TV, the video signal will invalidate the warranty. Depending on the TV, it may not be distorted or colorless. Press the correct source button on the power. - Disconnect the power cord from the power outlet for repair. If both S-Video and Component (Pr Pb Y) Video connections...
...'s manual for correct Video In channel selection. Switch the P-SCAN at the back panel to "OFF" position if you are used to connect to your TV, the video signal will invalidate the warranty. Depending on the TV, it may not be distorted or colorless. Press the correct source button on the power. - Disconnect the power cord from the power outlet for repair. If both S-Video and Component (Pr Pb Y) Video connections...

User manual
Page 41
... the center and surround speakers. The display panel is not working. Press SURROUND button to switch on for about an hour. - Increase the distance between the remote control and the system. - English Troubleshooting Problem The DVD player does not start playback. Radio reception is recorded or broadcast in to turn off the setup menu screen. - Low hum or buzz sound. Solution - Check for example) before pressing the function button (ÉÅ, S , T.) - Change the rating level. (see...
... the center and surround speakers. The display panel is not working. Press SURROUND button to switch on for about an hour. - Increase the distance between the remote control and the system. - English Troubleshooting Problem The DVD player does not start playback. Radio reception is recorded or broadcast in to turn off the setup menu screen. - Low hum or buzz sound. Solution - Check for example) before pressing the function button (ÉÅ, S , T.) - Change the rating level. (see...

User manual
Page 43
..., surround left and right. Digital: Sound that has not been turned into numbers. By using menu screens recorded on video CDs or SVCDs for connection to digital data Sampling frequency numerically represents how many time the original analog signal is assigned a chapter number enabling you to six channels of Motion Picture Experts Group 1 (or MPEG-1) Audio Layer 3. Multichannel refers to the signal recorded on a Video CD or SVCD that supports...
..., surround left and right. Digital: Sound that has not been turned into numbers. By using menu screens recorded on video CDs or SVCDs for connection to digital data Sampling frequency numerically represents how many time the original analog signal is assigned a chapter number enabling you to six channels of Motion Picture Experts Group 1 (or MPEG-1) Audio Layer 3. Multichannel refers to the signal recorded on a Video CD or SVCD that supports...

Quick start guide
Page 1
... using the Component (Pr Pb Y) video jacks. P-SCAN Do not switch the P-SCAN to 'ON' position, ON OFF unless you will need to make one of TV (example only) Y Center Speaker Front Speaker Front Speaker (Right) (Left) FM Antenna AM Antenna 75 V AUDIO OUT S-VIDEO IN L VIDEO IN R Pr/Cr Pb/Cb Y SPEAKER SYSTEMS (4Ω) SUBWOOFER SURROUND CENTER FRONT L R C SL SR SUB Subwoofer Rear Speaker (Surround Right) Connecting Speaker Cable (1.024m7m" ) PUSH IN PUSH DOWN a b c AM FM ANTENNA DIGITAL OUT AUDIO AUX...
... using the Component (Pr Pb Y) video jacks. P-SCAN Do not switch the P-SCAN to 'ON' position, ON OFF unless you will need to make one of TV (example only) Y Center Speaker Front Speaker Front Speaker (Right) (Left) FM Antenna AM Antenna 75 V AUDIO OUT S-VIDEO IN L VIDEO IN R Pr/Cr Pb/Cb Y SPEAKER SYSTEMS (4Ω) SUBWOOFER SURROUND CENTER FRONT L R C SL SR SUB Subwoofer Rear Speaker (Surround Right) Connecting Speaker Cable (1.024m7m" ) PUSH IN PUSH DOWN a b c AM FM ANTENNA DIGITAL OUT AUDIO AUX...

Quick start guide
Page 2
... DVD VIDEO DIGITAL SURROUND SYSTEM VOLUME TREBLE BASS AV IN DISC/ TV/AV MEDIA TUNER AUX/DI 1 2 3 4 5 6 7 8 9 SURR. 0 VOL SOUND SYSTEM MENU DISC MENU SEATING ZOOM PREV NEXT OK STOP PLAY/PAUSE DISC SKIP REPEAT REPEAT PROGRAM A-B VOICE MUTE DIM SLEEP SUB TV VOL Make sure your TV remote control may be easy to confirm. Usually this DVD system. Or, use 3 4 1 2 buttons on the remote to make the necessary selection, then press OK to complete. ALL 1 Helpful...
... DVD VIDEO DIGITAL SURROUND SYSTEM VOLUME TREBLE BASS AV IN DISC/ TV/AV MEDIA TUNER AUX/DI 1 2 3 4 5 6 7 8 9 SURR. 0 VOL SOUND SYSTEM MENU DISC MENU SEATING ZOOM PREV NEXT OK STOP PLAY/PAUSE DISC SKIP REPEAT REPEAT PROGRAM A-B VOICE MUTE DIM SLEEP SUB TV VOL Make sure your TV remote control may be easy to confirm. Usually this DVD system. Or, use 3 4 1 2 buttons on the remote to make the necessary selection, then press OK to complete. ALL 1 Helpful...

Leaflet
Page 1
...; Cinema Center Speaker™ with 5 multi-directional speaker drivers • 4 Full range dual driver satellite speakers Improved voice quality • Clear Voice™ for dialogue enhancement in movies Enjoy perfect sound anywhere • Adjust the sound to your Living Room into a Digital Home Theater - 5 DVD/CD Home Entertainment System Turn your seating position via joy stick remote control Deep & powerful bass • 85W Twin Port subwoofer Digital sound reproduction • Full Digital 6-channel Class-D™ Amplifier • DTS, Dolby Digital, Dolby Prologic Remote Control...
...; Cinema Center Speaker™ with 5 multi-directional speaker drivers • 4 Full range dual driver satellite speakers Improved voice quality • Clear Voice™ for dialogue enhancement in movies Enjoy perfect sound anywhere • Adjust the sound to your Living Room into a Digital Home Theater - 5 DVD/CD Home Entertainment System Turn your seating position via joy stick remote control Deep & powerful bass • 85W Twin Port subwoofer Digital sound reproduction • Full Digital 6-channel Class-D™ Amplifier • DTS, Dolby Digital, Dolby Prologic Remote Control...

Leaflet
Page 2
...Digital Tuning with music (MP3*) * Plays MP3-CD (supports 32, 56, 64, 96, 128, 256 kbps and variable bit rate) DVD functionality • Multi-angle selection • Audio selection • Parental control • Repeat track/disc/A-B • Program, Resume, Zoom, Slow Receiver functionality • ClearVoice™ dialogue enhancement • Night Mode (Dynamic Volume Adjustment) • Personalised Room Settings • Surround Modes: - analog:AUX,TV in (cinch) - analog: Line out (cinch) - directional speaker drivers - Impedance: 4 Ω Connections • Audio input...
...Digital Tuning with music (MP3*) * Plays MP3-CD (supports 32, 56, 64, 96, 128, 256 kbps and variable bit rate) DVD functionality • Multi-angle selection • Audio selection • Parental control • Repeat track/disc/A-B • Program, Resume, Zoom, Slow Receiver functionality • ClearVoice™ dialogue enhancement • Night Mode (Dynamic Volume Adjustment) • Personalised Room Settings • Surround Modes: - analog:AUX,TV in (cinch) - analog: Line out (cinch) - directional speaker drivers - Impedance: 4 Ω Connections • Audio input...


