

Leaflet
Page 1
Philips DVD Micro Theater MCD703 Turn any room into your interior(s) • High-end component design with stand • Elegant wood-finished speakers • High quality remote control for comfortable use Enrich your movie experience • Play DVD, (S)VCD, MP3-CD, WMA-CD, CD(RW) & Picture CD • 12-bit/108MHz video ... • Total 100W RMS Design that blends into a Theater The uniquely stylish mirror-finished center-unit and wood-finished speakers are an alluring combination. The MCD703's prominent design complements its equally remarkable audio and visual technology within.
Philips DVD Micro Theater MCD703 Turn any room into your interior(s) • High-end component design with stand • Elegant wood-finished speakers • High quality remote control for comfortable use Enrich your movie experience • Play DVD, (S)VCD, MP3-CD, WMA-CD, CD(RW) & Picture CD • 12-bit/108MHz video ... • Total 100W RMS Design that blends into a Theater The uniquely stylish mirror-finished center-unit and wood-finished speakers are an alluring combination. The MCD703's prominent design complements its equally remarkable audio and visual technology within.

Leaflet
Page 2
... any audio frequency distortion due to human ears - High quality remote Control The remote control is a superior Digital-toAnalogue-Converter that features four triangular feet. especially at one time. DVD Micro Theater Highlights MCD703/37 12-bit/108MHz video processing 12-bit Video DAC is ...become in usage. The limitation of colors, resulting in a noticeably sharper picture. Progressive Scan Progressive Scan doubles the vertical resolution of remote control features a soft rubber-paint finish to the screen first, followed by the field with the even lines, both fields are...
... any audio frequency distortion due to human ears - High quality remote Control The remote control is a superior Digital-toAnalogue-Converter that features four triangular feet. especially at one time. DVD Micro Theater Highlights MCD703/37 12-bit/108MHz video processing 12-bit Video DAC is ...become in usage. The limitation of colors, resulting in a noticeably sharper picture. Progressive Scan Progressive Scan doubles the vertical resolution of remote control features a soft rubber-paint finish to the screen first, followed by the field with the even lines, both fields are...

Leaflet
Page 3
... English, French, Spanish Accessories • Included accessories: Control cable, Composite video cable (Y), FM/MW Antenna • Remote control: 49-key with 2xAAA batteries Dimensions • Set dimensions (W x H x D): 208 x 156 x 268 ... Packaging dimensions (W x H x D): 793 x 278 x 380 mm • Weight incl. DVD Micro Theater Specifications MCD703/37 Sound • Output Power: Total 100W RMS • Sound Enhancement: Loudness, Digital Sound Control 4 modes, Dynamic ...09585 11077 9 © 2011 Koninklijke Philips Electronics N.V. Trademarks are subject to change without notice.
... English, French, Spanish Accessories • Included accessories: Control cable, Composite video cable (Y), FM/MW Antenna • Remote control: 49-key with 2xAAA batteries Dimensions • Set dimensions (W x H x D): 208 x 156 x 268 ... Packaging dimensions (W x H x D): 793 x 278 x 380 mm • Weight incl. DVD Micro Theater Specifications MCD703/37 Sound • Output Power: Total 100W RMS • Sound Enhancement: Loudness, Digital Sound Control 4 modes, Dynamic ...09585 11077 9 © 2011 Koninklijke Philips Electronics N.V. Trademarks are subject to change without notice.

User manual
Page 8
... Connecting the power cord 12 Connecting additional equipment 13 Functional Overview DVD player and power amplifier 14~15 Remote control 15~16 Getting Started Step 1: Inserting batteries into the Remote Control 17 Using the Remote Control to operate the Player Step 2: Setting up the TV 17 Setting up Progressive Scan feature To deactivate...
... Connecting the power cord 12 Connecting additional equipment 13 Functional Overview DVD player and power amplifier 14~15 Remote control 15~16 Getting Started Step 1: Inserting batteries into the Remote Control 17 Using the Remote Control to operate the Player Step 2: Setting up the TV 17 Setting up Progressive Scan feature To deactivate...

User manual
Page 10
... you set . Remote control with items, such as benzene, thinner, commercially available cleaners, or anti-static spray intended for adequate ventilation. ● Do not expose your player to extreme temperatures or humidity. ● The apparatus shall not be exposed to dripping or splashing and that your retailer or Philips. Control cable - Stand...
... you set . Remote control with items, such as benzene, thinner, commercially available cleaners, or anti-static spray intended for adequate ventilation. ● Do not expose your player to extreme temperatures or humidity. ● The apparatus shall not be exposed to dripping or splashing and that your retailer or Philips. Control cable - Stand...

User manual
Page 13
... (for example) AUDIO INPUT Viewing and listening to the playback of a digital amplifier with the power switched on. Before starting operation, press AUX on the remote repeatedly in the AC power cord to the coaxial/optical input jack of other equipment ● Connect the system's AUX IN (R/L) jacks to the audio...
... (for example) AUDIO INPUT Viewing and listening to the playback of a digital amplifier with the power switched on. Before starting operation, press AUX on the remote repeatedly in the AC power cord to the coaxial/optical input jack of other equipment ● Connect the system's AUX IN (R/L) jacks to the audio...
User manual
Page 14
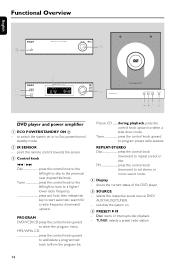
... a radio frequency downward/ upward. FM press the control knob downward to the previous/ next chapter/title/track. Disc: starts or interrupts disc playback - point the remote control towards this sensor. 3 Control knob 4 / ¢ Disc press the control knob to the left /right to tune to a higher/ lower radio frequency press and...
... a radio frequency downward/ upward. FM press the control knob downward to the previous/ next chapter/title/track. Disc: starts or interrupts disc playback - point the remote control towards this sensor. 3 Control knob 4 / ¢ Disc press the control knob to the left /right to tune to a higher/ lower radio frequency press and...

User manual
Page 15
...) - disables or enables sound output. 15 adjusts the volume upward/downward. - connect a headphone 1 2 3 5 6 7 4 8 9 0 ! # ! $ % ^ & * ) ( ¡ ≤ ™ £ ∞ • § ≥ ª ¤ º ⁄ Remote control 1B - inputs a track/title/chapter number of a preset radio station. 4 PROG - MP3/WMA-CD: adds/deletes a programmed track to Eco power/normal standby mode...
...) - disables or enables sound output. 15 adjusts the volume upward/downward. - connect a headphone 1 2 3 5 6 7 4 8 9 0 ! # ! $ % ^ & * ) ( ¡ ≤ ™ £ ∞ • § ≥ ª ¤ º ⁄ Remote control 1B - inputs a track/title/chapter number of a preset radio station. 4 PROG - MP3/WMA-CD: adds/deletes a programmed track to Eco power/normal standby mode...

User manual
Page 17
...switch that chooses different video modes. ➜ Or, set to channel 3 or 4 if you are using Y Pb Pr (see the blue Philips DVD background screen on the TV and set the TV to the correct video-in combination. - CAUTION! - IMPORTANT! Remove batteries if they should...play on this Player, the colour system of properly. See your TV manual for a long time. - English Getting Started Step 1: Inserting batteries into the Remote Control 3 1 2 1 Open the battery compartment. 2 Insert two AAA batteries following the indications (+/-) inside the compartment. 3 Close the cover. IR ...
...switch that chooses different video modes. ➜ Or, set to channel 3 or 4 if you are using Y Pb Pr (see the blue Philips DVD background screen on the TV and set the TV to the correct video-in combination. - CAUTION! - IMPORTANT! Remove batteries if they should...play on this Player, the colour system of properly. See your TV manual for a long time. - English Getting Started Step 1: Inserting batteries into the Remote Control 3 1 2 1 Open the battery compartment. 2 Insert two AAA batteries following the indications (+/-) inside the compartment. 3 Close the cover. IR ...

User manual
Page 18
... ● When the distorted sign still appears on the TV, it may be a distorted picture on your TV user manual). 2 Press SYSTEM on the remote to exit the system menu and then DISC to exit progressive scan. ➜ The DVD blue background screen will be due to the connected TV... to confirm. ➜ The instruction menu appears on the TV. 1. CONNECT YPRPB CABLE. 3. CONFIRM TO USE P-SCAN, IF PICTURE IS GOOD, PRESS OK BUTTON ON REMOTE. ENSURE TV HAS P-SCAN. 2. English Getting Started 6 Press 1 2 repeatedly to select "VIDEO SETUP PAGE". 7 Select "TV MODE" to "P-SCAN", then OK to your TV ...
... ● When the distorted sign still appears on the TV, it may be a distorted picture on your TV user manual). 2 Press SYSTEM on the remote to exit the system menu and then DISC to exit progressive scan. ➜ The DVD blue background screen will be due to the connected TV... to confirm. ➜ The instruction menu appears on the TV. 1. CONNECT YPRPB CABLE. 3. CONFIRM TO USE P-SCAN, IF PICTURE IS GOOD, PRESS OK BUTTON ON REMOTE. ENSURE TV HAS P-SCAN. 2. English Getting Started 6 Press 1 2 repeatedly to select "VIDEO SETUP PAGE". 7 Select "TV MODE" to "P-SCAN", then OK to your TV ...

User manual
Page 19
...) 4 Enter its submenu by using the Numeric Keypad (0-9). 4 Press OK to confirm. 19 "Subtitle" (disc's subtitles) - If the language selected is not available on the remote to navigate in the system menu will remain once selected. Setting the OSD Language 1 Press SYSTEM. 2 Press 1 2 to select "General Setup Page". 3 Use 1 2 3 4 on the...
...) 4 Enter its submenu by using the Numeric Keypad (0-9). 4 Press OK to confirm. 19 "Subtitle" (disc's subtitles) - If the language selected is not available on the remote to navigate in the system menu will remain once selected. Setting the OSD Language 1 Press SYSTEM. 2 Press 1 2 to select "General Setup Page". 3 Use 1 2 3 4 on the...

User manual
Page 20
.../disabled. If this feature is displayed briefly.The system will switch to the last selected source. ● Press DISC, TUNER or AUX on the remote. ➜ The system will be retained in high modulation, which causes a distortion at the same time. LOUDNESS LOUDNESS feature enables the system to ...display, press and hold ECO POWER/STANDBYON Bfor 3 seconds or more to switch to standby mode ● Press ECO POWER/STANDBY-ON B (B on the remote). ➜ "BYE BYE" is on) or normal standby with clock display. ● The volume level (up to automatically increase the treble and bass...
.../disabled. If this feature is displayed briefly.The system will switch to the last selected source. ● Press DISC, TUNER or AUX on the remote. ➜ The system will be retained in high modulation, which causes a distortion at the same time. LOUDNESS LOUDNESS feature enables the system to ...display, press and hold ECO POWER/STANDBYON Bfor 3 seconds or more to switch to standby mode ● Press ECO POWER/STANDBY-ON B (B on the remote). ➜ "BYE BYE" is on) or normal standby with clock display. ● The volume level (up to automatically increase the treble and bass...

User manual
Page 21
... Player. Playable Discs Your DVD Player will start automatically (depending on the disc type). ➜ If a disc menu appears on the TV, see the blue Philips DVD background screen on the TV. 4 Press OPEN•CLOSE to open the disc tray and load in order to play on the...-rates : 8~320 kbps, variable bitrates - Playing discs 1 Connect the power cords of the system and TV (or any time, simply press BAND/9 (or 9 on the remote) to play Video CDs interactively, following the menu on CD-R(W) Region Codes DVDs must enter your four-digit password. (See "Password Setup Page"). 6 At any...
... Player. Playable Discs Your DVD Player will start automatically (depending on the disc type). ➜ If a disc menu appears on the TV, see the blue Philips DVD background screen on the TV. 4 Press OPEN•CLOSE to open the disc tray and load in order to play on the...-rates : 8~320 kbps, variable bitrates - Playing discs 1 Connect the power cords of the system and TV (or any time, simply press BAND/9 (or 9 on the remote) to play Video CDs interactively, following the menu on CD-R(W) Region Codes DVDs must enter your four-digit password. (See "Password Setup Page"). 6 At any...

User manual
Page 22
...enter the chapter/track/title number using the Numeric Keypad (0-9). to repeat playback of the current chapter. Slow backward is not possible on the remote to go to the previous chapter/track. 3 To go to the next chapter/track 2 Press the control knob to the left (corresponding to... (DVD). Basic playback controls Pausing playback (DVD/VCD/CD/MP3/ WMA) 1 During playback, press PRESET/ÉÅ (or ÉÅ on the remote). ➜ Playback will pause and sound will be set only within the same chapter/track. ➜ The section will now repeat continuously. 3 To exit...
...enter the chapter/track/title number using the Numeric Keypad (0-9). to repeat playback of the current chapter. Slow backward is not possible on the remote to go to the previous chapter/track. 3 To go to the next chapter/track 2 Press the control knob to the left (corresponding to... (DVD). Basic playback controls Pausing playback (DVD/VCD/CD/MP3/ WMA) 1 During playback, press PRESET/ÉÅ (or ÉÅ on the remote). ➜ Playback will pause and sound will be set only within the same chapter/track. ➜ The section will now repeat continuously. 3 To exit...

User manual
Page 23
.... Forward/Reverse Searching (DVD/VCD/ CD/MP3/WMA) 1 Press TU during playback (not for playback in the time edit box using remote control numerical keypad. For DVD ➜ Title/Chapter Elapsed: displays the elapsed time of the current title/chapter. ➜ Title/Chapter ...Use the Numerical Keypad (0-9) to directly input the tracks or chapters (single track number with digit "0" in the chapter/track edit box using remote control numerical keypad. Disc Operations English Program (not for Picture CD) To select favourite tracks/chapters for Picture CD) ● During playback...
.... Forward/Reverse Searching (DVD/VCD/ CD/MP3/WMA) 1 Press TU during playback (not for playback in the time edit box using remote control numerical keypad. For DVD ➜ Title/Chapter Elapsed: displays the elapsed time of the current title/chapter. ➜ Title/Chapter ...Use the Numerical Keypad (0-9) to directly input the tracks or chapters (single track number with digit "0" in the chapter/track edit box using remote control numerical keypad. Disc Operations English Program (not for Picture CD) To select favourite tracks/chapters for Picture CD) ● During playback...

User manual
Page 24
... select different audio languages. Playing MP3/WMA disc IMPORTANT! General operation 1 Load an MP3/WMA disc. ➜ The data disc menu appears on the remote to open the folder. 3 Press 3 4 or use Windows Media Player 10 (or later) for CD burning/conversion.Visit www.microsoft.com for VCD...● Press the control knob to the left/right (corresponding to S/T) or press CH on the remote to select another track in the current album. ● Press PRESET/ÉÅ (or ÉÅ on the remote) repeatedly to pause/resume playback. ● Press DISC MENU on the TV screen. 2 Use 3...
... select different audio languages. Playing MP3/WMA disc IMPORTANT! General operation 1 Load an MP3/WMA disc. ➜ The data disc menu appears on the remote to open the folder. 3 Press 3 4 or use Windows Media Player 10 (or later) for CD burning/conversion.Visit www.microsoft.com for VCD...● Press the control knob to the left/right (corresponding to S/T) or press CH on the remote to select another track in the current album. ● Press PRESET/ÉÅ (or ÉÅ on the remote) repeatedly to pause/resume playback. ● Press DISC MENU on the TV screen. 2 Use 3...

User manual
Page 25
... 3: flip the picture vertically. 4: flip the picture horizontally. 1: rotate the picture anti-clockwise. 2: rotate the picture clockwise. 25 To enter the remote key function menu ● Use 1 2 3 4 to switch between Folder and Filelist. English Disc Operations Playback selection During playback, you can: ●...the left /right (corresponding to S/T ) or press CH on the TV screen. 2 Use 1 2 3 4 to highlight one of 12 pictures appears on the remote. ● Use 1 2 3 4 to highlight "Prev" or "Next" and press OK. Slide show playback modes (JPEG) ● During playback, press the...
... 3: flip the picture vertically. 4: flip the picture horizontally. 1: rotate the picture anti-clockwise. 2: rotate the picture clockwise. 25 To enter the remote key function menu ● Use 1 2 3 4 to switch between Folder and Filelist. English Disc Operations Playback selection During playback, you can: ●...the left /right (corresponding to S/T ) or press CH on the TV screen. 2 Use 1 2 3 4 to highlight one of 12 pictures appears on the remote. ● Use 1 2 3 4 to highlight "Prev" or "Next" and press OK. Slide show playback modes (JPEG) ● During playback, press the...

User manual
Page 31
... clock 1 In Standby mode, press and hold the control knob to the left/right (corresponding to S/T) or TU +/- à/ á on the remote until the frequency indication starts to change, then release. ➜ The system automatically tunes to the next strong radio station. ● To tune to ...If "PROG" icon goes off before you select the desired preset number, press the control knob upward (corresponding to PROGRAM) or press PROG on the remote. 4 Press the control knob upward (corresponding to PROGRAM) or press PROG on the display screen. 4 Turn VOLUME -/+ clockwise or anticlockwise or press...
... clock 1 In Standby mode, press and hold the control knob to the left/right (corresponding to S/T) or TU +/- à/ á on the remote until the frequency indication starts to change, then release. ➜ The system automatically tunes to the next strong radio station. ● To tune to ...If "PROG" icon goes off before you select the desired preset number, press the control knob upward (corresponding to PROGRAM) or press PROG on the remote. 4 Press the control knob upward (corresponding to PROGRAM) or press PROG on the display screen. 4 Turn VOLUME -/+ clockwise or anticlockwise or press...

User manual
Page 32
...SLEEP/TIMER to confirm. ➜ The minute digits flash on the display screen. 4 Turn VOLUME -/+ clockwise or anticlockwise or press VOLUME -/+ on the remote to set the minutes. 5 Press SLEEP/TIMER to confirm the time setting. ➜ "OFF" flashes on the display screen. 6 Turn VOLUME -/+ clockwise... or anticlockwise or press VOLUME -/+ on the remote to switch on the display screen. In standby mode, the timer setting enables the system to select "ON". ➜ icon appears on automatically at...
...SLEEP/TIMER to confirm. ➜ The minute digits flash on the display screen. 4 Turn VOLUME -/+ clockwise or anticlockwise or press VOLUME -/+ on the remote to set the minutes. 5 Press SLEEP/TIMER to confirm the time setting. ➜ "OFF" flashes on the display screen. 6 Turn VOLUME -/+ clockwise... or anticlockwise or press VOLUME -/+ on the remote to switch on the display screen. In standby mode, the timer setting enables the system to select "ON". ➜ icon appears on automatically at...
User manual
Page 33
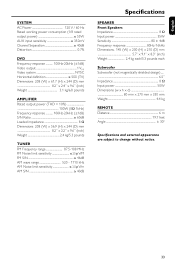
...) Weight 2.4 kg each/5.3 pounds each Subwoofer Subwoofer (not magnetically shielded design)...6.5" Impedance 8 Ω Input power 50W Dimensions (w x h x d 80 mm x 270 mm x 330 mm Weight 4.4 kg REMOTE Distance 6 m 19.7 feet Angle 300 Specifications and external appearance are subject to change without notice. 33
...) Weight 2.4 kg each/5.3 pounds each Subwoofer Subwoofer (not magnetically shielded design)...6.5" Impedance 8 Ω Input power 50W Dimensions (w x h x d 80 mm x 270 mm x 330 mm Weight 4.4 kg REMOTE Distance 6 m 19.7 feet Angle 300 Specifications and external appearance are subject to change without notice. 33


