
User manual
Page 6
...the unit. Install in any way, such as power-supply cord or plug is required when the apparatus has been damaged in accordance with one wider than the other apparatus (including amplifiers) that the unit has a double insulation system 6 Do not install near water. 6. Servicing is... when unused for replacement of the polarized or grounding-type plug. Do not defeat the safety purpose of the obsolete outlet. 10.Protect the power cord from tip-over. 13. AC Polarized Plug A polarized plug has two blades with the manufacturer´s instructions. 8. A grounding type...
...the unit. Install in any way, such as power-supply cord or plug is required when the apparatus has been damaged in accordance with one wider than the other apparatus (including amplifiers) that the unit has a double insulation system 6 Do not install near water. 6. Servicing is... when unused for replacement of the polarized or grounding-type plug. Do not defeat the safety purpose of the obsolete outlet. 10.Protect the power cord from tip-over. 13. AC Polarized Plug A polarized plug has two blades with the manufacturer´s instructions. 8. A grounding type...

User manual
Page 8
...Supplied accessories 9 Environmental information 9 Care and safety information 9 Functional Overview Main unit and remote control 10-11 Control buttons available on the remote only ... 11 Connections Step 1: Connecting FM/AM antennas 12 Step 2: Connecting the speakers 13 Step 3: Connecting to PC 13 Step 4: Connecting the AC power... cord ........ 13 Step 5: Inserting batteries into the remote control 13 Using the remote control to operate the system 13 USB PC Link Quick Setup Guide 14 PC system requirement 14 Install MusicMatch software 14 Enable...
...Supplied accessories 9 Environmental information 9 Care and safety information 9 Functional Overview Main unit and remote control 10-11 Control buttons available on the remote only ... 11 Connections Step 1: Connecting FM/AM antennas 12 Step 2: Connecting the speakers 13 Step 3: Connecting to PC 13 Step 4: Connecting the AC power... cord ........ 13 Step 5: Inserting batteries into the remote control 13 Using the remote control to operate the system 13 USB PC Link Quick Setup Guide 14 PC system requirement 14 Install MusicMatch software 14 Enable...
User manual
Page 9
.... Supplied accessories (page 3 - P1) - FM wire antenna - Do not expose the system, batteries or discs to the type plate on the lens. A cleaning agent may damage the disc! - English Refer to humidity, rain, sand or excessive heat (caused by heating equipment or direct sunlight). USB PC LINK software installer CD-ROM - AC power...
.... Supplied accessories (page 3 - P1) - FM wire antenna - Do not expose the system, batteries or discs to the type plate on the lens. A cleaning agent may damage the disc! - English Refer to humidity, rain, sand or excessive heat (caused by heating equipment or direct sunlight). USB PC LINK software installer CD-ROM - AC power...

User manual
Page 12
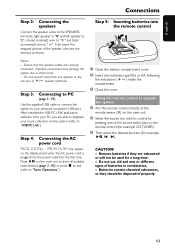
... page 3 - Using other radiation source to prevent unwanted noise. - Place the AM loop antenna on . - Connections English Refer to the power outlet only after you have finished hooking up everything. The combination of the antennas for optimal reception. - Step 1: Connecting FM/AM antennas -... ends to a stand or wall. - For better FM stereo reception, connect external FM antenna. 12 Use only the supplied speakers. Never make or change connections with the power switched on a shelf or attach it to the wall. - Adjust the position of the main unit and speakers provide ...
... page 3 - Using other radiation source to prevent unwanted noise. - Place the AM loop antenna on . - Connections English Refer to the power outlet only after you have finished hooking up everything. The combination of the antennas for optimal reception. - Step 1: Connecting FM/AM antennas -... ends to a stand or wall. - For better FM stereo reception, connect external FM antenna. 12 Use only the supplied speakers. Never make or change connections with the power switched on a shelf or attach it to the wall. - Adjust the position of the main unit and speakers provide ...
User manual
Page 13
...3 Then select the desired function (for example CAUTION! - P5) Use the supplied USB cable to connect the system to your music collection via the system (refer to short-circuit. - Using the remote control to operate the system 1 Aim the remote control directly at the remote sensor (iR) on the main... substances, so they are exhausted or will not be disposed of the source select keys on the display panel when the AC power cord is plugged into the power outlet for a long time. - Fully insert the stripped portion of batteries in combination. - Step 5: Inserting batteries into the...
...3 Then select the desired function (for example CAUTION! - P5) Use the supplied USB cable to connect the system to your music collection via the system (refer to short-circuit. - Using the remote control to operate the system 1 Aim the remote control directly at the remote sensor (iR) on the main... substances, so they are exhausted or will not be disposed of the source select keys on the display panel when the AC power cord is plugged into the power outlet for a long time. - Fully insert the stripped portion of batteries in combination. - Step 5: Inserting batteries into the...

User manual
Page 14
...comes with this customized MusicMatch software for latest update on the "USBPCLINK.exe". Select other MusicMatch jukebox software first from "http://www.audio.philips.com". Free hard disk space : 15 MB for the first time. It is deactivated in order to the CD-ROM drive in Windows...MMXX200 or higher - Please use . If it for the software Install MusicMatch software 4 USB 2 PC LINK 1 3 POWER ON/OFF 5 1 Use the supplied USB cable to connect the audio system to drag/drop any music tracks from the list. - You are advised to read the MusicMatch tutorial before using USB ...
...comes with this customized MusicMatch software for latest update on the "USBPCLINK.exe". Select other MusicMatch jukebox software first from "http://www.audio.philips.com". Free hard disk space : 15 MB for the first time. It is deactivated in order to the CD-ROM drive in Windows...MMXX200 or higher - Please use . If it for the software Install MusicMatch software 4 USB 2 PC LINK 1 3 POWER ON/OFF 5 1 Use the supplied USB cable to connect the audio system to drag/drop any music tracks from the list. - You are advised to read the MusicMatch tutorial before using USB ...

User manual
Page 16
Switching to store the setting. ➜ The clock will start working. Setting the clock The clock can be erased when the system is active, whenever you switch the system to set in either 12-hour or 24-hour mode ("11:59 PM" or "23:59" for example). 4 (00:00 / 12:00AM) 3... repeatedly to standby mode, it will exit clock setting mode if no button is displayed. Demonstration mode If the demonstration mode is disconnected from the power supply. - To activate the demonstration In standby mode, press and hold CLOCK•TIMER on the main unit until "DEMO ON" is displayed. English...
Switching to store the setting. ➜ The clock will start working. Setting the clock The clock can be erased when the system is active, whenever you switch the system to set in either 12-hour or 24-hour mode ("11:59 PM" or "23:59" for example). 4 (00:00 / 12:00AM) 3... repeatedly to standby mode, it will exit clock setting mode if no button is displayed. Demonstration mode If the demonstration mode is disconnected from the power supply. - To activate the demonstration In standby mode, press and hold CLOCK•TIMER on the main unit until "DEMO ON" is displayed. English...
User manual
Page 20
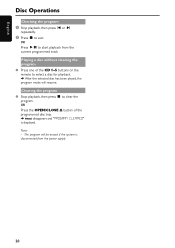
Note: - The program will resume. OR Press the OPEN/CLOSE 0 button of the CD 1~5 buttons on the remote to start playback from the power supply. 20 Clearing the program Stop playback, then press Ç to exit. English Disc Operations Checking the program 1 Stop playback, then press í...197; to select a disc for playback. ➜ After the selected disc has been played, the program mode will be erased if the system is disconnected from the current programmed track Playing a disc without clearing the program Press one of the programmed disc tray. ➜ PROG disappears ...
Note: - The program will resume. OR Press the OPEN/CLOSE 0 button of the CD 1~5 buttons on the remote to start playback from the power supply. 20 Clearing the program Stop playback, then press Ç to exit. English Disc Operations Checking the program 1 Stop playback, then press í...197; to select a disc for playback. ➜ After the selected disc has been played, the program mode will be erased if the system is disconnected from the current programmed track Playing a disc without clearing the program Press one of the programmed disc tray. ➜ PROG disappears ...

User manual
Page 21
...for FM stereo reception. OR In standby mode, press and hold Çuntil the frequency indication starts to change, then release. ➜ The system automatically tunes to the next strong signal radio reception. ➜ lights up to radio stations"). 2 Press PROGRAM (PROG). ➜ The preset ...want to store the radio station in the memory, starting from preset (1) and all available radio stations automatically. 1 Connect the system to enter tuner mode. Tuning to radio stations 1 Press TUNER to the power supply, "AUTO INSTALL - Notes: - English Tuner Operations IMPORTANT!
...for FM stereo reception. OR In standby mode, press and hold Çuntil the frequency indication starts to change, then release. ➜ The system automatically tunes to the next strong signal radio reception. ➜ lights up to radio stations"). 2 Press PROGRAM (PROG). ➜ The preset ...want to store the radio station in the memory, starting from preset (1) and all available radio stations automatically. 1 Connect the system to enter tuner mode. Tuning to radio stations 1 Press TUNER to the power supply, "AUTO INSTALL - Notes: - English Tuner Operations IMPORTANT!


