Leaflet
Page 2
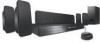
... Composite video (CVBS) output, AUX in, FM Antenna, Easy-Fit Speaker Connectors, Digital coaxial in Power • Power supply: 120V, 60Hz • Standby power consumption: < 1 W • Power consumption: 180 W Loudspeakers • Satellite speaker drivers: 3" full range woofer • Satellite speaker ...: 6 09585 14693 8 © 2011 Koninklijke Philips Electronics N.V. EasyLink EasyLink lets you want - It shows subtle shades and smoother graduation of your living room. DVD home theater system Specifications HTS3565D/37 Highlights Picture/Display • D/A converter: 12...
... Composite video (CVBS) output, AUX in, FM Antenna, Easy-Fit Speaker Connectors, Digital coaxial in Power • Power supply: 120V, 60Hz • Standby power consumption: < 1 W • Power consumption: 180 W Loudspeakers • Satellite speaker drivers: 3" full range woofer • Satellite speaker ...: 6 09585 14693 8 © 2011 Koninklijke Philips Electronics N.V. EasyLink EasyLink lets you want - It shows subtle shades and smoother graduation of your living room. DVD home theater system Specifications HTS3565D/37 Highlights Picture/Display • D/A converter: 12...
User manual
Page 3
...the cart/apparatus combination to the unit: ● Install all servicing to dripping or splashing. 17.Do not place any way, such as power-supply cord or plug is used for long periods of the polarized or grounding-type plug. Do not block any heat sources such as marked on...CUSTOMER SERVICE CENTER.' 12. liquid filled objects, lighted candles). 18.This product may result in any sources of the obsolete outlet. 10.Protect the power cord from being walked on or pinched, particularly at plugs, convenience receptacles, and the point where they exit from tip-over. 13. Heed all...
...the cart/apparatus combination to the unit: ● Install all servicing to dripping or splashing. 17.Do not place any way, such as power-supply cord or plug is used for long periods of the polarized or grounding-type plug. Do not block any heat sources such as marked on...CUSTOMER SERVICE CENTER.' 12. liquid filled objects, lighted candles). 18.This product may result in any sources of the obsolete outlet. 10.Protect the power cord from being walked on or pinched, particularly at plugs, convenience receptacles, and the point where they exit from tip-over. 13. Heed all...
User manual
Page 6
English Table of contents General General Information ...8 Setup precautions...8 Accessories supplied ...8 Cleaning discs ...8 About recycling...8 Product Overview Main Unit ...9 Remote Control ...10-12 Using the remote control ...12 Connections Basic Connections ...13-18 Step ... 4: Connecting to a HDMI-compatible TV 15 Option 5: Using an accessory RF modulator 16 Step 3: Connecting speakers and subwoofer 17 Step 4: Connecting the power cord...18 Optional Connections ...19 Connecting audio from cable box/recorder/game console or TV 19 Basic Setup Getting Started...20-25 Finding the correct...
English Table of contents General General Information ...8 Setup precautions...8 Accessories supplied ...8 Cleaning discs ...8 About recycling...8 Product Overview Main Unit ...9 Remote Control ...10-12 Using the remote control ...12 Connections Basic Connections ...13-18 Step ... 4: Connecting to a HDMI-compatible TV 15 Option 5: Using an accessory RF modulator 16 Step 3: Connecting speakers and subwoofer 17 Step 4: Connecting the power cord...18 Optional Connections ...19 Connecting audio from cable box/recorder/game console or TV 19 Basic Setup Getting Started...20-25 Finding the correct...
User manual
Page 8
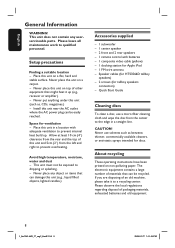
...to a recycling center. Never place this unit on a carpet. - Place this unit near the AC outlet where the AC power plug can be exposed to prevent overheating. Never place any userserviceable parts. Quick Start Guide Cleaning discs To clean a disc, use...local regulations regarding disposal of an old machine, please take it up . Never put anything under this unit (e.g., liquid filled objects, lighted candles.) Accessories supplied - 1 subwoofer - 1 center speaker - 2 front and 2 rear speakers - 1 remote control with adequate ventilation to qualified personnel. Avoid high temperature...
...to a recycling center. Never place this unit on a carpet. - Place this unit near the AC outlet where the AC power plug can be exposed to prevent overheating. Never place any userserviceable parts. Quick Start Guide Cleaning discs To clean a disc, use...local regulations regarding disposal of an old machine, please take it up . Never put anything under this unit (e.g., liquid filled objects, lighted candles.) Accessories supplied - 1 subwoofer - 1 center speaker - 2 front and 2 rear speakers - 1 remote control with adequate ventilation to qualified personnel. Avoid high temperature...

User manual
Page 17
... unwanted noise, never place the speakers too close to the proper position. Assemble the rear speakers to the main unit, subwoofer, AC power adapter, TV or any other radiation sources. 17 1_hts3565-66D_37_eng2_final813.i17 17 2008-03-27 3:11:59 PM Connect the speaker cables to... A Connect the speaker cables to the speakers. - C Connect all the speakers and subwoofer to the speaker stands and secure the position with the supplied screws. Make sure that the colours of the main unit. For Tallboy speakers (HTS3566D): - Step 3: Connecting speakers and subwoofer Before you start... ...
... unwanted noise, never place the speakers too close to the proper position. Assemble the rear speakers to the main unit, subwoofer, AC power adapter, TV or any other radiation sources. 17 1_hts3565-66D_37_eng2_final813.i17 17 2008-03-27 3:11:59 PM Connect the speaker cables to... A Connect the speaker cables to the speakers. - C Connect all the speakers and subwoofer to the speaker stands and secure the position with the supplied screws. Make sure that the colours of the main unit. For Tallboy speakers (HTS3566D): - Step 3: Connecting speakers and subwoofer Before you start... ...

User manual
Page 18
Helpful Hints: - Before making or changing any connections, make sure that all the devices are disconnected from the power outlet. 18 1_hts3565-66D_37_eng2_final813.i18 18 2008-03-27 3:12:00 PM Refer to the type plate at the rear or bottom of the product for identification and supply ratings. - The standby LED on the main unit lights up. Basic Connections (continued) English AUX 2 AUX 1 Step 4: Connecting the power cord After everything is connected properly, connect the AC power cord into the power outlet.
Helpful Hints: - Before making or changing any connections, make sure that all the devices are disconnected from the power outlet. 18 1_hts3565-66D_37_eng2_final813.i18 18 2008-03-27 3:12:00 PM Refer to the type plate at the rear or bottom of the product for identification and supply ratings. - The standby LED on the main unit lights up. Basic Connections (continued) English AUX 2 AUX 1 Step 4: Connecting the power cord After everything is connected properly, connect the AC power cord into the power outlet.
User manual
Page 35
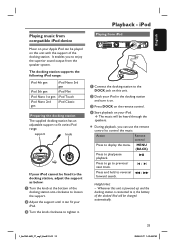
... Nano 3rd gen iPod 5th gen iPod Mini iPod Nano 1st gen iPod Touch iPod Nano 2nd gen iPod Classic Preparing the docking station The supplied docking station has an adjustable support to reverse/ m / M forward search. Playback - It enables you can fit your iPod. support knob If your iPod.... iPod Playing from the speaker system. C Press DOCK on this unit is powered up and the docking station is connected to the docking station, adjust the support as below: A Turn the knob at the bottom of the docking...
... Nano 3rd gen iPod 5th gen iPod Mini iPod Nano 1st gen iPod Touch iPod Nano 2nd gen iPod Classic Preparing the docking station The supplied docking station has an adjustable support to reverse/ m / M forward search. Playback - It enables you can fit your iPod. support knob If your iPod.... iPod Playing from the speaker system. C Press DOCK on this unit is powered up and the docking station is connected to the docking station, adjust the support as below: A Turn the knob at the bottom of the docking...
User manual
Page 59
...the product. • Product repair and/or part replacement because of improper installation or maintenance, connections to improper voltage supply, power line surge, lightning damage, retained images or screen markings resulting from viewing fixed stationary content for extended periods, product...original product in material or workmanship occurs and a valid claim is exchanged, any replacement item becomes your product becomes Philips' property. Non-Philips manufacturers, suppliers, or publishers may provide a separate warranty for their own products packaged with the product. This ...
...the product. • Product repair and/or part replacement because of improper installation or maintenance, connections to improper voltage supply, power line surge, lightning damage, retained images or screen markings resulting from viewing fixed stationary content for extended periods, product...original product in material or workmanship occurs and a valid claim is exchanged, any replacement item becomes your product becomes Philips' property. Non-Philips manufacturers, suppliers, or publishers may provide a separate warranty for their own products packaged with the product. This ...
Quick start guide
Page 1
... the multichannel surround mode. B Place a disc with your product and get support at www.philips.com/welcome HTS3565D HTS3566D 1 Connect 2 Set up . C Press AUX (MP3 LINK) repeatedly until 'MP3 LINK... Need help? Box 671539 Marietta, GA 30006 0026 All rights reserved. z To enjoy the powerful surround sound from where it . Then turn on the ipod. USB device A Connect your USB... device now. Other portable audio player A Use a 3.5mm stereo audio cable (not supplied) to connect the headphone output jack on your portable audio player to 'DISC' mode. Note...
... the multichannel surround mode. B Place a disc with your product and get support at www.philips.com/welcome HTS3565D HTS3566D 1 Connect 2 Set up . C Press AUX (MP3 LINK) repeatedly until 'MP3 LINK... Need help? Box 671539 Marietta, GA 30006 0026 All rights reserved. z To enjoy the powerful surround sound from where it . Then turn on the ipod. USB device A Connect your USB... device now. Other portable audio player A Use a 3.5mm stereo audio cable (not supplied) to connect the headphone output jack on your portable audio player to 'DISC' mode. Note...
Quick start guide
Page 2
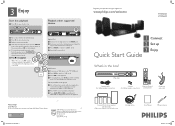
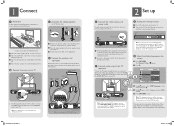
... 3 or 4. FRONT CENTER FRONT FRONT LEFT RIGHT SUBWOOFER REAR REAR LEFT RIGHT AUX 2 AUX 1 Main Unit (rear) z Use the supplied composite video cable to connect the CVBS jack on this Home Theater system, not for optimum reception. A Place the center speaker above or ...CENTER RFRIGOHNTT REAR RIGHT SUBWOOFER * Tallboy rear speakers for HTS3566D model. 1_hts3565-66D_37_qsg_eng2_final82 2 2 Set up E Connect the radio antenna and power cable Keep the antenna away from the speakers. F Connect audio output from the speakers and subwoofer to the same colored jacks at normal ...
... 3 or 4. FRONT CENTER FRONT FRONT LEFT RIGHT SUBWOOFER REAR REAR LEFT RIGHT AUX 2 AUX 1 Main Unit (rear) z Use the supplied composite video cable to connect the CVBS jack on this Home Theater system, not for optimum reception. A Place the center speaker above or ...CENTER RFRIGOHNTT REAR RIGHT SUBWOOFER * Tallboy rear speakers for HTS3566D model. 1_hts3565-66D_37_qsg_eng2_final82 2 2 Set up E Connect the radio antenna and power cable Keep the antenna away from the speakers. F Connect audio output from the speakers and subwoofer to the same colored jacks at normal ...


