User manual
Page 2
... your Philips product, you qualify, plus easy access to accessories from our convenient home shopping network. For Customer Use Enter below the Serial No. For the safety of the cabinet. And take advantage of the best-built, best-backed products available today. MA C5097 DAYS• REGI ITHIN 10 NEEDED W safety Know these important benefits. NO USER-SERVICEABLE PARTS INSIDE. Model No Serial...
... your Philips product, you qualify, plus easy access to accessories from our convenient home shopping network. For Customer Use Enter below the Serial No. For the safety of the cabinet. And take advantage of the best-built, best-backed products available today. MA C5097 DAYS• REGI ITHIN 10 NEEDED W safety Know these important benefits. NO USER-SERVICEABLE PARTS INSIDE. Model No Serial...
User manual
Page 3
...3 3/7/01, 4:12 PM 3139 115 20621 4 3 2 1 ^ DISC CHANGE 3CD C H A N G E R DISC 1 3 DISC DIRECT PLAY DISC 2 DISC 3 OPEN • CLOSE CD / CD-R / CD-RW COMPATIBLE CD SYNCHRO RECORDING FWSTANDBY-ON MINI HIFI SYSTEM VOLUME ECO POWER EV PRESET N PR G DEMO STOP/ CLEAR PLAY• PAUSE EARCH • TUNIN DISPLAY PROG CLOCK• TIMER AUTO REPLAY DUBBING REC MUSIC LEVEL VOLUME INTERACTIVE VU METER CD 1•2•3 FM •AM CD TUNER L LEFT S C CENTER SURROUND SPEAKERS R RIGHT S SOURCE PRO LOGIC TAPE AUX TAPE 1•2 CDR / DVD SOUND NAVIGATION -
...3 3/7/01, 4:12 PM 3139 115 20621 4 3 2 1 ^ DISC CHANGE 3CD C H A N G E R DISC 1 3 DISC DIRECT PLAY DISC 2 DISC 3 OPEN • CLOSE CD / CD-R / CD-RW COMPATIBLE CD SYNCHRO RECORDING FWSTANDBY-ON MINI HIFI SYSTEM VOLUME ECO POWER EV PRESET N PR G DEMO STOP/ CLEAR PLAY• PAUSE EARCH • TUNIN DISPLAY PROG CLOCK• TIMER AUTO REPLAY DUBBING REC MUSIC LEVEL VOLUME INTERACTIVE VU METER CD 1•2•3 FM •AM CD TUNER L LEFT S C CENTER SURROUND SPEAKERS R RIGHT S SOURCE PRO LOGIC TAPE AUX TAPE 1•2 CDR / DVD SOUND NAVIGATION -

User manual
Page 7
... Controls Controls on the system and remote control 13-14 Basic Functions Plug and Play 15 Demonstration mode 15 Switching the system on 16 Switching the system to Standby mode ........ 16 Power Saving Automatic Standby 16 Display mode 16 Volume Control 16 Sound Navigation 17 CD Operation Discs for Playback 18 Loading Discs 18 Disc Playback 19 Programming the disc tracks 19-20 Repeat 20 Shuffle 20 Radio Reception Storing Preset Radio Stations 21-22 Tuning to Preset Radio Stations 22 Erasing a Preset Radio Station 22 Contents External Sources 22 Tape Operation...
... Controls Controls on the system and remote control 13-14 Basic Functions Plug and Play 15 Demonstration mode 15 Switching the system on 16 Switching the system to Standby mode ........ 16 Power Saving Automatic Standby 16 Display mode 16 Volume Control 16 Sound Navigation 17 CD Operation Discs for Playback 18 Loading Discs 18 Disc Playback 19 Programming the disc tracks 19-20 Repeat 20 Shuffle 20 Radio Reception Storing Preset Radio Stations 21-22 Tuning to Preset Radio Stations 22 Erasing a Preset Radio Station 22 Contents External Sources 22 Tape Operation...

User manual
Page 8
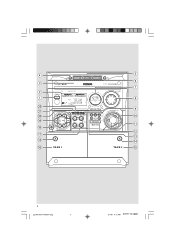
... loop antenna - To disconnect the system from the power supply completely, remove the AC power plug from the rear and the top of Dolby Laboratories. G The mechanical parts of the set contain selflubricating bearings and must accept any interference received, including interference that the operating voltage indicated on the lens of materials which can be oiled or lubricated. Supplied accessories - Your system consists of the disc...
... loop antenna - To disconnect the system from the power supply completely, remove the AC power plug from the rear and the top of Dolby Laboratories. G The mechanical parts of the set contain selflubricating bearings and must accept any interference received, including interference that the operating voltage indicated on the lens of materials which can be oiled or lubricated. Supplied accessories - Your system consists of the disc...

User manual
Page 10
... are not supplied. For optimal sound performance, use old and new or different types of batteries in combination. - symbols inside the battery compartment. 2 1 10 pg 001-031/P750/37-Eng 10 CAUTION! - Rear Surround Speakers Connect the speaker wires to the REAR SURROUND terminals, right speaker to "R" and left and right OUT terminals of a TV,VCR, Laser Disc player, DVD player or CD Recorder to the AUX/CDR IN terminals...
... are not supplied. For optimal sound performance, use old and new or different types of batteries in combination. - symbols inside the battery compartment. 2 1 10 pg 001-031/P750/37-Eng 10 CAUTION! - Rear Surround Speakers Connect the speaker wires to the REAR SURROUND terminals, right speaker to "R" and left and right OUT terminals of a TV,VCR, Laser Disc player, DVD player or CD Recorder to the AUX/CDR IN terminals...

User manual
Page 11
... CD, TUNER, TAPE or AUX to normal stereo mode. For the best Dolby Pro Logic sound, switch on the remote control. ➜ A test signal is advisable to switch the Dolby Pro Logic to switch on the system. 2 Press TEST TONE on DPL with DSC set up the Dolby Pro Logic system You must sit at the back of the room. Center Speaker For the best sound, place the center speaker at an angle of wireless rear speakers (not supplied) to adjust...
... CD, TUNER, TAPE or AUX to normal stereo mode. For the best Dolby Pro Logic sound, switch on the remote control. ➜ A test signal is advisable to switch the Dolby Pro Logic to switch on the system. 2 Press TEST TONE on DPL with DSC set up the Dolby Pro Logic system You must sit at the back of the room. Center Speaker For the best sound, place the center speaker at an angle of wireless rear speakers (not supplied) to adjust...

User manual
Page 13
... sound feature. to stop programming on the display mode selected. 8 VOLUME - to delete the preset radio station. to view the selected Dolby Pro Logic setting. $ç - to select Dolby Surround, Dolby Center Phantom, Dolby 3 Stereo or Stereo mode. # DPL DISPLAY PANEL - to start plug & play mode. for PLUG & PLAY...(on the system only) to initiate and start playback. for TAPE to select waveband : FM or AM. for TAPE to stop playback or to exit clock setting or cancel timer. for TUNER ........ for TAPE to reset tape counter number...
... sound feature. to stop programming on the display mode selected. 8 VOLUME - to delete the preset radio station. to view the selected Dolby Pro Logic setting. $ç - to select Dolby Surround, Dolby Center Phantom, Dolby 3 Stereo or Stereo mode. # DPL DISPLAY PANEL - to start plug & play mode. for PLUG & PLAY...(on the system only) to initiate and start playback. for TAPE to select waveband : FM or AM. for TAPE to stop playback or to exit clock setting or cancel timer. for TUNER ........ for TAPE to reset tape counter number...

User manual
Page 15
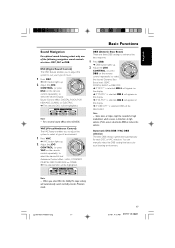
... MINI HIFI SYSTEM Basic Functions VOLUME PR G English VAC EXT S EV PRESET N DEMO PLAY• STOP/ PAUSE CLEAR EARCH • TUNIN DISPLAY PROG CLOCK• TIMER AUTO REPLAY DUBBING REC CD 1•2•3 FM •AM CD TUNER MUSIC LEVEL VOLUME INTERACTIVE VU METER L LEFT S C CENTER SURROUND SPEAKERS R RIGHT S SOURCE PRO LOGIC TAPE AUX TAPE 1•2 CDR / DVD SOUND NAVIGATION - If Plug and Play has not been installed 1 When you to start installation. ➜ All previously stored radio stations will play when Plug and Play...
... MINI HIFI SYSTEM Basic Functions VOLUME PR G English VAC EXT S EV PRESET N DEMO PLAY• STOP/ PAUSE CLEAR EARCH • TUNIN DISPLAY PROG CLOCK• TIMER AUTO REPLAY DUBBING REC CD 1•2•3 FM •AM CD TUNER MUSIC LEVEL VOLUME INTERACTIVE VU METER L LEFT S C CENTER SURROUND SPEAKERS R RIGHT S SOURCE PRO LOGIC TAPE AUX TAPE 1•2 CDR / DVD SOUND NAVIGATION - If Plug and Play has not been installed 1 When you to start installation. ➜ All previously stored radio stations will play when Plug and Play...

User manual
Page 16
... headphones G Connect the headphones plug to the n socket at half brightness. Note: - G Press DISPLAY repeatedly to the last selected source. MODE 2 .......... MODE 3 .......... Volume Control Adjust VOLUME to the selected source. G Press CD, TUNER, TAPE, AUX (or CD 123, TUNER, TAPE 1/2 or AUX/CDR on the remote control. ➜ Playback will continue without sound and "MUTE" will be at the front of the DISC DIRECT PLAY buttons or OPEN•CLOSE. ➜ The system will switch to increase (turn knob clockwise...
... headphones G Connect the headphones plug to the n socket at half brightness. Note: - G Press DISPLAY repeatedly to the last selected source. MODE 2 .......... MODE 3 .......... Volume Control Adjust VOLUME to the selected source. G Press CD, TUNER, TAPE, AUX (or CD 123, TUNER, TAPE 1/2 or AUX/CDR on the remote control. ➜ Playback will continue without sound and "MUTE" will be at the front of the DISC DIRECT PLAY buttons or OPEN•CLOSE. ➜ The system will switch to increase (turn knob clockwise...
User manual
Page 17
... settings to Dolby Center Phantom mode. When you to adjust the system to suit your listening environment. pg 001-031/P750/37-Eng 17 17 3/7/01, 4:12 PM 3139 115 20621 DSC (Digital Sound Control) The DSC feature enables you select VAC, the Dolby Pro Logic setting will automatically switch to enhance the bass response. 1 Press DBB. ➜ DBB button lights up DSC 2 Adjust the JOG CONTROL...
... settings to Dolby Center Phantom mode. When you to adjust the system to suit your listening environment. pg 001-031/P750/37-Eng 17 17 3/7/01, 4:12 PM 3139 115 20621 DSC (Digital Sound Control) The DSC feature enables you select VAC, the Dolby Pro Logic setting will automatically switch to enhance the bass response. 1 Press DBB. ➜ DBB button lights up DSC 2 Adjust the JOG CONTROL...
User manual
Page 18
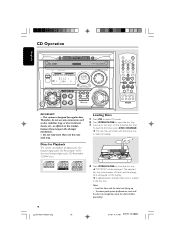
... R DISC 1 3 DISC DIRECT PLAY DISC 2 DISC 3 OPEN • CLOSE CD / CD-R / CD-RW COMPATIBLE CD SYNCHRO RECORDING FWSTANDBY-ON MINI HIFI SYSTEM VOLUME PR G 1 EXT S EV PRESET N DEMO PLAY• STOP/ CLEAR PAUSE EARCH • TUNIN DISPLAY PROG CLOCK• TIMER AUTO REPLAY DUBBING REC MUSIC LEVEL VOLUME INTERACTIVE VU METER CD 1•2•3 FM •AM CD TUNER L LEFT S C CENTER SURROUND SPEAKERS R RIGHT S SOURCE PRO LOGIC TAPE AUX TAPE 1•2 CDR / DVD SOUND NAVIGATION - The selected disc tray, total number of tracks and the playing time will be...
... R DISC 1 3 DISC DIRECT PLAY DISC 2 DISC 3 OPEN • CLOSE CD / CD-R / CD-RW COMPATIBLE CD SYNCHRO RECORDING FWSTANDBY-ON MINI HIFI SYSTEM VOLUME PR G 1 EXT S EV PRESET N DEMO PLAY• STOP/ CLEAR PAUSE EARCH • TUNIN DISPLAY PROG CLOCK• TIMER AUTO REPLAY DUBBING REC MUSIC LEVEL VOLUME INTERACTIVE VU METER CD 1•2•3 FM •AM CD TUNER L LEFT S C CENTER SURROUND SPEAKERS R RIGHT S SOURCE PRO LOGIC TAPE AUX TAPE 1•2 CDR / DVD SOUND NAVIGATION - The selected disc tray, total number of tracks and the playing time will be...

User manual
Page 21
... the frequency indication starts to 40 preset radio stations in stereo, will show "SEARCH" until the optimal reception is found . FWSTANDBY-ON MINI HIFI SYSTEM Radio Reception VOLUME PR G English EV PRESET N DEMO PLAY• STOP/ CLEAR PAUSE EARCH • TUNIN DISPLAY PROG CLOCK• TIMER AUTO REPLAY DUBBING REC MUSIC LEVEL VOLUME INTERACTIVE VU METER CD 1•2•3 FM •AM CD TUNER L LEFT S C CENTER SURROUND SPEAKERS R RIGHT S SOURCE PRO LOGIC TAPE AUX TAPE 1•2 CDR / DVD SOUND NAVIGATION - A few...
... the frequency indication starts to 40 preset radio stations in stereo, will show "SEARCH" until the optimal reception is found . FWSTANDBY-ON MINI HIFI SYSTEM Radio Reception VOLUME PR G English EV PRESET N DEMO PLAY• STOP/ CLEAR PAUSE EARCH • TUNIN DISPLAY PROG CLOCK• TIMER AUTO REPLAY DUBBING REC MUSIC LEVEL VOLUME INTERACTIVE VU METER CD 1•2•3 FM •AM CD TUNER L LEFT S C CENTER SURROUND SPEAKERS R RIGHT S SOURCE PRO LOGIC TAPE AUX TAPE 1•2 CDR / DVD SOUND NAVIGATION - A few...

User manual
Page 22
... Sources STANDBY-ON G If the sound from the same source simultaneously. - EXT S EV PRESET N PR G DEMO STOP/ PLAY• PAUSE CLEAR EARCH • TUNIN DISPLAY PROG CLOCK• TIMER AUTO REPLAY DUBBING REC MUSIC LEVEL INTERACTIVE VU MET CD 1•2•3 FM •AM CD TUNER LCR LEFT CENTER S S SURROUND SPEAKERS SOURCE PRO LOGIC TAPE AUX TAPE 1•2 CDR / DVD Listening to External Sources 1 Connect the audio out terminals of the external equipment (TV,VCR, Laser Disc player, DVD player...
... Sources STANDBY-ON G If the sound from the same source simultaneously. - EXT S EV PRESET N PR G DEMO STOP/ PLAY• PAUSE CLEAR EARCH • TUNIN DISPLAY PROG CLOCK• TIMER AUTO REPLAY DUBBING REC MUSIC LEVEL INTERACTIVE VU MET CD 1•2•3 FM •AM CD TUNER LCR LEFT CENTER S S SURROUND SPEAKERS SOURCE PRO LOGIC TAPE AUX TAPE 1•2 CDR / DVD Listening to External Sources 1 Connect the audio out terminals of the external equipment (TV,VCR, Laser Disc player, DVD player...
User manual
Page 23
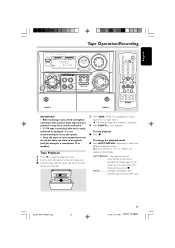
...-ON MINI HIFI SYSTEM Tape Operation/Recording VOLUME VAC EXT S EV PRESET N DEMO PLAY• STOP/ CLEAR PAUSE EARCH • TUNIN DISPLAY PROG CLOCK• TIMER AUTO REPLAY DUBBING REC MUSIC LEVEL VOLUME INTERACTIVE VU METER CD 1•2•3 FM •AM CD TUNER L LEFT S C CENTER SURROUND SPEAKERS R RIGHT S SOURCE PRO LOGIC TAPE AUX TAPE 1•2 CDR / DVD SOUND NAVIGATION - To change the playback mode G Press AUTO REPLAY repeatedly to start playback. JOG DSC DBB -+-+ TAPE 1 TAPE 2 IMPORTANT! - Tape Playback 1 Press çto open side...
...-ON MINI HIFI SYSTEM Tape Operation/Recording VOLUME VAC EXT S EV PRESET N DEMO PLAY• STOP/ CLEAR PAUSE EARCH • TUNIN DISPLAY PROG CLOCK• TIMER AUTO REPLAY DUBBING REC MUSIC LEVEL VOLUME INTERACTIVE VU METER CD 1•2•3 FM •AM CD TUNER L LEFT S C CENTER SURROUND SPEAKERS R RIGHT S SOURCE PRO LOGIC TAPE AUX TAPE 1•2 CDR / DVD SOUND NAVIGATION - To change the playback mode G Press AUTO REPLAY repeatedly to start playback. JOG DSC DBB -+-+ TAPE 1 TAPE 2 IMPORTANT! - Tape Playback 1 Press çto open side...

User manual
Page 24
... possible only on the system. The tape counter will be displayed. Recording is stopped 1 Press à or á. 2 Press Ç when you want to protect. Preparation for example). - tune to start recording. Note: - G It is reached, then release. ➜ The tape continues playing. One Touch Recording 1 Press CD, TUNER or AUX to select the source. 2 Start playback of tape. English Tape Operation/Recording To rewind...
... possible only on the system. The tape counter will be displayed. Recording is stopped 1 Press à or á. 2 Press Ç when you want to protect. Preparation for example). - tune to start recording. Note: - G It is reached, then release. ➜ The tape continues playing. One Touch Recording 1 Press CD, TUNER or AUX to select the source. 2 Start playback of tape. English Tape Operation/Recording To rewind...

User manual
Page 26
... seconds. ➜ If the clock has not been set . - Clock/Timer FWSTANDBY-ON MINI HIFI SYSTEM VOLUME English EXT S EV PRESET N PR G DEMO STOP/ PLAY• PAUSE CLEAR EARCH • TUNIN DISPLAY PROG CLOCK• TIMER AUTO REPLAY DUBBING REC CD 1•2•3 FM •AM CD TUNER MUSIC LEVEL VOLUME INTERACTIVE VU METER L LEFT S C CENTER SURROUND SPEAKERS R RIGHT S SOURCE PRO LOGIC TAPE AUX TAPE 1•2 CDR / DVD SOUND NAVIGATION - Clock Setting The clock can switch on the system. 26 pg 001-031/P750...
... seconds. ➜ If the clock has not been set . - Clock/Timer FWSTANDBY-ON MINI HIFI SYSTEM VOLUME English EXT S EV PRESET N PR G DEMO STOP/ PLAY• PAUSE CLEAR EARCH • TUNIN DISPLAY PROG CLOCK• TIMER AUTO REPLAY DUBBING REC CD 1•2•3 FM •AM CD TUNER MUSIC LEVEL VOLUME INTERACTIVE VU METER L LEFT S C CENTER SURROUND SPEAKERS R RIGHT S SOURCE PRO LOGIC TAPE AUX TAPE 1•2 CDR / DVD SOUND NAVIGATION - Clock Setting The clock can switch on the system. 26 pg 001-031/P750...

User manual
Page 29
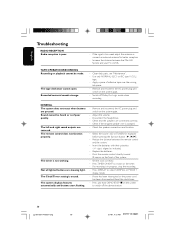
...Do not open the system as this will invalidate the warranty. If a fault occurs, first check the points listed below before taking the system for analog records. Problem Solution CD OPERATION "NO DISC" is a risk of tape operation. ¶ Use a ...disc lens ¶ After prolonged use solvents such as benzine, thinner, commercially available cleaners, or antistatic spray intended for repair. Wipe the disc from the center out. Troubleshooting WARNING Under no circumstances should you are unable to repair the system yourself, as there is displayed. Follow the instructions supplied...
...Do not open the system as this will invalidate the warranty. If a fault occurs, first check the points listed below before taking the system for analog records. Problem Solution CD OPERATION "NO DISC" is a risk of tape operation. ¶ Use a ...disc lens ¶ After prolonged use solvents such as benzine, thinner, commercially available cleaners, or antistatic spray intended for repair. Wipe the disc from the center out. Troubleshooting WARNING Under no circumstances should you are unable to repair the system yourself, as there is displayed. Follow the instructions supplied...
User manual
Page 30
... the speaker connections and location. - Reset the clock/timer. - Disconnect the headphones. - Check if the stripped speaker wire is in progress, stop the recording. - Recorded material sounds strange. - Select the source (CD or TUNER, for better reception. - Set the clock correctly. - English Troubleshooting RADIO RECEPTION Radio reception is of poor quality. GENERAL The system does not react when buttons are showing light. The tape deck door cannot open. Point the remote control directly toward...
... the speaker connections and location. - Reset the clock/timer. - Disconnect the headphones. - Check if the stripped speaker wire is in progress, stop the recording. - Recorded material sounds strange. - Select the source (CD or TUNER, for better reception. - Set the clock correctly. - English Troubleshooting RADIO RECEPTION Radio reception is of poor quality. GENERAL The system does not react when buttons are showing light. The tape deck door cannot open. Point the remote control directly toward...

User manual
Page 31
... for installation or setup of the product, adjustment of customer controls on the product, and installation or repair of antenna systems outside of the product. • product repair and/or part replacement because of misuse, accident, unauthorized repair or other cause not within the control of Philips Consumer Electronics Company. • reception problems caused by Philips Consumer Electronics Company. Take the product to a Philips factory service center (see enclosed list) or authorized service center for repair. Also keep your sales...
... for installation or setup of the product, adjustment of customer controls on the product, and installation or repair of antenna systems outside of the product. • product repair and/or part replacement because of misuse, accident, unauthorized repair or other cause not within the control of Philips Consumer Electronics Company. • reception problems caused by Philips Consumer Electronics Company. Take the product to a Philips factory service center (see enclosed list) or authorized service center for repair. Also keep your sales...
Leaflet
Page 2
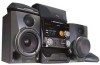
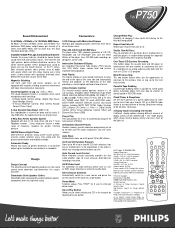
... music. 37-key Remote Control This infrared remote control operates volume +/-, all CD functions (POWER, NEXT, PREVIOUS, PLAY, STOP, PAUSE, SHUFFLE, REPEAT, PROGRAM, CD DIRECT 1, 2, 3, G and F), TV/AV select (TV VOL DN & TV VOL UP), TUNER select, TAPE 1/2 select, AUX/CDR select, SLEEP, TIMER ON/OFF, DISPLAY, CLOCK and Sound features including MUTE, TEST TONE, Dolby Pro-logic (DPL), Balance L/R, Center +/-, Rear +/-, Digital Sound Control (DSC), Virtual Ambience Control (VAC) and Dynamic Bass Boost (DBB). Shuffle One/All Discs Plays...
... music. 37-key Remote Control This infrared remote control operates volume +/-, all CD functions (POWER, NEXT, PREVIOUS, PLAY, STOP, PAUSE, SHUFFLE, REPEAT, PROGRAM, CD DIRECT 1, 2, 3, G and F), TV/AV select (TV VOL DN & TV VOL UP), TUNER select, TAPE 1/2 select, AUX/CDR select, SLEEP, TIMER ON/OFF, DISPLAY, CLOCK and Sound features including MUTE, TEST TONE, Dolby Pro-logic (DPL), Balance L/R, Center +/-, Rear +/-, Digital Sound Control (DSC), Virtual Ambience Control (VAC) and Dynamic Bass Boost (DBB). Shuffle One/All Discs Plays...


