
Leaflet
Page 1
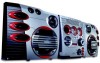
... only Philips Mini Hi-Fi System MP3 FWM587 Total Connectivity with Gameport You're intrigued by technology that connects and delights you, so get hooked on Philips' FWM587 with your favorite music Longer listening, greater enjoyment • Play 50 hours of games • MIX-IT for mixing the game sound with Gameport and Max Sound for instant power boost • 2 x 200W RMS/2 x 400W music power/6500W...
... only Philips Mini Hi-Fi System MP3 FWM587 Total Connectivity with Gameport You're intrigued by technology that connects and delights you, so get hooked on Philips' FWM587 with your favorite music Longer listening, greater enjoyment • Play 50 hours of games • MIX-IT for mixing the game sound with Gameport and Max Sound for instant power boost • 2 x 200W RMS/2 x 400W music power/6500W...

Leaflet
Page 2
... System, 6.5" woofer, 2.5" ferro fluid tweeter, 1" polydome piezo, Speaker grilles detachable Audio Playback • Playback Media: CD, CD-R, CD-RW, MP3CD • Loader Type: Disc Tray Changer • Number of Discs: 5 • Disc Playback Modes: Fast Forward/ Backward, Next/Previous Track Search, Repeat/one /disk/ program, 99-Track Programmable Tuner/Reception/Transmission • Auto digital tuning • Tuner Bands: FM Stereo, MW • Tuner Enhancements: Auto Store, Easy Set (Plug & Play) • Station presets: 40 Connectivity • Aux in: Line in bass, maximizing volume...
... System, 6.5" woofer, 2.5" ferro fluid tweeter, 1" polydome piezo, Speaker grilles detachable Audio Playback • Playback Media: CD, CD-R, CD-RW, MP3CD • Loader Type: Disc Tray Changer • Number of Discs: 5 • Disc Playback Modes: Fast Forward/ Backward, Next/Previous Track Search, Repeat/one /disk/ program, 99-Track Programmable Tuner/Reception/Transmission • Auto digital tuning • Tuner Bands: FM Stereo, MW • Tuner Enhancements: Auto Store, Easy Set (Plug & Play) • Station presets: 40 Connectivity • Aux in: Line in bass, maximizing volume...

User manual
Page 4
... of plug to receive all the privileges of owning a Philips product. • So complete and return the Warranty Registration Card enclosed with your purchase at once, and take advantage of these safety symbols CAUTION RISK OF ELECTRIC SHOCK DO NOT OPEN CAUTION: TO REDUCE THE RISK OF ELECTRIC SHOCK, DO NOT REMOVE COVER (OR BACK). NO USER-SERVICEABLE PARTS...
... of plug to receive all the privileges of owning a Philips product. • So complete and return the Warranty Registration Card enclosed with your purchase at once, and take advantage of these safety symbols CAUTION RISK OF ELECTRIC SHOCK DO NOT OPEN CAUTION: TO REDUCE THE RISK OF ELECTRIC SHOCK, DO NOT REMOVE COVER (OR BACK). NO USER-SERVICEABLE PARTS...

User manual
Page 6
... indicates that produce heat. 9. Follow all batteries correctly, + and - Do not block any way, such as power-supply cord or plug is required when the apparatus has been damaged in any ventilation openings. If the provided plug does not fit into the apparatus, the apparatus has been exposed to the unit: Install all instructions. 5. EL 6475-E004: 02/8 WARNING...
... indicates that produce heat. 9. Follow all batteries correctly, + and - Do not block any way, such as power-supply cord or plug is required when the apparatus has been damaged in any ventilation openings. If the provided plug does not fit into the apparatus, the apparatus has been exposed to the unit: Install all instructions. 5. EL 6475-E004: 02/8 WARNING...
User manual
Page 8
... Switching to standby mode (view clock) ... 16 Demonstration mode 16 Setting the clock 16 Dimming system's display screen 17 Volume control 17 Sound control 17 MAX sound 17 Digital sound control 17 Dynamic bass boost 17 Disc Operations Playable discs 18 Loading discs 18 Basic playback controls 18 Playing an MP3 disc 19 Repeat and shuffle 19 Repeat play 19 Random play 19 Programming the disc tracks 20 Checking the programme 20 Clearing the programme 20 Tuner Operations Tuning to radio stations 21 Presetting radio stations 21 Using the plug...
... Switching to standby mode (view clock) ... 16 Demonstration mode 16 Setting the clock 16 Dimming system's display screen 17 Volume control 17 Sound control 17 MAX sound 17 Digital sound control 17 Dynamic bass boost 17 Disc Operations Playable discs 18 Loading discs 18 Basic playback controls 18 Playing an MP3 disc 19 Repeat and shuffle 19 Repeat play 19 Random play 19 Programming the disc tracks 20 Checking the programme 20 Clearing the programme 20 Tuner Operations Tuning to radio stations 21 Presetting radio stations 21 Using the plug...
User manual
Page 9
... may cloud over when the system is designed to Eco Power standby. Care of packaging materials, exhausted batteries and old equipment. Finding a suitable location - Power saving - FM wire antenna - Handle the disc by heating equipment or direct sunlight). If this system may switch to standby mode automatically. English Refer to the type plate on the lens. - Always keep the disc tray closed to humidity, rain...
... may cloud over when the system is designed to Eco Power standby. Care of packaging materials, exhausted batteries and old equipment. Finding a suitable location - Power saving - FM wire antenna - Handle the disc by heating equipment or direct sunlight). If this system may switch to standby mode automatically. English Refer to the type plate on the lens. - Always keep the disc tray closed to humidity, rain...

User manual
Page 10
... operation. - Lights up /down. - Selects the relevant active mode. - CLOCK: sets the hours. * = Press and hold the button for more than two seconds. 10 CLOCK: sets the minutes. 7 STOP•DEMO STOP 9 - TUNER: tunes the radio frequency up when the system is in the Eco Power standby mode. 2 STANDBY ON B - TUNER: *erases a preset radio station. (only on the main unit) - *Turns on the system. - *Switches to standby mode. 3 Display screen 4 CLOCK•TIMER (CLK/TIMER) - *Enters clock or timer setting mode. 5 CD / TUNER/ AUX•GAME - Switches to the Eco Power standby...
... operation. - Lights up /down. - Selects the relevant active mode. - CLOCK: sets the hours. * = Press and hold the button for more than two seconds. 10 CLOCK: sets the minutes. 7 STOP•DEMO STOP 9 - TUNER: tunes the radio frequency up when the system is in the Eco Power standby mode. 2 STANDBY ON B - TUNER: *erases a preset radio station. (only on the main unit) - *Turns on the system. - *Switches to standby mode. 3 Display screen 4 CLOCK•TIMER (CLK/TIMER) - *Enters clock or timer setting mode. 5 CD / TUNER/ AUX•GAME - Switches to the Eco Power standby...
User manual
Page 11
... these music sources (CD,TUNER or AUX). @ MODE (GAME SOUND) - Selects a disc tray to your game console's v.ideo output. Switches to Eco Power standby mode. - *Switches to your favorite music from one of left /right audio output. % DBB - Adjusts the game's output volume level. $ VIDEO - DSC/PRESET - Selects different type of bass boost level settings (DBB 1, DBB 2, DBB 3 or DBB OFF). CD: starts or confirms tracks programming. - Plug in the headphones jack. Opens/closes the respective disc tray. Sets the sleep timer function. ≥ MUTE - Displays...
... these music sources (CD,TUNER or AUX). @ MODE (GAME SOUND) - Selects a disc tray to your game console's v.ideo output. Switches to Eco Power standby mode. - *Switches to your favorite music from one of left /right audio output. % DBB - Adjusts the game's output volume level. $ VIDEO - DSC/PRESET - Selects different type of bass boost level settings (DBB 1, DBB 2, DBB 3 or DBB OFF). CD: starts or confirms tracks programming. - Plug in the headphones jack. Opens/closes the respective disc tray. Sets the sleep timer function. ≥ MUTE - Displays...

User manual
Page 13
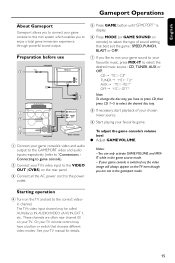
Use only the supplied speakers. Never make or change connections with the power switched on the TV for viewing. Position the antennas as far as shown on a shelf or attach it (not available for the first time. Gameport inputs are correctly connected. Use the game console's video cable (not supplied) to connect its audio outputs to store all versions). On the TV, the Video Input jack is plugged into the terminal as possible from a TV...
Use only the supplied speakers. Never make or change connections with the power switched on the TV for viewing. Position the antennas as far as shown on a shelf or attach it (not available for the first time. Gameport inputs are correctly connected. Use the game console's video cable (not supplied) to connect its audio outputs to store all versions). On the TV, the Video Input jack is plugged into the terminal as possible from a TV...
User manual
Page 15
Or, your TV remote control may be called AUX(iliary) IN, AUDIO/VIDEO (A/V) IN, EXT 1, etc. See your TV manual for details. 15 UDIO R. Preparation before use 2 rear panel 3 1 5 GAME•AUX 7 6 MIX-IT GAME SOUND SPEED PUNCH BLAST MODE G A M OLUME V E A A V IDEO UDIO L. CD ™ "MIX-CD" TUNER ™ "MIX-TU" AUX ™ "MIX-AUX" OFF ™ "MIX-OFF" Note: To change the disc tray, you have a button or switch that best suit the...
Or, your TV remote control may be called AUX(iliary) IN, AUDIO/VIDEO (A/V) IN, EXT 1, etc. See your TV manual for details. 15 UDIO R. Preparation before use 2 rear panel 3 1 5 GAME•AUX 7 6 MIX-IT GAME SOUND SPEED PUNCH BLAST MODE G A M OLUME V E A A V IDEO UDIO L. CD ™ "MIX-CD" TUNER ™ "MIX-TU" AUX ™ "MIX-AUX" OFF ™ "MIX-OFF" Note: To change the disc tray, you have a button or switch that best suit the...

User manual
Page 16
... CLK/TIMER (CLOCK•TIMER) to active mode ● Press CD, TUNER, or AUX. Setting the clock The clock can be erased when the system is disconnected from the power supply. - The system will exit clock setting mode if no button is active, whenever you switch the system to the Eco Power standby mode ● Press B. ➜ ECO POWER button lights up. ➜ The display screen will switch the system to the Eco Power standby or standby mode, make sure the demonstration mode has been deactivated. Switching to standby mode (view clock...
... CLK/TIMER (CLOCK•TIMER) to active mode ● Press CD, TUNER, or AUX. Setting the clock The clock can be erased when the system is disconnected from the power supply. - The system will exit clock setting mode if no button is active, whenever you switch the system to the Eco Power standby mode ● Press B. ➜ ECO POWER button lights up. ➜ The display screen will switch the system to the Eco Power standby or standby mode, make sure the demonstration mode has been deactivated. Switching to standby mode (view clock...
User manual
Page 17
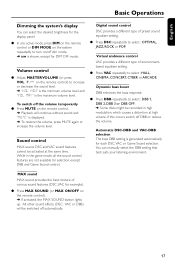
... the maximum volume level. on the remote control). ➜ If activated, the MAX SOUND button lights up. If this occurs, switch off dim mode. ➜ DIM is shown, except for DIM OFF mode. While in high modulation, which causes a distortion at the same time. English Basic Operations Dimming the system's display You can manually select the DBB setting that best suits your listening environment. Virtual ambience control VAC provides...
... the maximum volume level. on the remote control). ➜ If activated, the MAX SOUND button lights up. If this occurs, switch off dim mode. ➜ DIM is shown, except for DIM OFF mode. While in high modulation, which causes a distortion at the same time. English Basic Operations Dimming the system's display You can manually select the DBB setting that best suits your listening environment. Virtual ambience control VAC provides...

User manual
Page 18
... OPEN•CLOSE 0 DISC 1 on disc trays 2~5. The selected disc tray, total number of respective disc trays (refer to the Eco Power standby mode. 18 For example, if currently disc tray 1 is displayed. ➜ During random play once, then stop . OR In stop mode, press CD to select a disc tray to begin, then press ÉÅ. ➜ All the available discs will switch to "Loading discs"). To change the discs on top of the CD 1~5 buttons on...
... OPEN•CLOSE 0 DISC 1 on disc trays 2~5. The selected disc tray, total number of respective disc trays (refer to the Eco Power standby mode. 18 For example, if currently disc tray 1 is displayed. ➜ During random play once, then stop . OR In stop mode, press CD to select a disc tray to begin, then press ÉÅ. ➜ All the available discs will switch to "Loading discs"). To change the discs on top of the CD 1~5 buttons on...
User manual
Page 19
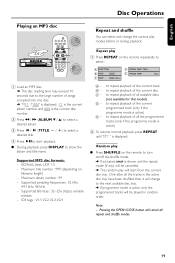
English Disc Operations Playing an MP3 disc 1 MP3 CD TUNER AUX GAME CD1 CD2 CD3 CD4 CD5 VOL TITLE ALBUM REPEAT PROGRAM SHUFFLE DISPLAY DIM SLEEP CLK/TIMER TIMER ON/OFF DSC VAC MUTE MAX ON/OFF GAME GAME SOUND MIX-IT TITLE A02 T008 3 4 2 ALB A02 T001 1 Load an MP3 disc. ➜ The disc reading time may exceed 10 seconds due to the large number of...
English Disc Operations Playing an MP3 disc 1 MP3 CD TUNER AUX GAME CD1 CD2 CD3 CD4 CD5 VOL TITLE ALBUM REPEAT PROGRAM SHUFFLE DISPLAY DIM SLEEP CLK/TIMER TIMER ON/OFF DSC VAC MUTE MAX ON/OFF GAME GAME SOUND MIX-IT TITLE A02 T008 3 4 2 ALB A02 T001 1 Load an MP3 disc. ➜ The disc reading time may exceed 10 seconds due to the large number of...

User manual
Page 21
... available radio stations automatically. 1 Connect the system to radio stations"). 2 Press PROGRAM (PROG). ➜ The preset number starts flashing. Make sure the FM and AM antennas are displayed. Presetting radio stations You can choose to store only the favorite radio stations. 1 Tune to your former presets will be overridden. PRESS PLAY" is displayed. 2 Press ÉÅon the main unit until an optimal reception is displayed. ➜ The current preset radio station will exit presetting mode if no stereo frequency...
... available radio stations automatically. 1 Connect the system to radio stations"). 2 Press PROGRAM (PROG). ➜ The preset number starts flashing. Make sure the FM and AM antennas are displayed. Presetting radio stations You can choose to store only the favorite radio stations. 1 Tune to your former presets will be overridden. PRESS PLAY" is displayed. 2 Press ÉÅon the main unit until an optimal reception is displayed. ➜ The current preset radio station will exit presetting mode if no stereo frequency...
User manual
Page 22
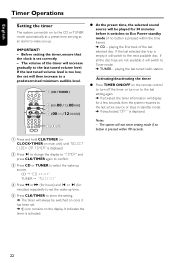
... of the timer will switch to Tuner mode. ➜ TUNER - If the last tuned volume level is set will switch to the next available disc. English Timer Operations Setting the timer The system can switch on to the CD or TUNER mode automatically at a preset time, serving as an alarm to wake you up source. If the last selected disc tray is displayed. Activating/deactivating the timer ● Press TIMER ON/OFF on the remote control to turn off the timer or turn on...
... of the timer will switch to Tuner mode. ➜ TUNER - If the last tuned volume level is set will switch to the next available disc. English Timer Operations Setting the timer The system can switch on to the CD or TUNER mode automatically at a preset time, serving as an alarm to wake you up source. If the last selected disc tray is displayed. Activating/deactivating the timer ● Press TIMER ON/OFF on the remote control to turn off the timer or turn on...
User manual
Page 23
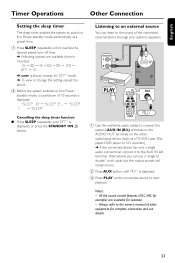
... ON/OFF GAME GAME SOUND MIX-IT 1 Use the red/white audio cables to connect the system's AUX IN (R/L) terminals to the AUDIO OUT terminals on the connected device to start playback. English Timer Operations Other Connection Setting the sleep timer The sleep timer enables the system to switch to Eco Power standby mode automatically at a preset time. 1 Press SLEEP repeatedly until "AUX" is displayed, or press the STANDBY ON B button. Listening to an external source You can use details. 23
... ON/OFF GAME GAME SOUND MIX-IT 1 Use the red/white audio cables to connect the system's AUX IN (R/L) terminals to the AUDIO OUT terminals on the connected device to start playback. English Timer Operations Other Connection Setting the sleep timer The sleep timer enables the system to switch to Eco Power standby mode automatically at a preset time. 1 Press SLEEP repeatedly until "AUX" is displayed, or press the STANDBY ON B button. Listening to an external source You can use details. 23

User manual
Page 24
...-noise ratio 62 dBA Channel separation 35 dB (1 kHz) MPEG 1 Layer 3 (MP3-CD MPEG AUDIO MP3-CD bit rate 32-256 kbps 128 kbps advised) Sampling frequencies 32, 44.1, 48 kHz TUNER FM wave range 87.5 - 108 MHz AM wave range 530 - 1700 kHz Number of presets 40 Antenna FM 300 Ω wire AM Loop antenna SPEAKERS System 3 way, Bass reflex Impedance 8 Ω...
...-noise ratio 62 dBA Channel separation 35 dB (1 kHz) MPEG 1 Layer 3 (MP3-CD MPEG AUDIO MP3-CD bit rate 32-256 kbps 128 kbps advised) Sampling frequencies 32, 44.1, 48 kHz TUNER FM wave range 87.5 - 108 MHz AM wave range 530 - 1700 kHz Number of presets 40 Antenna FM 300 Ω wire AM Loop antenna SPEAKERS System 3 way, Bass reflex Impedance 8 Ω...
User manual
Page 25
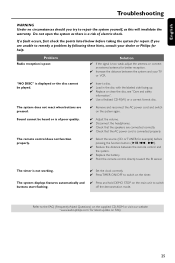
... the signal is not working. ✔ Set the clock correctly. ✔ Press TIMER ON/OFF to switch buttons start flashing. The timer is too weak, adjust the antenna or connect an external antenna for repair. The remote control does not function properly. ✔ Select the source (CD or TUNER, for latest update on the supplied CD-ROM or visit our website "www.audio.philips.com" for example) before taking the system for better reception. ✔...
... the signal is not working. ✔ Set the clock correctly. ✔ Press TIMER ON/OFF to switch buttons start flashing. The timer is too weak, adjust the antenna or connect an external antenna for repair. The remote control does not function properly. ✔ Select the source (CD or TUNER, for latest update on the supplied CD-ROM or visit our website "www.audio.philips.com" for example) before taking the system for better reception. ✔...

User manual
Page 26
.../province to receive warranty service. If you have additional questions, call us to operate in any circumstances for repair. But, because some states do not allow limitations on the product, and installation or repair of antenna systems outside of the product. • product repair and/or part replacement because of misuse, accident, unauthorized repair or other cause not within the control of Philips. • reception problems caused by...
.../province to receive warranty service. If you have additional questions, call us to operate in any circumstances for repair. But, because some states do not allow limitations on the product, and installation or repair of antenna systems outside of the product. • product repair and/or part replacement because of misuse, accident, unauthorized repair or other cause not within the control of Philips. • reception problems caused by...


