
Leaflet
Page 2
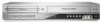
DVD/VCR Player Direct Dubbing Progressive Scan Specifications DVP3340V/17 Highlights Picture/Display • D/A converter: 14 bit / 27MHz • Picture enhancement: Progressive Scan Sound • D/A converter: 24 bit, 96 kHz • Dynamic Range (1kHz): 95 dB • Frequency response: 8 - 20 000 Hz • Signal to noise ratio: 90 • THD:
DVD/VCR Player Direct Dubbing Progressive Scan Specifications DVP3340V/17 Highlights Picture/Display • D/A converter: 14 bit / 27MHz • Picture enhancement: Progressive Scan Sound • D/A converter: 24 bit, 96 kHz • Dynamic Range (1kHz): 95 dB • Frequency response: 8 - 20 000 Hz • Signal to noise ratio: 90 • THD:
User manual
Page 5
... Audio CD or MP3/Windows MediaTM Audio file 27 Programmed Playback 27 Repeat Programmed Tracks 27 Erasing a Track from DVD to VCR 23 On-Screen Display - Contents Introduction 6 Moisture Condensation 6 Symbol Used in this Manual 6 About the Symbol Display 6 Notes on Discs 6 Types of Playable Discs 7 Region code 7 Notes on -screen . . . .15 Initial...
... Audio CD or MP3/Windows MediaTM Audio file 27 Programmed Playback 27 Repeat Programmed Tracks 27 Erasing a Track from DVD to VCR 23 On-Screen Display - Contents Introduction 6 Moisture Condensation 6 Symbol Used in this Manual 6 About the Symbol Display 6 Notes on Discs 6 Types of Playable Discs 7 Region code 7 Notes on -screen . . . .15 Initial...

User manual
Page 6
...If you use of the disc. Notes on the disc can cause poor picture quality and sound distortion. Symbol Used in this owner's manual carefully and retain it for two or three hours without operating it from the center out. Moisture Condensation Never operate the unit immediately after ... MP3 WMA All discs listed below DVD and finalized DVD±R/RW Video CDs Audio CDs MP3 files Windows MediaTM Audio files Cleaning Discs Fingerprints and dust on Discs Handling Discs Do not touch the playback side of this product, please read this Manual Note: Indicates special notes and operating...
...If you use of the disc. Notes on the disc can cause poor picture quality and sound distortion. Symbol Used in this owner's manual carefully and retain it for two or three hours without operating it from the center out. Moisture Condensation Never operate the unit immediately after ... MP3 WMA All discs listed below DVD and finalized DVD±R/RW Video CDs Audio CDs MP3 files Windows MediaTM Audio files Cleaning Discs Fingerprints and dust on Discs Handling Discs Do not touch the playback side of this product, please read this Manual Note: Indicates special notes and operating...
User manual
Page 9
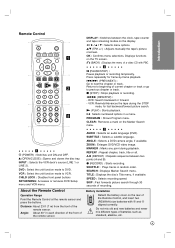
...SEARCH : Displays Marker Search menu. SPEED : Selects recording speed. CHILD LOCK : Disables front panel buttons SETUP/MENU: Accesses or removes DVD Setup menu and VCR menu. Displays functions on the Marker Search menu. O (BACK) : Displays the menu of a video CD with 3 and # ...alkaline, etc. 9 v/V (TRK +/-) : Adjusts manually the tape's picture onscreen. SUBTITLE : Selects a subtitle language. Angle: About 30° in each direction of the front of the Remote Control, and insert two (R03/AAA) size batteries with PBC. VCR: Rewinds/Advances the tape during playback. N (PLAY...
...SEARCH : Displays Marker Search menu. SPEED : Selects recording speed. CHILD LOCK : Disables front panel buttons SETUP/MENU: Accesses or removes DVD Setup menu and VCR menu. Displays functions on the Marker Search menu. O (BACK) : Displays the menu of a video CD with 3 and # ...alkaline, etc. 9 v/V (TRK +/-) : Adjusts manually the tape's picture onscreen. SUBTITLE : Selects a subtitle language. Angle: About 30° in each direction of the front of the Remote Control, and insert two (R03/AAA) size batteries with PBC. VCR: Rewinds/Advances the tape during playback. N (PLAY...

User manual
Page 11
...tuner and VCR still output through the DVD/VCR OUT (A1, V) jacks. Component Video / Progressive Scan connection If your television is connected to the corresponding jacks on the TV using the supplied audio cables (A2). Connect the COMPONENT/PROGRESSIVE SCAN VIDEO OUT jacks on the unit to the DVP3340V. Do not... of your audio system. Note: If you connect both connections to your TV, video displayed might be displayed unstable. Please refer to the manuals of both S-Video and component jack to solve the problem. 11 Notes: • The picture and sound of the unit to VIDEO....
...tuner and VCR still output through the DVD/VCR OUT (A1, V) jacks. Component Video / Progressive Scan connection If your television is connected to the corresponding jacks on the TV using the supplied audio cables (A2). Connect the COMPONENT/PROGRESSIVE SCAN VIDEO OUT jacks on the unit to the DVP3340V. Do not... of your audio system. Note: If you connect both connections to your TV, video displayed might be displayed unstable. Please refer to the manuals of both S-Video and component jack to solve the problem. 11 Notes: • The picture and sound of the unit to VIDEO....
User manual
Page 12
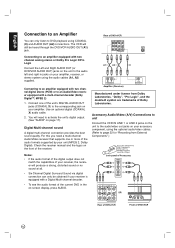
...to page 22 for "Recording from Dolby Laboratories. English Connection to an Amplifier You can only be heard through the DVD/VCR AUDIO OUT (A1) jack. Rear of DVD+VCR Connecting to an amplifier equipped with a Digital Multi-channel decoder. • To see the audio format of your...AUDIO" on the front of Dolby Laboratories. "Dolby", "Pro Logic", and the double-D symbol are trademarks of the receiver. Check the receiver manual and the logos on page 17). Use an optional digital (COAXIAL X) audio cable. 2. Digital Multi-channel sound A digital multi-channel connection ...
...to page 22 for "Recording from Dolby Laboratories. English Connection to an Amplifier You can only be heard through the DVD/VCR AUDIO OUT (A1) jack. Rear of DVD+VCR Connecting to an amplifier equipped with a Digital Multi-channel decoder. • To see the audio format of your...AUDIO" on the front of Dolby Laboratories. "Dolby", "Pro Logic", and the double-D symbol are trademarks of the receiver. Check the receiver manual and the logos on page 17). Use an optional digital (COAXIAL X) audio cable. 2. Digital Multi-channel sound A digital multi-channel connection ...

User manual
Page 19
... made between the unit and the TV, set the TV's source selector to playback, press N (PLAY). To search: 1. To return to VIDEO. 3. Manual Tracking To manually adjust the tracking use the v/V (TRK +/-) buttons on the tape. Press X (PAUSE/STEP) during playback. Direct VIDEO/AUDIO connection is unplugged for a ... tape speed for the first time. • The tape speed (SP & SLP) changes. • Streaks or snow appear due to operate the VCR and DVD. Note: After 5 minutes in SEARCH mode the unit returns to PLAY mode to protect the tape and video heads. Note: After 3 minutes in ...
... made between the unit and the TV, set the TV's source selector to playback, press N (PLAY). To search: 1. To return to VIDEO. 3. Manual Tracking To manually adjust the tracking use the v/V (TRK +/-) buttons on the tape. Press X (PAUSE/STEP) during playback. Direct VIDEO/AUDIO connection is unplugged for a ... tape speed for the first time. • The tape speed (SP & SLP) changes. • Streaks or snow appear due to operate the VCR and DVD. Note: After 5 minutes in SEARCH mode the unit returns to PLAY mode to protect the tape and video heads. Note: After 3 minutes in ...

User manual
Page 23
... until you wish to copy into the VCR, the real-time counter shows length of the tape (T-140, T-160, or T-210 etc.). Press DISPLAY until the REM indicator displays on the TV screen. 3. At the point that you stop the copy process manually when the DVD movie ends, or the unit may replay...
... until you wish to copy into the VCR, the real-time counter shows length of the tape (T-140, T-160, or T-210 etc.). Press DISPLAY until the REM indicator displays on the TV screen. 3. At the point that you stop the copy process manually when the DVD movie ends, or the unit may replay...

User manual
Page 24
... tape is ejected after rewinding and the turns itself off does not function during regular DVD play mode. (unit power stays on automatically and playback begins. • At the end of the tape. VCR Auto Play System This unit features automatic playback. Note: Auto power off automatically. Place... cassette before removing it, but if you do, it is ready to the unit for S-VHS Quasi Playback. 24 English Additional VCR Information • During manual recording playback, or fast forward modes, the unit automatically starts rewinding the tape at the beginning of the tape and is ejected...
... tape is ejected after rewinding and the turns itself off does not function during regular DVD play mode. (unit power stays on automatically and playback begins. • At the end of the tape. VCR Auto Play System This unit features automatic playback. Note: Auto power off automatically. Place... cassette before removing it, but if you do, it is ready to the unit for S-VHS Quasi Playback. 24 English Additional VCR Information • During manual recording playback, or fast forward modes, the unit automatically starts rewinding the tape at the beginning of the tape and is ejected...

User manual
Page 31
...is not connected securely. The disc is placed upside down . Connect the audio cable into the wall outlet securely. Turn on another VCR. Operation 31 The unit does not start playback. Wrong cable connection. Tape is a rental or was recorded on the equipment connected ... the possible cause of the equipment connected with the audio cable is not set . Clean the disc. Troubleshooting Check the following guide for manual tracking adjustment while tape is disconnected. Symptom No power. Cause The power cord is playing. No tape is inserted. Check the connection. ...
...is not connected securely. The disc is placed upside down . Connect the audio cable into the wall outlet securely. Turn on another VCR. Operation 31 The unit does not start playback. Wrong cable connection. Tape is a rental or was recorded on the equipment connected ... the possible cause of the equipment connected with the audio cable is not set . Clean the disc. Troubleshooting Check the following guide for manual tracking adjustment while tape is disconnected. Symptom No power. Cause The power cord is playing. No tape is inserted. Check the connection. ...

Quick start guide
Page 2
... audio cable (Not supplied) RCA video cable (Not supplied) VCR IN DVD/VCR LINE 1 OUT AUDIO AUDIO AUDIO OUT VIDEO VIDEO COAXIAL DVD EXCLUSIVE OUT DVD EXCLUSIVE OUT REAR OF DVD+VCR For additional connection diagrams, see the accompanying User Manual. 1 Connect To connect to your television, follow the instructions ... the power cords of the devices from the DVD/VCR to an AC power outlet. REAR OF TV (EXAMPLE ONLY) VCR IN DVD/VCR LINE 1 OUT AUDIO OUT AUDIO AUDIO VIDEO VIDEO COAXIAL DVD EXCLUSIVE OUT DVD EXCLUSIVE OUT REAR OF DVD+VCR Connection to a Cable / Satellite Box 1 ...
... audio cable (Not supplied) RCA video cable (Not supplied) VCR IN DVD/VCR LINE 1 OUT AUDIO AUDIO AUDIO OUT VIDEO VIDEO COAXIAL DVD EXCLUSIVE OUT DVD EXCLUSIVE OUT REAR OF DVD+VCR For additional connection diagrams, see the accompanying User Manual. 1 Connect To connect to your television, follow the instructions ... the power cords of the devices from the DVD/VCR to an AC power outlet. REAR OF TV (EXAMPLE ONLY) VCR IN DVD/VCR LINE 1 OUT AUDIO OUT AUDIO AUDIO VIDEO VIDEO COAXIAL DVD EXCLUSIVE OUT DVD EXCLUSIVE OUT REAR OF DVD+VCR Connection to a Cable / Satellite Box 1 ...

Quick start guide
Page 4
3 Enjoy Playing a Disc 1 With the TV and DVD/VCR on, press the DVD button to www.philips.com/welcome 3 Playback may start playback. DVDs must have a Region Code of Philips Electronics North America Corp Marietta, GA 30006 0026 All rights reserved. User Manual See the user manual that came with the label facing up and the shiny side facing...
3 Enjoy Playing a Disc 1 With the TV and DVD/VCR on, press the DVD button to www.philips.com/welcome 3 Playback may start playback. DVDs must have a Region Code of Philips Electronics North America Corp Marietta, GA 30006 0026 All rights reserved. User Manual See the user manual that came with the label facing up and the shiny side facing...


