

Leaflet
Page 1
... channel decoder • Full DVD Video playback • On screen user friendly Graphical set-up menu • 20 FM and 10 AM tuner presets • 96kHz/24Bit Audio DAC's • Digital audio output (for CD recording) • 3 analogue audio inputs and 1 audio output • 3 video inputs and 2 video outputs • 1 S-Video output • Multi disc resume memory • 4 fast forward and reverse speeds • Parental control with CHILD lock • Multi angles disc supported • Speaker wall-brackets, video connection cable for TV hook-up and quick installation...
... channel decoder • Full DVD Video playback • On screen user friendly Graphical set-up menu • 20 FM and 10 AM tuner presets • 96kHz/24Bit Audio DAC's • Digital audio output (for CD recording) • 3 analogue audio inputs and 1 audio output • 3 video inputs and 2 video outputs • 1 S-Video output • Multi disc resume memory • 4 fast forward and reverse speeds • Parental control with CHILD lock • Multi angles disc supported • Speaker wall-brackets, video connection cable for TV hook-up and quick installation...
Leaflet
Page 2
... adding impact. By using wOOx Technology is a tight bass sound that cinema essential sonic sound boom. SAT : in /output : 1 digital output connection • Video inputs/outputs 3 input sources, 2 output connections (15-video) - AM antenna : loop type - Dolby, Dolby Digital®, Dolby ProLogic® and the doubleD symbol are delivered through a dedicated sixth, subwoofer channel. Front left , right, center) and 2x70W (rear), receiver amplifiers together with the enclosed wall-brackets.The five speakers are foreseen to change without noticeable distortion. Also...
... adding impact. By using wOOx Technology is a tight bass sound that cinema essential sonic sound boom. SAT : in /output : 1 digital output connection • Video inputs/outputs 3 input sources, 2 output connections (15-video) - AM antenna : loop type - Dolby, Dolby Digital®, Dolby ProLogic® and the doubleD symbol are delivered through a dedicated sixth, subwoofer channel. Front left , right, center) and 2x70W (rear), receiver amplifiers together with the enclosed wall-brackets.The five speakers are foreseen to change without noticeable distortion. Also...

User manual
Page 2
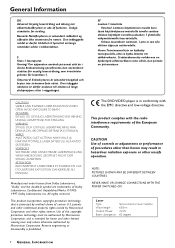
...: -Connect the blue wire to the terminal marked N or coloured black. -Connect the brown wire to the terminal marked L or coloured red. -Do not connect either wire to avoid a possible shock hazard should it should not be greater than 5 Amp. Before replacing the plug cover, make certain that the cord grip is not suitable for your plug, proceed as follows: 1 Remove fuse cover and fuse. 2 Fix new fuse which...
...: -Connect the blue wire to the terminal marked N or coloured black. -Connect the brown wire to the terminal marked L or coloured red. -Do not connect either wire to avoid a possible shock hazard should it should not be greater than 5 Amp. Before replacing the plug cover, make certain that the cord grip is not suitable for your plug, proceed as follows: 1 Remove fuse cover and fuse. 2 Fix new fuse which...
User manual
Page 4
... is protected by Macrovision Corporation and other rights owners. The DVD VIDEO player is in conformity with the radio interference requirements of procedures other than herein may result in hazardous radiation exposure or other limited viewing uses only unless otherwise authorised by Macrovision Corporation, and is prohibited. NOTE: PICTURES SHOWN MAY BE DIFFERENT BETWEEN COUNTRIES. Laser Type Wave length Output Power...
... is protected by Macrovision Corporation and other rights owners. The DVD VIDEO player is in conformity with the radio interference requirements of procedures other than herein may result in hazardous radiation exposure or other limited viewing uses only unless otherwise authorised by Macrovision Corporation, and is prohibited. NOTE: PICTURES SHOWN MAY BE DIFFERENT BETWEEN COUNTRIES. Laser Type Wave length Output Power...
User manual
Page 5
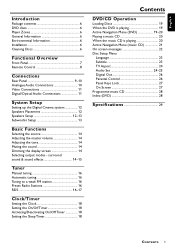
...Package contents 6 DVD discs 6 Player Zones 6 General Information 6 Environmental Information 6 Installation 6 Cleaning Discs 6 Functional Overview Front Panel 7 Remote Control 8 Connections Rear Panel 9-10 Analogue Audio Connections 10 Video Connections 11 Digital/Optical Audio Connections 11 System Setup Setting up the Digital Cinema system 12 Speakers Placement 12 Speakers Setup 12-13 Subwoofer Setup 13 Basic Functions Selecting the source 14 Adjusting the master volume 14 Adjusting the tone 14 Muting the sound 14 Dimming the display screen 14 Selecting output modes -
...Package contents 6 DVD discs 6 Player Zones 6 General Information 6 Environmental Information 6 Installation 6 Cleaning Discs 6 Functional Overview Front Panel 7 Remote Control 8 Connections Rear Panel 9-10 Analogue Audio Connections 10 Video Connections 11 Digital/Optical Audio Connections 11 System Setup Setting up the Digital Cinema system 12 Speakers Placement 12 Speakers Setup 12-13 Subwoofer Setup 13 Basic Functions Selecting the source 14 Adjusting the master volume 14 Adjusting the tone 14 Muting the sound 14 Dimming the display screen 14 Selecting output modes -
User manual
Page 6
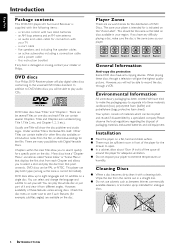
... on the "Zone Label". DVD discs allow up to search quickly for analogue discs. 6 INTRODUCTION The zone your player to separate into three materials: cardboard (box), polystyrene foam (buffer) and polyethylene (bags, protective foam sheet). English Introduction Package contents This DVD/CD player-AV Surround Receiver is the featue film itself. Installation q Place the player on the disc. this instruction booklet If any difficulty playing a disc, make the packaging easy...
... on the "Zone Label". DVD discs allow up to search quickly for analogue discs. 6 INTRODUCTION The zone your player to separate into three materials: cardboard (box), polystyrene foam (buffer) and polyethylene (bags, protective foam sheet). English Introduction Package contents This DVD/CD player-AV Surround Receiver is the featue film itself. Installation q Place the player on the disc. this instruction booklet If any difficulty playing a disc, make the packaging easy...
User manual
Page 7
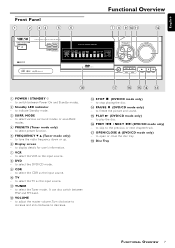
.... 6 Display screen - Turn clockwise to increase and anti-clockwise to the previous or next chapter/track. & OPEN/CLOSE 0 (DVD/CD mode only) - English Front Panel 1 2 34 56 POWER /STANDBY DVD /CD PLAYER- to skip to decrease. # STOP Ç (DVD/CD mode only) - DIGITAL AV SURROUND RECEIVER PRESETS FREQUENCYv SURR. to select the VCR as the input source. 0 TV - to select preset function. 5 FREQUENCY 4 3 (Tuner mode only) - MODE FREQUENCY v DIGITAL CINEMA CENTER Functional Overview 7 8 9 0! @ SOURCE SELECT CDR TV DVD VCR TUNER VOLUME OPEN/CLOSE PREV NEXT PLAY...
.... 6 Display screen - Turn clockwise to increase and anti-clockwise to the previous or next chapter/track. & OPEN/CLOSE 0 (DVD/CD mode only) - English Front Panel 1 2 34 56 POWER /STANDBY DVD /CD PLAYER- to skip to decrease. # STOP Ç (DVD/CD mode only) - DIGITAL AV SURROUND RECEIVER PRESETS FREQUENCYv SURR. to select the VCR as the input source. 0 TV - to select preset function. 5 FREQUENCY 4 3 (Tuner mode only) - MODE FREQUENCY v DIGITAL CINEMA CENTER Functional Overview 7 8 9 0! @ SOURCE SELECT CDR TV DVD VCR TUNER VOLUME OPEN/CLOSE PREV NEXT PLAY...
User manual
Page 8
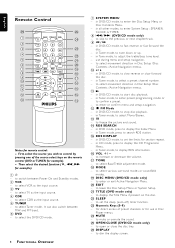
...in Tuner mode, to adjust the treble/bass tone level. - to select various surround modes or soundfield modes. ( DISC MENU (DVD/CD mode only) - to increase or decrease the volume. & TONE - in Tone mode, to display RDS information. ^ VOL +/- - in DVD/CD mode, to tune down or up. - in Tuner mode, to enter the Disc Setup Menu or Disc Contents Menu. - to select a preset channel number. - in Tuner mode, to select TV as the input source. 3 TV - to select movement direction in Tuner mode, to enter preset programming mode or to star t disc playback. - in Disc Setup /Disc...
...in Tuner mode, to adjust the treble/bass tone level. - to select various surround modes or soundfield modes. ( DISC MENU (DVD/CD mode only) - to increase or decrease the volume. & TONE - in Tone mode, to display RDS information. ^ VOL +/- - in DVD/CD mode, to tune down or up. - in Tuner mode, to enter the Disc Setup Menu or Disc Contents Menu. - to select a preset channel number. - in Tuner mode, to select TV as the input source. 3 TV - to select movement direction in Tuner mode, to enter preset programming mode or to star t disc playback. - in Disc Setup /Disc...

User manual
Page 9
... source. 6 2 AUDIO IN For connecting analogue (Left/Right) audio signals from the AV CONNECTOR to your TV. 6 VIDEO OUT For connecting to the wall outlet, ensure that has a digital COAXIAL IN terminal. The type plate is received. Position the loop antenna to the FM terminal. VCR - REC - Never make or change any connections with VIDEO IN terminals for viewing or recording. Move the antenna in DVD/CD mode only) Digital Coaxial Output...
... source. 6 2 AUDIO IN For connecting analogue (Left/Right) audio signals from the AV CONNECTOR to your TV. 6 VIDEO OUT For connecting to the wall outlet, ensure that has a digital COAXIAL IN terminal. The type plate is received. Position the loop antenna to the FM terminal. VCR - REC - Never make or change any connections with VIDEO IN terminals for viewing or recording. Move the antenna in DVD/CD mode only) Digital Coaxial Output...

User manual
Page 11
CONNECTIONS 11 To convert the digital multichannel signal into a stereo signal, following settings have to 2 audio channel (see page 26) Note: - Digital recording is not possible when the digital source material is copy-protected. In "Audio Set", set to a CD-R. In "Digital Out", set to be used to record digitally a multichannel surround sound audio signal (Dolby Digital or DTS) to PCM (see page 25) - English Video Connections Digital/Optical Audio Connections Recording from the digital output The digital output can be activated in the Disc Setup Menu : -
CONNECTIONS 11 To convert the digital multichannel signal into a stereo signal, following settings have to 2 audio channel (see page 26) Note: - Digital recording is not possible when the digital source material is copy-protected. In "Audio Set", set to a CD-R. In "Digital Out", set to be used to record digitally a multichannel surround sound audio signal (Dolby Digital or DTS) to PCM (see page 25) - English Video Connections Digital/Optical Audio Connections Recording from the digital output The digital output can be activated in the Disc Setup Menu : -
User manual
Page 12
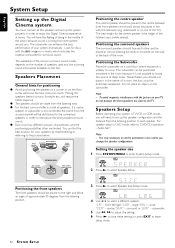
... to enjoy the Digital Cinema experience at the back of speakers used and the incoming sound information available on the subwoofer. Nevertheless, you change the speaker configuration. For speaker setup in order to occur. Audio Set". subwoofer. 5 Use à / á to adjust the setting. 6 Press £ to save these settings or press EXIT to "DVD/CD operation - The subwoofer can enhance the bass performance of deep tones. Placing the speakers behind curtains, furniture...
... to enjoy the Digital Cinema experience at the back of speakers used and the incoming sound information available on the subwoofer. Nevertheless, you change the speaker configuration. For speaker setup in order to occur. Audio Set". subwoofer. 5 Use à / á to adjust the setting. 6 Press £ to save these settings or press EXIT to "DVD/CD operation - The subwoofer can enhance the bass performance of deep tones. Placing the speakers behind curtains, furniture...
User manual
Page 13
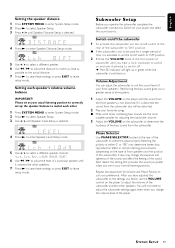
.... 2 Play your normal listening position. Reinforcing the bass sound gives you desire, use the VOLUME control on the player to adjust the volume of the subwoofer and the other . 1 Press SYSTEM MENU to enter System Setup mode. 2 Press £ to select Speaker Setup. 3 Use ( / ) until Speaker Level Setup is selected. 4 Press £ to enter Speaker Level Setup mode. 5 Use ( / ) to select a different speaker channel : "Lch, Cch, Rch, LSUR, RSUR, SUB". 6 Use à / á to adjust the level of the subwoofer). q Male vocal tunes containing bass sounds are...
.... 2 Play your normal listening position. Reinforcing the bass sound gives you desire, use the VOLUME control on the player to adjust the volume of the subwoofer and the other . 1 Press SYSTEM MENU to enter System Setup mode. 2 Press £ to select Speaker Setup. 3 Use ( / ) until Speaker Level Setup is selected. 4 Press £ to enter Speaker Level Setup mode. 5 Use ( / ) to select a different speaker channel : "Lch, Cch, Rch, LSUR, RSUR, SUB". 6 Use à / á to adjust the level of the subwoofer). q Male vocal tunes containing bass sounds are...
User manual
Page 14
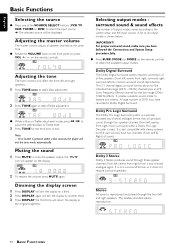
... the system setup and the input source. Selecting output modes surround sound & sound effects The number of all speaker channels at the same time. This 5.1 channel digital surround format allows for five individual full-range (20Hz - 20kHz) channels plus an LFE (Low Frequency Effects) channel for correct surround sound reproduction. q Rotate the VOLUME knob on the remote control). Dolby Digital Surround The Dolby Digital Surround system requires connection of output modes varies according to theatre and cinema. If no button is used. Dolby Pro Logic Surround The Dolby Pro...
... the system setup and the input source. Selecting output modes surround sound & sound effects The number of all speaker channels at the same time. This 5.1 channel digital surround format allows for five individual full-range (20Hz - 20kHz) channels plus an LFE (Low Frequency Effects) channel for correct surround sound reproduction. q Rotate the VOLUME knob on the remote control). Dolby Digital Surround The Dolby Digital Surround system requires connection of output modes varies according to theatre and cinema. If no button is used. Dolby Pro Logic Surround The Dolby Pro...
User manual
Page 16
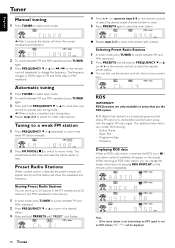
... DISPLAY on the remote control repeatedly. RDS functions are only available in areas that allows FM stations to hear. Selecting Preset Radio Stations 1 In tuner mode, press TUNER to switch between FM and MW waveband. 2 Press FREQUENCY 4 or 3 to tune in the weak FM station manually. 2 Press FM MODE (Ç) to switch to activate auto tuning mode. ➜ When a station is selected, the preset number will appear shortly and the display will show the waveband and frequency. RDS (Radio...
... DISPLAY on the remote control repeatedly. RDS functions are only available in areas that allows FM stations to hear. Selecting Preset Radio Stations 1 In tuner mode, press TUNER to switch between FM and MW waveband. 2 Press FREQUENCY 4 or 3 to tune in the weak FM station manually. 2 Press FM MODE (Ç) to switch to activate auto tuning mode. ➜ When a station is selected, the preset number will appear shortly and the display will show the waveband and frequency. RDS (Radio...
User manual
Page 18
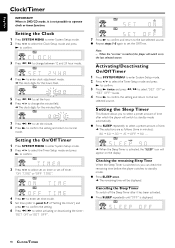
... Clock Setup mode and press £ to confirm. 3 Press à / á to change between 12 and 24 hour mode. 4 Press £ to enter clock adjustment mode. ➜ The clock digits for the hours flash. 5 Press à / á to set the hour. 6 Press ( / ) to change the minute field. ➜ The clock digits for the minutes flash. 7 Press à / á to operate clock or timer function...
... Clock Setup mode and press £ to confirm. 3 Press à / á to change between 12 and 24 hour mode. 4 Press £ to enter clock adjustment mode. ➜ The clock digits for the hours flash. 5 Press à / á to set the hour. 6 Press ( / ) to change the minute field. ➜ The clock digits for the minutes flash. 7 Press à / á to operate clock or timer function...
User manual
Page 19
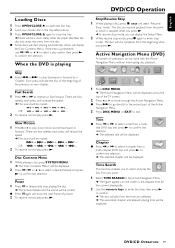
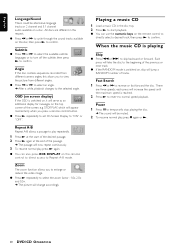
...; The sound will be displayed. DVD/CD OPERATION 19 English DVD/CD Operation Loading Discs 1 Press OPEN/CLOSE 0 to open the disc tray. 2 Load your chosen disc in the Active Navigation Menu. ➜ The figure appears on the screen is playing Stop/Resume Stop 1 While playing a disc, press Ç once will be displayed. q Some discs will start playback from a multi-chapter DVD disc and press £ to temporarily stop mode. There are...
...; The sound will be displayed. DVD/CD OPERATION 19 English DVD/CD Operation Loading Discs 1 Press OPEN/CLOSE 0 to open the disc tray. 2 Load your chosen disc in the Active Navigation Menu. ➜ The figure appears on the screen is playing Stop/Resume Stop 1 While playing a disc, press Ç once will be displayed. q Some discs will start playback from a multi-chapter DVD disc and press £ to temporarily stop mode. There are...
User manual
Page 20
...; to select the available subtitle languages or to turn off the subtitle, then press £ to normal speed playback. When the music CD is reached. 2 Press £ to revert to confirm. English Language/Sound There could be muted. 2 To resume normal play, pressÅagain or £. 20 DVD/CD OPERATION Zoom The zoom function allows you press a remote control button.
...; to select the available subtitle languages or to turn off the subtitle, then press £ to normal speed playback. When the music CD is reached. 2 Press £ to revert to confirm. English Language/Sound There could be muted. 2 To resume normal play, pressÅagain or £. 20 DVD/CD OPERATION Zoom The zoom function allows you press a remote control button.
User manual
Page 22
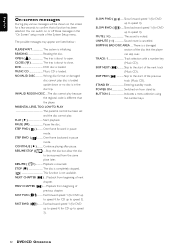
... disc cannot play because the regional code is initialising. PLAY Start playback. RESUME STOP ( )...Stop the disc but allow the disc to be shown on the screen for a few seconds to speed 3). FAST BWD Fast backward speed 1 (for DVD up to speed 4, for DVD up to confirm that the player can switch on from stand by. TRACK: 1 Track selection with a number key (Music CD). BUTTON: 2 Indicates a menu selection using...
... disc cannot play because the regional code is initialising. PLAY Start playback. RESUME STOP ( )...Stop the disc but allow the disc to be shown on the screen for a few seconds to speed 3). FAST BWD Fast backward speed 1 (for DVD up to speed 4, for DVD up to confirm that the player can switch on from stand by. TRACK: 1 Track selection with a number key (Music CD). BUTTON: 2 Indicates a menu selection using...
User manual
Page 26
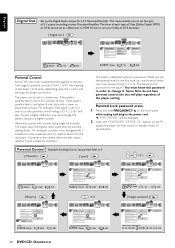
... level will play. However, in a similar way. This becomes the password for a 5.1 Receiver/Decoder. The player plays the highest rated scene that generally is from 1 to change the player's rating to your Dolby & DTS decoders. [ Digital out ] Parental Control Some DVD discs have parental control, the disc will play a higher rated disc, you to set to the disc. Parental Lock password erase 1 Press and hold FREQUENCY 3 on the front panel while unplug and plug...
... level will play. However, in a similar way. This becomes the password for a 5.1 Receiver/Decoder. The player plays the highest rated scene that generally is from 1 to change the player's rating to your Dolby & DTS decoders. [ Digital out ] Parental Control Some DVD discs have parental control, the disc will play a higher rated disc, you to set to the disc. Parental Lock password erase 1 Press and hold FREQUENCY 3 on the front panel while unplug and plug...
User manual
Page 29
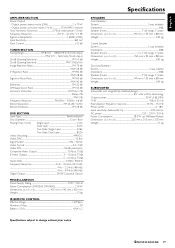
English AMPLIFIER SECTION Power Output - Output power, surround mode (1 kHz 70 W RMS / channel Total Harmonic Distortion 0.7% at rated power (1 kHz) Frequency Response 20 Hz - 20 kHz / ±1 dB Signal-to-Noise Ratio 65dB (CCIR) Input Sensitivity ...460 mV Tone Control ...±12 dB TUNER SECTION Tuning Range FM 87.50 - 108.00 MHz (50 kHz steps MW 531 - 1602 kHz (9 kHz steps) 26 dB Quieting Sensitivity FM...
English AMPLIFIER SECTION Power Output - Output power, surround mode (1 kHz 70 W RMS / channel Total Harmonic Distortion 0.7% at rated power (1 kHz) Frequency Response 20 Hz - 20 kHz / ±1 dB Signal-to-Noise Ratio 65dB (CCIR) Input Sensitivity ...460 mV Tone Control ...±12 dB TUNER SECTION Tuning Range FM 87.50 - 108.00 MHz (50 kHz steps MW 531 - 1602 kHz (9 kHz steps) 26 dB Quieting Sensitivity FM...


