
User manual
Page 1
Register your product and get support at www.philips.com/welcome CD645 EN Digital Cordless Telephone ! Charge each handset for 24 hours before use. Warning Use only rechargeable batteries.
Register your product and get support at www.philips.com/welcome CD645 EN Digital Cordless Telephone ! Charge each handset for 24 hours before use. Warning Use only rechargeable batteries.
User manual
Page 4
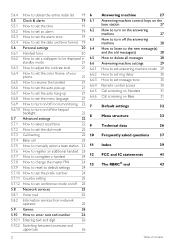
... station 23 11 5.7.6 How to register an additional handset 23 5.7.7 How to unregister a handset 24 12 5.7.8 How to change the master PIN 5.7.9 How to reset to default settings 24 13 24 5.7.10 How to set the prefix number 24 5.7.11 Country setting 25 5.7.12 How to set conference mode on/off 25 5.8 Network services...
... station 23 11 5.7.6 How to register an additional handset 23 5.7.7 How to unregister a handset 24 12 5.7.8 How to change the master PIN 5.7.9 How to reset to default settings 24 13 24 5.7.10 How to set the prefix number 24 5.7.11 Country setting 25 5.7.12 How to set conference mode on/off 25 5.8 Network services...

User manual
Page 13
... telephone line cord supplied with the unit. 3 Getting started 3.3 Place the handset on the charging cradle of the base station. 2 Leave it for at least 24 hours before plugging the line cord to the line socket. 3.2 Install rechargeable batteries Your CD645 is to the electricity socket. This can impair the range...
... telephone line cord supplied with the unit. 3 Getting started 3.3 Place the handset on the charging cradle of the base station. 2 Leave it for at least 24 hours before plugging the line cord to the line socket. 3.2 Install rechargeable batteries Your CD645 is to the electricity socket. This can impair the range...
User manual
Page 15
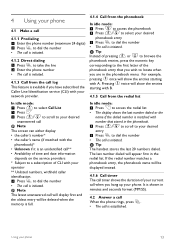
... providers * Subject to a subscription of the phonebook entry that stored in the redial list. 4 Using your phone 4.1 Make a call 4.1.1 Predialing 1 Enter the phone number (maximum 24 digits) 2 Press r to dial the number • The call is initiated. 4.1.2 Direct dialing 1 Press r to take the line 2 Enter the phone number • The call...
... providers * Subject to a subscription of the phonebook entry that stored in the redial list. 4 Using your phone 4.1 Make a call 4.1.1 Predialing 1 Enter the phone number (maximum 24 digits) 2 Press r to dial the number • The call is initiated. 4.1.2 Direct dialing 1 Press r to take the line 2 Enter the phone number • The call...
User manual
Page 18
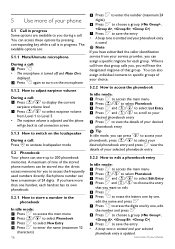
...progress. The available options are available to 200 phonebook memories. Use more of your selected phonebook entry is saved. Note If you have a maximum of 24 digits. 5 Use more of your phone 5.1 Call in progress Some options are : 5.1.1 Mute/Unmute microphone During a call: 1 Press > •... u/d to select Phonebook 3 Press < to select New Entry 4 Press < to enter the name (maximum 12 characters) 16 5 Press < to enter the number (maximum 24 digits) 6 Press < to choose a group (, , , ) 7 Press < to save the entry • A beep tone is emitted and your phonebook entry is updated...
...progress. The available options are available to 200 phonebook memories. Use more of your selected phonebook entry is saved. Note If you have a maximum of 24 digits. 5 Use more of your phone 5.1 Call in progress Some options are : 5.1.1 Mute/Unmute microphone During a call: 1 Press > •... u/d to select Phonebook 3 Press < to select New Entry 4 Press < to enter the name (maximum 12 characters) 16 5 Press < to enter the number (maximum 24 digits) 6 Press < to choose a group (, , , ) 7 Press < to save the entry • A beep tone is emitted and your phonebook entry is updated...

User manual
Page 20
... choose the format for all received numbers. 5.4.1 How to access the call log You can store the last 20 numbers your phone Only the first 24 digits of your have dialed. You can then make a call with alternate dialing sequences. Warning Call back from the call log In idle mode: 1 2 Press...
... choose the format for all received numbers. 5.4.1 How to access the call log You can store the last 20 numbers your phone Only the first 24 digits of your have dialed. You can then make a call with alternate dialing sequences. Warning Call back from the call log In idle mode: 1 2 Press...

User manual
Page 21
... < to access the main menu 2 Press u/d to select Clock & Alarm 3 Press < to select Set Date/Time 4 Press < to enter the current time (hh:mm) in 24 hour format and the current date (dd/ mm/yy) Note To change the date and time format, see Section 5.6.4. 5 Press < to save the settings 5.5.2 How...
... < to access the main menu 2 Press u/d to select Clock & Alarm 3 Press < to select Set Date/Time 4 Press < to enter the current time (hh:mm) in 24 hour format and the current date (dd/ mm/yy) Note To change the date and time format, see Section 5.6.4. 5 Press < to save the settings 5.5.2 How...

User manual
Page 25
... 2, Number 3, Number 4) 7 Press < to enter the number 8 Press < to save the settings 5.7.5 How to manually select a base station One CD645 handset can register up to 24 digits for baby call number. 5.7.4.1 How to activate baby call mode 1 Press < to access the main menu 2 Press u/d to select Advanced Set 3 Press < and u/d to...
... 2, Number 3, Number 4) 7 Press < to enter the number 8 Press < to save the settings 5.7.5 How to manually select a base station One CD645 handset can register up to 24 digits for baby call number. 5.7.4.1 How to activate baby call mode 1 Press < to access the main menu 2 Press u/d to select Advanced Set 3 Press < and u/d to...

User manual
Page 26
... < to access the main menu 2 Press u/d to select Advanced Set 3 Press < and u/d to select Change PIN 4 Press < to enter the 4-digit master PIN when prompted 24 5 Press < to enter the new 4-digit PIN 6 Press < to enter the new 4-digit PIN again for setting call log entries will be deleted, but your...
... < to access the main menu 2 Press u/d to select Advanced Set 3 Press < and u/d to select Change PIN 4 Press < to enter the 4-digit master PIN when prompted 24 5 Press < to enter the new 4-digit PIN 6 Press < to enter the new 4-digit PIN again for setting call log entries will be deleted, but your...
User manual
Page 38
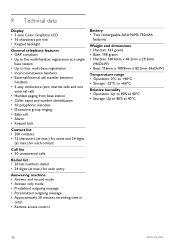
... • Distinctive group ringing • Baby call • Alarm • Keypad lock Contact list • 200 contacts • 12 characters (at max.) for name and 24 digits (at max.) for each contact Call list • 50 unanswered calls Redial list • 20 last numbers dialed •...; 24 digits (at max.) for each entry Answering machine • Answer and record mode • Answer only mode • Predefined outgoing message • Personalized outgoing message &#...
... • Distinctive group ringing • Baby call • Alarm • Keypad lock Contact list • 200 contacts • 12 characters (at max.) for name and 24 digits (at max.) for each contact Call list • 50 unanswered calls Redial list • 20 last numbers dialed •...; 24 digits (at max.) for each entry Answering machine • Answer and record mode • Answer only mode • Predefined outgoing message • Personalized outgoing message &#...

User manual
Page 39
...• Use only the SUPPLIED RECHARGEABLE BATTERIES. Reset the phone: unplug and plug back in the mains. • Charge the batteries for at least 24 hours • Move closer to the base station • Use the line cable provided • Connect the line adaptor (when needed) to the ...sure the supplied batteries are charged up Caller ID does not work properly. • Check with your phone. ENGLISH 10 Frequently asked questions www.philips.com/support In this chapter you will switch on charger. The appears soon after the batteries are charged. • Replace the batteries with new...
...• Use only the SUPPLIED RECHARGEABLE BATTERIES. Reset the phone: unplug and plug back in the mains. • Charge the batteries for at least 24 hours • Move closer to the base station • Use the line cable provided • Connect the line adaptor (when needed) to the ...sure the supplied batteries are charged up Caller ID does not work properly. • Check with your phone. ENGLISH 10 Frequently asked questions www.philips.com/support In this chapter you will switch on charger. The appears soon after the batteries are charged. • Replace the batteries with new...
User manual
Page 41
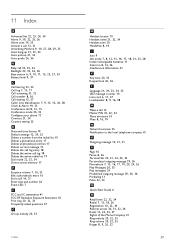
... 21 Answering Machine 9, 10, 27, 28, 29, 35 Auto hang-up 21, 32, 34 Auto pick-up 21, 34 Auto prefix 24, 34 B Baby call 23, 32, 34 Backlight 22, 32, 34, 36 Base station 6, 9, 10, 11, 15, 23, 27...32 Configure your phone 12 Contrast 21, 34 Country setting 25 D Date and time format 19 Default settings 12, 24, 32 Delete a number from the redial list 19 Delete a phonebook entry 17 Delete all phonebook entries 17 Delete...34 Redial 7, 13, 18, 36 Registration 10, 23, 34 Remote access 30, 31, 32, 36 Reset 12, 24, 34, 37 Rights of the Phone Company 41 Ring melody 20, 32, 33 Ring volume 20, 32, 33 Ringer 8, 9, ...
... 21 Answering Machine 9, 10, 27, 28, 29, 35 Auto hang-up 21, 32, 34 Auto pick-up 21, 34 Auto prefix 24, 34 B Baby call 23, 32, 34 Backlight 22, 32, 34, 36 Base station 6, 9, 10, 11, 15, 23, 27...32 Configure your phone 12 Contrast 21, 34 Country setting 25 D Date and time format 19 Default settings 12, 24, 32 Delete a number from the redial list 19 Delete a phonebook entry 17 Delete all phonebook entries 17 Delete...34 Redial 7, 13, 18, 36 Registration 10, 23, 34 Remote access 30, 31, 32, 36 Reset 12, 24, 34, 37 Rights of the Phone Company 41 Ring melody 20, 32, 33 Ring volume 20, 32, 33 Ringer 8, 9, ...

User manual
Page 42
S Save a redial list entry 19 Stop message playback 10, 31 Store a number in the phonebook 16 Switch call 8 T Text 26 Tone 11, 14, 15, 16, 17, 19, 20, 22, 23, 30, 31, 32, 33, 34, 35 Transfer the phonebook 17 U Unmute 16, 22 Unregister 24, 34, 37 V Voice mail 9, 17, 35 40 Index
S Save a redial list entry 19 Stop message playback 10, 31 Store a number in the phonebook 16 Switch call 8 T Text 26 Tone 11, 14, 15, 16, 17, 19, 20, 22, 23, 30, 31, 32, 33, 34, 35 Transfer the phonebook 17 U Unmute 16, 22 Unregister 24, 34, 37 V Voice mail 9, 17, 35 40 Index
Quick start guide
Page 3
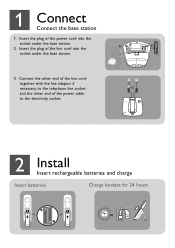
Insert the plug of the power cord into the socket under the base station. 2. Insert the plug of the line cord into the socket under the base station. 3. 1 Connect Connect the base station 1. Connect the other end of the line cord together with the line adaptor if necessary, to the telephone line socket and the other end of the power cable to the electricity socket. 1 2 3 2 Install Insert rechargeable batteries and charge Insert batteries Charge handset for 24 hours
Insert the plug of the power cord into the socket under the base station. 2. Insert the plug of the line cord into the socket under the base station. 3. 1 Connect Connect the base station 1. Connect the other end of the line cord together with the line adaptor if necessary, to the telephone line socket and the other end of the power cable to the electricity socket. 1 2 3 2 Install Insert rechargeable batteries and charge Insert batteries Charge handset for 24 hours

Quick start guide
Page 5
... select Personal Set and / to select Wallpaper and / to scroll to your desired phonebook entry to select New Entry 4. Press to enter the number (maximum 24 digits) 6. Press 2.
... select Personal Set and / to select Wallpaper and / to scroll to your desired phonebook entry to select New Entry 4. Press to enter the number (maximum 24 digits) 6. Press 2.

Quick start guide
Page 6
...information, see the user manual that came with your CD640 or CD645. Press to delete the current message See CD645 user manual for at least 24 hours ● Move closer to the base station ● Use the line cable provided in the box ● Move closer to replay ...batteries are charged up Caller Line Identification (CLI) service does not work ● Check your subscription with your network operator Need help www.philips.com/support Press to go back to previous message if it is pressed after one metre away from any electrical appliances The is pressed within...
...information, see the user manual that came with your CD640 or CD645. Press to delete the current message See CD645 user manual for at least 24 hours ● Move closer to the base station ● Use the line cable provided in the box ● Move closer to replay ...batteries are charged up Caller Line Identification (CLI) service does not work ● Check your subscription with your network operator Need help www.philips.com/support Press to go back to previous message if it is pressed after one metre away from any electrical appliances The is pressed within...