
Leaflet
Page 2
...; Digital Auto Tracking • Auto Play • Auto Repeat • Auto Rewind • Auto Eject • Auto Power Off UPC: 037849880296 Product Dimensions: 15.2"W x 15.8"H x 14.8"D Product weight: 27.5 lbs. KID Design 981198, Philips Consumer Electronics Co. Program dialogue and narrative material is stored indefinitely in both SP and SLP speeds. Automatic Channel Setup Activating this menu-driven feature will also reset the clock after a power failure.The menu-driven time zone feature allows selection of appropriate time for direct...
...; Digital Auto Tracking • Auto Play • Auto Repeat • Auto Rewind • Auto Eject • Auto Power Off UPC: 037849880296 Product Dimensions: 15.2"W x 15.8"H x 14.8"D Product weight: 27.5 lbs. KID Design 981198, Philips Consumer Electronics Co. Program dialogue and narrative material is stored indefinitely in both SP and SLP speeds. Automatic Channel Setup Activating this menu-driven feature will also reset the clock after a power failure.The menu-driven time zone feature allows selection of appropriate time for direct...
User manual
Page 3
...-Savings Time • Index Search • 19 micron head, improves the picture quality during playback of SLP tapes • On-Screen displays in English or Spanish • On-Screen Menu Programming, accessible with remote control or front panel buttons • One-Touch Recording • Remote Control with capability to operate a Cable Box or Direct Broadcast System • Remote Locator • Repeat Play • Skip Search • Sleep Timer • SmartClockTM • SmartLockTM • Smart Picture • Timer Recording • VCR Plus+ Programming System...
...-Savings Time • Index Search • 19 micron head, improves the picture quality during playback of SLP tapes • On-Screen displays in English or Spanish • On-Screen Menu Programming, accessible with remote control or front panel buttons • One-Touch Recording • Remote Control with capability to operate a Cable Box or Direct Broadcast System • Remote Locator • Repeat Play • Skip Search • Sleep Timer • SmartClockTM • SmartLockTM • Smart Picture • Timer Recording • VCR Plus+ Programming System...

User manual
Page 4
... Channel Setup 10-11 Setting the Clock 12-17 Daylight-Savings Time 18 Time Zone 19 Setting the Remote to Operate a Cable Box/DBS 20-21 Description of Controls Front Panel 22 Rear Panel 23 Remote Control Buttons 24-25 Adjusting the Picture Controls 26-27 On-Screen Status Displays 28 Basic Operations Playing 29 Recording 30 Recording Options One-Touch Recording 31 Rerecording (Tape Duplication 32 Defeat Recording 33 Timer Recording 34-37 Setting Up the VCR Plus+ Programming System 38-39 Timer Recording...
... Channel Setup 10-11 Setting the Clock 12-17 Daylight-Savings Time 18 Time Zone 19 Setting the Remote to Operate a Cable Box/DBS 20-21 Description of Controls Front Panel 22 Rear Panel 23 Remote Control Buttons 24-25 Adjusting the Picture Controls 26-27 On-Screen Status Displays 28 Basic Operations Playing 29 Recording 30 Recording Options One-Touch Recording 31 Rerecording (Tape Duplication 32 Defeat Recording 33 Timer Recording 34-37 Setting Up the VCR Plus+ Programming System 38-39 Timer Recording...

User manual
Page 5
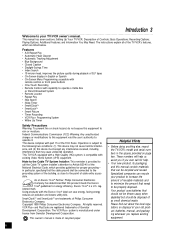
..., then pulling up the lid. 2 2 Place three AA batteries inside the battery compartment with the mark. However, the video heads will eventually require cleaning or replacement. TV/VCR Maintenance q In this service. q Periodic maintenance is required to operate the Cable Box/DBS. The use only tapes with their + and - Before Using the TV/VCR 5 Putting Batteries in the Remote Control 1 1 Remove the battery compartment lid on notes are supplied. • Do not...
..., then pulling up the lid. 2 2 Place three AA batteries inside the battery compartment with the mark. However, the video heads will eventually require cleaning or replacement. TV/VCR Maintenance q In this service. q Periodic maintenance is required to operate the Cable Box/DBS. The use only tapes with their + and - Before Using the TV/VCR 5 Putting Batteries in the Remote Control 1 1 Remove the battery compartment lid on notes are supplied. • Do not...

User manual
Page 8
.... CONNECT ANTENNA OR CABLE TO TVCR POWER EJECT SLEEP/WAKE UP SPEED REC/OTR MEMORY PAUSE/STILL REW MENU PLAY STOP F.FWD STATUS/EXIT CLEAR 4 1 2 3 CH. 4 5 6 7 8 9 A.CH CABLE/DBS 0 COMBI VOL. Then the TV/VCR will go to the lowest channel programmed. (If you are using a Cable Box. • Line Input mode will appear. You may need to follow the steps on pages nine-10 to select a language and set , CHANNELS...
.... CONNECT ANTENNA OR CABLE TO TVCR POWER EJECT SLEEP/WAKE UP SPEED REC/OTR MEMORY PAUSE/STILL REW MENU PLAY STOP F.FWD STATUS/EXIT CLEAR 4 1 2 3 CH. 4 5 6 7 8 9 A.CH CABLE/DBS 0 COMBI VOL. Then the TV/VCR will go to the lowest channel programmed. (If you are using a Cable Box. • Line Input mode will appear. You may need to follow the steps on pages nine-10 to select a language and set , CHANNELS...
User manual
Page 9
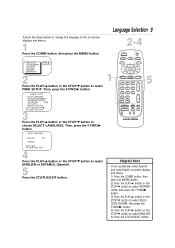
PRIMARY SETUP > SELECT LANGUAGE AUTO PROGRAMMING CH MEMORY REVIEW VOLUME BAR [ON] SET CLOCK REMOTE LOCATOR SELECT KL CHOOSE B TO END PRESS EXIT 3 Press the PLAY/v button or the STOP/w button to select ENGLISH or ESPAÑOL (Spanish). 5 Press the STATUS/EXIT button. 2-4 1 POWER EJECT SLEEP/WAKE UP SPEED REC/OTR MEMORY PAUSE/STILL REW MENU PLAY STOP F.FWD STATUS/EXIT CLEAR 1 2 3 CH. 4 5 6 7 8 9 A.CH CABLE/DBS 0 COMBI VOL. Then, press...
PRIMARY SETUP > SELECT LANGUAGE AUTO PROGRAMMING CH MEMORY REVIEW VOLUME BAR [ON] SET CLOCK REMOTE LOCATOR SELECT KL CHOOSE B TO END PRESS EXIT 3 Press the PLAY/v button or the STOP/w button to select ENGLISH or ESPAÑOL (Spanish). 5 Press the STATUS/EXIT button. 2-4 1 POWER EJECT SLEEP/WAKE UP SPEED REC/OTR MEMORY PAUSE/STILL REW MENU PLAY STOP F.FWD STATUS/EXIT CLEAR 1 2 3 CH. 4 5 6 7 8 9 A.CH CABLE/DBS 0 COMBI VOL. Then, press...
User manual
Page 12
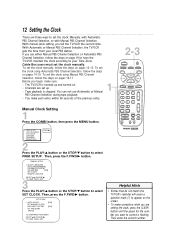
... STOP/w button to select SET CLOCK. To set the clock manually. Then enter the correct number. Cable Box users must set the clock manually, follow the steps on pages 12-13. PRIMARY SETUP > SELECT LANGUAGE AUTO PROGRAMMING CH MEMORY REVIEW VOLUME BAR [ON] SET CLOCK REMOTE LOCATOR SELECT KL CHOOSE B TO END PRESS EXIT 3 Press the PLAY/v button or the STOP/w button to select PRIM. SET CLOCK > AUTO CLOCK SET MANUAL CLOCK DAYLIGHT SVG.TIME SET TIME ZONE [AUTO] [ON] [ON] TO CONTINUE PRESS MENU SELECT...
... STOP/w button to select SET CLOCK. To set the clock manually. Then enter the correct number. Cable Box users must set the clock manually, follow the steps on pages 12-13. PRIMARY SETUP > SELECT LANGUAGE AUTO PROGRAMMING CH MEMORY REVIEW VOLUME BAR [ON] SET CLOCK REMOTE LOCATOR SELECT KL CHOOSE B TO END PRESS EXIT 3 Press the PLAY/v button or the STOP/w button to select PRIM. SET CLOCK > AUTO CLOCK SET MANUAL CLOCK DAYLIGHT SVG.TIME SET TIME ZONE [AUTO] [ON] [ON] TO CONTINUE PRESS MENU SELECT...

User manual
Page 24
... display the pop up menu. SPEED Button Press to fast forward past 30 seconds of the TV/VCR to play a tape. Details are on page 46. Press to select channels 100 and above, enter channel numbers as a two-digit number for the quickest results. MENU Button Press to adjust the tracking. TRACKING m/n Button Press during playback to select the recording speed (SP or SLP). Number Buttons Use to select channels and to set the Wake Up Timer. PLAY/v Button...
... display the pop up menu. SPEED Button Press to fast forward past 30 seconds of the TV/VCR to play a tape. Details are on page 46. Press to select channels 100 and above, enter channel numbers as a two-digit number for the quickest results. MENU Button Press to adjust the tracking. TRACKING m/n Button Press during playback to select the recording speed (SP or SLP). Number Buttons Use to select channels and to set the Wake Up Timer. PLAY/v Button...

User manual
Page 25
... page 46. POWER EJECT SLEEP/WAKE UP SPEED REC/OTR MEMORY PAUSE/STILL REW MENU PLAY STOP F.FWD STATUS/EXIT CLEAR 1 2 3 CH. 4 5 6 7 8 9 A.CH CABLE/DBS 0 COMBI VOL. press the CABLE/DBS button before pressing other Cable Box/DBS buttons. • The buttons with the VCR Plus+ programming system. Details are on page 28. MEMORY Button Press to memorize a tape position at which the real-time counter was set a timer recording with a shaded...
... page 46. POWER EJECT SLEEP/WAKE UP SPEED REC/OTR MEMORY PAUSE/STILL REW MENU PLAY STOP F.FWD STATUS/EXIT CLEAR 1 2 3 CH. 4 5 6 7 8 9 A.CH CABLE/DBS 0 COMBI VOL. press the CABLE/DBS button before pressing other Cable Box/DBS buttons. • The buttons with the VCR Plus+ programming system. Details are on page 28. MEMORY Button Press to memorize a tape position at which the real-time counter was set a timer recording with a shaded...

User manual
Page 32
... source unit (VCR or camcorder) will record your tape. Copying will turn on automatically. 4 Point the TV/VCR remote control at the TV/VCR. If playback begins, press the STOP button on the unit. 3 The TV/VCR will play your tape. 32 Rerecording (Tape Duplication) AUDIO and VIDEO OUT Jacks on source unit (VCR or Camcorder) VIDEO AUDIO OUT IN Audio Cable (white) from AUDIO OUT to AUDIO EARPHONE AUDIO VIDEO STOP/EJECT Video Cable (yellow) from VIDEO OUT to VIDEO 1 Make the connections shown above, using audio and video cables. (Make...
... source unit (VCR or camcorder) will record your tape. Copying will turn on automatically. 4 Point the TV/VCR remote control at the TV/VCR. If playback begins, press the STOP button on the unit. 3 The TV/VCR will play your tape. 32 Rerecording (Tape Duplication) AUDIO and VIDEO OUT Jacks on source unit (VCR or Camcorder) VIDEO AUDIO OUT IN Audio Cable (white) from AUDIO OUT to AUDIO EARPHONE AUDIO VIDEO STOP/EJECT Video Cable (yellow) from VIDEO OUT to VIDEO 1 Make the connections shown above, using audio and video cables. (Make...
User manual
Page 34
....SLOW VCR PLUS+ /ENTER MUTE TRACKING F.ADV SLOW SMART PICTURE SKIP INDEX SEARCH SEARCH Helpful Hints • If the power fails, programmed timer recordings will turn itself automatically if you begin, make sure: q The clock is reset. (The clock will record the same channel on page 33. Details are on any day you are using the AUTO CLOCK feature, reset the clock manually. The TV/VCR will be restored when the clock is set. q There is a tape...
....SLOW VCR PLUS+ /ENTER MUTE TRACKING F.ADV SLOW SMART PICTURE SKIP INDEX SEARCH SEARCH Helpful Hints • If the power fails, programmed timer recordings will turn itself automatically if you begin, make sure: q The clock is reset. (The clock will record the same channel on page 33. Details are on any day you are using the AUTO CLOCK feature, reset the clock manually. The TV/VCR will be restored when the clock is set. q There is a tape...

User manual
Page 35
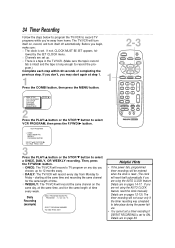
... EXIT 7 Follow the instructions in step 6 to change. Then use the Number buttons to select another position. 5 Use the Number buttons to enter the channel of the TV program at the Cable Box and leave the Cable Box on the item you want to set automatically.) ONE TIME PROGRAM PROGRAM 1 CHANNEL 10 TIME ON 09:30 PM TIME OFF - - : - - ONE TIME PROGRAM PROGRAM 1 CHANNEL - - - 4-7 POWER EJECT SLEEP/WAKE UP SPEED REC/OTR MEMORY PAUSE/STILL REW MENU PLAY STOP F.FWD STATUS...
... EXIT 7 Follow the instructions in step 6 to change. Then use the Number buttons to select another position. 5 Use the Number buttons to enter the channel of the TV program at the Cable Box and leave the Cable Box on the item you want to set automatically.) ONE TIME PROGRAM PROGRAM 1 CHANNEL 10 TIME ON 09:30 PM TIME OFF - - : - - ONE TIME PROGRAM PROGRAM 1 CHANNEL - - - 4-7 POWER EJECT SLEEP/WAKE UP SPEED REC/OTR MEMORY PAUSE/STILL REW MENU PLAY STOP F.FWD STATUS...

User manual
Page 36
... year will not be displayed automatically. (You cannot program the TV/VCR to record more Helpful Hints. VAR.SLOW VCR PLUS+ /ENTER MUTE TRACKING F.ADV SLOW SMART PICTURE SKIP INDEX SEARCH SEARCH 9 ONE TIME PROGRAM PROGRAM 1 CHANNEL 10 TIME ON 09:30 PM TIME OFF 11:00 PM REC SPEED SLP START DATE 07/10/99 SATURDAY Turn off the TV/VCR, PLEASE TURN OFF FOR TIMER RECORDING appears on the screen. Details about tape speed...
... year will not be displayed automatically. (You cannot program the TV/VCR to record more Helpful Hints. VAR.SLOW VCR PLUS+ /ENTER MUTE TRACKING F.ADV SLOW SMART PICTURE SKIP INDEX SEARCH SEARCH 9 ONE TIME PROGRAM PROGRAM 1 CHANNEL 10 TIME ON 09:30 PM TIME OFF 11:00 PM REC SPEED SLP START DATE 07/10/99 SATURDAY Turn off the TV/VCR, PLEASE TURN OFF FOR TIMER RECORDING appears on the screen. Details about tape speed...
User manual
Page 40
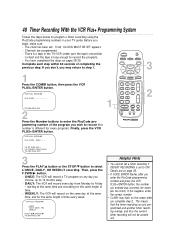
... within 60 seconds of time every week. VCR PLUS+ PROGRAM PLUS CODE : 95557 - - - 1 POWER EJECT SLEEP/WAKE UP SPEED REC/OTR MEMORY PAUSE/STILL REW MENU PLAY STOP F.FWD STATUS/EXIT CLEAR 1 2 3 CH. 4 5 6 7 8 9 A.CH CABLE/DBS 0 COMBI VOL. q Channels are on pages 38-39. 40 Timer Recording With the VCR Plus+ Programming System Follow the steps below to step 1. 1 Press the COMBI button, then press the VCR PLUS+/ENTER button. VCR PLUS+ PROGRAM >ONCE DAILY (MON...
... within 60 seconds of time every week. VCR PLUS+ PROGRAM PLUS CODE : 95557 - - - 1 POWER EJECT SLEEP/WAKE UP SPEED REC/OTR MEMORY PAUSE/STILL REW MENU PLAY STOP F.FWD STATUS/EXIT CLEAR 1 2 3 CH. 4 5 6 7 8 9 A.CH CABLE/DBS 0 COMBI VOL. q Channels are on pages 38-39. 40 Timer Recording With the VCR Plus+ Programming System Follow the steps below to step 1. 1 Press the COMBI button, then press the VCR PLUS+/ENTER button. VCR PLUS+ PROGRAM >ONCE DAILY (MON...

User manual
Page 50
... REVIEW EXIT PRIM. SETUP VCR PROGRAM VCR SETUP PRESS B 2 Press the PLAY/v button or the STOP/w button to select CHANGE CODE. After you connect the power cord to enter your desired access code in the Confirm Code space. Then, press the F.FWD/B button. You will appear. New Code _ ___ Confirm Code _ _ _ _ 6 Press the STATUS/EXIT button. 1 2,4 POWER EJECT SLEEP/WAKE UP SPEED REC/OTR MEMORY PAUSE/STILL REW MENU PLAY STOP F.FWD STATUS/EXIT CLEAR 1 2 3 CH. 4 5 6 7 8 9 A.CH CABLE...
... REVIEW EXIT PRIM. SETUP VCR PROGRAM VCR SETUP PRESS B 2 Press the PLAY/v button or the STOP/w button to select CHANGE CODE. After you connect the power cord to enter your desired access code in the Confirm Code space. Then, press the F.FWD/B button. You will appear. New Code _ ___ Confirm Code _ _ _ _ 6 Press the STATUS/EXIT button. 1 2,4 POWER EJECT SLEEP/WAKE UP SPEED REC/OTR MEMORY PAUSE/STILL REW MENU PLAY STOP F.FWD STATUS/EXIT CLEAR 1 2 3 CH. 4 5 6 7 8 9 A.CH CABLE...

User manual
Page 58
... settings. SPORTS MOVIE WEAK SIGNAL VIDEO GAMES TV RESET Use to watch a sports program. Use to watch a movie. Use when the picture is weak; The following options will remain on screen. Use to reset the picture controls to their original settings. 1 Press the SMART PICTURE button repeatedly until the Smart Picture mode you to improve the picture when the antenna/cable signal is weak. to improve the TV/VCR's picture when viewing sports, a movie, or video games; Use when playing a video...
... settings. SPORTS MOVIE WEAK SIGNAL VIDEO GAMES TV RESET Use to watch a sports program. Use to watch a movie. Use when the picture is weak; The following options will remain on screen. Use to reset the picture controls to their original settings. 1 Press the SMART PICTURE button repeatedly until the Smart Picture mode you to improve the picture when the antenna/cable signal is weak. to improve the TV/VCR's picture when viewing sports, a movie, or video games; Use when playing a video...

User manual
Page 63
... play ) - slowest tape speed (recording time for a T120 tape is approximately two hours); channels 14-69). • Cable - a feature in which the TV/VCR scans all standard channels can be received without a Cable Box. OTR: One-Touch Recording; Sharpness: adjusting softens or clarifies the picture on the screen. Glossary 63 VHF (very high frequency; channels 2-13) and UHF (ultra high frequency; average tape speed; Line Input: The channel to which provides enhanced picture detail. Mode: a TV/VCR operation. Picture: adjusting...
... play ) - slowest tape speed (recording time for a T120 tape is approximately two hours); channels 14-69). • Cable - a feature in which the TV/VCR scans all standard channels can be received without a Cable Box. OTR: One-Touch Recording; Sharpness: adjusting softens or clarifies the picture on the screen. Glossary 63 VHF (very high frequency; channels 2-13) and UHF (ultra high frequency; average tape speed; Line Input: The channel to which provides enhanced picture detail. Mode: a TV/VCR operation. Picture: adjusting...

User manual
Page 64
... seven). • Check your TV/VCR. There is displayed on (but do not play a tape in a TV/VCR in your hookups (pages six-seven). • Set up the channels (page 10). This will not perform a timer recording. • Make sure the recording start and stop times are using the AUTO CLOCK feature, reset the clock manually. Midnight is moved from direct sunlight and keep the TV/VCR power on the back of your product...
... seven). • Check your TV/VCR. There is displayed on (but do not play a tape in a TV/VCR in your hookups (pages six-seven). • Set up the channels (page 10). This will not perform a timer recording. • Make sure the recording start and stop times are using the AUTO CLOCK feature, reset the clock manually. Midnight is moved from direct sunlight and keep the TV/VCR power on the back of your product...

User manual
Page 65
... between the remote control and the TV/VCR. • Inspect and replace the batteries in the remote control. Refer to Play in your TV/VCR, keep the power on the TV/VCR power, then eject the tape. Details are on page five. Details are on page 28. • Make sure closed captions. • Make sure COUNTER ONLY is set to program a timer recording) using the front panel buttons. Number buttons won't work for the program. Details are...
... between the remote control and the TV/VCR. • Inspect and replace the batteries in the remote control. Refer to Play in your TV/VCR, keep the power on the TV/VCR power, then eject the tape. Details are on page five. Details are on page 28. • Make sure closed captions. • Make sure COUNTER ONLY is set to program a timer recording) using the front panel buttons. Number buttons won't work for the program. Details are...

User manual
Page 67
... status display 28 status/exit button 25, 28 still picture 46 stop/p button 25 stop/eject button 22 super high speed searching . . .46 super long play 30, 63 table of contents 4 tape duplication 32 speed 30, 63 time setting 12-17 zone 19 timer recording cancelling 37 reviewing 37 setting 34-36 with vcr plus+ programming system 40-41 tint, adjusting 26-27 tracking 57 var.slow button 25, 46 vcr plus+ /enter button 25, 40 programming system...
... status display 28 status/exit button 25, 28 still picture 46 stop/p button 25 stop/eject button 22 super high speed searching . . .46 super long play 30, 63 table of contents 4 tape duplication 32 speed 30, 63 time setting 12-17 zone 19 timer recording cancelling 37 reviewing 37 setting 34-36 with vcr plus+ programming system 40-41 tint, adjusting 26-27 tracking 57 var.slow button 25, 46 vcr plus+ /enter button 25, 40 programming system...


