
Leaflet
Page 1
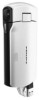
...; 3" touch-screen for smooth and intuitive control • Flash, auto focus, face & smile detection Share your favorite photos and videos effortlessly • Integrated USB plug for no-fuss connection to your PC/Mac • Instant video editor for simple editing on the camcorder • Dual format recording for full HD and email-friendly formats • Quick sharing for viewing your pocket • Extra long battery...
...; 3" touch-screen for smooth and intuitive control • Flash, auto focus, face & smile detection Share your favorite photos and videos effortlessly • Integrated USB plug for no-fuss connection to your PC/Mac • Instant video editor for simple editing on the camcorder • Dual format recording for full HD and email-friendly formats • Quick sharing for viewing your pocket • Extra long battery...
Leaflet
Page 2
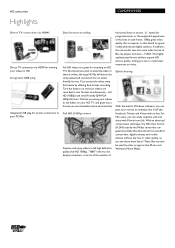
... is superior to your PC/Mac Dual format recording Full HD videos are recorded in typical mobile phones and digital cameras. HD camcorder Highlights CAM295WH/00 Direct TV connection via HDMI Direct TV connection via HDMI for viewing your videos in HD Integrated USB plug Integrated USB plug for no fuss. This lets you enjoy your videos to the display resolution, in video quality, so you can also...
... is superior to your PC/Mac Dual format recording Full HD videos are recorded in typical mobile phones and digital cameras. HD camcorder Highlights CAM295WH/00 Direct TV connection via HDMI Direct TV connection via HDMI for viewing your videos in HD Integrated USB plug Integrated USB plug for no fuss. This lets you enjoy your videos to the display resolution, in video quality, so you can also...
Leaflet
Page 3
... exposure control movies, cut video Battery • Type: Li-ion Battery • Life: 120 Minutes • Charge Time: 3.5 hrs. via HDMI • Speaker: Built-in flip-out USB (USB2.0) • Audio-out: via adaptor, 5.5 hrs. www.philips.com Trademarks are subject to YouTube, upload button for websites, upload button for email • Video Editing: add titles, music and credits, create Accessories included • Quick Start Guide • Philips Arcsoft Software: . •...
... exposure control movies, cut video Battery • Type: Li-ion Battery • Life: 120 Minutes • Charge Time: 3.5 hrs. via HDMI • Speaker: Built-in flip-out USB (USB2.0) • Audio-out: via adaptor, 5.5 hrs. www.philips.com Trademarks are subject to YouTube, upload button for websites, upload button for email • Video Editing: add titles, music and credits, create Accessories included • Quick Start Guide • Philips Arcsoft Software: . •...
User manual
Page 1
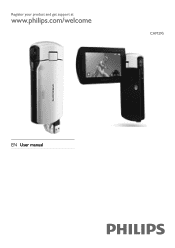
Register your product and get support at www.philips.com/welcome CAM295 EN User manual
Register your product and get support at www.philips.com/welcome CAM295 EN User manual
User manual
Page 3
Contents 1 Important 4 Safety 4 Notice 4 2 Your camcorder 5 Introduction 5 What's in the box 5 Functional overview 6 3 Get started 8 Load the Micro SD card 8 Turn on 8 First-time setup 8 Charge the built-in battery 9 4 Use your camcorder 10 Record video 10 Take pictures 10 Play 10 Adjust settings 12 5 Use more of your camcorder 13 View video or pictures on TV 13 Install and use the camcorder software 13 6 Technical specifications 15 7 Frequently asked questions (FAQ) 16 EN 3
Contents 1 Important 4 Safety 4 Notice 4 2 Your camcorder 5 Introduction 5 What's in the box 5 Functional overview 6 3 Get started 8 Load the Micro SD card 8 Turn on 8 First-time setup 8 Charge the built-in battery 9 4 Use your camcorder 10 Record video 10 Take pictures 10 Play 10 Adjust settings 12 5 Use more of your camcorder 13 View video or pictures on TV 13 Install and use the camcorder software 13 6 Technical specifications 15 7 Frequently asked questions (FAQ) 16 EN 3
User manual
Page 4
.... k Apparatus shall not be exposed to qualified service personnel. liquid filled objects, lighted candles). 1 Important Safety a Read these instructions. f Clean only with the manufacturer's instructions. Install in any sources of danger on separate collection of your old product helps to operate the equipment. j Refer all servicing to dripping or splashing. Servicing is required when the apparatus has been damaged...
.... k Apparatus shall not be exposed to qualified service personnel. liquid filled objects, lighted candles). 1 Important Safety a Read these instructions. f Clean only with the manufacturer's instructions. Install in any sources of danger on separate collection of your old product helps to operate the equipment. j Refer all servicing to dripping or splashing. Servicing is required when the apparatus has been damaged...

User manual
Page 5
... or pictures either directly or on the large screen of the camcorder. Always bring your product to a professional to the Internet directly via your PC/Mac What's in the box Make sure that the following items are located at the USB arm of a connected TV • upload the recorded movies or pictures to remove the built-in the box: • Camcorder • Quick start guide...
... or pictures either directly or on the large screen of the camcorder. Always bring your product to a professional to the Internet directly via your PC/Mac What's in the box Make sure that the following items are located at the USB arm of a connected TV • upload the recorded movies or pictures to remove the built-in the box: • Camcorder • Quick start guide...
User manual
Page 6
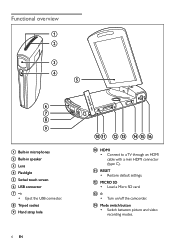
Functional overview a b c d e f g h i a Built-in microphones b Built-in speaker c Lens d Flashlight e Swivel touch screen f USB connector g • Eject the USB connector. l MICRO SD • Load a Micro SD card. h Tripod socket i Hand strap hole 6 EN jk l m n o p j HDMI • Connect to a TV through an HDMI cable with a mini HDMI connector (type C). n Mode switch button • Switch between picture and video recording modes. m • Turn on/off the camcorder. k RESET • Restore default settings.
Functional overview a b c d e f g h i a Built-in microphones b Built-in speaker c Lens d Flashlight e Swivel touch screen f USB connector g • Eject the USB connector. l MICRO SD • Load a Micro SD card. h Tripod socket i Hand strap hole 6 EN jk l m n o p j HDMI • Connect to a TV through an HDMI cable with a mini HDMI connector (type C). n Mode switch button • Switch between picture and video recording modes. m • Turn on/off the camcorder. k RESET • Restore default settings.

User manual
Page 7
p T/W • In viewfinder mode, zoom in/out. • During video play mode, switch to viewfinder mode. EN 7 o Shutter button • In viewfinder mode, take a picture or start/stop video recording. • In play , change the volume.
p T/W • In viewfinder mode, zoom in/out. • During video play mode, switch to viewfinder mode. EN 7 o Shutter button • In viewfinder mode, take a picture or start/stop video recording. • In play , change the volume.
User manual
Page 8
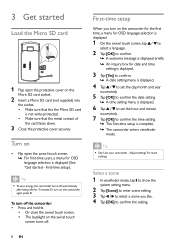
... date setting. »» A time setting menu is displayed. 6 Tap / to set the hour and minute successively. 7 Tap [OK] to confirm the setting. 8 EN Turn on • Flip open the protective cover on the camcorder again, press . Adjust settings' for more settings. First-time setup). Tip •• See 'Use your camcorder - 3 Get started Load the Micro SD card 1 Flap open the swivel touch screen. »» For first-time users, a menu for...
... date setting. »» A time setting menu is displayed. 6 Tap / to set the hour and minute successively. 7 Tap [OK] to confirm the setting. 8 EN Turn on • Flip open the protective cover on the camcorder again, press . Adjust settings' for more settings. First-time setup). Tip •• See 'Use your camcorder - 3 Get started Load the Micro SD card 1 Flap open the swivel touch screen. »» For first-time users, a menu for...

User manual
Page 9
... mode, tap to show the system setting menu. 2 Tap [Effects] to enter scene setting. 3 Tap / to select a special effect you like. 4 Tap [OK] to a USB socket on a PC. »» The status indicator on the shutter button starts flashing in orange. Charge the built-in battery is fully charged for media play media files in the camcorder through direct USB connection. •• Rechargeable batteries have a limited number of charge cycles. Battery...
... mode, tap to show the system setting menu. 2 Tap [Effects] to enter scene setting. 3 Tap / to select a special effect you like. 4 Tap [OK] to a USB socket on a PC. »» The status indicator on the shutter button starts flashing in orange. Charge the built-in battery is fully charged for media play media files in the camcorder through direct USB connection. •• Rechargeable batteries have a limited number of charge cycles. Battery...

User manual
Page 10
... camcorder Record video 1 Adjust the swivel touch screen to start recording. »» A red time indicator is displayed briefly. Play 1 In viewfinder mode, tap on the swivel touch screen to enter play mode. »» The last recorded media is played automatically. 2 Swipe to the left/rights to select a picture or video clip for play. 3 If the selected file is a video clip, tap in /out if necessary. 6 Press the shutter button again to end recording. »» [Recording...
... camcorder Record video 1 Adjust the swivel touch screen to start recording. »» A red time indicator is displayed briefly. Play 1 In viewfinder mode, tap on the swivel touch screen to enter play mode. »» The last recorded media is played automatically. 2 Swipe to the left/rights to select a picture or video clip for play. 3 If the selected file is a video clip, tap in /out if necessary. 6 Press the shutter button again to end recording. »» [Recording...

User manual
Page 11
... to set the starting point you want . 5 Tap [Preview] to preview the edited video clip. 6 After confirmation, tap[Save] to save the edited video clip as a new file. Delete a file 1 In play mode, swipe to the left/right on the swivel touch screen to select a recorded video clip. 2 Tap to enter the trim window. »» A bar for confirmation. Trim a video clip Note •• Only video files not recorded with 'Dual recording' can...
... to set the starting point you want . 5 Tap [Preview] to preview the edited video clip. 6 After confirmation, tap[Save] to save the edited video clip as a new file. Delete a file 1 In play mode, swipe to the left/right on the swivel touch screen to select a recorded video clip. 2 Tap to enter the trim window. »» A bar for confirmation. Trim a video clip Note •• Only video files not recorded with 'Dual recording' can...
User manual
Page 12
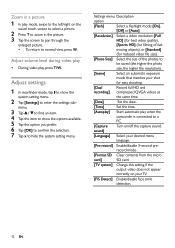
... time. [Autoplay] Start automatic play , press T/W. Zoom in a picture 1 In play mode, swipe to the left/right on the swivel touch screen to select a picture. 2 Press T to zoom in the picture. 3 Tap the screen to pan through the enlarged picture. • To return to enter the settings sub- record mode. [Format SD Clear contents from the micro card] SD card. [TV system] Change this setting if the output video...
... time. [Autoplay] Start automatic play , press T/W. Zoom in a picture 1 In play mode, swipe to the left/right on the swivel touch screen to select a picture. 2 Press T to zoom in the picture. 3 Tap the screen to pan through the enlarged picture. • To return to enter the settings sub- record mode. [Format SD Clear contents from the micro card] SD card. [TV system] Change this setting if the output video...
User manual
Page 13
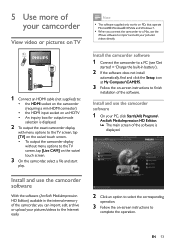
... the internal memory of the camcorder, you connect the camcorder to a Mac, use the iMovie software to finish installation of the software. Install and use the camcorder software With the software (ArcSoft MediaImpression HD Edition) available in battery'). 2 If the software does not install automatically, find and click the Setup icon at My Computer\CAM295. 3 Follow the on-screen instructions to import and edit your pictures/ videos directly. 5 Use more of...
... the internal memory of the camcorder, you connect the camcorder to a Mac, use the iMovie software to finish installation of the software. Install and use the camcorder software With the software (ArcSoft MediaImpression HD Edition) available in battery'). 2 If the software does not install automatically, find and click the Setup icon at My Computer\CAM295. 3 Follow the on-screen instructions to import and edit your pictures/ videos directly. 5 Use more of...

User manual
Page 14
Transfer video/pictures to a PC/Mac 1 Connect the camcorder to a PC/Mac (see 'Get started' > 'Charge the built-in battery'). »» It may take some time for Mac). 14 EN Tip •• You can also import the video/picture files with the camcorder software (for PC) or iMovie (for the PC/Mac to recognize the camcorder. 2 Find your video/pictures at My Computer\CAM295\DCIM\100MEDIA or My Computer\CAM295 SD\ DCIM\100MEDIA. 3 Copy any video/pictures you want to your designated folder in the PC/Mac.
Transfer video/pictures to a PC/Mac 1 Connect the camcorder to a PC/Mac (see 'Get started' > 'Charge the built-in battery'). »» It may take some time for Mac). 14 EN Tip •• You can also import the video/picture files with the camcorder software (for PC) or iMovie (for the PC/Mac to recognize the camcorder. 2 Find your video/pictures at My Computer\CAM295\DCIM\100MEDIA or My Computer\CAM295 SD\ DCIM\100MEDIA. 3 Copy any video/pictures you want to your designated folder in the PC/Mac.
User manual
Page 15
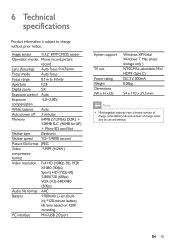
...) Audio file format AAC Battery 1100mAh Li-ion (built- Battery life and number of charge cycles. Image sensor 1/3.2" 8MP CMOS sensor Operation modes Movie record, picture record Lens (focusing) Auto focus f=4.76mm Focus mode Auto focus Focus range 0.1m to change without prior notice. in); *120-minute battery life time based on 720P recording PC interface Mini USB 2.0 port System support TV out Power rating Weight Dimensions (W x H x D) Windows XP/Vista/ Windows 7, Mac (mass...
...) Audio file format AAC Battery 1100mAh Li-ion (built- Battery life and number of charge cycles. Image sensor 1/3.2" 8MP CMOS sensor Operation modes Movie record, picture record Lens (focusing) Auto focus f=4.76mm Focus mode Auto focus Focus range 0.1m to change without prior notice. in); *120-minute battery life time based on 720P recording PC interface Mini USB 2.0 port System support TV out Power rating Weight Dimensions (W x H x D) Windows XP/Vista/ Windows 7, Mac (mass...
User manual
Page 16
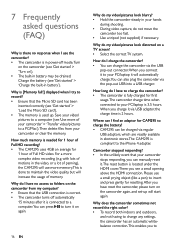
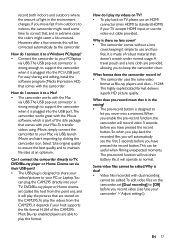
.... Why is [Memory full!] displayed when I have reset the camcorder, please turn it on again. 16 EN Why do my video/pictures look distorted on a TV screen? •• Select the correct TV system. Why do I try to record? •• Ensure that the USB connection is correct. •• The camcorder turns off mode.Turn on the camcorder (see 'Get started' > 'Turn on'). •...
.... Why is [Memory full!] displayed when I have reset the camcorder, please turn it on again. 16 EN Why do my video/pictures look distorted on a TV screen? •• Select the correct TV system. Why do I try to record? •• Ensure that the USB connection is correct. •• The camcorder turns off mode.Turn on the camcorder (see 'Get started' > 'Turn on'). •...
User manual
Page 17
... camcorder works with dual recording cannot be edited.Why is that , and in ? •• The camcorder uses the same video format as normal. EN 17 What format does the camcorder record in extreme cases the colors might need some time to correct that ? •• Video files recorded with the Mac via their USB-port? •• The USB plug is designed to share your videos/pictures...
... camcorder works with dual recording cannot be edited.Why is that , and in ? •• The camcorder uses the same video format as normal. EN 17 What format does the camcorder record in extreme cases the colors might need some time to correct that ? •• Video files recorded with the Mac via their USB-port? •• The USB plug is designed to share your videos/pictures...

User manual
Page 18
... will be hard to follow what is captured when you review the video • Try shooting from below.You can easily look back on video making •• You can easily join the different video segments together with the camcorder.To enjoy these memories to the fullest, here are some simple video tips: • When capturing videos, hold your camcorder...
... will be hard to follow what is captured when you review the video • Try shooting from below.You can easily look back on video making •• You can easily join the different video segments together with the camcorder.To enjoy these memories to the fullest, here are some simple video tips: • When capturing videos, hold your camcorder...


