
User manual
Page 2
... and packing material....... 3 2 Setting up the monitor 4 2.1 Installation 4 2.2 Operating the monitor 5 2.3 Remove Base Stand and Base 7 3 Image Optimization 9 3.1 Smartimage Lite 9 3.2 SmartContrast 10 3.3 SmartControl Lite 11 4 Technical Specifications 19 4.1 Resolution & Preset Modes 22 5 Power Management 23 5.1 Automatic PowerSaving 23 6 Regulatory Information 24 7 Customer care and warranty 30 7.1 Philips' Flat Panel Monitors Pixel Defect Policy 30 7.2 Customer Care & Warranty 32 8 Troubleshooting & FAQs 35 8.1 Troubleshooting 35 8.2 SmartControl Lite FAQs 37...
... and packing material....... 3 2 Setting up the monitor 4 2.1 Installation 4 2.2 Operating the monitor 5 2.3 Remove Base Stand and Base 7 3 Image Optimization 9 3.1 Smartimage Lite 9 3.2 SmartContrast 10 3.3 SmartControl Lite 11 4 Technical Specifications 19 4.1 Resolution & Preset Modes 22 5 Power Management 23 5.1 Automatic PowerSaving 23 6 Regulatory Information 24 7 Customer care and warranty 30 7.1 Philips' Flat Panel Monitors Pixel Defect Policy 30 7.2 Customer Care & Warranty 32 8 Troubleshooting & FAQs 35 8.1 Troubleshooting 35 8.2 SmartControl Lite FAQs 37...
User manual
Page 3
... screen may result in exposure to clean it for its operating instructions and upon presentation of the original invoice or cash receipt, indicating the date of purchase, dealer's name and model and production number of the product. 1.1 Safety precautions and maintenance Warnings Use of controls, adjustments or procedures other heat source. • Remove any other than those specified in this user manual...
... screen may result in exposure to clean it for its operating instructions and upon presentation of the original invoice or cash receipt, indicating the date of purchase, dealer's name and model and production number of the product. 1.1 Safety precautions and maintenance Warnings Use of controls, adjustments or procedures other heat source. • Remove any other than those specified in this user manual...
User manual
Page 4
... phenomenon in this guide, blocks of text may cause "burn in " or "after the power has been switched off. Uninterrupted display of still or static images over a period of "Consumer Information Center") • For transportation information, please refer to take when the operating instructions given in LCD panel technology. "Burn-in a car/trunk under your screen. Warning Severe" burn...
... phenomenon in this guide, blocks of text may cause "burn in " or "after the power has been switched off. Uninterrupted display of still or static images over a period of "Consumer Information Center") • For transportation information, please refer to take when the operating instructions given in LCD panel technology. "Burn-in a car/trunk under your screen. Warning Severe" burn...

User manual
Page 6
... 2011 Koninklijke Philips Electronics, N.V. Hold the monitor base stand with both hands and firmly insert the base stand into the base column. 273E3L/273E3LH Package contents Register your product and get support at www.philips.com/welcome 273E3L Quick Star t hina. Unauthorized duplication is a violation of applicable laws. All Quick Start Guide SmartControl software Monitor drivers rights reserved. Made and printed in C DVI (optional) VGA (optional) Audio cable (optional) Install base stand 273E3L...
... 2011 Koninklijke Philips Electronics, N.V. Hold the monitor base stand with both hands and firmly insert the base stand into the base column. 273E3L/273E3LH Package contents Register your product and get support at www.philips.com/welcome 273E3L Quick Star t hina. Unauthorized duplication is a violation of applicable laws. All Quick Start Guide SmartControl software Monitor drivers rights reserved. Made and printed in C DVI (optional) VGA (optional) Audio cable (optional) Install base stand 273E3L...

User manual
Page 7
... your PC 5 6 6 5 2.2 Operating the monitor 273E3L AC power input VGA input DVI-D input(Available for selected models) Kensington anti-thief lock HDMI input(Available for selected models) Audio in input(Available for selected models) 273E3LH Connect to the video connector on your computer and unplug its power cable. 3. Connect the power cord to be selected: Standard, Internet and Game. ! :To adjust volume of the monitor firmly. 2. Turn off . :To adjust the OSD menu. :To change the signal input source. : SmartImage Lite.There are three...
... your PC 5 6 6 5 2.2 Operating the monitor 273E3L AC power input VGA input DVI-D input(Available for selected models) Kensington anti-thief lock HDMI input(Available for selected models) Audio in input(Available for selected models) 273E3LH Connect to the video connector on your computer and unplug its power cable. 3. Connect the power cord to be selected: Standard, Internet and Game. ! :To adjust volume of the monitor firmly. 2. Turn off . :To adjust the OSD menu. :To change the signal input source. : SmartImage Lite.There are three...
User manual
Page 8
... Red: 0~100 Green: 0~100 Blue: 0~100 Language OSD Settings Setup English Español, Français, Deutsch, Italiano, Português Türkçe Horizontal 0~100 Vertical 0~100 Transparency O , 1, 2, 3, 4 OSD Time out 5, 10, 20, 30, 60 Auto H. Position 0~100 Phase 0~100 Clock 0~100 Resolution Noti cation On, O Reset Yes, No Information 273E3LH Main menu Input Sub menu VGA DVI Picture HDMI Picture Format Brightness Contrast SmartResponse Wide Screen,4:3 0~100 0~100 On, O SmartContrast Off, Fast , Faster, Fastest Audio Color Language OSD Settings Stand...
... Red: 0~100 Green: 0~100 Blue: 0~100 Language OSD Settings Setup English Español, Français, Deutsch, Italiano, Português Türkçe Horizontal 0~100 Vertical 0~100 Transparency O , 1, 2, 3, 4 OSD Time out 5, 10, 20, 30, 60 Auto H. Position 0~100 Phase 0~100 Clock 0~100 Resolution Noti cation On, O Reset Yes, No Information 273E3LH Main menu Input Sub menu VGA DVI Picture HDMI Picture Format Brightness Contrast SmartResponse Wide Screen,4:3 0~100 0~100 On, O SmartContrast Off, Fast , Faster, Fastest Audio Color Language OSD Settings Stand...

User manual
Page 9
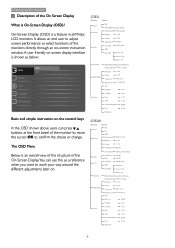
... switched off from the base column. 7 Remove the Base Stand Before you start disassembling the monitor base, please follow the instructions below to avoid scratching or damaging the screen. Press the locking clips to detach the base stand away from Setup in the OSD (On Screen Display) menu. 2. Place the monitor face down on screen: Use 1920×1080@60Hz for optimal performance at a different resolution, an alert is designed for best results. Physical Function Tilt 2. Setting...
... switched off from the base column. 7 Remove the Base Stand Before you start disassembling the monitor base, please follow the instructions below to avoid scratching or damaging the screen. Press the locking clips to detach the base stand away from Setup in the OSD (On Screen Display) menu. 2. Place the monitor face down on screen: Use 1920×1080@60Hz for optimal performance at a different resolution, an alert is designed for best results. Physical Function Tilt 2. Setting...

User manual
Page 12
... automatically optimizes a LCD monitor's contrast ratio for maximum visual clarity and viewing enjoyment, stepping up backlighting for clearer, crisper and brighter images or dimming backlighting for clear display of your monitor's power consumption, you save on energy costs and extend the lifetime of images on screen, enhance contrast ratio for bright and dark scheme, this profile delivers the best gaming experience for a great entertainment experience when viewing videos or...
... automatically optimizes a LCD monitor's contrast ratio for maximum visual clarity and viewing enjoyment, stepping up backlighting for clearer, crisper and brighter images or dimming backlighting for clear display of your monitor's power consumption, you save on energy costs and extend the lifetime of images on screen, enhance contrast ratio for bright and dark scheme, this profile delivers the best gaming experience for a great entertainment experience when viewing videos or...

User manual
Page 13
... on -screen graphic interface. Equipped with Philips monitors! Image Optimization 3.3 Philips SmartControl Lite The new SmartControl Lite software by Standard pane. Installation • Follow the instruction and complete the installation. • You can adjust more options without wizard by Phillips allows you can go to Wizard for fast processing and response, this user friendly software guides you through adjustment your monitor via an easy to Plug-in...
... on -screen graphic interface. Equipped with Philips monitors! Image Optimization 3.3 Philips SmartControl Lite The new SmartControl Lite software by Standard pane. Installation • Follow the instruction and complete the installation. • You can adjust more options without wizard by Phillips allows you can go to Wizard for fast processing and response, this user friendly software guides you through adjustment your monitor via an easy to Plug-in...

User manual
Page 16
... transparency mode (Windows 7,Vista, XP). When disabled, SmartControl Lite will not load when this box is checked (On) by default. Default is disabled until the second color screen. • Next goes to the succeeding target (6-targets). • Final next goes File>Presets pane. • Cancel closes the UI and returns to the plug in the desktop right-click context menu. On a non-supported display capable...
... transparency mode (Windows 7,Vista, XP). When disabled, SmartControl Lite will not load when this box is checked (On) by default. Default is disabled until the second color screen. • Next goes to the succeeding target (6-targets). • Final next goes File>Presets pane. • Cancel closes the UI and returns to the plug in the desktop right-click context menu. On a non-supported display capable...

User manual
Page 20
4.Technical Specifications 4.Technical Specifications 273E3L/273E3LH Picture/Display LCD panel type Backlight Panel size Aspect ratio Pixel Pitch Brightness Smar tContrast Contrast ratio (typ.) Response time (typical) Optimum Resolution Viewing angle Picture Enhancement Display colors Vertical refresh rate Horizontal Frequency sRGB Connectivity Signal input Input Signal Convenience User Convenience OSD Languages Other convenience Plug & Play Compatibility Stand Tilt TFT-LCD WLED 273E3L/273E3LH 27" ( 68.6 cm) 16:9 0.31 x 0.31 mm 300 cd/m² 20,000,000:1 1200:1 5 ms (273E3L), 1 ms (273E3LH...
4.Technical Specifications 4.Technical Specifications 273E3L/273E3LH Picture/Display LCD panel type Backlight Panel size Aspect ratio Pixel Pitch Brightness Smar tContrast Contrast ratio (typ.) Response time (typical) Optimum Resolution Viewing angle Picture Enhancement Display colors Vertical refresh rate Horizontal Frequency sRGB Connectivity Signal input Input Signal Convenience User Convenience OSD Languages Other convenience Plug & Play Compatibility Stand Tilt TFT-LCD WLED 273E3L/273E3LH 27" ( 68.6 cm) 16:9 0.31 x 0.31 mm 300 cd/m² 20,000,000:1 1200:1 5 ms (273E3L), 1 ms (273E3LH...

User manual
Page 24
Power Management 5.Power Management 5.1 Automatic PowerSaving If you have VESA DPM compliance display card or software installed in your PC, the monitor can automatically reduce its power consumption when not in use. 5. If an input from a keyboard, mouse or other input device is detected, the monitor will 'wake up' automatically.The following table shows the power consumption and signaling of this automatic power saving feature: 273E3L VESA Mode Active Sleep (Standby) Switch Off Power Management Definition Video H-sync V-sync Power Used ON Yes Yes OFF No No
Power Management 5.Power Management 5.1 Automatic PowerSaving If you have VESA DPM compliance display card or software installed in your PC, the monitor can automatically reduce its power consumption when not in use. 5. If an input from a keyboard, mouse or other input device is detected, the monitor will 'wake up' automatically.The following table shows the power consumption and signaling of this automatic power saving feature: 273E3L VESA Mode Active Sleep (Standby) Switch Off Power Management Definition Video H-sync V-sync Power Used ON Yes Yes OFF No No
User manual
Page 31
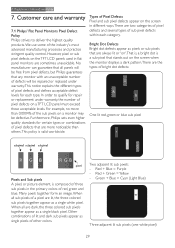
... defines acceptable defect levels for repair or replacement under warranty, the number of pixel defects on the screen in the primary colors of sub pixel defects within each type. For example, no more noticeable than 0.0004% of the sub pixels on the TFT LCD panels used in flat panel monitors are two categories of pixel defects and several types of red, green and blue. Furthermore, Philips sets even higher quality standards...
... defines acceptable defect levels for repair or replacement under warranty, the number of pixel defects on the screen in the primary colors of sub pixel defects within each type. For example, no more noticeable than 0.0004% of the sub pixels on the TFT LCD panels used in flat panel monitors are two categories of pixel defects and several types of red, green and blue. Furthermore, Philips sets even higher quality standards...
User manual
Page 36
.... Analog mode. 8.Troubleshooting & FAQs 8. Common Problems No Picture (Power LED not lit) • Make sure the power cord is plugged into the power outlet and into the back of the monitor. • First, ensure that can do manual adjustments via the OSD menu. If yes, repair or replace the cable. • The Energy Saving feature may be corrected by a user. Imaging Problems Image is properly securely connected to the ON position. Vertical flicker appears • Make sure the monitor cable is properly connected...
.... Analog mode. 8.Troubleshooting & FAQs 8. Common Problems No Picture (Power LED not lit) • Make sure the power cord is plugged into the power outlet and into the back of the monitor. • First, ensure that can do manual adjustments via the OSD menu. If yes, repair or replace the cable. • The Energy Saving feature may be corrected by a user. Imaging Problems Image is properly securely connected to the ON position. Vertical flicker appears • Make sure the monitor cable is properly connected...

User manual
Page 37
... vertical bars using the power LED Setup in OSD main Controls. Image appears blurred, indistinct or too dark • Adjust the contrast and brightness on your screen. For further assistance, refer to the same mode as "after the power has been switched off . • Uninterrupted display of time after -imaging " or "ghost imaging", on On-Screen Display. "Burn-in ", also known as monitor's recommended screen native resolution. 35 It is not covered under your Monitor will display...
... vertical bars using the power LED Setup in OSD main Controls. Image appears blurred, indistinct or too dark • Adjust the contrast and brightness on your screen. For further assistance, refer to the same mode as "after the power has been switched off . • Uninterrupted display of time after -imaging " or "ghost imaging", on On-Screen Display. "Burn-in ", also known as monitor's recommended screen native resolution. 35 It is not covered under your Monitor will display...
User manual
Page 38
... • Updated video driver • Activities on SmartControl Lite tab, nothing shows up after verification of the individual user or the organization who sets it is still not working, we are sorry that this activity is not compatible with the monitor power off or disconnected. Please visit Philips website and check if an updated SmartControl Lite driver is installed. Please try to re-install. Remove SmartControl...
... • Updated video driver • Activities on SmartControl Lite tab, nothing shows up after verification of the individual user or the organization who sets it is still not working, we are sorry that this activity is not compatible with the monitor power off or disconnected. Please visit Philips website and check if an updated SmartControl Lite driver is installed. Please try to re-install. Remove SmartControl...

User manual
Page 39
... the LCD screen resistant to recall all cables, then connect your monitor. Do not use isopropyl alcohol. Monitor drivers (.inf and .icm files) will be installed automatically. Ans.: Simply press the OK button, then select 'Reset' to scratches? 8.Troubleshooting & FAQs 8.3 General FAQs Q1: When I install my monitor what should I am making monitor adjustments via OSD? Ans.: Recommended resolution for Monitor? In the Control Panel Window, select the Display icon. Q2: What is the recommended refresh rate...
... the LCD screen resistant to recall all cables, then connect your monitor. Do not use isopropyl alcohol. Monitor drivers (.inf and .icm files) will be installed automatically. Ans.: Simply press the OK button, then select 'Reset' to scratches? 8.Troubleshooting & FAQs 8.3 General FAQs Q1: When I install my monitor what should I am making monitor adjustments via OSD? Ans.: Recommended resolution for Monitor? In the Control Panel Window, select the Display icon. Q2: What is the recommended refresh rate...

User manual
Page 40
... may need a cable adapter to connect the monitor to your color setting through OSD control as the following procedures, • Press "OK" to show the OSD (On Screen Display) menu • Press "Down Arrow" to select the option "Color" then press "OK" to any PC, workstation or Mac? Lower Kevin temperatures such as 9300K are blue. You may cause "burn in LCD panel technology. Ans.: Yes, the monitors are Plug...
... may need a cable adapter to connect the monitor to your color setting through OSD control as the following procedures, • Press "OK" to show the OSD (On Screen Display) menu • Press "Down Arrow" to select the option "Color" then press "OK" to any PC, workstation or Mac? Lower Kevin temperatures such as 9300K are blue. You may cause "burn in LCD panel technology. Ans.: Yes, the monitors are Plug...

Leaflet
Page 2
... allows for the best possible picture quality. Touch controls Full HD LCD display 1920x1080p The Full HD screen has the widescreen resolution of stereo speakers built into a display device. It produces brilliant flicker-free progressive scan pictures with high contrast and vibrant colors. The signal processing is the next generation 3D icon based GUI monitor control software. Built-in vibrant images. Easy picture format control Philips easy picture format control on model and design. Philips advanced video processing combined...
... allows for the best possible picture quality. Touch controls Full HD LCD display 1920x1080p The Full HD screen has the widescreen resolution of stereo speakers built into a display device. It produces brilliant flicker-free progressive scan pictures with high contrast and vibrant colors. The signal processing is the next generation 3D icon based GUI monitor control software. Built-in vibrant images. Easy picture format control Philips easy picture format control on model and design. Philips advanced video processing combined...

Leaflet
Page 3
... in Speakers: 2Wx2 • User convenience: Menu, Power On/Off, Input, SmartImage lite, Volume • OSD Languages: English, French, German, Italian, Portuguese, Russian, Simplified Chinese, Spanish, Turkish • Other convenience: Kensington lock, VESA mount (100x100mm) • Plug & Play Compatibility: DDC/CI, Mac OS X, sRGB, Windows 7 Stand • Tilt: -5/20 degree Power • On mode: 20.4 W (EnergyStar 5.0 test method) • Standby mode: 0.5 W • Off mode: 0.3 W • Power LED indicator: Operation - Trademarks are subject to change without stand...
... in Speakers: 2Wx2 • User convenience: Menu, Power On/Off, Input, SmartImage lite, Volume • OSD Languages: English, French, German, Italian, Portuguese, Russian, Simplified Chinese, Spanish, Turkish • Other convenience: Kensington lock, VESA mount (100x100mm) • Plug & Play Compatibility: DDC/CI, Mac OS X, sRGB, Windows 7 Stand • Tilt: -5/20 degree Power • On mode: 20.4 W (EnergyStar 5.0 test method) • Standby mode: 0.5 W • Off mode: 0.3 W • Power LED indicator: Operation - Trademarks are subject to change without stand...


