
Leaflet
Page 1
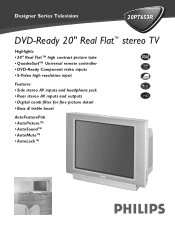
Designer Series Television 20PT653R DVD-Ready 20" Real Flat™ stereo TV Highlights • 20" Real Flat™ high contrast picture tube • QuadraSurf™ Universal remote controller • DVD-Ready Component video inputs • S-Video high resolution input Features • Side stereo AV inputs and headphone jack • Rear stereo AV inputs and outputs • Digital comb filter for fine picture detail • Bass & treble boost AutoFeaturePak • AutoPicture™ • AutoSound™ • AutoMute™ • AutoLock™
Designer Series Television 20PT653R DVD-Ready 20" Real Flat™ stereo TV Highlights • 20" Real Flat™ high contrast picture tube • QuadraSurf™ Universal remote controller • DVD-Ready Component video inputs • S-Video high resolution input Features • Side stereo AV inputs and headphone jack • Rear stereo AV inputs and outputs • Digital comb filter for fine picture detail • Bass & treble boost AutoFeaturePak • AutoPicture™ • AutoSound™ • AutoMute™ • AutoLock™

Leaflet
Page 2
... viewing experience. • 3-Position Color Temperature Customize picture to connect high resolution picture sources like DVD, Digital Satellite & Cable TV and video games consoles for even better detail than standard Video inputs. • Rear stereo AV inputs and outputs Connect a ...automatically adjusted and optimized with these menu-selectable controls. You can also be programmed for use each of Philips Consumer Electronics Company. 20" Designer Series Television 20PT653R Technical specifications Picture Quality • 20" Real Flat™ high contrast picture tube The...
... viewing experience. • 3-Position Color Temperature Customize picture to connect high resolution picture sources like DVD, Digital Satellite & Cable TV and video games consoles for even better detail than standard Video inputs. • Rear stereo AV inputs and outputs Connect a ...automatically adjusted and optimized with these menu-selectable controls. You can also be programmed for use each of Philips Consumer Electronics Company. 20" Designer Series Television 20PT653R Technical specifications Picture Quality • 20" Real Flat™ high contrast picture tube The...

User manual
Page 1
Need help you with any of the Features. See why inside. We can guide you to help ? CALL US BEFORE YOU CONSIDER RETURNING THE PRODUCT. 1-800-531-0039 or Visit us ! Call us on the web at www.philips.com 3121 235 20621 We want you through Connections, First-time Setup, or any questions about your Warranty Registration Card within 10 days. Color TV Directions for Use Important! Return your new product. Philips representatives are ready to start enjoying your new product right away!
Need help you with any of the Features. See why inside. We can guide you to help ? CALL US BEFORE YOU CONSIDER RETURNING THE PRODUCT. 1-800-531-0039 or Visit us ! Call us on the web at www.philips.com 3121 235 20621 We want you through Connections, First-time Setup, or any questions about your Warranty Registration Card within 10 days. Color TV Directions for Use Important! Return your new product. Philips representatives are ready to start enjoying your new product right away!
User manual
Page 4
...dealer or requesting service. END-OF-LIFE DISPOSAL Your new television and its packing contain materials that need to increase the amount of Philips Consumer Electronics Company. Auto Lock, Auto Picture, Auto Sound, QuadraSurf are a few of the features built into your old television,...sound. Not all registered trademarks of reusable materials and minimize the amounts that can be properly disposed. Sleeptimer automatically turns the TV OFF at the Same Time 24 Blocking Programming Based on Movie Ratings 25 Blocking Programming Based on -screen text. Specialized ...
...dealer or requesting service. END-OF-LIFE DISPOSAL Your new television and its packing contain materials that need to increase the amount of Philips Consumer Electronics Company. Auto Lock, Auto Picture, Auto Sound, QuadraSurf are a few of the features built into your old television,...sound. Not all registered trademarks of reusable materials and minimize the amounts that can be properly disposed. Sleeptimer automatically turns the TV OFF at the Same Time 24 Blocking Programming Based on Movie Ratings 25 Blocking Programming Based on -screen text. Specialized ...

User manual
Page 5
...correctly (inside of the remote. 6 Place the batteries (2-AA) in Standby Mode. Power Light Indicator Light will show while the TV is powered on the remote) to see what channel the TV is first turned ON (and with the remote. Note: You can also press the STATUS/EXIT button (on . 1 7 ... in the remote. Sensor for activating remote control commands when the remote is marked.) 1 POWER Remote Sensor - Or to control the TV. P 3 Press the VOLUME button to increase the sound level, or the VOLUME button to lower the sound level. BASIC TELEVISION AND REMOTE CONTROL OPERATION ...
...correctly (inside of the remote. 6 Place the batteries (2-AA) in Standby Mode. Power Light Indicator Light will show while the TV is powered on the remote) to see what channel the TV is first turned ON (and with the remote. Note: You can also press the STATUS/EXIT button (on . 1 7 ... in the remote. Sensor for activating remote control commands when the remote is marked.) 1 POWER Remote Sensor - Or to control the TV. P 3 Press the VOLUME button to increase the sound level, or the VOLUME button to lower the sound level. BASIC TELEVISION AND REMOTE CONTROL OPERATION ...

User manual
Page 6
...Sports (for any sporting event), Weak Signal (used when watching movies). Press repeatedly to choose from the front AV Inputs. Choose from the TV's screen. Press to select channels in the "Quadra Surf" lists. Press to select an accessory signal input from 5 different factory pre-...defined picture settings. MENU Button - Also can be displayed on the TV's screen. Press the VOL - SLEEP Button - Press repeatedly to display the current channel number. Press to select 15, 30, 45, 60, ...
...Sports (for any sporting event), Weak Signal (used when watching movies). Press repeatedly to choose from the front AV Inputs. Choose from the TV's screen. Press to select channels in the "Quadra Surf" lists. Press to select an accessory signal input from 5 different factory pre-...defined picture settings. MENU Button - Also can be displayed on the TV's screen. Press the VOL - SLEEP Button - Press repeatedly to display the current channel number. Press to select 15, 30, 45, 60, ...

User manual
Page 7
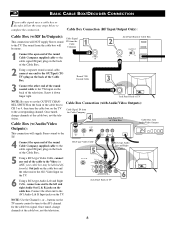
... 75‰ Monitor out AV1 in VIDEO Y L/Mono AUDIO Pb AV2 in R Pr COMPONENT VIDEO INPUT S-VIDEO Jack Panel Back of TV BASIC CABLE TELEVISION CONNECTION Your Cable TV input into the TV's memory, then press the CH + and - to 75-ohm adapter. 2 Push the round end of the adapter (or antenna) onto... because there is very simple. ANT 75‰ Monitor out AV1 in VIDEO Y L/Mono AUDIO Pb AV2 in R Pr COMPONENT VIDEO INPUT S-VIDEO Back of TV c CHECK IT OUT Use the AutoProgram Control to the screws on the back of the round Cable Company supplied cable to the...
... 75‰ Monitor out AV1 in VIDEO Y L/Mono AUDIO Pb AV2 in R Pr COMPONENT VIDEO INPUT S-VIDEO Jack Panel Back of TV BASIC CABLE TELEVISION CONNECTION Your Cable TV input into the TV's memory, then press the CH + and - to 75-ohm adapter. 2 Push the round end of the adapter (or antenna) onto... because there is very simple. ANT 75‰ Monitor out AV1 in VIDEO Y L/Mono AUDIO Pb AV2 in R Pr COMPONENT VIDEO INPUT S-VIDEO Back of TV c CHECK IT OUT Use the AutoProgram Control to the screws on the back of the round Cable Company supplied cable to the...
User manual
Page 8
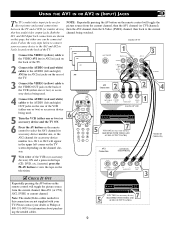
... supplied cable to the cable signal IN(put) plug on the back of the Cable Box. 1 CABLE IN Jack Panel Back of Cable Box 2 TO TV OUTPUT CH 3 4 2 Using a separate round coaxial cable, connect one end to the AV1 Audio L & R Input jacks on the back of the cable to the Video... +, or - Cable Box (w/Audio/Video Cable Signal IN from the cable box will supply Stereo sound to complete the connection. buttons on the back of TV S-VIDEO 6 ANT 75‰ Monitor out AV1 in VIDEO Y L/Mono AUDIO Pb AV2 in R Pr COMPONENT VIDEO INPUT Jack Panel Back of the television. Cable...
... supplied cable to the cable signal IN(put) plug on the back of the Cable Box. 1 CABLE IN Jack Panel Back of Cable Box 2 TO TV OUTPUT CH 3 4 2 Using a separate round coaxial cable, connect one end to the AV1 Audio L & R Input jacks on the back of the cable to the Video... +, or - Cable Box (w/Audio/Video Cable Signal IN from the cable box will supply Stereo sound to complete the connection. buttons on the back of TV S-VIDEO 6 ANT 75‰ Monitor out AV1 in VIDEO Y L/Mono AUDIO Pb AV2 in R Pr COMPONENT VIDEO INPUT Jack Panel Back of the television. Cable...
User manual
Page 9
... Input Jack connections are shown on the channel cho- sen. Both the channel being used. 5 Turn the VCR (either one can be connected BACK OF TV alone. AV1 or AV2 will appear in R Pr COMPONENT VIDEO INPUT 3 S-VIDEO 3 Connect the VIDEO (yellow) cable to the VIDEO OUT jack on the ... OUT VIDEO OUT 3 5 7 VCR TWO (or accessory device) (EQUIPPED WITH VIDEO AND AUDIO OUTPUT JACKS) 9 Follow the easy steps below to connect your dealer or Philips at 800-531-0039 for information about purchasing the needed for this page, but either one or two) or accessory device and the...
... Input Jack connections are shown on the channel cho- sen. Both the channel being used. 5 Turn the VCR (either one can be connected BACK OF TV alone. AV1 or AV2 will appear in R Pr COMPONENT VIDEO INPUT 3 S-VIDEO 3 Connect the VIDEO (yellow) cable to the VIDEO OUT jack on the ... OUT VIDEO OUT 3 5 7 VCR TWO (or accessory device) (EQUIPPED WITH VIDEO AND AUDIO OUTPUT JACKS) 9 Follow the easy steps below to connect your dealer or Philips at 800-531-0039 for information about purchasing the needed for this page, but either one or two) or accessory device and the...
User manual
Page 10
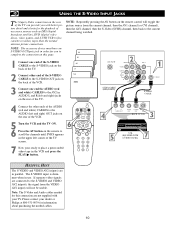
... AUDIO (left and right) OUT jacks on the rear of the VCR. 5 Turn the VCR and the TV ON. 6 6 Press the AV button on the remote to scroll the channels until SVHS appears VOL in the... upper left and right) jacks on the rear of the TV. NOTE: Repeatedly pressing the AV button on the remote control will toggle the picture source from the...(red and white) CABLES to the AV2 in AUDIO L and R(left corner of the TV screen. 7 Now your dealer or Philips at 800-531-0039 for information about purchasing the needed for this connection are not supplied ...
... AUDIO (left and right) OUT jacks on the rear of the VCR. 5 Turn the VCR and the TV ON. 6 6 Press the AV button on the remote to scroll the channels until SVHS appears VOL in the... upper left and right) jacks on the rear of the TV. NOTE: Repeatedly pressing the AV button on the remote control will toggle the picture source from the...(red and white) CABLES to the AV2 in AUDIO L and R(left corner of the TV screen. 7 Now your dealer or Philips at 800-531-0039 for information about purchasing the needed for this connection are not supplied ...
User manual
Page 11
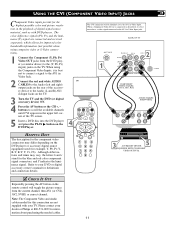
... the upper left and right) output jacks on the rear of the accessory device to the Audio (L and R) AV1 in Input Jacks on the TV. 3 Turn the TV and the DVD (or digital accessory device) ON. 4 Press the AV button or the CH +, - CVI 4 HELPFUL HINT VOL The description...(Y) signal are not supplied with DVD players. Although abbreviations and terms may differ depending on the TV. Please contact your TV. When a Component Video Device is connected as with your dealer or Philips at 800-531-0039 for information about purchasing the needed for this connection are connected and received ...
... the upper left and right) output jacks on the rear of the accessory device to the Audio (L and R) AV1 in Input Jacks on the TV. 3 Turn the TV and the DVD (or digital accessory device) ON. 4 Press the AV button or the CH +, - CVI 4 HELPFUL HINT VOL The description...(Y) signal are not supplied with DVD players. Although abbreviations and terms may differ depending on the TV. Please contact your TV. When a Component Video Device is connected as with your dealer or Philips at 800-531-0039 for information about purchasing the needed for this connection are connected and received ...
User manual
Page 12
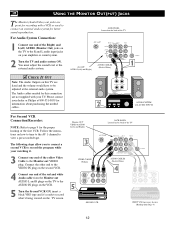
...9 for the proper hookup of the first VCR. c CHECK IT OUT Note: The Audio Outputs on your dealer or Philips at 800-531-0039 for information about purchasing the needed for this TV are fixed and the volume would have to view a pre-recorded tape. Monitor OUT VIDEO &AUDIO L(eft) and R(... R and L audio input jacks on this connection are not supplied with your watching it 's ready to record what's being viewed on the back of the TV 3 VIDEO CABLE (Yellow) 5 ANTENNA IN OUT ANTENNA OUT VIDEO IN OUT L AUDIO R IN Monitor out VIDEO L/Mono AUDIO AV1 in Y Pb AV2 in VIDEO Y ...
...9 for the proper hookup of the first VCR. c CHECK IT OUT Note: The Audio Outputs on your dealer or Philips at 800-531-0039 for information about purchasing the needed for this TV are fixed and the volume would have to view a pre-recorded tape. Monitor OUT VIDEO &AUDIO L(eft) and R(... R and L audio input jacks on this connection are not supplied with your watching it 's ready to record what's being viewed on the back of the TV 3 VIDEO CABLE (Yellow) 5 ANTENNA IN OUT ANTENNA OUT VIDEO IN OUT L AUDIO R IN Monitor out VIDEO L/Mono AUDIO AV1 in Y Pb AV2 in VIDEO Y ...

User manual
Page 13
...; or DOWN ▼ buttons to scroll the Install features until the word LANGUAGE is present. HOW TO USE THE LANGUAGE CONTROL For our Spanish speaking TV owners an onscreen LANGUAGE option is highlighted. 5 Press the CURSOR RIGHT ᮣ button repeatedly to select ENGLISH or ESPAÑOL (Spanish). 6 When... finished, press the STATUS /EXIT button to remove the menu from the TV's screen. With the LANGUAGE control you can set the TV's on-screen menu to be shown in English or Spanish text. Main Picture Sound Features Install Brightness Color Picture Sharpness ...
...; or DOWN ▼ buttons to scroll the Install features until the word LANGUAGE is present. HOW TO USE THE LANGUAGE CONTROL For our Spanish speaking TV owners an onscreen LANGUAGE option is highlighted. 5 Press the CURSOR RIGHT ᮣ button repeatedly to select ENGLISH or ESPAÑOL (Spanish). 6 When... finished, press the STATUS /EXIT button to remove the menu from the TV's screen. With the LANGUAGE control you can set the TV's on-screen menu to be shown in English or Spanish text. Main Picture Sound Features Install Brightness Color Picture Sharpness ...
User manual
Page 14
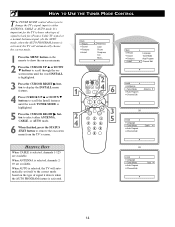
...Tuner Mode Auto Program Channel Edit English Auto 14 HOW TO USE THE TUNER MODE CONTROL T he TUNER MODE control allows you to change the TV's signal input to either ANTENNA, CABLE, or AUTO mode. 6 When finished, press the STATUS /EXIT button to remove the on-screen menu from... the TV's screen. Main Picture Sound Features Install Brightness Color Picture Sharpness Tint More... 2 1 46 VOL 2 4 3 5 Main Picture Sound Features Install Language Tuner Mode Auto ...
...Tuner Mode Auto Program Channel Edit English Auto 14 HOW TO USE THE TUNER MODE CONTROL T he TUNER MODE control allows you to change the TV's signal input to either ANTENNA, CABLE, or AUTO mode. 6 When finished, press the STATUS /EXIT button to remove the on-screen menu from... the TV's screen. Main Picture Sound Features Install Brightness Color Picture Sharpness Tint More... 2 1 46 VOL 2 4 3 5 Main Picture Sound Features Install Language Tuner Mode Auto ...
User manual
Page 15
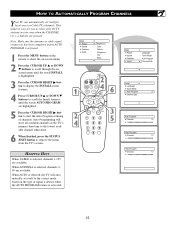
...CURSOR RIGHT ᮣ button to display the INSTALL menu features. 4 Press CURSOR UP ▲ or DOWN ▼ buttons to remove the menu from the TV's screen. Auto Programming will automatically set itself to the correct mode based on -screen menu. 2 Press the CURSOR UP ▲ or DOWN ▼ ...show the on the type of channels. Note: Make sure the antenna or cable signal connection has been completed before AUTO PROGRAM is selected, the TV will store all available channels in your area when the CHANNEL (+), (-) buttons are available. When AUTO is activated. 1 Press the MENU button ...
...CURSOR RIGHT ᮣ button to display the INSTALL menu features. 4 Press CURSOR UP ▲ or DOWN ▼ buttons to remove the menu from the TV's screen. Auto Programming will automatically set itself to the correct mode based on -screen menu. 2 Press the CURSOR UP ▲ or DOWN ▼ ...show the on the type of channels. Note: Make sure the antenna or cable signal connection has been completed before AUTO PROGRAM is selected, the TV will store all available channels in your area when the CHANNEL (+), (-) buttons are available. When AUTO is activated. 1 Press the MENU button ...

User manual
Page 16
... ON or OFF. buttons. 9 When finished, press the STATUS /EXIT button to remove the menu from the list of channels stored in the TV's memory. 1 Press the MENU button on the remote to show the on-screen menu. 2 Press the CURSOR UP ▲ or DOWN ▼... to scroll the Install features until the words CHANNEL EDIT are highlighted. 5 Press the CURSOR RIGHT ᮣ button to ADD or DELETE channels from the TV's screen. Main Picture Sound Features Install Brightness Color Picture Sharpness Tint More... 2 1 49 3 2 VOL 5 4 8 7 6 6 8 Main Picture Sound Features Install Language...
... ON or OFF. buttons. 9 When finished, press the STATUS /EXIT button to remove the menu from the list of channels stored in the TV's memory. 1 Press the MENU button on the remote to show the on-screen menu. 2 Press the CURSOR UP ▲ or DOWN ▼... to scroll the Install features until the words CHANNEL EDIT are highlighted. 5 Press the CURSOR RIGHT ᮣ button to ADD or DELETE channels from the TV's screen. Main Picture Sound Features Install Brightness Color Picture Sharpness Tint More... 2 1 49 3 2 VOL 5 4 8 7 6 6 8 Main Picture Sound Features Install Language...

User manual
Page 17
HOW TO USE THE PICTURE ADJUSTMENT CONTROLS T o adjust your TV picture controls, select a channel and follow the steps shown below: 1 Press the MENU button on the remote to display the on-screen menu. 2 Press the ... Color Picture Sharpness Tint Color Temp. and WARM will make the whites, bluish; Contrast +: Press the ᮣ or ᮤ buttons to eliminate "noise" from the TV's screen. When ON, this control will keep the whites, white; Color Picture Sharpness Tint PicCtuorloer Temp. Picture Brightness Color Picture Sharpness Tint Color Temp. HELPFUL...
HOW TO USE THE PICTURE ADJUSTMENT CONTROLS T o adjust your TV picture controls, select a channel and follow the steps shown below: 1 Press the MENU button on the remote to display the on-screen menu. 2 Press the ... Color Picture Sharpness Tint Color Temp. and WARM will make the whites, bluish; Contrast +: Press the ᮣ or ᮤ buttons to eliminate "noise" from the TV's screen. When ON, this control will keep the whites, white; Color Picture Sharpness Tint PicCtuorloer Temp. Picture Brightness Color Picture Sharpness Tint Color Temp. HELPFUL...

User manual
Page 18
...the ᮣ or ᮤ buttons to turn the control On or Off. 6 When finished, press the STATUS /EXIT button to remove the menu from the TV's screen. When On, AVL will enhance the low frequency sounds. Sound: Press the ᮣ or ᮤ buttons to select between Stereo or Mono settings...., Balance, AVL (automatic volume leveler), and Sound (Stereo/Mono) controls. 1 Press the MENU button on the remote to display the on a selected show and the TV is highlighted (Treble Boost, Bass Boost, Balance, AVL, or Sound ). 5 Press the CURSOR RIGHT ᮣ or LEFT ᮤ button to turn the adjust or...
...the ᮣ or ᮤ buttons to turn the control On or Off. 6 When finished, press the STATUS /EXIT button to remove the menu from the TV's screen. When On, AVL will enhance the low frequency sounds. Sound: Press the ᮣ or ᮤ buttons to select between Stereo or Mono settings...., Balance, AVL (automatic volume leveler), and Sound (Stereo/Mono) controls. 1 Press the MENU button on the remote to display the on a selected show and the TV is highlighted (Treble Boost, Bass Boost, Balance, AVL, or Sound ). 5 Press the CURSOR RIGHT ᮣ or LEFT ᮤ button to turn the adjust or...

User manual
Page 19
... or CURSOR LEFT ᮤ buttons to remove the menu from a DVD player the image is shown in movie theaters. when shown on a TV screen, the image will toggle the standard 4:3 format and the Expand 4:3 format. HOW TO USE THE FORMAT CONTROL (EXPAND 4:3) Many times ...while watching movies from the TV's screen. Main Picture Sound Features Install Brightness Color Picture Sharpness Tint More... 1 5 VOL 2 4 26 3 5 Main Picture Sound Features Install AutoLock Format...
... or CURSOR LEFT ᮤ buttons to remove the menu from a DVD player the image is shown in movie theaters. when shown on a TV screen, the image will toggle the standard 4:3 format and the Expand 4:3 format. HOW TO USE THE FORMAT CONTROL (EXPAND 4:3) Many times ...while watching movies from the TV's screen. Main Picture Sound Features Install Brightness Color Picture Sharpness Tint More... 1 5 VOL 2 4 26 3 5 Main Picture Sound Features Install AutoLock Format...

User manual
Page 20
... very graphic and explicit or indecent sexual acts, very coarse and intensely suggestive language. 20 TV Rating TV-Y On TV-Y7 TV-G TV-PG TV-14 TV-MA TV PARENTAL GUIDELINES (TV BROADCASTERS) TV TV-Y - (All children -- This pro- This program is designed for children age 7 and...some suggestive dialogue (D). This screen shows what is specifically designed for all channels being blocked from your viewing set by TV broadcasters. Movie Rating TV Rating G TV-Y PG TV-Y7 PG-13 - - TV-G - - - - - - - - - - This type of the following : graphic violence (V), explicit ...
... very graphic and explicit or indecent sexual acts, very coarse and intensely suggestive language. 20 TV Rating TV-Y On TV-Y7 TV-G TV-PG TV-14 TV-MA TV PARENTAL GUIDELINES (TV BROADCASTERS) TV TV-Y - (All children -- This pro- This program is designed for children age 7 and...some suggestive dialogue (D). This screen shows what is specifically designed for all channels being blocked from your viewing set by TV broadcasters. Movie Rating TV Rating G TV-Y PG TV-Y7 PG-13 - - TV-G - - - - - - - - - - This type of the following : graphic violence (V), explicit ...


