User Manual
Page 1
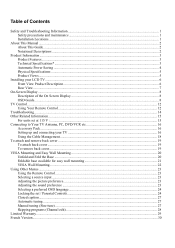
... cover...19 VESA Mounting and Easy Wall Mounting 20 Unfold and Fold the Base ...20 Foldable base available for easy wall mounting 21 VESA Wall Mounting...22 Using Other Menus ...23 Using the Remote Control ...23 Selecting a source input ...23 Adjusting the picture preference...23 Adjusting the sound preference ...23 Selecting a preferred OSD language...24 Locking the set / Parental Controls...24 Closed caption...27 Automatic tuning ...27 Manual tuning (Fine tune) ...27 Skipping programs (Channel edit) ...28 Limited Warranty...29 French...
... cover...19 VESA Mounting and Easy Wall Mounting 20 Unfold and Fold the Base ...20 Foldable base available for easy wall mounting 21 VESA Wall Mounting...22 Using Other Menus ...23 Using the Remote Control ...23 Selecting a source input ...23 Adjusting the picture preference...23 Adjusting the sound preference ...23 Selecting a preferred OSD language...24 Locking the set / Parental Controls...24 Closed caption...27 Automatic tuning ...27 Manual tuning (Fine tune) ...27 Skipping programs (Channel edit) ...28 Limited Warranty...29 French...

User Manual
Page 2
... follow these instructions when connecting and using as a PC monitor, always activate a screen saver program during operation or transportation. However, never use alcohol, solvents or ammonia-based liquids. • Consult a service technician if the TV does not operate normally when you have been followed. If a still image in this manual. • The casing cover should be opened only by qualified service personnel. •...
... follow these instructions when connecting and using as a PC monitor, always activate a screen saver program during operation or transportation. However, never use alcohol, solvents or ammonia-based liquids. • Consult a service technician if the TV does not operate normally when you have been followed. If a still image in this manual. • The casing cover should be opened only by qualified service personnel. •...
User Manual
Page 3
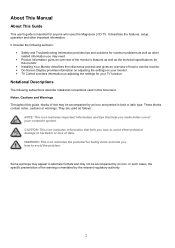
... and printed in this guide, blocks of your TV function. These blocks contain notes, cautions or warnings. WARNING: This icon indicates the potential for common problems as well as the technical specifications for this monitor. • Installing Your Monitor describes the initial setup process and gives an overview of how to use of text may need. • Product Information...
... and printed in this guide, blocks of your TV function. These blocks contain notes, cautions or warnings. WARNING: This icon indicates the potential for common problems as well as the technical specifications for this monitor. • Installing Your Monitor describes the initial setup process and gives an overview of how to use of text may need. • Product Information...

User Manual
Page 4
This is available only in RGB (H/V) format) Technical Specifications* LCD PANEL • Type • Screen size • Pixel Pitch • LCD Panel type • Effective viewing area • Display Colors TFT LCD 15 inch 0.297 x 0.297mm 1024 x 768 pixels R.G.B. Video - Sync • Input signal levels • Sync input signal • Sync polarities • Input Frequency • Video interface AUDIO • Input level for PC/SVHS • Headphone out signal level • Loudspeaker 80 MHz 75 ohm...
This is available only in RGB (H/V) format) Technical Specifications* LCD PANEL • Type • Screen size • Pixel Pitch • LCD Panel type • Effective viewing area • Display Colors TFT LCD 15 inch 0.297 x 0.297mm 1024 x 768 pixels R.G.B. Video - Sync • Input signal levels • Sync input signal • Sync polarities • Input Frequency • Video interface AUDIO • Input level for PC/SVHS • Headphone out signal level • Loudspeaker 80 MHz 75 ohm...

User Manual
Page 5
OPTICAL CHARACTERISTICS • Contrast ratio • Brightness 350:1 (typ.) 250 cd/m2 (typ.) • Peak contrast angle • White Chromaticity • Viewing Angle (C/R >5) 6 o'clock x: 0.283 y: 0.297 (at 9300° K) x: 0.313 y: 0.329 (at 6500° K) x: 0.313 y: 0.329 (sRGB) Upper >50° (typ.) Lower >60° (typ.) Left >75° (typ.) Right >75° (typ.) • Response time
OPTICAL CHARACTERISTICS • Contrast ratio • Brightness 350:1 (typ.) 250 cd/m2 (typ.) • Peak contrast angle • White Chromaticity • Viewing Angle (C/R >5) 6 o'clock x: 0.283 y: 0.297 (at 9300° K) x: 0.313 y: 0.329 (at 6500° K) x: 0.313 y: 0.329 (sRGB) Upper >50° (typ.) Lower >60° (typ.) Left >75° (typ.) Right >75° (typ.) • Response time
User Manual
Page 7
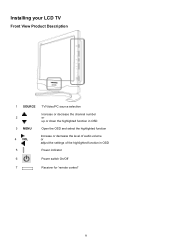
Installing your LCD TV Front View Product Description 1 SOURCE TV/Video/PC source selection Increase or decrease the channel number 2 or up or down the highlighted function in OSD 3 MENU Open the OSD and select the highlighted function 4 VOL Increase or decrease the level of audio volume or adjust the settings of the highlighted function in OSD 5 Power indicator 6 Power switch On/Off 7 Receiver for 'remote control' 6
Installing your LCD TV Front View Product Description 1 SOURCE TV/Video/PC source selection Increase or decrease the channel number 2 or up or down the highlighted function in OSD 3 MENU Open the OSD and select the highlighted function 4 VOL Increase or decrease the level of audio volume or adjust the settings of the highlighted function in OSD 5 Power indicator 6 Power switch On/Off 7 Receiver for 'remote control' 6

User Manual
Page 9
... adjust screen performance of TVs directly through an on the front control of your adjustments. Basic and simple instruction on the control keys When you can then start making adjustments to suit personal preference 8 or the OSD Guide TV/Video Mode INPUT SELECT PC TV AV S-VIDEO Select video source for main display: • PC VGA input • Antenna or cable TV input • CVBS composite video input • S-video input PICTURE SOUND BRIGHTNESS CONTRAST COLOR...
... adjust screen performance of TVs directly through an on the front control of your adjustments. Basic and simple instruction on the control keys When you can then start making adjustments to suit personal preference 8 or the OSD Guide TV/Video Mode INPUT SELECT PC TV AV S-VIDEO Select video source for main display: • PC VGA input • Antenna or cable TV input • CVBS composite video input • S-video input PICTURE SOUND BRIGHTNESS CONTRAST COLOR...
User Manual
Page 10
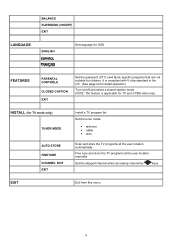
... video only. INSTALL (for children. BALANCE SURROUND (ON/OFF) EXIT LANGUAGE ENGLISH Set language for OSD FEATURES PARENTAL CONTROLS CLOSED CAPTION EXIT Set the password (0711) and block specific programs that are not suitable for TV mode only) TUNER MODE AUTO STORE FINETUNE CHANNEL EDIT EXIT Install a TV program list Set the tuner mode: • antenna • cable • auto Scan and store the TV programs at the user location automatically Fine tune and store the TV programs at the user location manually Set...
... video only. INSTALL (for children. BALANCE SURROUND (ON/OFF) EXIT LANGUAGE ENGLISH Set language for OSD FEATURES PARENTAL CONTROLS CLOSED CAPTION EXIT Set the password (0711) and block specific programs that are not suitable for TV mode only) TUNER MODE AUTO STORE FINETUNE CHANNEL EDIT EXIT Install a TV program list Set the tuner mode: • antenna • cable • auto Scan and store the TV programs at the user location automatically Fine tune and store the TV programs at the user location manually Set...

User Manual
Page 14
... source button. (The amber light indicates when set the TV temporarily to programs For a 2-digit program number, the 2nd digit must be entered within 2 seconds. 13 1 Standby 2 Selecting TV programs 3 Closed Caption 4 Volume 5 Menu 6 Cursor 7 Sleep timer 8 Sound mode 9 AV source 10 Status 11 Mute 12 A/CH 13 Numerical keys To set is in OSD and clear menu from screen. To access the last program viewed. For direct access to standby mode. To restore sound, press button again. To disable or enable closed caption...
... source button. (The amber light indicates when set the TV temporarily to programs For a 2-digit program number, the 2nd digit must be entered within 2 seconds. 13 1 Standby 2 Selecting TV programs 3 Closed Caption 4 Volume 5 Menu 6 Cursor 7 Sleep timer 8 Sound mode 9 AV source 10 Status 11 Mute 12 A/CH 13 Numerical keys To set is in OSD and clear menu from screen. To access the last program viewed. For direct access to standby mode. To restore sound, press button again. To disable or enable closed caption...
User Manual
Page 15
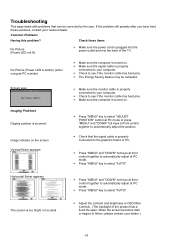
... to select "AUTO". Common Problems Having this problem? Imaging Problems Display position is incorrect Image vibrates on . • Make sure the signal cable is properly connected to your nearest dealer. No Picture (Power LED is amber) (when using as PC monitor) • Make sure the computer is turned on the screen Vertical flicker appears • Press "MENU" key to select "ADJUST POSITION" control at PC mode or press "MENU" and...
... to select "AUTO". Common Problems Having this problem? Imaging Problems Display position is incorrect Image vibrates on . • Make sure the signal cable is properly connected to your nearest dealer. No Picture (Power LED is amber) (when using as PC monitor) • Make sure the computer is turned on the screen Vertical flicker appears • Press "MENU" key to select "ADJUST POSITION" control at PC mode or press "MENU" and...
User Manual
Page 16
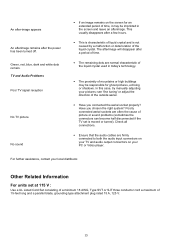
... the audio cables are firmly connected to both the audio input connectors on your TV and audio output connectors on the screen for an extended period of time, it may be imprinted in today's technology. • The proximity of 15-feet long and a parallel blade, grounding type attachment plug rated 15 A, 125 V. 15 TV and Audio Problems Poor TV signal reception No TV picture No sound...
... the audio cables are firmly connected to both the audio input connectors on your TV and audio output connectors on the screen for an extended period of time, it may be imprinted in today's technology. • The proximity of 15-feet long and a parallel blade, grounding type attachment plug rated 15 A, 125 V. 15 TV and Audio Problems Poor TV signal reception No TV picture No sound...
User Manual
Page 17
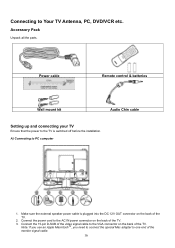
... external speaker power cable is switched off before the installation. Connect the power cord to the VGA connector on the back of the monitor signal cable. 16 Power cable Remote control & batteries Wall mount kit Audio Chin cable Setting up and connecting your TV Ensure that the power to PC computer 1. Connect the 15-pin D-SUB of the video signal cable to the AC IN power connector on the back of the TV. 3. Accessory Pack Unpack all the parts. A) Connecting...
... external speaker power cable is switched off before the installation. Connect the power cord to the VGA connector on the back of the monitor signal cable. 16 Power cable Remote control & batteries Wall mount kit Audio Chin cable Setting up and connecting your TV Ensure that the power to PC computer 1. Connect the 15-pin D-SUB of the video signal cable to the AC IN power connector on the back of the TV. 3. Accessory Pack Unpack all the parts. A) Connecting...

User Manual
Page 18
... sound from the external speakers will be connected to the antenna port of the TV marked . Connect the stereo audio cable to PC AUDIO IN on the back of the TV and the other to AUDIO OUT terminal of the sound card on the back of tuner box. 17 Note that this set only accepts a S-Video cable without a locating guide. C) Connecting to TV/CATV Connect an antenna or CATV cable to the headphone output...
... sound from the external speakers will be connected to the antenna port of the TV marked . Connect the stereo audio cable to PC AUDIO IN on the back of the TV and the other to AUDIO OUT terminal of the sound card on the back of tuner box. 17 Note that this set only accepts a S-Video cable without a locating guide. C) Connecting to TV/CATV Connect an antenna or CATV cable to the headphone output...

User Manual
Page 22
... horizontal distance (130 mm) between the two mounting screws. Foldable base available for attachment to solid wood, brick or concrete walls. 4. Smart tips Use the full scale template to the wall. For wood walls: Discard the wall anchors! The manufacturer accepts no liability for improper installations or installations not performed in depth. 5. At the locations marked, drill two holes in the...
... horizontal distance (130 mm) between the two mounting screws. Foldable base available for attachment to solid wood, brick or concrete walls. 4. Smart tips Use the full scale template to the wall. For wood walls: Discard the wall anchors! The manufacturer accepts no liability for improper installations or installations not performed in depth. 5. At the locations marked, drill two holes in the...

User Manual
Page 24
.... 7. Adjusting the picture preference 1. Three options are 4 input sources: • PC • TV • AV • S-Video 4. Press , to further change COLOR TEMP setting. 5. Or, press MENU to adjust BRIGHTNESS, CONTRAST, COLOR, SHARPNESS. Use , to activate the control menu display. 2. Press MENU to scroll the highlight SOUND, and then press MENU. 3. Use , to highlight the input source to select the input source. There are available here: COOL (blue white), NORMAL (balanced) or WARM (red white). 4. Press MENU...
.... 7. Adjusting the picture preference 1. Three options are 4 input sources: • PC • TV • AV • S-Video 4. Press , to further change COLOR TEMP setting. 5. Or, press MENU to adjust BRIGHTNESS, CONTRAST, COLOR, SHARPNESS. Use , to activate the control menu display. 2. Press MENU to scroll the highlight SOUND, and then press MENU. 3. Use , to highlight the input source to select the input source. There are available here: COOL (blue white), NORMAL (balanced) or WARM (red white). 4. Press MENU...

User Manual
Page 25
... then press MENU. 3. Locking the set / Parental Controls Understanding Parental Controls The Parental Controls feature receives and processes the data that are not rated, are 3 languages: • ENGLISH • • 4. In the Parental Controls section you have no sexual dialogue or sexual situations. Below brief explanations are unrated. This control implements the settings you 'll learn how to block channels and programs that contains program content advice...
... then press MENU. 3. Locking the set / Parental Controls Understanding Parental Controls The Parental Controls feature receives and processes the data that are not rated, are 3 languages: • ENGLISH • • 4. In the Parental Controls section you have no sexual dialogue or sexual situations. Below brief explanations are unrated. This control implements the settings you 'll learn how to block channels and programs that contains program content advice...
User Manual
Page 26
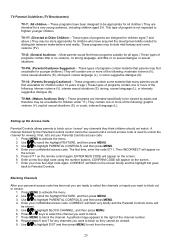
... the channels or inputs you want to Parental Controls. Use , to highlight PARENTAL CONTROLS, and then press MENU. 4. Blocking Channels After your personal access code has been set your new four-digit code again. Press or keys to select the channel you want to distinguish between make-believe and reality. Repeat steps 6 and 7 for any channels they cannot be appropriate for all ages.) These types of programs contain...
... the channels or inputs you want to Parental Controls. Use , to highlight PARENTAL CONTROLS, and then press MENU. 4. Blocking Channels After your personal access code has been set your new four-digit code again. Press or keys to select the channel you want to distinguish between make-believe and reality. Repeat steps 6 and 7 for any channels they cannot be appropriate for all ages.) These types of programs contain...
User Manual
Page 27
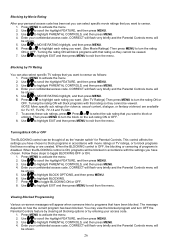
... then press MENU. 3. Use , to highlight PARENTAL CONTROLS, and then press MENU. 4. Blocking by entering your confidential access code. Use , to scroll the highlight FEATURE, and then press MENU. 3. You may view the blocked program and turn the rating ON or OFF. Use , to highlight PARENTAL CONTROLS, and then press MENU. 4. Use , to scroll the highlight FEATURE, and then press MENU. 3. CORRECT will flash very briefly and the Parental Controls menu will...
... then press MENU. 3. Use , to highlight PARENTAL CONTROLS, and then press MENU. 4. Blocking by entering your confidential access code. Use , to scroll the highlight FEATURE, and then press MENU. 3. You may view the blocked program and turn the rating ON or OFF. Use , to highlight PARENTAL CONTROLS, and then press MENU. 4. Use , to scroll the highlight FEATURE, and then press MENU. 3. CORRECT will flash very briefly and the Parental Controls menu will...
User Manual
Page 28
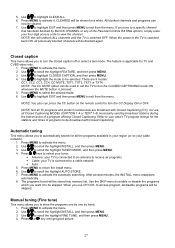
...; Antenna: your TV is connected to an antenna to receive air programs • Cable: your four-digit access code to turn the CLOSED CAPTIONING mode ON whenever the MUTE button is switched back ON, all TV programs and product commercials are broadcast with Closed Captioning. If you want it . When the power to a cable network • Auto 5. Closed caption This menu allows you use CH+/CH- Use the SKIP menu to enable or disable the programs which you tune to a specific channel...
...; Antenna: your TV is connected to an antenna to receive air programs • Cable: your four-digit access code to turn the CLOSED CAPTIONING mode ON whenever the MUTE button is switched back ON, all TV programs and product commercials are broadcast with Closed Captioning. If you want it . When the power to a cable network • Auto 5. Closed caption This menu allows you use CH+/CH- Use the SKIP menu to enable or disable the programs which you tune to a specific channel...
User Manual
Page 30
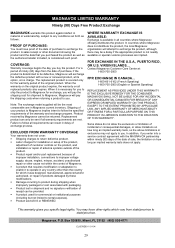
...repair and/or part replacement because of improper installation, connections to improper voltage supply, abuse, neglect, misuse, accident, unauthorized repair or other document showing the product and the date that requires modification or adaptation to any country other rights which it to operate in any conditions set forth as the authorized retailer included, is determined to you specific... lost in all replaced products also expires. Note: The exchange model supplied will exchange the defective product with the MAGNAVOX partnership within the control of Magnavox. •...
...repair and/or part replacement because of improper installation, connections to improper voltage supply, abuse, neglect, misuse, accident, unauthorized repair or other document showing the product and the date that requires modification or adaptation to any country other rights which it to operate in any conditions set forth as the authorized retailer included, is determined to you specific... lost in all replaced products also expires. Note: The exchange model supplied will exchange the defective product with the MAGNAVOX partnership within the control of Magnavox. •...


