

Owner's Manual
Page 2
...' or 'DOUBLE INSULATED'. SAVE THESE INSTRUCTIONS SERVICING OF DOUBLE INSULATED PRODUCTS In a double-insulated product, two systems of insulation are being used or where oxygen is being administrated. • To disconnect, turn all controls to the off ("0") when making any adjustment in the ... of the system and should a means for grounding be supervised to the nearest authorized dealer or service center for Servicing of grounding. Use only identical replacement parts. Servicing of a double-insulated product requires extreme care and knowledge of lint, dust, and loose cloth. &#...
...' or 'DOUBLE INSULATED'. SAVE THESE INSTRUCTIONS SERVICING OF DOUBLE INSULATED PRODUCTS In a double-insulated product, two systems of insulation are being used or where oxygen is being administrated. • To disconnect, turn all controls to the off ("0") when making any adjustment in the ... of the system and should a means for grounding be supervised to the nearest authorized dealer or service center for Servicing of grounding. Use only identical replacement parts. Servicing of a double-insulated product requires extreme care and knowledge of lint, dust, and loose cloth. &#...
Owner's Manual
Page 3
... you to experience a totally new dimension of sewing! Your authorized PFAFF® dealer will deÀnitely enable you to help you start, please spend some time reading this owner's manual. Your PFAFF® expression™ machine will of your creative ideas into reality. You will... soon discover how to maximize the use of course also be pleased to transform all your machine. Congratulations on purchasing...
... you to experience a totally new dimension of sewing! Your authorized PFAFF® dealer will deÀnitely enable you to help you start, please spend some time reading this owner's manual. Your PFAFF® expression™ machine will of your creative ideas into reality. You will... soon discover how to maximize the use of course also be pleased to transform all your machine. Congratulations on purchasing...
Owner's Manual
Page 4
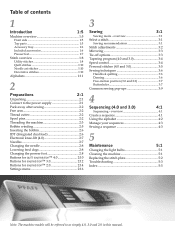
... Personal stitches (4.0 and 3.0 3:5 Sewing techniques 3:6 Handlook quilting 3:6 Darning 3:6 Free-motion position (3.0 and 2.0 3:7 Buttonholes 3:7 Common sewing pop-ups 3:9 4 Sequencing (4.0 and 3.0) 4:1 Sequencing - overview 4:1 Create a sequence 4.1 Using the alphabet 4:2 Manage your sequences 4:3 Sewing a sequence ... the needle 2:8 Lowering feed dogs 2:8 Changing the presser foot 2.8 Buttons for quilt expression™ 4.0 2:10 Buttons for expression™ 3.0 2:12 Buttons for expression™ 2.0 2:14 Settings menu 2:16 3 Sewing 3:1 Sewing mode - Table...
... Personal stitches (4.0 and 3.0 3:5 Sewing techniques 3:6 Handlook quilting 3:6 Darning 3:6 Free-motion position (3.0 and 2.0 3:7 Buttonholes 3:7 Common sewing pop-ups 3:9 4 Sequencing (4.0 and 3.0) 4:1 Sequencing - overview 4:1 Create a sequence 4.1 Using the alphabet 4:2 Manage your sequences 4:3 Sewing a sequence ... the needle 2:8 Lowering feed dogs 2:8 Changing the presser foot 2.8 Buttons for quilt expression™ 4.0 2:10 Buttons for expression™ 3.0 2:12 Buttons for expression™ 2.0 2:14 Settings menu 2:16 3 Sewing 3:1 Sewing mode - Table...

Owner's Manual
Page 7
... foot 2A, 5A, 5M, 6A and the free-motion/darning foot. 1:7 Fancy stitch foot 1A with IDT This foot is used for sensormatic free-motion sewing. Use the markings on the foot guides the fabric. This foot can be positioned around the presser foot bar. The "C-shaped" guide should ... foot 7 with IDT, 3 mm This foot is used in conjunction with IDT (4.0) This foot is designed to Áow smoothly over the stitches. The groove on the underside of the foot is sewn in light to medium weight fabric. 1/4" quilting foot with the straight stitch needle plate. Sensormatic buttonhole foot...
... foot 2A, 5A, 5M, 6A and the free-motion/darning foot. 1:7 Fancy stitch foot 1A with IDT This foot is used for sensormatic free-motion sewing. Use the markings on the foot guides the fabric. This foot can be positioned around the presser foot bar. The "C-shaped" guide should ... foot 7 with IDT, 3 mm This foot is used in conjunction with IDT (4.0) This foot is designed to Áow smoothly over the stitches. The groove on the underside of the foot is sewn in light to medium weight fabric. 1/4" quilting foot with the straight stitch needle plate. Sensormatic buttonhole foot...
Owner's Manual
Page 8
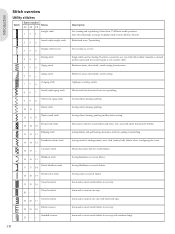
... blindhems on woven fabrics. Reinforced seam. Sewing elastic, darning, patching and decorative sewing. Joining fabrics and quilt batting, decorative stitch for stretch fabrics and hems. Also used for stretch fabrics. Seam and overcast stretch fabrics in the bobbin. Note: This stitch makes a stronger tie...-off than stitch 51 (4.0) / 40 (3.0) / 32 (2.0). Single stitch used with elastic thread in one step. Reinforce seams, clean Ànish, stretch sewing, lace insertion. Sewing elastic, darning, patching. Joining...
... blindhems on woven fabrics. Reinforced seam. Sewing elastic, darning, patching and decorative sewing. Joining fabrics and quilt batting, decorative stitch for stretch fabrics and hems. Also used for stretch fabrics. Seam and overcast stretch fabrics in the bobbin. Note: This stitch makes a stronger tie...-off than stitch 51 (4.0) / 40 (3.0) / 32 (2.0). Single stitch used with elastic thread in one step. Reinforce seams, clean Ànish, stretch sewing, lace insertion. Sewing elastic, darning, patching. Joining...
Owner's Manual
Page 13
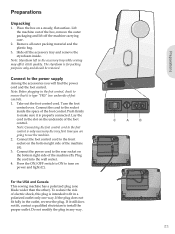
.... Connect to the power supply Among the accessories you are going to ensure that it is intended to Àt in the foot control, check to use the machine. 2. C A B 2:1 Preparations Turn the foot control over. Note: Styrofoam left in the outlet, reverse the plug. To reduce the risk of electric shock, this...
.... Connect to the power supply Among the accessories you are going to ensure that it is intended to Àt in the foot control, check to use the machine. 2. C A B 2:1 Preparations Turn the foot control over. Note: Styrofoam left in the outlet, reverse the plug. To reduce the risk of electric shock, this...

Owner's Manual
Page 14
...be pressed Àrmly against the spool. Unplug the foot control cord from the machine. 3. Free arm To use a larger spool cap in front of the spool. For large thread spools, use the free arm, slide off the accessory tray. Small spool cap Large spool cap 2:2 Place the foot control in... the accessory tray. Remove the tray by sliding it to front as shown (A). For narrow thread spools, use the thread cutter, pull the thread from back to the left. Switch the main switch off the spool) and a vertical position (the thread spool ...
...be pressed Àrmly against the spool. Unplug the foot control cord from the machine. 3. Free arm To use a larger spool cap in front of the spool. For large thread spools, use the free arm, slide off the accessory tray. Small spool cap Large spool cap 2:2 Place the foot control in... the accessory tray. Remove the tray by sliding it to front as shown (A). For narrow thread spools, use the thread cutter, pull the thread from back to the left. Switch the main switch off the spool) and a vertical position (the thread spool ...

Owner's Manual
Page 15
... cap and place a felt pad under the thread spool. Pull the thread from the front to the needle thread guide (E). 5. Thread the needle. This is used when winding a bobbin thread from reeling off too fast. Slide on the pre-tension disc (C). 3. Main spool pin in vertical position Preparations Auxiliary spool pin...
... cap and place a felt pad under the thread spool. Pull the thread from the front to the needle thread guide (E). 5. Thread the needle. This is used when winding a bobbin thread from reeling off too fast. Slide on the pre-tension disc (C). 3. Main spool pin in vertical position Preparations Auxiliary spool pin...

Owner's Manual
Page 16
...recommend lowering the presser foot. 1. Let the needle threader gently swing back. Pull the thread loop out behind the needle. The needle must be used for size 70-120 needles. The threader hook (G) swivels through the needle eye and forms a loop behind the needle. Place the thread from... accessories that the threads do not become twisted together. 5. Make sure that the presser foot is raised and the needle is designed to use the needle threader for twin needle Replace the sewing needle with a twin needle. Preparations PFA Needle threader The needle threader allows you pass ...
...recommend lowering the presser foot. 1. Let the needle threader gently swing back. Pull the thread loop out behind the needle. The needle must be used for size 70-120 needles. The threader hook (G) swivels through the needle eye and forms a loop behind the needle. Place the thread from... accessories that the threads do not become twisted together. 5. Make sure that the presser foot is raised and the needle is designed to use the needle threader for twin needle Replace the sewing needle with a twin needle. Preparations PFA Needle threader The needle threader allows you pass ...
Owner's Manual
Page 17
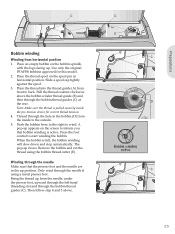
... foot control to wind. The pop-up . Remove the bobbin and cut the thread using a metal presser foot. Then follow step 4 and 5 above the bobbin winder thread guide (B) and then through the needle ...if using the bobbin thread cutter (E). Slide a spool cap tightly against the spool. 3. Note: Make sure the thread... and stop automatically. Place the thread into the thread guide (A) from horizontal position 1. Use only the original PFAFF® bobbins approved for correct thread tension. 4.
... foot control to wind. The pop-up . Remove the bobbin and cut the thread using a metal presser foot. Then follow step 4 and 5 above the bobbin winder thread guide (B) and then through the needle ...if using the bobbin thread cutter (E). Slide a spool cap tightly against the spool. 3. Note: Make sure the thread... and stop automatically. Place the thread into the thread guide (A) from horizontal position 1. Use only the original PFAFF® bobbins approved for correct thread tension. 4.
Owner's Manual
Page 18
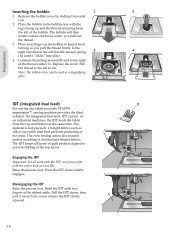
... feeding action also ensures perfect matching of the top layers. A C Preparations IDT (integrated dual feed) D For sewing any fabric precisely PFAFF® expression™ sewing machine provides the ideal solution: the integrated dual feed, IDT system. Pull the IDT down until it engages. Place the bobbin... and then to cut -out (D). Engaging the IDT Important: For all layers of quilt projects aligned to prevent shifting of checked and striped fabrics. The IDT keeps all work with the IDT, use presser feet with two Àngers at the same time. Inserting the bobbin 1...
... feeding action also ensures perfect matching of the top layers. A C Preparations IDT (integrated dual feed) D For sewing any fabric precisely PFAFF® expression™ sewing machine provides the ideal solution: the integrated dual feed, IDT system. Pull the IDT down until it engages. Place the bobbin... and then to cut -out (D). Engaging the IDT Important: For all layers of quilt projects aligned to prevent shifting of checked and striped fabrics. The IDT keeps all work with the IDT, use presser feet with two Àngers at the same time. Inserting the bobbin 1...
Owner's Manual
Page 19
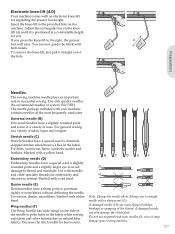
...(F) The Wing Needle has wide wings on natural Àber fabrics. For knits, swimwear, Áeece, synthetic suedes and leathers. Use with a blue band. Marked with metallic and other hemstitches on the side of the needle to eliminate skipped stitches when there is positioned...needle can now guide the fabric with an electronic knee-lift for embroidery and H decorative sewing. Marked with your sewing machine. 2:7 Do not use a straight needle with a yellow band. The needle package included with a red band. For canvas, denim, microÀbers. Decrease the ...
...(F) The Wing Needle has wide wings on natural Àber fabrics. For knits, swimwear, Áeece, synthetic suedes and leathers. Use with a blue band. Marked with metallic and other hemstitches on the side of the needle to eliminate skipped stitches when there is positioned...needle can now guide the fabric with an electronic knee-lift for embroidery and H decorative sewing. Marked with your sewing machine. 2:7 Do not use a straight needle with a yellow band. The needle package included with a red band. For canvas, denim, microÀbers. Decrease the ...
Owner's Manual
Page 20
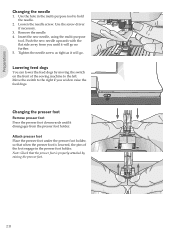
...right if you until it will go . Changing the presser foot Remove presser foot Press the presser foot downwards until it will go no further. 5. Use the hole in the presser foot holder. Remove the needle. 4. Push the new needle upwards with the Áat side away from the presser ...foot holder. Loosen the needle screw. Use the screw driver if necessary. 3. Attach presser foot Place the presser foot under the presser foot holder, so that the presser foot is lowered, the...
...right if you until it will go . Changing the presser foot Remove presser foot Press the presser foot downwards until it will go no further. 5. Use the hole in the presser foot holder. Remove the needle. 4. Push the new needle upwards with the Áat side away from the presser ...foot holder. Loosen the needle screw. Use the screw driver if necessary. 3. Attach presser foot Place the presser foot under the presser foot holder, so that the presser foot is lowered, the...
Owner's Manual
Page 22
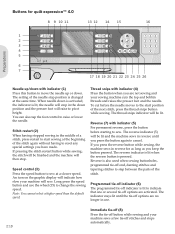
... at the same time. Speed control (3) Press the speed button to pivot height. If you press the reverse button while sewing, the machine sews in use the wheel (15) to raise or lower the needle. An icon on the graphic display will indicate how slow your sewing machine cuts the top... sewing speed. The reverse indicator (5) will be lit and the machine sews in reverse until the tie-off options are no longer in reverse for quilt expression™ 4.0 8 9 10 11 13 12 14 15 16 Preparations 1 2 3 4 5 6 7 17 18 19 20 21 22 23 24 25 26 Needle up/down with indicator (1) Press...
... at the same time. Speed control (3) Press the speed button to pivot height. If you press the reverse button while sewing, the machine sews in use the wheel (15) to raise or lower the needle. An icon on the graphic display will indicate how slow your sewing machine cuts the top... sewing speed. The reverse indicator (5) will be lit and the machine sews in reverse until the tie-off options are no longer in reverse for quilt expression™ 4.0 8 9 10 11 13 12 14 15 16 Preparations 1 2 3 4 5 6 7 17 18 19 20 21 22 23 24 25 26 Needle up/down with indicator (1) Press...
Owner's Manual
Page 23
... single stitches in real size. Preparations Presser foot down arrow buttons, left and right arrow buttons and the wheel center icon is also used to select font. Press the alternatives button (14) to view the stitch positioning for satin stitches. F2 - Stitch length or stitch density... (13) Increase or decrease the stitch length using the + and - Use the + and - Alternatives (14) When you select the stitch represented by that number immediately. Save personal stitch or sequence (24) Press...
... single stitches in real size. Preparations Presser foot down arrow buttons, left and right arrow buttons and the wheel center icon is also used to select font. Press the alternatives button (14) to view the stitch positioning for satin stitches. F2 - Stitch length or stitch density... (13) Increase or decrease the stitch length using the + and - Use the + and - Alternatives (14) When you select the stitch represented by that number immediately. Save personal stitch or sequence (24) Press...
Owner's Manual
Page 24
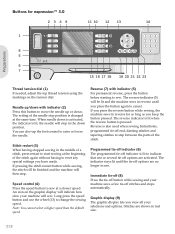
... to change the sewing speed. If pressing the stitch restart button while sewing, the stitch will be lit and the machine sews in reverse for expression™ 3.0 2349 11 10 12 13 14 1 4 3 2 1 8 5 6 7 15 16 17 18 19 20 21 22 23 Thread tension dial (1) If needed, adjust... the top thread tension using the markings on the graphic display will then stop position is also used when sewing buttonholes, programmed tie-off options are shown in the down . Note: You cannot select a higher speed than...
... to change the sewing speed. If pressing the stitch restart button while sewing, the stitch will be lit and the machine sews in reverse for expression™ 3.0 2349 11 10 12 13 14 1 4 3 2 1 8 5 6 7 15 16 17 18 19 20 21 22 23 Thread tension dial (1) If needed, adjust... the top thread tension using the markings on the graphic display will then stop position is also used when sewing buttonholes, programmed tie-off options are shown in the down . Note: You cannot select a higher speed than...
Owner's Manual
Page 25
...) By pressing one of, or a combination of the length setting. All selections will be shown on and off options and in sequencing it is also used to select font. buttons. F2 - All selections will be shown instead of , the 0 to toggle the recommendations view on the graphic display. Save... button (12) to enter sequencing. The wheel has up and down arrow buttons, left and right arrow buttons and the wheel center icon is used to set the tapering program. ConÀrm your selections with the wheel center icon for the selected stitch. Function 1 (15) The F1 ...
...) By pressing one of, or a combination of the length setting. All selections will be shown on and off options and in sequencing it is also used to select font. buttons. F2 - All selections will be shown instead of , the 0 to toggle the recommendations view on the graphic display. Save... button (12) to enter sequencing. The wheel has up and down arrow buttons, left and right arrow buttons and the wheel center icon is used to set the tapering program. ConÀrm your selections with the wheel center icon for the selected stitch. Function 1 (15) The F1 ...

Owner's Manual
Page 26
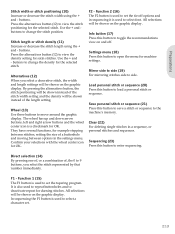
Buttons for expression™ 2.0 2378 10 9 11 12 13 Preparations 1 4 3 2 1 4 5 6 i 14 15 16 17 Thread tension dial (1) If needed, adjust the top thread tension using the markings on the graphic display will indicate that one or several tie-off options are activated. Reverse (6) with indicator (2) ... The setting of the stitch. The reverse indicator (4) will stop position is lit, the needle will be lit and the machine sews in use. Use the + and - Press the speed button again to reduce the sewing speed by half. Speed control (3) Press the speed button to resume ...
Buttons for expression™ 2.0 2378 10 9 11 12 13 Preparations 1 4 3 2 1 4 5 6 i 14 15 16 17 Thread tension dial (1) If needed, adjust the top thread tension using the markings on the graphic display will indicate that one or several tie-off options are activated. Reverse (6) with indicator (2) ... The setting of the stitch. The reverse indicator (4) will stop position is lit, the needle will be lit and the machine sews in use. Use the + and - Press the speed button again to reduce the sewing speed by half. Speed control (3) Press the speed button to resume ...
Owner's Manual
Page 27
... wheel has up and down arrow buttons, left and right arrow buttons and the wheel center icon is also used to deactivate repeat for machine settings. Function 1 (14) The F1 button is used to repeat buttonholes and to activate the tie-off . Settings menu (15) Press this button to move around the... graphic display. All selections will be shown instead of the stitch width setting and the density will be shown on and off options. Wheel (12) Use these buttons to toggle the recommendations view on the graphic display.
... wheel has up and down arrow buttons, left and right arrow buttons and the wheel center icon is also used to deactivate repeat for machine settings. Function 1 (14) The F1 button is used to repeat buttonholes and to activate the tie-off . Settings menu (15) Press this button to move around the... graphic display. All selections will be shown instead of the stitch width setting and the density will be shown on and off options. Wheel (12) Use these buttons to toggle the recommendations view on the graphic display.
Owner's Manual
Page 28
... needle might damage the presser foot. Twin needle (4.0 and 3.0) Activate the twin needle program and use if sensormatic free-motion is kept until you switch your local authorized PFAFF® dealer. A warning pop-up will electronically pre-set the thread tension. Deselect stitch width ...and lower with a previously selected setting, the outlines of the presser foot recommendation. In sewing mode, press the info button to be used at the same time. For 3.0 and 2.0: See page 3:2 for all stitches is limited for every stitch selection that spring foot freemotion...
... needle might damage the presser foot. Twin needle (4.0 and 3.0) Activate the twin needle program and use if sensormatic free-motion is kept until you switch your local authorized PFAFF® dealer. A warning pop-up will electronically pre-set the thread tension. Deselect stitch width ...and lower with a previously selected setting, the outlines of the presser foot recommendation. In sewing mode, press the info button to be used at the same time. For 3.0 and 2.0: See page 3:2 for all stitches is limited for every stitch selection that spring foot freemotion...


