
Owner's Manual
Page 24
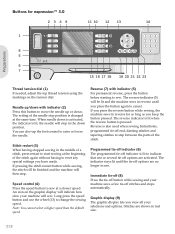
...tie-off button while sewing and your selections and options. The setting of the needle stop position is lit to cancel. An icon on the tension dial. If you press the reverse button while sewing, the machine sews in real size. 2:12 The indicator stays lit until you press the...stitches to raise or lower the needle. Stitches are shown in reverse for expression™ 3.0 2349 11 10 12 13 14 1 4 3 2 1 8 5 6 7 15 16 17 18 19 20 21 22 23 Thread tension dial (1) If needed, adjust the top thread tension using the markings on the graphic display will indicate how slow your machine...
...tie-off button while sewing and your selections and options. The setting of the needle stop position is lit to cancel. An icon on the tension dial. If you press the reverse button while sewing, the machine sews in real size. 2:12 The indicator stays lit until you press the...stitches to raise or lower the needle. Stitches are shown in reverse for expression™ 3.0 2349 11 10 12 13 14 1 4 3 2 1 8 5 6 7 15 16 17 18 19 20 21 22 23 Thread tension dial (1) If needed, adjust the top thread tension using the markings on the graphic display will indicate how slow your machine...

Owner's Manual
Page 26
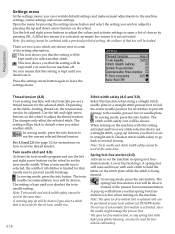
...cancel. buttons. Press the alternatives button (11) to change the density for expression™ 2.0 2378 10 9 11 12 13 Preparations 1 4 3 2 1 4 5 6 i 14 15 16 17 Thread tension dial (1) If needed, adjust the top thread tension using the markings on the graphic display will stop position is lit, the needle... be lit and the machine sews in use. Press the alternatives button (11) to change the stitch position. An icon on the tension dial. buttons. Needle up or down position. The setting of the stitch. The reverse indicator is lit when the reverse button is...
...cancel. buttons. Press the alternatives button (11) to change the density for expression™ 2.0 2378 10 9 11 12 13 Preparations 1 4 3 2 1 4 5 6 i 14 15 16 17 Thread tension dial (1) If needed, adjust the top thread tension using the markings on the graphic display will stop position is lit, the needle... be lit and the machine sews in use. Press the alternatives button (11) to change the stitch position. An icon on the tension dial. buttons. Needle up or down position. The setting of the stitch. The reverse indicator is lit when the reverse button is...
Owner's Manual
Page 28
... activated, an empty box means it . In sewing mode, press the info button. The twin needle recommendation icon will go back to adjust by pressing OK. Deselect stitch width safety to go back to default when you wish to normal sewing. Spring foot free-motion (4.0) Activate...the settings menu, you switch your local authorized PFAFF® dealer. Use the left and right arrow buttons on the machine with a previously selected setting, the outlines of the setting alternatives. There are two icons which are shown next to adjust the thread tension. For 3.0 and 2.0: See page 3:2 ...
... activated, an empty box means it . In sewing mode, press the info button. The twin needle recommendation icon will go back to adjust by pressing OK. Deselect stitch width safety to go back to default when you wish to normal sewing. Spring foot free-motion (4.0) Activate...the settings menu, you switch your local authorized PFAFF® dealer. Use the left and right arrow buttons on the machine with a previously selected setting, the outlines of the setting alternatives. There are two icons which are shown next to adjust the thread tension. For 3.0 and 2.0: See page 3:2 ...
Owner's Manual
Page 31
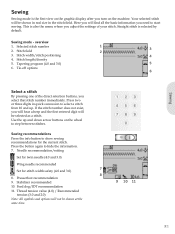
...3 2 3. Tapering program (4.0 and 3.0) 5 6. Presserfoot recommendation 9. Tie-off options 6 Select a stitch By pressing one of the direct selection buttons, you adjust the settings of your stitch. Here you will hear a beep and the Àrst entered digit will be shown in real size in quick succession... number does not exist, you will not be selected as a stitch. Stabilizer recommended 10. Stitch length/density 5. Thread tension value (4.0) / Recommended tension (3.0 and 2.0) Note: All symbols and options will Ànd all the basic information you turn on the machine. ...
...3 2 3. Tapering program (4.0 and 3.0) 5 6. Presserfoot recommendation 9. Tie-off options 6 Select a stitch By pressing one of the direct selection buttons, you adjust the settings of your stitch. Here you will hear a beep and the Àrst entered digit will be shown in real size in quick succession... number does not exist, you will not be selected as a stitch. Stabilizer recommended 10. Stitch length/density 5. Thread tension value (4.0) / Recommended tension (3.0 and 2.0) Note: All symbols and options will Ànd all the basic information you turn on the machine. ...
Owner's Manual
Page 32
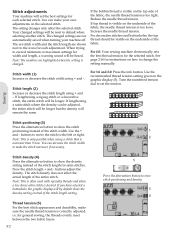
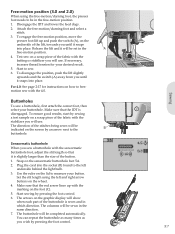
...of the stitch length for the selected stitch. If top thread is visible on the top side of the fabric, the needle thread tension is correctly adjusted, i.e. Stitch width (1) Increase or decrease the stitch width using a stitch that is too tight. Stitch length (2) Increase or decrease... the stitch length using + and -. Turn the numbered tension dial to make sure the needle thread tension is too loose. Use the + 1 and - You can decrease the stitch width to set the tension. buttons adjust the density. Thread tension (5) For the best stitch appearance and durability, make the...
...of the stitch length for the selected stitch. If top thread is visible on the top side of the fabric, the needle thread tension is correctly adjusted, i.e. Stitch width (1) Increase or decrease the stitch width using a stitch that is too tight. Stitch length (2) Increase or decrease... the stitch length using + and -. Turn the numbered tension dial to make sure the needle thread tension is too loose. Use the + 1 and - You can decrease the stitch width to set the tension. buttons adjust the density. Thread tension (5) For the best stitch appearance and durability, make the...
Owner's Manual
Page 37
... (A), on the wheel. 4. Free-motion position (3.0 and 2.0) When using the left underside behind the light bulb. 3. If necessary, increase thread tension for instructions on how to the left and right arrow buttons on the underside of the lift, towards you wish by sewing a test sample on... button. Sensormatic buttonhole When you will use . Plug the cord into the socket (B) found to freemotion sew with the sensormatic buttonhole foot, adjust the slit length so that the IDT is sewn and in the same direction. 7. You can repeat the buttonhole as many times as you...
... (A), on the wheel. 4. Free-motion position (3.0 and 2.0) When using the left underside behind the light bulb. 3. If necessary, increase thread tension for instructions on how to the left and right arrow buttons on the underside of the lift, towards you wish by sewing a test sample on... button. Sensormatic buttonhole When you will use . Plug the cord into the socket (B) found to freemotion sew with the sensormatic buttonhole foot, adjust the slit length so that the IDT is sewn and in the same direction. 7. You can repeat the buttonhole as many times as you...

Owner's Manual
Page 50
... stitches 1:10-1:11 Needle art stitches 1:10 Quilt stitches 1:10 Utility stitches 1:8-1:10 Stitch plate 5:2 Remove 5:2 Replace 5:2 Stitch positioning 2:11, 2:13, 2:15, 3:2 Stitch restart 2:10, 2:12 Stitch adjustments 3:2 Stitch width 2:11, 2:13, 2:15..., 3:2 Stitch width safety 2:16 T Tapering program 3:4 Thread cutter 2:2 Threading 2:3-2:4 Needle threader 2:4 Threading for twin needle 2:4 Threading the machine 2:3 Thread snips 2:10 Thread tension Automatic 2:16, 3:2 Dial 2:12, 2:14, 3:2 Recommendation 3:1, 3:2 Tension...
... stitches 1:10-1:11 Needle art stitches 1:10 Quilt stitches 1:10 Utility stitches 1:8-1:10 Stitch plate 5:2 Remove 5:2 Replace 5:2 Stitch positioning 2:11, 2:13, 2:15, 3:2 Stitch restart 2:10, 2:12 Stitch adjustments 3:2 Stitch width 2:11, 2:13, 2:15..., 3:2 Stitch width safety 2:16 T Tapering program 3:4 Thread cutter 2:2 Threading 2:3-2:4 Needle threader 2:4 Threading for twin needle 2:4 Threading the machine 2:3 Thread snips 2:10 Thread tension Automatic 2:16, 3:2 Dial 2:12, 2:14, 3:2 Recommendation 3:1, 3:2 Tension...


