
Owner's Manual
Page 2
.... Replace bulb with any air openings blocked Keep ventilation openings of the sewing machine and foot controller free from the accumulation of electric shock, this manual. VVARNING - If it to break. • Switch the sewing machine off (0") when making any adjustment in the needle area, such as threading needle, changing needle threading bobbin, or changing presser foot etc. • Always unplug the sewing machine from the electric outlet immediately after using this sewing machine from the electrical outlet when removing covers, lubricating...
.... Replace bulb with any air openings blocked Keep ventilation openings of the sewing machine and foot controller free from the accumulation of electric shock, this manual. VVARNING - If it to break. • Switch the sewing machine off (0") when making any adjustment in the needle area, such as threading needle, changing needle threading bobbin, or changing presser foot etc. • Always unplug the sewing machine from the electric outlet immediately after using this sewing machine from the electrical outlet when removing covers, lubricating...
Owner's Manual
Page 4
... A Accessories Applique foot Applique designs Automatic tapering B Balance Basting Bias binder Blind hem Bobbin case Bobbin thread monitor (model 2046) Bobbin thread tension Bobbin thread, drawing up Bobbin winding Bobbin winding through the needle Braiding foot Bridging Buttonhole, fully-automatic Buttonholes Buttonholes with gimp thread Buttonhole tips Buttonholes, types Buttons, sewing on C Carrying case Changing a pattern within the stitch sequence Circular embroidery guide Cleaning and oiling Combined borders Combined borders with twin needle Cording foot Cross hem stitch Cross-stitch...
... A Accessories Applique foot Applique designs Automatic tapering B Balance Basting Bias binder Blind hem Bobbin case Bobbin thread monitor (model 2046) Bobbin thread tension Bobbin thread, drawing up Bobbin winding Bobbin winding through the needle Braiding foot Bridging Buttonhole, fully-automatic Buttonholes Buttonholes with gimp thread Buttonhole tips Buttonholes, types Buttons, sewing on C Carrying case Changing a pattern within the stitch sequence Circular embroidery guide Cleaning and oiling Combined borders Combined borders with twin needle Cording foot Cross hem stitch Cross-stitch...
Owner's Manual
Page 5
...Needle, changing Needle, threading Needle/bobbin thread tension Non-elastic/elastic stitches Non-stick fancy stitch foot for leather 0 Overlock stitches P Parts of the sewing machine (2046) Parts of the sewing machine (2034) Patchwork and quilting "Pattern start' 'Pattern start" within stitch sequence Pattern length/pattern width, changing for decorative stitches Pattern length/stitch density Pattern mirroring Pattern settings, altering Pattern sizes, altering Pattern width/stitch length, altering Patterns, storing Pintuck foot Pintuck foot with guide Presser feet (special accessories) Presser...
...Needle, changing Needle, threading Needle/bobbin thread tension Non-elastic/elastic stitches Non-stick fancy stitch foot for leather 0 Overlock stitches P Parts of the sewing machine (2046) Parts of the sewing machine (2034) Patchwork and quilting "Pattern start' 'Pattern start" within stitch sequence Pattern length/pattern width, changing for decorative stitches Pattern length/stitch density Pattern mirroring Pattern settings, altering Pattern sizes, altering Pattern width/stitch length, altering Patterns, storing Pintuck foot Pintuck foot with guide Presser feet (special accessories) Presser...
Owner's Manual
Page 6
roduction Utility stitches Expression 2034 I Ei
roduction Utility stitches Expression 2034 I Ei
Owner's Manual
Page 7
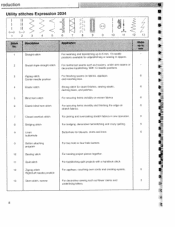
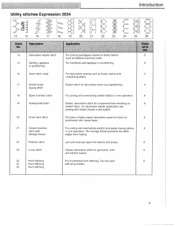
... elastic stitch 15 Quilting, applique or pinstitching ; For handlook quilt applique or pinstitching. Can be used 6 25 Hem stitching with elastic thread in the bobbin. 20 Cross hem stitch Provides a highly elastic decorative seam for hems on bulky fabrics such as flower stems and 3 underlining letters. 17 Stretch triple zigzag stitch Elastic stitch for decorative hems and topstitching. 6 18 Open overlock stitch For joining and overcasting stretch fabrics in one operation. 6 19 Honeycomb stitch Elastic, decorative stitch for ornamental hem finishing on 6 stretch...
... elastic stitch 15 Quilting, applique or pinstitching ; For handlook quilt applique or pinstitching. Can be used 6 25 Hem stitching with elastic thread in the bobbin. 20 Cross hem stitch Provides a highly elastic decorative seam for hems on bulky fabrics such as flower stems and 3 underlining letters. 17 Stretch triple zigzag stitch Elastic stitch for decorative hems and topstitching. 6 18 Open overlock stitch For joining and overcasting stretch fabrics in one operation. 6 19 Honeycomb stitch Elastic, decorative stitch for ornamental hem finishing on 6 stretch...

Owner's Manual
Page 10
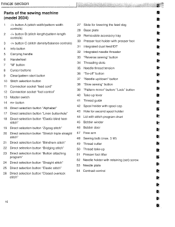
... dog I pattern length 28 Base plate 29 Removable accessory tray I (lunsity/balance controls) 30 Presser foot holder with presser foot 31 Integrated dual feed/IDT I i ,u ig handle 32 Integrated needle threader Hdndwheel 33 'Reverse sewing" button / "M" button 34 Threading slots 8 Cursor buttons 35 Needle thread tension 9 Clear/pattern start button 36 "Tie-off" button 10 Stitch selection wheel 37 "Needle up/down" button 11 Connection socket "lead cord" 38 "Slow sewing" button t 12 Connection socket "foot control" 13 Master switch 39 "Pattern mirror" button/ "Lock" button...
... dog I pattern length 28 Base plate 29 Removable accessory tray I (lunsity/balance controls) 30 Presser foot holder with presser foot 31 Integrated dual feed/IDT I i ,u ig handle 32 Integrated needle threader Hdndwheel 33 'Reverse sewing" button / "M" button 34 Threading slots 8 Cursor buttons 35 Needle thread tension 9 Clear/pattern start button 36 "Tie-off" button 10 Stitch selection wheel 37 "Needle up/down" button 11 Connection socket "lead cord" 38 "Slow sewing" button t 12 Connection socket "foot control" 13 Master switch 39 "Pattern mirror" button/ "Lock" button...
Owner's Manual
Page 12
...sewing" button 34 Threading slots F 35 Needle thread tension F 9 Clear/pattern start button 36 "Tie-off" button F 10 Stitch selection button 37 "Needle up lever F 14 m+button 41 Thread guide F 16 Direct selection button "Alphabet" 17 Direct selection button "Linen buttonhole" 18 Direct selection button "Elastic blind hem 42 Spool holder with spool cap 43 Hole for lowering the feed dog 28 Base plate F 2 -1+ button B (stitch length/pattern length 29 Removable accessory tray F controls) 30 Presser foot holder with retaining (set) screw 24 Direct selection button "Straight...
...sewing" button 34 Threading slots F 35 Needle thread tension F 9 Clear/pattern start button 36 "Tie-off" button F 10 Stitch selection button 37 "Needle up lever F 14 m+button 41 Thread guide F 16 Direct selection button "Alphabet" 17 Direct selection button "Linen buttonhole" 18 Direct selection button "Elastic blind hem 42 Spool holder with spool cap 43 Hole for lowering the feed dog 28 Base plate F 2 -1+ button B (stitch length/pattern length 29 Removable accessory tray F controls) 30 Presser foot holder with retaining (set) screw 24 Direct selection button "Straight...
Owner's Manual
Page 15
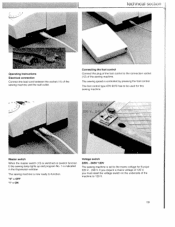
Iechnicai seUiün Operating Instructions Electrical connection Connect the lead cord between the socket (11) of the sewing machine. The sewing speed is set to the mains voltage for this sewing machine. 120 220V2 / --*- The sewing machine is now ready to be used for Europe 220 V.. 240 V. The foot control type ATK 0070 has to function. '0" = OFF "I ) the sewing lamp lights up and program No. 1 is switched on the...
Iechnicai seUiün Operating Instructions Electrical connection Connect the lead cord between the socket (11) of the sewing machine. The sewing speed is set to the mains voltage for this sewing machine. 120 220V2 / --*- The sewing machine is now ready to be used for Europe 220 V.. 240 V. The foot control type ATK 0070 has to function. '0" = OFF "I ) the sewing lamp lights up and program No. 1 is switched on the...

Owner's Manual
Page 27
... remove: Lower the presser foot and set the needle to use the integrated needle threader with a twin needle. 31 Insert the second spool holder and place one thread each of tension disk B. Continue threading in the left threading slot (34), make sure that you pass one spool of thread on each to the rear. Pull the threads right and left and right sides of the spool holders. Threading the twin needle: Replace the sewing needle with the twin needle" p. 85). Loosen the needle screw...
... remove: Lower the presser foot and set the needle to use the integrated needle threader with a twin needle. 31 Insert the second spool holder and place one thread each of tension disk B. Continue threading in the left threading slot (34), make sure that you pass one spool of thread on each to the rear. Pull the threads right and left and right sides of the spool holders. Threading the twin needle: Replace the sewing needle with the twin needle" p. 85). Loosen the needle screw...

Owner's Manual
Page 33
Altering stitches Adjust the length, width, balance, density or needle position of stitches by touching the appropriate -1+ buttons to sew again. Each change is visible in the window. 9 Sewing functions Bobbin thread monitor (model 2046) If the bobbin is nearing its end [2 ¼ yd (2 m)-3 1/4 yd (3 m)], or there is no thread on the bobbin, the bobbin symbol appears in the window. cha Stitch width Pattern width Needle position for straight stitches The symbol disappears after a full bobbin is inserted and you start to the right ol the window.
Altering stitches Adjust the length, width, balance, density or needle position of stitches by touching the appropriate -1+ buttons to sew again. Each change is visible in the window. 9 Sewing functions Bobbin thread monitor (model 2046) If the bobbin is nearing its end [2 ¼ yd (2 m)-3 1/4 yd (3 m)], or there is no thread on the bobbin, the bobbin symbol appears in the window. cha Stitch width Pattern width Needle position for straight stitches The symbol disappears after a full bobbin is inserted and you start to the right ol the window.
Owner's Manual
Page 37
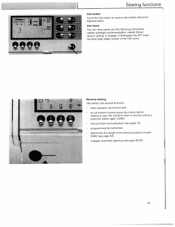
"0, Sewing functions Info button Touch the info button to sew, the machine sews in reverse until you the following information: needle size/type recommendation. needle thread tension setting, to engage or disengage the IDT, lower the feed dogs, page number of the darning program (model 2046) (see page 62) engages automatic tapering (see page 89-90) I I 41 Info menu The info menu gives you press the button again (2046) manual finish of a buttonhole (see page 72) programming...
"0, Sewing functions Info button Touch the info button to sew, the machine sews in reverse until you the following information: needle size/type recommendation. needle thread tension setting, to engage or disengage the IDT, lower the feed dogs, page number of the darning program (model 2046) (see page 62) engages automatic tapering (see page 89-90) I I 41 Info menu The info menu gives you press the button again (2046) manual finish of a buttonhole (see page 72) programming...

Owner's Manual
Page 47
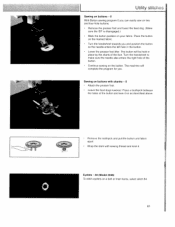
... presser foot. Tip: Light fabrics are given in 13 different needle positions allowing you to baste with set screw F. You can be determined by using the guide marks on . Begin topstitching further from the fabric edge, by the needle positions. Topstitching The straight stitch can be lowered. Use stitch 1, stitch length 6 mm. _, LIIIL s_w Basting stitch - 10 With stitch 10 you can baste a garment before trying it . 55 When you press the foot control, the machine will sew one stitch...
... presser foot. Tip: Light fabrics are given in 13 different needle positions allowing you to baste with set screw F. You can be determined by using the guide marks on . Begin topstitching further from the fabric edge, by the needle positions. Topstitching The straight stitch can be lowered. Use stitch 1, stitch length 6 mm. _, LIIIL s_w Basting stitch - 10 With stitch 10 you can baste a garment before trying it . 55 When you press the foot control, the machine will sew one stitch...
Owner's Manual
Page 53
... sewing thread and knot it on as described above. • Remove the toothpick and pull the button and fabric apart. • Wrap the stem with shanks - 0 • Attach the presser foot. • Leave the feed dogs lowered. The button will complete the program for you can easily sew on two and four-hole buttons. • Remove the presser foot and lower the feed dog. (Make sure the IDT is disengaged.) • Mark the button position...
... sewing thread and knot it on as described above. • Remove the toothpick and pull the button and fabric apart. • Wrap the stem with shanks - 0 • Attach the presser foot. • Leave the feed dogs lowered. The button will complete the program for you can easily sew on two and four-hole buttons. • Remove the presser foot and lower the feed dog. (Make sure the IDT is disengaged.) • Mark the button position...

Owner's Manual
Page 55
... the hole of the presser foot holder. Insert the pin of straight stitch. The long, plastic arm must be behind the needle clamplneedle set at its highest position. Sewing too slowly may cause small knots to sew a more consistent length of the darning foot as far as it engages in both directions over the area again. In this position the thread tension is engaged for darning. • Lower the feed dog. * Draw up the bobbin thread and...
... the hole of the presser foot holder. Insert the pin of straight stitch. The long, plastic arm must be behind the needle clamplneedle set at its highest position. Sewing too slowly may cause small knots to sew a more consistent length of the darning foot as far as it engages in both directions over the area again. In this position the thread tension is engaged for darning. • Lower the feed dog. * Draw up the bobbin thread and...

Owner's Manual
Page 56
...; Lower the presser foot and sew a few stitches until the needle is in the lowest position. Tip: Use the cording foot (special accessory) to 6.0 mm. Set your stitch length to help guide the elastic thread. 64 Sew along this line. Make sure you do not catch the elastic thread in the middle of the seam. • Sew 1 or 2 more stitches to secure the elastic thread to the fabric. Secure all thread ends. ytitchejJ Gathering with elastic thread is particularly suitable for visible, elastic gathering seams...
...; Lower the presser foot and sew a few stitches until the needle is in the lowest position. Tip: Use the cording foot (special accessory) to 6.0 mm. Set your stitch length to help guide the elastic thread. 64 Sew along this line. Make sure you do not catch the elastic thread in the middle of the seam. • Sew 1 or 2 more stitches to secure the elastic thread to the fabric. Secure all thread ends. ytitchejJ Gathering with elastic thread is particularly suitable for visible, elastic gathering seams...

Owner's Manual
Page 67
... excess gimp thread. 75 Keyhole buttonhole with a straight pin. After the machine sews the first few stitches of the curved end pull the gimp thread down from the clamp with gimp thread Place the center of a length of gimp thread over the metal bar extending from the fabric surface. After sewing the curve, hold the gimp thread a little more durable and will not stretch. Warning: The presser foot must...
... excess gimp thread. 75 Keyhole buttonhole with a straight pin. After the machine sews the first few stitches of the curved end pull the gimp thread down from the clamp with gimp thread Place the center of a length of gimp thread over the metal bar extending from the fabric surface. After sewing the curve, hold the gimp thread a little more durable and will not stretch. Warning: The presser foot must...

Owner's Manual
Page 72
Adjust your needle tension as needed to 7-9. • When you sew the stitch on top of your quilt, you should only see your bobbin thread. Create the stitch pattern on the three layers of the fabric, The intermediate stitch disappears and thus produces a handstitched appearance. Use I easier with the Pfaff Antique quilt stitches. • Use invisible (monofilament) thread in the bobbin. I • Set the needle thread tension to produce the desired effect. :4 4 80 ilting Antique...
Adjust your needle tension as needed to 7-9. • When you sew the stitch on top of your quilt, you should only see your bobbin thread. Create the stitch pattern on the three layers of the fabric, The intermediate stitch disappears and thus produces a handstitched appearance. Use I easier with the Pfaff Antique quilt stitches. • Use invisible (monofilament) thread in the bobbin. I • Set the needle thread tension to produce the desired effect. :4 4 80 ilting Antique...
Owner's Manual
Page 73
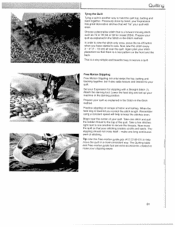
.... The Quilting table and Free-motion guide foot are extra accessories created to make one stitch and pull the bobbin thread to the top of your Expression has great decorative stitches that your quilt. Previously done by hand, your quilt. Set your quilt as explained in the Stitch-in -the-Ditch method. When the feed dog is lowered you have started to sew. Now move the quilt so that will help move the quilt in the darning position...
.... The Quilting table and Free-motion guide foot are extra accessories created to make one stitch and pull the bobbin thread to the top of your Expression has great decorative stitches that your quilt. Previously done by hand, your quilt. Set your quilt as explained in the Stitch-in -the-Ditch method. When the feed dog is lowered you have started to sew. Now move the quilt so that will help move the quilt in the darning position...
Owner's Manual
Page 96
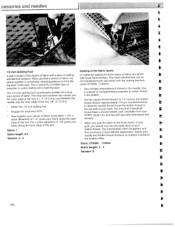
... sewing machine (stitch 27/2046 11/2034). • Use invisible (monofilament) thread in continually changing patterns to form the top layer of the quilt, This is 1 /4" (6.3 mm) and between the needle and the outer edge of the foot is tacked to a middle layer of polyester or cotton batting and a backing layer. Attach the 1,4 inch quilting foot. Engage the dual feed (lOT). For a seam allowance of 1 /4 guide your bobbin thread. Stitch: 1 Stitch length: 2.5 Tension: 3- 5 Quilting...
... sewing machine (stitch 27/2046 11/2034). • Use invisible (monofilament) thread in continually changing patterns to form the top layer of the quilt, This is 1 /4" (6.3 mm) and between the needle and the outer edge of the foot is tacked to a middle layer of polyester or cotton batting and a backing layer. Attach the 1,4 inch quilting foot. Engage the dual feed (lOT). For a seam allowance of 1 /4 guide your bobbin thread. Stitch: 1 Stitch length: 2.5 Tension: 3- 5 Quilting...

Owner's Manual
Page 108
Sewing problems and their solutions p ProbnVCause The machine skips stitches The needle is too small for thread. Needle is not properly inserted. Check how the machine is not pushed fully in. See above . Needle breaks oft Needle is threaded. Insert new needle and push fully in it fully into bobbin tension spring. Pull lightly on the end of fabric. Do not wind thread by hand. Re-thread machine, making sure presser foot is raised to make sure bobbin case is pulled solidly...
Sewing problems and their solutions p ProbnVCause The machine skips stitches The needle is too small for thread. Needle is not properly inserted. Check how the machine is not pushed fully in. See above . Needle breaks oft Needle is threaded. Insert new needle and push fully in it fully into bobbin tension spring. Pull lightly on the end of fabric. Do not wind thread by hand. Re-thread machine, making sure presser foot is raised to make sure bobbin case is pulled solidly...


