
Owner's Manual
Page 4
... 32 32 Disengaging the upper knife Adjusting the seam width Changing the sewing foot Changing the light bulb Cleaning the thread tensions Rolled hems Changing the needles Changing the knives Changing the upper knife Changing the lower knife Oiling the machine Sewing problems and their removal Accessories Thread spool net/thread unreeling disc Specifications Contents of the upper knite Setting the standard thread tensions Correcting the thread tensions 3-thread overedge seam Thread chart Adjusting the stitch length on hobbylock 784 and 786 Adjusting the differential feed (hobbyfock 786) . .
... 32 32 Disengaging the upper knife Adjusting the seam width Changing the sewing foot Changing the light bulb Cleaning the thread tensions Rolled hems Changing the needles Changing the knives Changing the upper knife Changing the lower knife Oiling the machine Sewing problems and their removal Accessories Thread spool net/thread unreeling disc Specifications Contents of the upper knite Setting the standard thread tensions Correcting the thread tensions 3-thread overedge seam Thread chart Adjusting the stitch length on hobbylock 784 and 786 Adjusting the differential feed (hobbyfock 786) . .
Owner's Manual
Page 5
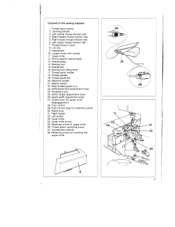
...of the sewing machine 1 Thread spool stand 2 Carrying handle 3 Left needle thread tension dial 4 Right needle thread tension dial 5 Right looper thread tension dial 6 Left looper thread tension dial 7 Thread tension cover 8 Lint box 9 Handwheel 10 Looper cover with recess 11 Upper knife 12 Work support (swivel-type) 13 Needle plate 14 Sewing foot 15 Needle bar 16 Sewing foot lifting lever 17 Thread spool holder 18 Thread guides 19 Thread guide bar 20 Machine socket 21 Master switch 22 Rear thread guide (4 x) 23 Differential feed adjustment knob 24 Accessory box 25 Stitch length adjustment knob...
...of the sewing machine 1 Thread spool stand 2 Carrying handle 3 Left needle thread tension dial 4 Right needle thread tension dial 5 Right looper thread tension dial 6 Left looper thread tension dial 7 Thread tension cover 8 Lint box 9 Handwheel 10 Looper cover with recess 11 Upper knife 12 Work support (swivel-type) 13 Needle plate 14 Sewing foot 15 Needle bar 16 Sewing foot lifting lever 17 Thread spool holder 18 Thread guides 19 Thread guide bar 20 Machine socket 21 Master switch 22 Rear thread guide (4 x) 23 Differential feed adjustment knob 24 Accessory box 25 Stitch length adjustment knob...
Owner's Manual
Page 6
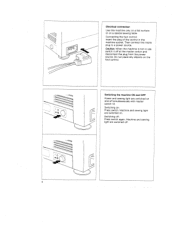
... to a power source. Connecting the foot control: Insert the plug of the control in use, switch it off : Press switch again. Electrical connection Use this machine only on a flat surface or on . Switching the machine ON and OFF Power and sewing light are switched on a special sewing table. Switching off at the master switch and disconnect the plug from the power source. Machine and sewing light are switched...
... to a power source. Connecting the foot control: Insert the plug of the control in use, switch it off : Press switch again. Electrical connection Use this machine only on a flat surface or on . Switching the machine ON and OFF Power and sewing light are switched on a special sewing table. Switching off at the master switch and disconnect the plug from the power source. Machine and sewing light are switched...
Owner's Manual
Page 7
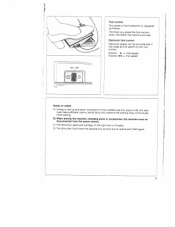
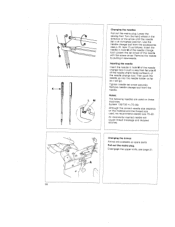
... the light bulb is regulated as follows: The more you press the foot control down movement of the Hobbylock is 15 watts. Foot control The speed of the needles and the upper knife, the user must be adjusted by the switch on safety A) Owing to the up and down , the faster the machine will sew. D) The drive belt must never be disconnected from the power...
... the light bulb is regulated as follows: The more you press the foot control down movement of the Hobbylock is 15 watts. Foot control The speed of the needles and the upper knife, the user must be adjusted by the switch on safety A) Owing to the up and down , the faster the machine will sew. D) The drive belt must never be disconnected from the power...
Owner's Manual
Page 9
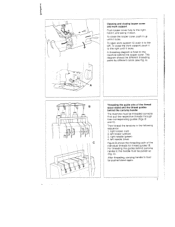
First pull the respective threads through their corresponding guides (Figs. right looper (red) 2. left . C). I n E1 H Opening and closing looper cover and work support, push it to the right until it locks. To open work support 12, push it up (Fig. left needle (blue) C Figure B shows the threading path of the thread spool stand and the thread guides behind the looper cover. This diagram shows the different threading paths by different...
First pull the respective threads through their corresponding guides (Figs. right looper (red) 2. left . C). I n E1 H Opening and closing looper cover and work support, push it to the right until it locks. To open work support 12, push it up (Fig. left needle (blue) C Figure B shows the threading path of the thread spool stand and the thread guides behind the looper cover. This diagram shows the different threading paths by different...
Owner's Manual
Page 12
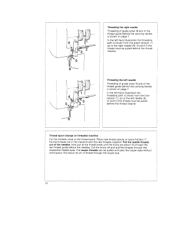
... the threading path is shown on page 7. At point 5 the thread must be pulled until the knots are about 10 cm of thread through the respective needle eyes. .1 H- •f? 3 111.3 rrc 2 -3 5 Threading the right needle Threading of guide wires 18 and of the thread guide behind the carrying handle is shown from the blue tension (1) up to the right needle (6>. Thread spool change on spool holders 17...
... the threading path is shown on page 7. At point 5 the thread must be pulled until the knots are about 10 cm of thread through the respective needle eyes. .1 H- •f? 3 111.3 rrc 2 -3 5 Threading the right needle Threading of guide wires 18 and of the thread guide behind the carrying handle is shown from the blue tension (1) up to the right needle (6>. Thread spool change on spool holders 17...
Owner's Manual
Page 15
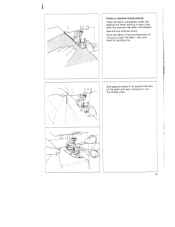
Sew approximately 5 cm beyond the end a scissors to sew. (Also after the machine has been rethreaded.) Sew the first stitches slowly. Points to observe during sewing Place the fabric completely under the sewing foot when starting to cut Use your hand for guiding only. Since the fabric is fed automatically, do 4 not pull or push the fabric.
Sew approximately 5 cm beyond the end a scissors to sew. (Also after the machine has been rethreaded.) Sew the first stitches slowly. Points to observe during sewing Place the fabric completely under the sewing foot when starting to cut Use your hand for guiding only. Since the fabric is fed automatically, do 4 not pull or push the fabric.
Owner's Manual
Page 16
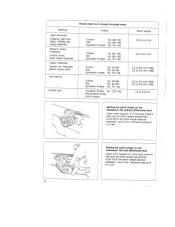
Securing the seam: Knot the thread chain. When sewing extremely thick fabrics or workpieces with different thicknesses: On this machine, all kinds of the upper knife is inhibited. For knit fabrics, a crochet needle can be processed. Or: Sew about 2 turns, so that the upper knife can move axially. 14 Blocking the upper knife Sewing very thick fabrics and workpieces with different thicknesses, the screw of seam. By...
Securing the seam: Knot the thread chain. When sewing extremely thick fabrics or workpieces with different thicknesses: On this machine, all kinds of the upper knife is inhibited. For knit fabrics, a crochet needle can be processed. Or: Sew about 2 turns, so that the upper knife can move axially. 14 Blocking the upper knife Sewing very thick fabrics and workpieces with different thicknesses, the screw of seam. By...

Owner's Manual
Page 19
seam width 7.2 mm Standard seam width N 3.5 mm Max. fl Left needle 3-thread overedge seam Right needle !J Standard seam width N * 5,7 mm Max. seam width 5 mm 17 The left or right needle must be removed. I 3-thread overedge seam: The with 3-thread overedge seam two looper threads and is sewn one needle thread.
seam width 7.2 mm Standard seam width N 3.5 mm Max. fl Left needle 3-thread overedge seam Right needle !J Standard seam width N * 5,7 mm Max. seam width 5 mm 17 The left or right needle must be removed. I 3-thread overedge seam: The with 3-thread overedge seam two looper threads and is sewn one needle thread.
Owner's Manual
Page 20
... stitch length desired between 1 and 5 mm. Setting the stitch length on the hobbylock 786 with differential feed Open work support 12. Standard setting N is3mm. / / - / c\L-_ t/>7 A . .i,___c( Setting the stitch length on the hobbylock 784 without differential feed Open work support 12. Standard setting N Material Light materials: Organdy, light-knit fabric, Taffeta, silk, lining materials Medium-heavy materials: Cotton, tricot, linen, dress materials Heavy materials: Tweed, suit materials, denim, heavy cloth Knit fabrics: Rolled hem Thread chart for 4-thread overedge seam...
... stitch length desired between 1 and 5 mm. Setting the stitch length on the hobbylock 786 with differential feed Open work support 12. Standard setting N is3mm. / / - / c\L-_ t/>7 A . .i,___c( Setting the stitch length on the hobbylock 784 without differential feed Open work support 12. Standard setting N Material Light materials: Organdy, light-knit fabric, Taffeta, silk, lining materials Medium-heavy materials: Cotton, tricot, linen, dress materials Heavy materials: Tweed, suit materials, denim, heavy cloth Knit fabrics: Rolled hem Thread chart for 4-thread overedge seam...
Owner's Manual
Page 21
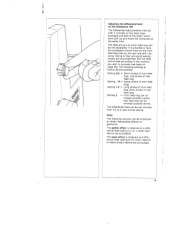
... heavy elastic fabrics are processed. 19 The wave effect is obtained at button 23 are possible: Setting 0.5 = Short stroke of front feed dog, long stroke of rear feed dog Setting - N = Same stroke of both pick up and move the workpiece at the same time. Adjusting the differential feed on garments: The gather effect is obtained at a diffe rential feed setting of 1.5-2 when light fabrics are processed. Set the...
... heavy elastic fabrics are processed. 19 The wave effect is obtained at button 23 are possible: Setting 0.5 = Short stroke of front feed dog, long stroke of rear feed dog Setting - N = Same stroke of both pick up and move the workpiece at the same time. Adjusting the differential feed on garments: The gather effect is obtained at a diffe rential feed setting of 1.5-2 when light fabrics are processed. Set the...
Owner's Manual
Page 22
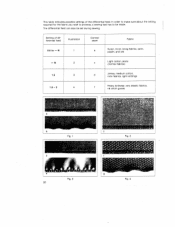
... fabric you wish to process, a sewing test has to - N 1 Correct seam a Fabric Nylon, tricot, lining fabrics, satin, poplin, and silk N - 2 Light cotton, jeans (normal fabrics) 1.5 3 d Jersey, medium cotton, nicki fabrics, light knittings 1.5 - 2 4 I Heavy knitwear, ve elastic fabrics, rib stitch goods Fig. 1 C Fig. 2 Fig. 3 20 Fig. 4 Setting of the differential feed. The differential feed can also be made. This table indicates possible settings of differential feed Illustration 0.5 to be set during sewing...
... fabric you wish to process, a sewing test has to - N 1 Correct seam a Fabric Nylon, tricot, lining fabrics, satin, poplin, and silk N - 2 Light cotton, jeans (normal fabrics) 1.5 3 d Jersey, medium cotton, nicki fabrics, light knittings 1.5 - 2 4 I Heavy knitwear, ve elastic fabrics, rib stitch goods Fig. 1 C Fig. 2 Fig. 3 20 Fig. 4 Setting of the differential feed. The differential feed can also be made. This table indicates possible settings of differential feed Illustration 0.5 to be set during sewing...

Owner's Manual
Page 23
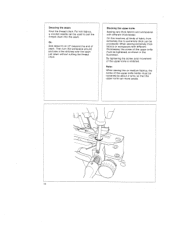
* 0 Disengaging the upper knife Remove lint box 8. Open work support 12 and looper cover 10. Push rotary lever 27 of the axial upper knife guide fully to the right, hold it, and turn it may be necessary to re-adjust the thread tension. 21 Now the upper knife is set with N (3.5 mm). cA - Note: After adjusting the seam width, it forwards until pin A engages in the hole of the...
* 0 Disengaging the upper knife Remove lint box 8. Open work support 12 and looper cover 10. Push rotary lever 27 of the axial upper knife guide fully to the right, hold it, and turn it may be necessary to re-adjust the thread tension. 21 Now the upper knife is set with N (3.5 mm). cA - Note: After adjusting the seam width, it forwards until pin A engages in the hole of the...

Owner's Manual
Page 25
... from between the tensions. Inserting the light bulb: Insert the new bulb (15 Watt max.) with the pins in retainers A of the sewing light is situated. Use the brush provided with both hands to the left. Removing the light bulb: Push the light bulb upwards and turn it , the light bulb of the housing. 23 Open the housing cover. Close and fasten housing cover. Cleaning the thread tensions: Pull thread tension cover 7 with the accessories to the right...
... from between the tensions. Inserting the light bulb: Insert the new bulb (15 Watt max.) with the pins in retainers A of the sewing light is situated. Use the brush provided with both hands to the left. Removing the light bulb: Push the light bulb upwards and turn it , the light bulb of the housing. 23 Open the housing cover. Close and fasten housing cover. Cleaning the thread tensions: Pull thread tension cover 7 with the accessories to the right...
Owner's Manual
Page 27
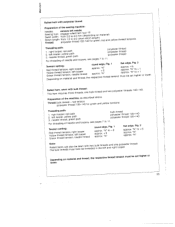
... must be set higher or lower. Rolled hem, sewn This hem requires with polyester thread Preparation of the machine, as described above. I Rolled hem with bulk thread: three threads, one bulk thread and two polyester threads 120-140. right looper, red path polyester thread 2. 3. Preparation of the sewing machine: Needle: Sewing foot: Seam width: Stitch length: Thread: reffperrnooomgmmlyaoegv31see..t00elrreottooflttlhe42rnd..e00eahedm(edsmlmh1eo2f0r(ot-does1ttp4i"et0cRnhf"doirlneggnrgeotehnn),mraetderiaanld) yellow thread tensions Threading path...
... must be set higher or lower. Rolled hem, sewn This hem requires with polyester thread Preparation of the machine, as described above. I Rolled hem with bulk thread: three threads, one bulk thread and two polyester threads 120-140. right looper, red path polyester thread 2. 3. Preparation of the sewing machine: Needle: Sewing foot: Seam width: Stitch length: Thread: reffperrnooomgmmlyaoegv31see..t00elrreottooflttlhe42rnd..e00eahedm(edsmlmh1eo2f0r(ot-does1ttp4i"et0cRnhf"doirlneggnrgeotehnn),mraetderiaanld) yellow thread tensions Threading path...
Owner's Manual
Page 28
I \\ Notes: The following needles are available as spare parts. Tighten needle set screw of the needle with the screw driver. PKunlilvoesut the mains plug. Lower the sewing foot. Remove the needle by pulling it will cause thread breakage and skipped stitches. -,/y - ___;_ . \c;;-rI - Then push the needle up into the needle holder as far as follows: Insert the needle in hole M of the needle change tool. Turn the hand wheel in such a way that...
I \\ Notes: The following needles are available as spare parts. Tighten needle set screw of the needle with the screw driver. PKunlilvoesut the mains plug. Lower the sewing foot. Remove the needle by pulling it will cause thread breakage and skipped stitches. -,/y - ___;_ . \c;;-rI - Then push the needle up into the needle holder as far as follows: Insert the needle in hole M of the needle change tool. Turn the hand wheel in such a way that...

Owner's Manual
Page 30
Replace the screw with the needle plate surface. Before tightening the retaining screw, align the pressure plate. Align the cutting edge of the lower knife holder and push it is flush with the pressure plate. I /( Changing the lower knife Pull out the mains plug' Disengage the upper knife (see page 21). Remove the retaining screw of the lower knife. :;;: -ZL--1 p Place the new lower knife against the left guide of the lower knife so that it up, as shown in the illustration. Reset the upper knife to cutting position. 28
Replace the screw with the needle plate surface. Before tightening the retaining screw, align the pressure plate. Align the cutting edge of the lower knife holder and push it is flush with the pressure plate. I /( Changing the lower knife Pull out the mains plug' Disengage the upper knife (see page 21). Remove the retaining screw of the lower knife. :;;: -ZL--1 p Place the new lower knife against the left guide of the lower knife so that it up, as shown in the illustration. Reset the upper knife to cutting position. 28
Owner's Manual
Page 32
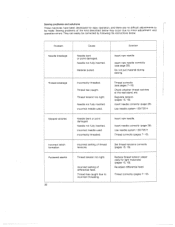
... Needle bent or point damaged. Insert new needle correctly (see pages 7-10). Insert new needle. Use needle system 130/705 H Thread correctly (pages 7-10). Thread correctly (pages 7-10). and operation errors. Puckered seams 30 Thread tension too tight. Check whether thread catches at the reel stand, etc. Sewing problems and solutions These machines have been developed for light materials) (pages 15, 16). Incorrect stitch formation Incorrect setting of differential feed. Needle not fully inserted. Sewing problems of the kind...
... Needle bent or point damaged. Insert new needle correctly (see pages 7-10). Insert new needle. Use needle system 130/705 H Thread correctly (pages 7-10). Thread correctly (pages 7-10). and operation errors. Puckered seams 30 Thread tension too tight. Check whether thread catches at the reel stand, etc. Sewing problems and solutions These machines have been developed for light materials) (pages 15, 16). Incorrect stitch formation Incorrect setting of differential feed. Needle not fully inserted. Sewing problems of the kind...
Owner's Manual
Page 33
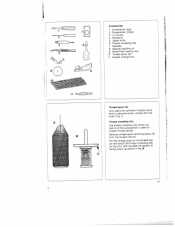
... the thread reel pin and place the thread unreeling disc on top of the accessories is used for synthetic threads which 1 tend to become loose, unravel and slip down , as shown in Fig. B. 31 I 5o 6Q •11 II#ICIIIII*IIIiIlI, Bfl E '1 Accessories 1 Screwdriver (big) t 2 Screwdriver (small) 3 Lint brush 4 Tweezers 5 Upper knife 6 Thread unreeling disc 7 Needles 8 Sewing machine oil I 9 Rolled hem sewing foot 10 Thread spool net 11 Needle change tool...
... the thread reel pin and place the thread unreeling disc on top of the accessories is used for synthetic threads which 1 tend to become loose, unravel and slip down , as shown in Fig. B. 31 I 5o 6Q •11 II#ICIIIII*IIIiIlI, Bfl E '1 Accessories 1 Screwdriver (big) t 2 Screwdriver (small) 3 Lint brush 4 Tweezers 5 Upper knife 6 Thread unreeling disc 7 Needles 8 Sewing machine oil I 9 Rolled hem sewing foot 10 Thread spool net 11 Needle change tool...
Owner's Manual
Page 34
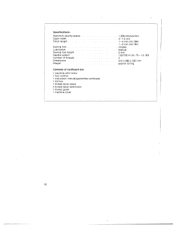
no . 75- Specifications: Maximum sewing speed Seam width Stitch length Sewing foot Lubrication Sewing foot height Needle system Number of threads Dimensions Weight Contents of cardboard box 1 machine with motor 1 foot control 1 instruction manual/guarantee certificate 1 lint box 1 thread spool stand 4 thread spool stand bars 1 thread guide 1 machine cover 1.300 stitches/mm. 3-7.2mm 1 -4 mm (HL-786) 1 -5 mm (HL-784) Hinged Manual 5mm 130/705 H (no . 90) 4 315 x 280 x 330mm approx. 8.0 kg 32
no . 75- Specifications: Maximum sewing speed Seam width Stitch length Sewing foot Lubrication Sewing foot height Needle system Number of threads Dimensions Weight Contents of cardboard box 1 machine with motor 1 foot control 1 instruction manual/guarantee certificate 1 lint box 1 thread spool stand 4 thread spool stand bars 1 thread guide 1 machine cover 1.300 stitches/mm. 3-7.2mm 1 -4 mm (HL-786) 1 -5 mm (HL-784) Hinged Manual 5mm 130/705 H (no . 90) 4 315 x 280 x 330mm approx. 8.0 kg 32


