Owner's Manual
Page 3
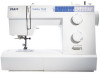
Parts of your hobby™ 1142 sewing machine 1 Bobbin winder stop 2 Bobbin winder spindle 3 Hole for extra spool pin 4 Spool pin 5 Carrying handle 6 Bobbin thread guide 7 Take-up lever 8 Foot pressure dial 9 Face plate 10 Thread cutter 11 Buttonhole lever 12 Needle threader 13 Slide for lowering the feed dog 14 Needle plate 15...
Parts of your hobby™ 1142 sewing machine 1 Bobbin winder stop 2 Bobbin winder spindle 3 Hole for extra spool pin 4 Spool pin 5 Carrying handle 6 Bobbin thread guide 7 Take-up lever 8 Foot pressure dial 9 Face plate 10 Thread cutter 11 Buttonhole lever 12 Needle threader 13 Slide for lowering the feed dog 14 Needle plate 15...
Owner's Manual
Page 6
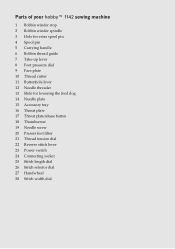
...Introduction TABLE OF CONTENTS Introduction Standard accessories IV Optional accessories V Accessory tray V Stitch table VI 1. Operate your hobby 1142 Carrying handle, carrying case 1:2 Connecting the foot control 1:2 Foot preassure dial 1:3 Dropping the feed dog 1:3... overlock stitch (Knit stitch) 2:10 Closed overlock stitch 2:10 Blindhem 2:11 Blindhem stitch (elastic) 2:11 Automatic buttonhole 2:12 Buttonhole with gimp thread 2:14 Manual buttonhole 2:14 Button sewing 2:15 Sewing on zippers 2:16 Sewing on patches 2:18 Darning with the elastic stitch 2:18...
...Introduction TABLE OF CONTENTS Introduction Standard accessories IV Optional accessories V Accessory tray V Stitch table VI 1. Operate your hobby 1142 Carrying handle, carrying case 1:2 Connecting the foot control 1:2 Foot preassure dial 1:3 Dropping the feed dog 1:3... overlock stitch (Knit stitch) 2:10 Closed overlock stitch 2:10 Blindhem 2:11 Blindhem stitch (elastic) 2:11 Automatic buttonhole 2:12 Buttonhole with gimp thread 2:14 Manual buttonhole 2:14 Button sewing 2:15 Sewing on zippers 2:16 Sewing on patches 2:18 Darning with the elastic stitch 2:18...

Owner's Manual
Page 8
IV Introduction Standard accessories 1 1 Standard presser foot A Part No. 820 546-096 2 Buttonhole foot B 2 Part No. 820 547-096 3 Overcasting foot C 3 Part No. 820 548-096 4 Zipper foot E 4 Part No. 820 549-096 5 Blindhem foot G 5 Part No. 820 550-096 6 Automatic buttonhole foot R 6 Part No. 820 551-096 7 Edge Guide/Quilting Guide 7 Part No. 820 552-096
IV Introduction Standard accessories 1 1 Standard presser foot A Part No. 820 546-096 2 Buttonhole foot B 2 Part No. 820 547-096 3 Overcasting foot C 3 Part No. 820 548-096 4 Zipper foot E 4 Part No. 820 549-096 5 Blindhem foot G 5 Part No. 820 550-096 6 Automatic buttonhole foot R 6 Part No. 820 551-096 7 Edge Guide/Quilting Guide 7 Part No. 820 552-096

Owner's Manual
Page 10
...; For stitching on elastic band, darning tears and patches For invisible hem attachment and simultaneous serging. VI Introduction Stitch table hobby 1142 Stitch A Buttonhole B Straight stitch, needle position middle C Straight stitch, needle position left D Zigzag stitch E Triple zigzag stitch F Elastic... J Closed overlock stitch M Decorative stitch N Decorative stitch O Decorative stitch P Decorative stitch Description Standard buttonhole for stretch fabrics For invisible hem attachment For decorative hems on Àne materials, e.g. linen A traditional decorative stitch e.g.
...; For stitching on elastic band, darning tears and patches For invisible hem attachment and simultaneous serging. VI Introduction Stitch table hobby 1142 Stitch A Buttonhole B Straight stitch, needle position middle C Straight stitch, needle position left D Zigzag stitch E Triple zigzag stitch F Elastic... J Closed overlock stitch M Decorative stitch N Decorative stitch O Decorative stitch P Decorative stitch Description Standard buttonhole for stretch fabrics For invisible hem attachment For decorative hems on Àne materials, e.g. linen A traditional decorative stitch e.g.
Owner's Manual
Page 23
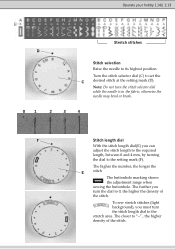
... to the stretch area. The higher the number, the longer the E stitch The buttonhole marking shows the adjustment range when sewing the buttonhole. The further you turn the stitch length dial to "-" , the higher density of the stitch. Operate your hobby 1142 1:13 Stretch stitches D Stitch selection Raise the needle to set the C desired...
... to the stretch area. The higher the number, the longer the E stitch The buttonhole marking shows the adjustment range when sewing the buttonhole. The further you turn the stitch length dial to "-" , the higher density of the stitch. Operate your hobby 1142 1:13 Stretch stitches D Stitch selection Raise the needle to set the C desired...

Owner's Manual
Page 26
... low, the threads are interlaced above the top fabric. For darning and buttonhole set the tension between two layers of fabric and sewing method. Balanced tension: The ideal straight stitch has threads locked between 2 and 3. 1:16 Operate your hobby 1142 Balancing needle thread tension The thread tension should be adjusted depending on the...
... low, the threads are interlaced above the top fabric. For darning and buttonhole set the tension between two layers of fabric and sewing method. Balanced tension: The ideal straight stitch has threads locked between 2 and 3. 1:16 Operate your hobby 1142 Balancing needle thread tension The thread tension should be adjusted depending on the...

Owner's Manual
Page 28
... to bring the needle down into the fabric. Lower the presser foot and smooth the threads toward you to the left when sewing with the buttonhole foot. Lower the needle into the fabric. Depress the foot control. Gently guide the fabric along the seam guide letting the fabric feed by itself...
... to bring the needle down into the fabric. Lower the presser foot and smooth the threads toward you to the left when sewing with the buttonhole foot. Lower the needle into the fabric. Depress the foot control. Gently guide the fabric along the seam guide letting the fabric feed by itself...

Owner's Manual
Page 38
... Note: Make sure there is necessary to use stabilizer to its highest position. 2:12 Utility stitches and practical sewing D C A E B stitch A 4-5 0.5-1 1-5 R F Automatic Buttonhole Buttonholes are ideally suited to this purpose. Mark the starting point using the actual fabric Note: The size of... buttonhole is a gap, the length of the buttonhole either with a magic pen or dress pin, and always sew a sample buttonhole Àrst, using the handwheel. Insert the fabric under the foot and lower ...
... Note: Make sure there is necessary to use stabilizer to its highest position. 2:12 Utility stitches and practical sewing D C A E B stitch A 4-5 0.5-1 1-5 R F Automatic Buttonhole Buttonholes are ideally suited to this purpose. Mark the starting point using the actual fabric Note: The size of... buttonhole is a gap, the length of the buttonhole either with a magic pen or dress pin, and always sew a sample buttonhole Àrst, using the handwheel. Insert the fabric under the foot and lower ...

Owner's Manual
Page 39
...right row. Raise the foot and remove the fabric. Cut both needle and bobbin threads leaving about 10 cm (4") thread ends. Adjusting the buttonhole stitch density Turn the stitch length dial within the range of fabric by pulling the button holder a little to "1". Pull the needle thread... to wrong side of " " to adjust the buttonhole stitch density. To open the buttonhole Insert a pin inside the bartack. To get a narrow buttonhole, set the marking close to cut the opening. Take care not to "0" as it will go. When...
...right row. Raise the foot and remove the fabric. Cut both needle and bobbin threads leaving about 10 cm (4") thread ends. Adjusting the buttonhole stitch density Turn the stitch length dial within the range of fabric by pulling the button holder a little to "1". Pull the needle thread... to wrong side of " " to adjust the buttonhole stitch density. To open the buttonhole Insert a pin inside the bartack. To get a narrow buttonhole, set the marking close to cut the opening. Take care not to "0" as it will go. When...

Owner's Manual
Page 40
... page 2:13. Lower the needle into the fabric at the starting point. Pull the buttonhole lever down as far as follows: Attach the buttonhole foot B. Sew the front bartack and left end of the foot (B) to the left... . Press the foot control gently and sew the buttonhole over the gimp thread. Pull the left row to the left . Pull both needle and bobbin ...point and lower the foot. On knits the gimp thread is the same as it and cut the buttonhole opening, refer to the instructions on the front of the gimp cord to tighten it will go ....
... page 2:13. Lower the needle into the fabric at the starting point. Pull the buttonhole lever down as far as follows: Attach the buttonhole foot B. Sew the front bartack and left end of the foot (B) to the left... . Press the foot control gently and sew the buttonhole over the gimp thread. Pull the left row to the left . Pull both needle and bobbin ...point and lower the foot. On knits the gimp thread is the same as it and cut the buttonhole opening, refer to the instructions on the front of the gimp cord to tighten it will go ....

Owner's Manual
Page 49
... The machine does not sew or run The machine is important if there are too Àne. This is not plugged in the hook race. Buttonhole is not sewn neatly The stitch density is not suitable for the fabric being sewn. Layer slippage Foot pressure is not raised after bobbin winding...
... The machine does not sew or run The machine is important if there are too Àne. This is not plugged in the hook race. Buttonhole is not sewn neatly The stitch density is not suitable for the fabric being sewn. Layer slippage Foot pressure is not raised after bobbin winding...

Owner's Manual
Page 50
... stitch 2:9 B Basic sewing I 2:2 Blindhem 2:11 Inserting the bobbin 1:8 Blindhem stitch (elastic) 2:11 Bobbin winding Bringing up the bobbin thread M 1:6 1:12 Button sewing 2:15 Manual buttonhole 2:14 Buttonhole - remove and attach 1:5 D Darning with gimp thread 2:14 Needle threader 1:10 C O Carrying handle, carrying case 1:2 Open overlock stitch 2:10 Changing the needle 1:5 Optional accessories V Changing...
... stitch 2:9 B Basic sewing I 2:2 Blindhem 2:11 Inserting the bobbin 1:8 Blindhem stitch (elastic) 2:11 Bobbin winding Bringing up the bobbin thread M 1:6 1:12 Button sewing 2:15 Manual buttonhole 2:14 Buttonhole - remove and attach 1:5 D Darning with gimp thread 2:14 Needle threader 1:10 C O Carrying handle, carrying case 1:2 Open overlock stitch 2:10 Changing the needle 1:5 Optional accessories V Changing...


