
Owner's Manual
Page 6
... 9:2 Crosshair 9:3 Color list 9:3 Zoom 9:3 Embroidery information 9:4 Current stitch 9:4 Go to stitch 9:4 Thread tension 9:4 Basting 9:5 Color block sort 9:5 Pan 9:5 Option bar 9:6 More options 9:6 Speed control 9:7 Hoop position 9:7 Precise positioning 9:8 Common embroidery stitch-out pop-ups 9:11 10 Files & Folders Files & Folders -
... 9:2 Crosshair 9:3 Color list 9:3 Zoom 9:3 Embroidery information 9:4 Current stitch 9:4 Go to stitch 9:4 Thread tension 9:4 Basting 9:5 Color block sort 9:5 Pan 9:5 Option bar 9:6 More options 9:6 Speed control 9:7 Hoop position 9:7 Precise positioning 9:8 Common embroidery stitch-out pop-ups 9:11 10 Files & Folders Files & Folders -

Owner's Manual
Page 29
The material is positioned at the same time. The IDT keeps all work with the IDT, use presser feet ... of quilt projects aligned to prevent shifting of the hole. Press the IDT down , then pull it is fed precisely. Adjust the rectangular bar on the machine. The even feeding action also ensures perfect matching of the seam. Electronic knee... height for regulating the presser foot height. IDT (Integrated dual feed) For sewing any fabric precisely PFAFF® creative vision™ sewing and embroidery machine provides the ideal solution: the integrated dual feed, IDT system.
The material is positioned at the same time. The IDT keeps all work with the IDT, use presser feet ... of quilt projects aligned to prevent shifting of the hole. Press the IDT down , then pull it is fed precisely. Adjust the rectangular bar on the machine. The even feeding action also ensures perfect matching of the seam. Electronic knee... height for regulating the presser foot height. IDT (Integrated dual feed) For sewing any fabric precisely PFAFF® creative vision™ sewing and embroidery machine provides the ideal solution: the integrated dual feed, IDT system.

Owner's Manual
Page 102
... editor. Enter embroidery stitch editor to adjust your own created sequence or stitch, loaded to embroidery edit, the sequence or stitch will not affect the position of the selected stitch Embroidery mode - icons to side BCDE Decrease width of the selected stitch Decrease length of the stitch like they do in... embroidery edit, tie-offs are automatically inserted at the A beginning and at the end. Adjust stitches Open Embroidery stitch editor to join the stitches with precision. Use the + and - Note: If you make adjustments.
... editor. Enter embroidery stitch editor to adjust your own created sequence or stitch, loaded to embroidery edit, the sequence or stitch will not affect the position of the selected stitch Embroidery mode - icons to side BCDE Decrease width of the selected stitch Decrease length of the stitch like they do in... embroidery edit, tie-offs are automatically inserted at the A beginning and at the end. Adjust stitches Open Embroidery stitch editor to join the stitches with precision. Use the + and - Note: If you make adjustments.
Owner's Manual
Page 112
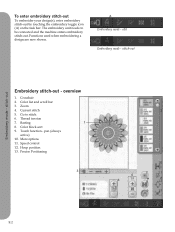
edit Embroidery mode - stitch-out Embroidery mode - Zoom 4. overview 1. Basting 1 8. Speed control 12. Precise Positioning 3 2 6 4 5 10 7 11 8 12 9 13 9:2 A Embroidery mode - Thread tension 7. Touch function - More options 11. The embroidery unit needs to stitch 6. Current stitch 5. To enter embroidery stitch-... and scroll bar 3. Functions used when embroidering a design are now shown. stitch-out Embroidery stitch-out - Crosshair 2. Color block sort 9. pan (always active) 10. Hoop position 13.
edit Embroidery mode - stitch-out Embroidery mode - Zoom 4. overview 1. Basting 1 8. Speed control 12. Precise Positioning 3 2 6 4 5 10 7 11 8 12 9 13 9:2 A Embroidery mode - Thread tension 7. Touch function - More options 11. The embroidery unit needs to stitch 6. Current stitch 5. To enter embroidery stitch-... and scroll bar 3. Functions used when embroidering a design are now shown. stitch-out Embroidery stitch-out - Crosshair 2. Color block sort 9. pan (always active) 10. Hoop position 13.

Owner's Manual
Page 118
... an exact spot on the fabric by using the stylus or the wheel. Fine tune with the previously embroidered design. 9:8 13 J I Orbiting - stitch-out Precise positioning (13) Precise positioning allows you want it on your design is also used when you to a previously embroidered design. It is lined up the design where you would...
... an exact spot on the fabric by using the stylus or the wheel. Fine tune with the previously embroidered design. 9:8 13 J I Orbiting - stitch-out Precise positioning (13) Precise positioning allows you want it on your design is also used when you to a previously embroidered design. It is lined up the design where you would...

Owner's Manual
Page 119
... check corners Orbiting can continue and make sure the needle is easy to use with the new zoom to the selected position when doing precise positioning. You can then remain close to the needle and fabric. Use the corner icons to set to be set the ...will be used when either locking point or matching point is useful when positioning a design on the connecting point. Zoom to needle (J) Precise positioning is above the fabric to prevent damage to the fabric when using precise positioning. stitch-out Disable needle warning (K) Check allow lower needle icon (K) ...
... check corners Orbiting can continue and make sure the needle is easy to use with the new zoom to the selected position when doing precise positioning. You can then remain close to the needle and fabric. Use the corner icons to set to be set the ...will be used when either locking point or matching point is useful when positioning a design on the connecting point. Zoom to needle (J) Precise positioning is above the fabric to prevent damage to the fabric when using precise positioning. stitch-out Disable needle warning (K) Check allow lower needle icon (K) ...

Owner's Manual
Page 120
...rotate to one of the embroidered design. To line up the designs. Close precise positioning and start embroidering. Select the next function, rotate design (D) to the right position in the hoop. move the locking point to move the locking point using ... corner. Check that the needle is very useful. 1. Choose one previously embroidered, precise positioning is at the exact position. 5. stitch-out 3. A 2. Use the touch function - If satisfied, close precise positioning and start embroidering. 9:10 I touch function - Use the touch function - move...
...rotate to one of the embroidered design. To line up the designs. Close precise positioning and start embroidering. Select the next function, rotate design (D) to the right position in the hoop. move the locking point to move the locking point using ... corner. Check that the needle is very useful. 1. Choose one previously embroidered, precise positioning is at the exact position. 5. stitch-out 3. A 2. Use the touch function - If satisfied, close precise positioning and start embroidering. 9:10 I touch function - Use the touch function - move...
Owner's Manual
Page 137
...side 6:3 Monochrome 9:6 More options 8:9, 9:6 Move 6:5, 8:7 Move a file or folder 10:6 Move design into hoop 8:6 Move to park position 8:9 Move up one folder level 10:5 Multi-select 6:4, 8:5 Multi-select and select equal 8:10 N Needles 2:10 Needle thread breaks 11:3 ...4:7 Personal designs 10:4 Personal files 10:3 Personal fonts 10:3 Personal info 3:13 Personal menu 3:4 PFAFF® HD screen 3:2 Position of the marked stitch point 6:5 Precise positioning 9:8 Presser feet 1:11 Presser foot down (J 2:16 Non-original parts and accessories 11:4 Not an editable ...
...side 6:3 Monochrome 9:6 More options 8:9, 9:6 Move 6:5, 8:7 Move a file or folder 10:6 Move design into hoop 8:6 Move to park position 8:9 Move up one folder level 10:5 Multi-select 6:4, 8:5 Multi-select and select equal 8:10 N Needles 2:10 Needle thread breaks 11:3 ...4:7 Personal designs 10:4 Personal files 10:3 Personal fonts 10:3 Personal info 3:13 Personal menu 3:4 PFAFF® HD screen 3:2 Position of the marked stitch point 6:5 Precise positioning 9:8 Presser feet 1:11 Presser foot down (J 2:16 Non-original parts and accessories 11:4 Not an editable ...


