Owner's Manual
Page 3
... advise you at any time. it will deÀnitely enable you to experience a totally new dimension of the most highly tuned technology and features. Your PFAFF® creative vision™ will enable you to transform all your new PFAFF® creative vision™. Before you have acquired one of sewing and embroidery. Congratulations! As a sewing enthusiast, you...
... advise you at any time. it will deÀnitely enable you to experience a totally new dimension of the most highly tuned technology and features. Your PFAFF® creative vision™ will enable you to transform all your new PFAFF® creative vision™. Before you have acquired one of sewing and embroidery. Congratulations! As a sewing enthusiast, you...
Owner's Manual
Page 5
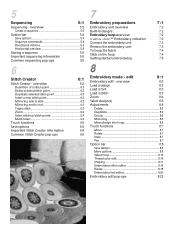
... stitch point 6:3 Insert a new stitch point 6:3 Mirroring side to side 6:3 Mirroring end to end 6:3 Triple stitch 6:3 Zoom 6:4 Select stitches/stitch points 6:4 Multi-select 6:4 Touch functions 6:5 Save options 6:5 Important Stitch Creator information 6:6 Common Stitch Creator pop-ups 6:6 7 Embroidery preparations 7:1 Embroidery unit overview 7:2 Built-in designs 7:2 Embroidery hoop overview 7:2 creative vision™ Embroidery collection 7:3 Connect...
... stitch point 6:3 Insert a new stitch point 6:3 Mirroring side to side 6:3 Mirroring end to end 6:3 Triple stitch 6:3 Zoom 6:4 Select stitches/stitch points 6:4 Multi-select 6:4 Touch functions 6:5 Save options 6:5 Important Stitch Creator information 6:6 Common Stitch Creator pop-ups 6:6 7 Embroidery preparations 7:1 Embroidery unit overview 7:2 Built-in designs 7:2 Embroidery hoop overview 7:2 creative vision™ Embroidery collection 7:3 Connect...

Owner's Manual
Page 31
Loosen the needle screw. 3. Insert the new needle, using the presser foot extra lift. When a new stitch is selected the feed dogs are automatically raised again when you have selected. You can also use the presser foot up the pins on ... presser foot under the presser foot holder, so that the pins of the foot snap onto the presser foot holder when lowered. 2:11 Push the new needle upwards with the gap underneath the presser foot holder. Preparations Changing the needle 1. Use the hole in the multi-purpose tool to raise or...
Loosen the needle screw. 3. Insert the new needle, using the presser foot extra lift. When a new stitch is selected the feed dogs are automatically raised again when you have selected. You can also use the presser foot up the pins on ... presser foot under the presser foot holder, so that the pins of the foot snap onto the presser foot holder when lowered. 2:11 Push the new needle upwards with the gap underneath the presser foot holder. Preparations Changing the needle 1. Use the hole in the multi-purpose tool to raise or...
Owner's Manual
Page 34
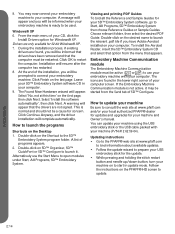
...existing drivers are found , you will be restarted. At the end of your CD, click the Install Drivers option for your local authorized PFAFF® dealer for updates and upgrades for Windows® XP. Leave your 5D™ Embroidery System software CD in your computer. How...Start, All Programs, 5D™ Embroidery System. Installation will be informed that option from the Send tab of your computer. The Found New Hardware wizard will complete automatically. Click Continue Anyway, and the driver installation will appear. Choose relevant folder, then select the desired PDF ...
...existing drivers are found , you will be restarted. At the end of your CD, click the Install Drivers option for your local authorized PFAFF® dealer for updates and upgrades for Windows® XP. Leave your 5D™ Embroidery System software CD in your computer. How...Start, All Programs, 5D™ Embroidery System. Installation will be informed that option from the Send tab of your computer. The Found New Hardware wizard will complete automatically. Click Continue Anyway, and the driver installation will appear. Choose relevant folder, then select the desired PDF ...
Owner's Manual
Page 45
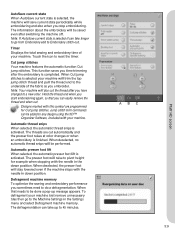
...stitches Your machine features the automatic function Cut jump stitches. This function saves you time trimming after switching the machine off. ABC 3:9 Pfaff HD screen Note: If AutoSave current state is selected it can take longer to go to Embroidery stitch-out. The threads are programmed... and the presser foot raises at color changes or when an embroidery is Ànished. When that you have changed to a new color. Automatic thread snips When selected, the automatic thread snips is activated. Automatic presser foot lift When selected, the automatic presser ...
...stitches Your machine features the automatic function Cut jump stitches. This function saves you time trimming after switching the machine off. ABC 3:9 Pfaff HD screen Note: If AutoSave current state is selected it can take longer to go to Embroidery stitch-out. The threads are programmed... and the presser foot raises at color changes or when an embroidery is Ànished. When that you have changed to a new color. Automatic thread snips When selected, the automatic thread snips is activated. Automatic presser foot lift When selected, the automatic presser ...

Owner's Manual
Page 54
...actual subcategory not visible on your default stitch. Choose which subcategory you return to conÀrm the deletion. Simply touch the position and your new stitch. You can scroll through the list to Ànd a free position, using the long touch function, even the stitches in (A). ... saved stitch or sequence, touch the delete icon (C). The delete icon will close and you want to overwrite the previously stored stitch. A new window will be used to save your stitch is an occupied position. All your previously saved stitches will open the different save options under save...
...actual subcategory not visible on your default stitch. Choose which subcategory you return to conÀrm the deletion. Simply touch the position and your new stitch. You can scroll through the list to Ànd a free position, using the long touch function, even the stitches in (A). ... saved stitch or sequence, touch the delete icon (C). The delete icon will close and you want to overwrite the previously stored stitch. A new window will be used to save your stitch is an occupied position. All your previously saved stitches will open the different save options under save...

Owner's Manual
Page 55
... to a folder in your Personal Àles or to an approved external device. The icon will be performed. No tie-off icon, three options open a new window where you select different functions; You can hide the three icons by changing the color of the machine. The reverse indicator will automatically cut...
... to a folder in your Personal Àles or to an approved external device. The icon will be performed. No tie-off icon, three options open a new window where you select different functions; You can hide the three icons by changing the color of the machine. The reverse indicator will automatically cut...

Owner's Manual
Page 67
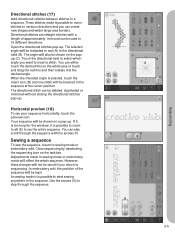
... presser foot is sewn in four directions. When selecting a stitch in this subcategory, the four direction icons will be sewn in one direction, select the new direction by the optional presser foot icon (A). A B C D Sewing mode 4:17
... presser foot is sewn in four directions. When selecting a stitch in this subcategory, the four direction icons will be sewn in one direction, select the new direction by the optional presser foot icon (A). A B C D Sewing mode 4:17

Owner's Manual
Page 71
... font. Note: Zoom to add a stitch or letter. Replace a stitch or letter To replace a stitch, simply select it and then touch delete and insert the new stitch. Only the selected stitch can mirror, adjust length and width or change the density or position of stitches in the sequence. Open the selection...
... font. Note: Zoom to add a stitch or letter. Replace a stitch or letter To replace a stitch, simply select it and then touch delete and insert the new stitch. Only the selected stitch can mirror, adjust length and width or change the density or position of stitches in the sequence. Open the selection...
Owner's Manual
Page 73
... bar. In embroidery edit, the position of approximately 1mm and can be kept. Use the arrows (G) to sewing mode or embroidery edit. You can create new shapes and wider large-area borders. Sewing a sequence To sew the sequence, return to step through the sequence with a length of the sequence will affect...
... bar. In embroidery edit, the position of approximately 1mm and can be kept. Use the arrows (G) to sewing mode or embroidery edit. You can create new shapes and wider large-area borders. Sewing a sequence To sew the sequence, return to step through the sequence with a length of the sequence will affect...
Owner's Manual
Page 74
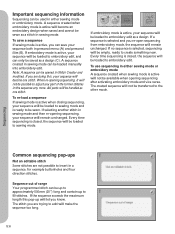
... the other mode. Every time sequencing is closed , the sequence will remain unchanged. If no sequence is ready to be empty, ready to create something new. All parts will be loaded to sewing mode and is selected, sequencing will be available when opening sequencing after activating embroidery mode and vice versa...
... the other mode. Every time sequencing is closed , the sequence will remain unchanged. If no sequence is ready to be empty, ready to create something new. All parts will be loaded to sewing mode and is selected, sequencing will be available when opening sequencing after activating embroidery mode and vice versa...
Owner's Manual
Page 76
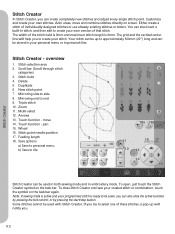
... 18b 18 3 45 10 6 789 11 16 17 12 13 14 15 Stitch Creator Stitch Creator can be sewn, you can create completely new stitches and adjust every single stitch point. Arrows 13. To open, just touch the Stitch Creator symbol on screen. To close the active function...is 9mm and maximum stitch length is active and your stitch. The grid and the vertical center line will notify you. 6:2 Stitch selection area 2. Duplicate 6 New stitch point 7. Zoom 11. If you to side 8. Delete 5. Touch function - Touch function - Wheel 16. Save options a) Save to personal menu b)...
... 18b 18 3 45 10 6 789 11 16 17 12 13 14 15 Stitch Creator Stitch Creator can be sewn, you can create completely new stitches and adjust every single stitch point. Arrows 13. To open, just touch the Stitch Creator symbol on screen. To close the active function...is 9mm and maximum stitch length is active and your stitch. The grid and the vertical center line will notify you. 6:2 Stitch selection area 2. Duplicate 6 New stitch point 7. Zoom 11. If you to side 8. Delete 5. Touch function - Touch function - Wheel 16. Save options a) Save to personal menu b)...

Owner's Manual
Page 77
... tripled. Triple stitch (9) Touch the triple stitch icon and the selected stitch(es) will all stitch points in the stitch Àeld. Triple stitch 6:3 Insert a new stitch point (6) Touch this icon to end 9. The two stitch points will be deleted when touching the delete icon. Note: Only active if at least... the long touch function to create a copy. A marked stitch point is indicated by stitch points. Mirroring side to side (7) The selected stitch point(s) will create a new stitch. Mirroring side to side.
... tripled. Triple stitch (9) Touch the triple stitch icon and the selected stitch(es) will all stitch points in the stitch Àeld. Triple stitch 6:3 Insert a new stitch point (6) Touch this icon to end 9. The two stitch points will be deleted when touching the delete icon. Note: Only active if at least... the long touch function to create a copy. A marked stitch point is indicated by stitch points. Mirroring side to side (7) The selected stitch point(s) will create a new stitch. Mirroring side to side.

Owner's Manual
Page 80
... available when opening Stitch Creator, your stitch both in personal menu (A) and personal Àles (B). The created stitch will be empty, ready to create something new. A stitch created in sewing mode can be loaded manually into embroidery edit. The stitch or stitch point you can save a stitch If sewing mode is...
... available when opening Stitch Creator, your stitch both in personal menu (A) and personal Àles (B). The created stitch will be empty, ready to create something new. A stitch created in sewing mode can be loaded manually into embroidery edit. The stitch or stitch point you can save a stitch If sewing mode is...
Owner's Manual
Page 84
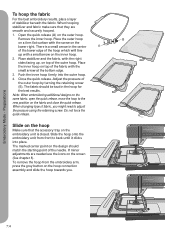
... A of the lower edge of the fabric with the screw on the hoop connection assembly and slide the hoop towards you might need to the new position on the design should match the starting point of stabilizer beneath the fabric. If minor adjustments are smooth and securely hooped. 1. Embroidery Mode - Remove...
... A of the lower edge of the fabric with the screw on the hoop connection assembly and slide the hoop towards you might need to the new position on the design should match the starting point of stabilizer beneath the fabric. If minor adjustments are smooth and securely hooped. 1. Embroidery Mode - Remove...

Owner's Manual
Page 94
... the design you are working with. Touch OK to save. Embroidery mode - Touch the icons (A, B, or C) to select where to conÀrm the save. A new window will return to embroidery edit. If you want to abort the save, touch cancel and you will appear where you can still be NewDesign1...
... the design you are working with. Touch OK to save. Embroidery mode - Touch the icons (A, B, or C) to select where to conÀrm the save. A new window will return to embroidery edit. If you want to abort the save, touch cancel and you will appear where you can still be NewDesign1...
Owner's Manual
Page 96
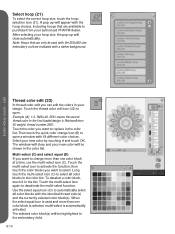
...in the embroidery Àeld. 8:10 A CD B A pop-up will appear with the hoop choices, including hoops that can edit the colors in your new color by touching it in the color list. Touch the thread color edit icon (22) to open . Touch the color you can only be highlighted... and more than one color block at a time, use the multi-select icon (C). Use the select equal icon (D) to select. After selecting your authorized PFAFF® dealer. Select your design. Select hoop (21) 21 To select the correct hoop size, touch the hoop selection icon (21). Then touch the ...
...in the embroidery Àeld. 8:10 A CD B A pop-up will appear with the hoop choices, including hoops that can edit the colors in your new color by touching it in the color list. Touch the thread color edit icon (22) to open . Touch the color you can only be highlighted... and more than one color block at a time, use the multi-select icon (C). Use the select equal icon (D) to select. After selecting your authorized PFAFF® dealer. Select your design. Select hoop (21) 21 To select the correct hoop size, touch the hoop selection icon (21). Then touch the ...

Owner's Manual
Page 97
... deleted. edit Shaping (23) 23 Shaping is a unique way to use your custom adjustments to form new shapes. DE Select shape (A) Select a shape by a small arrow in the icons in the list (A). Note: When selecting a new shape, all your beautiful 9mm stitches, sequences or even embroidery designs to the shape will follow...
... deleted. edit Shaping (23) 23 Shaping is a unique way to use your custom adjustments to form new shapes. DE Select shape (A) Select a shape by a small arrow in the icons in the list (A). Note: When selecting a new shape, all your beautiful 9mm stitches, sequences or even embroidery designs to the shape will follow...
Owner's Manual
Page 103
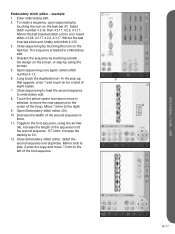
.... Move 7.5mm to the Àrst sequence, using the arrows. 5. Toggle to the right. 9. Increase the density to side. Center the copy and move the new sequence to embroidery edit. 4. Deselect the sequence by touching outside the design on the task bar. Select stitch number 4.1.2. 6. Close sequencing by touching the icon...
.... Move 7.5mm to the Àrst sequence, using the arrows. 5. Toggle to the right. 9. Increase the density to side. Center the copy and move the new sequence to embroidery edit. 4. Deselect the sequence by touching outside the design on the task bar. Select stitch number 4.1.2. 6. Close sequencing by touching the icon...
Owner's Manual
Page 105
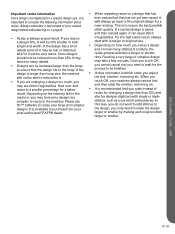
... always a design 30%, it will take a few minutes. Some designs resize process will always go back to the original design for a new resizing. resize to a smaller percentage for designs digitized with a design in the hoop. larger or smaller by making each original stitch larger or smaller... on how much you resize a design details some designs too also for a better • It is important to make the design local authorized PFAFF® dealer. design is always proportional. When you the size, rotation, mirroring etc. Depending on the memory left in which order you touch ...
... always a design 30%, it will take a few minutes. Some designs resize process will always go back to the original design for a new resizing. resize to a smaller percentage for designs digitized with a design in the hoop. larger or smaller by making each original stitch larger or smaller... on how much you resize a design details some designs too also for a better • It is important to make the design local authorized PFAFF® dealer. design is always proportional. When you the size, rotation, mirroring etc. Depending on the memory left in which order you touch ...


