
Owner's Manual
Page 2
... sewing machine is marked with the words 'DOUBLE INSULATION' or 'DOUBLE INSULATED'. Use only identical replacement parts. Always unplug this sewing machine from all controls to the off ("0") when making any adjustment in the needle area, such as threading needle, changing needle, threading bobbin, or changing presser foot, etc. • Always unplug sewing machine from outlet. • Do not unplug by the manufacturer as described in this manual. • Never operate this sewing machine if it has a damaged cord...
... sewing machine is marked with the words 'DOUBLE INSULATION' or 'DOUBLE INSULATED'. Use only identical replacement parts. Always unplug this sewing machine from all controls to the off ("0") when making any adjustment in the needle area, such as threading needle, changing needle, threading bobbin, or changing presser foot, etc. • Always unplug sewing machine from outlet. • Do not unplug by the manufacturer as described in this manual. • Never operate this sewing machine if it has a damaged cord...
Owner's Manual
Page 4
... power supply 2:2 Pack away after sewing 2:2 Custom LED lights 2:3 Free arm 2:3 Thread cutter 2:3 Stylus holder 2:3 Spool pins 2:4 Threading the machine 2:5 Needle threader 2:5 Bobbin winding 2:7 Inserting the bobbin 2:8 IDT (Integrated dual feed) 2:9 Electronic knee-lift 2:9 Needles 2:10 Changing the needle 2:11 Lowering feed dogs 2:11 Changing the presser foot 2:11 USB ports 2:12 Connect machine to computer 2:12 5D™ Embroidery Software 2:13 Installing your machine 2:14 Buttons and icons 2:15 3 PFAFF® HD screen 3:1 Task bar 3:2 Use...
... power supply 2:2 Pack away after sewing 2:2 Custom LED lights 2:3 Free arm 2:3 Thread cutter 2:3 Stylus holder 2:3 Spool pins 2:4 Threading the machine 2:5 Needle threader 2:5 Bobbin winding 2:7 Inserting the bobbin 2:8 IDT (Integrated dual feed) 2:9 Electronic knee-lift 2:9 Needles 2:10 Changing the needle 2:11 Lowering feed dogs 2:11 Changing the presser foot 2:11 USB ports 2:12 Connect machine to computer 2:12 5D™ Embroidery Software 2:13 Installing your machine 2:14 Buttons and icons 2:15 3 PFAFF® HD screen 3:1 Task bar 3:2 Use...

Owner's Manual
Page 8
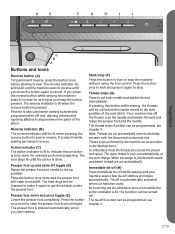
Threading slots 3. Thread cutter 4. Built-in USB ports 30. Presser foot bar and presser foot holder 14. Reverse 16. Speaker 26. Lid with stitch categories 2. Free arm 12. Action indicator 27 28 29 30 31 32 18. Presser foot up /down and pivot toggle 20. Handwheel 28. Built-in needle threader 7. Connection for power cord and foot control 32. Machine overview 18 19 20 21 22 23 24 25 1 26 Introduction 2 17 3 16 15...
Threading slots 3. Thread cutter 4. Built-in USB ports 30. Presser foot bar and presser foot holder 14. Reverse 16. Speaker 26. Lid with stitch categories 2. Free arm 12. Action indicator 27 28 29 30 31 32 18. Presser foot up /down and pivot toggle 20. Handwheel 28. Built-in needle threader 7. Connection for power cord and foot control 32. Machine overview 18 19 20 21 22 23 24 25 1 26 Introduction 2 17 3 16 15...
Owner's Manual
Page 11
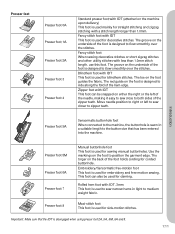
... Presser foot 6A Presser foot 7 Presser foot 8 Manual buttonhole foot This foot is used for embroidery and free-motion sewing. This foot can be used for side-motion stitches. Rolled hem foot with less than 1.0mm. The groove on the underside of the hem edge. Maxi-stitch foot This foot is used for darning. Fancy stitch foot When sewing decorative stitches or short zigzag stitches and other utility stitches with IDT, 3mm This foot is used to sew narrow hems in a suitable length to the button size that the IDT is designed...
... Presser foot 6A Presser foot 7 Presser foot 8 Manual buttonhole foot This foot is used for embroidery and free-motion sewing. This foot can be used for side-motion stitches. Rolled hem foot with less than 1.0mm. The groove on the underside of the hem edge. Maxi-stitch foot This foot is used for darning. Fancy stitch foot When sewing decorative stitches or short zigzag stitches and other utility stitches with IDT, 3mm This foot is used to sew narrow hems in a suitable length to the button size that the IDT is designed...
Owner's Manual
Page 12
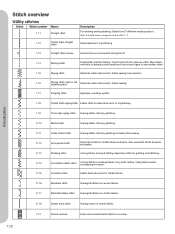
... tricot stitch Sewing seams on stretch fabrics. 1.2.1 Closed overlock Seam and overcast stretch fabrics in the bobbin. Note: This stitch makes a stronger tie-off . 1.1.4 1.1.5 Basting stitch Zigzag stitch Single stitch used with elastic thread in one stitch. Touch foot control to sew another stitch. Reinforced seam. Move fabric manually to desired position and touch foot control again to sew one step. 1:12 Bridging stitch Joining fabrics and quilt batting, decorative stitch for decorative hems or topstitching. 1.1.9 Three-step zigzag stitch Sewing elastic, darning...
... tricot stitch Sewing seams on stretch fabrics. 1.2.1 Closed overlock Seam and overcast stretch fabrics in the bobbin. Note: This stitch makes a stronger tie-off . 1.1.4 1.1.5 Basting stitch Zigzag stitch Single stitch used with elastic thread in one stitch. Touch foot control to sew another stitch. Reinforced seam. Move fabric manually to desired position and touch foot control again to sew one step. 1:12 Bridging stitch Joining fabrics and quilt batting, decorative stitch for decorative hems or topstitching. 1.1.9 Three-step zigzag stitch Sewing elastic, darning...

Owner's Manual
Page 27
... the winding will stop automatically. A pop-up appears on the spool pin in horizontal position. When the bobbin is pulled securely inside to the outside. 5. Then follow step 4 and 5 above the bobbin winder thread guide (B) and then through the bobbin thread guides (E). Pull the thread counter-clockwise above . Push the bobbin winder lever towards the bobbin to wind. Hold the end of the needle. Winding while threaded Make sure that the presser foot and the needle...
... the winding will stop automatically. A pop-up appears on the spool pin in horizontal position. When the bobbin is pulled securely inside to the outside. 5. Then follow step 4 and 5 above the bobbin winder thread guide (B) and then through the bobbin thread guides (E). Pull the thread counter-clockwise above . Push the bobbin winder lever towards the bobbin to wind. Hold the end of the needle. Winding while threaded Make sure that the presser foot and the needle...

Owner's Manual
Page 31
... feed dogs are also lowered when using the multi-purpose tool. Place the presser foot under the presser foot holder, so that the pins of the foot snap onto the presser foot holder when lowered. 2:11 Press upwards until it will go no further. 5. Use the hole in the multi-purpose tool to raise or lower the presser foot holder. Loosen the needle screw. 3. You can also use the presser foot up the pins on buttons, free-motion sewing and embroidering. Preparations Changing...
... feed dogs are also lowered when using the multi-purpose tool. Place the presser foot under the presser foot holder, so that the pins of the foot snap onto the presser foot holder when lowered. 2:11 Press upwards until it will go no further. 5. Use the hole in the multi-purpose tool to raise or lower the presser foot holder. Loosen the needle screw. 3. You can also use the presser foot up the pins on buttons, free-motion sewing and embroidering. Preparations Changing...
Owner's Manual
Page 35
... stitches and stops automatically. Action indicator (C) The action indicator is lit to indicate that an action is automatically activated when cut and the presser foot raised. Start/stop . When the design is lowered automatically when you press the button again to stop (F) Press this button while sewing, the threads will be cut both needle and bobbin threads are cut automatically at the color change. The feed dogs will be lowered to make...
... stitches and stops automatically. Action indicator (C) The action indicator is lit to indicate that an action is automatically activated when cut and the presser foot raised. Start/stop . When the design is lowered automatically when you press the button again to stop (F) Press this button while sewing, the threads will be cut both needle and bobbin threads are cut automatically at the color change. The feed dogs will be lowered to make...

Owner's Manual
Page 44
.... Machine settings (A) Owner's name Touch the icon to the machine settings (A), sound settings (B) and screen and light settings (C). The setting is shown when turning on the machine with this function when using a straight stitch stitch plate or a straight stitch presser foot to lock the center needle position for the set to normal sewing. You will make manual adjustments to get a pop-up where you can override automatic settings and make sure that is not a straight stitch, a pop-up informs you that needle size to...
.... Machine settings (A) Owner's name Touch the icon to the machine settings (A), sound settings (B) and screen and light settings (C). The setting is shown when turning on the machine with this function when using a straight stitch stitch plate or a straight stitch presser foot to lock the center needle position for the set to normal sewing. You will make manual adjustments to get a pop-up where you can override automatic settings and make sure that is not a straight stitch, a pop-up informs you that needle size to...
Owner's Manual
Page 46
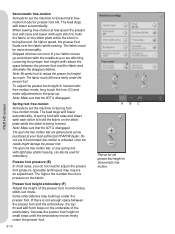
... fabric. Presser foot height embroidery (F) Adjust the height of the embroidery. Skipped stitches can also be used for presser foot 6A. The fabric must be purchased at low speed the presser foot will lower automatically. Note: Make sure that the IDT is activated, since the needle might damage the presser foot. The feed dogs will raise and lower with the needle as you do not need to reduce the presser foot height too much. When sewing free-motion at your fabric...
... fabric. Presser foot height embroidery (F) Adjust the height of the embroidery. Skipped stitches can also be used for presser foot 6A. The fabric must be purchased at low speed the presser foot will lower automatically. Note: Make sure that the IDT is activated, since the needle might damage the presser foot. The feed dogs will raise and lower with the needle as you do not need to reduce the presser foot height too much. When sewing free-motion at your fabric...

Owner's Manual
Page 56
...speed control icon to get a pop-up . The next time you have chosen. Sewing programs (19) 19 Sewing programs - When tapering is Ànished. 4:6 The width is reduced until the width is 0mm and the action indicator on the machine ...change the set to the previously selected angle. Touch the angle you start to sew, the stitch width will be set to default. Set the speed limit you to reduce the speed. It becomes wider until the taper is activated at both the beginning and at the end and you want for your desired length and press the reverse button. Speed control...
...speed control icon to get a pop-up . The next time you have chosen. Sewing programs (19) 19 Sewing programs - When tapering is Ànished. 4:6 The width is reduced until the width is 0mm and the action indicator on the machine ...change the set to the previously selected angle. Touch the angle you start to sew, the stitch width will be set to default. Set the speed limit you to reduce the speed. It becomes wider until the taper is activated at both the beginning and at the end and you want for your desired length and press the reverse button. Speed control...

Owner's Manual
Page 60
... make up the entire stitch). for general sewing, the threads evenly meet between the two fabric layers. Buttonhole slit length (23) Set the buttonhole slit length by using + to increase, and - Sewing mode 23 4:10 Touch + to decrease when sewing a buttonhole with specialty threads and when a less dense satin stitch is too loose. Stitch density + Stitch density - If the bobbin thread is visible on the top side of the fabric, the needle thread tension is correctly adjusted...
... make up the entire stitch). for general sewing, the threads evenly meet between the two fabric layers. Buttonhole slit length (23) Set the buttonhole slit length by using + to increase, and - Sewing mode 23 4:10 Touch + to decrease when sewing a buttonhole with specialty threads and when a less dense satin stitch is too loose. Stitch density + Stitch density - If the bobbin thread is visible on the top side of the fabric, the needle thread tension is correctly adjusted...

Owner's Manual
Page 63
... buttonhole. Start sewing by pressing the foot control or start/stop button. You can repeat the buttonhole as many times as you have adjusted your button using the button ruler on the foot. The machine sews the bartack and the second column. The repeat function will also be completed automatically and the threads are aligned, press the reverse button to sew identical copies. Sewing mode 23 Manual buttonhole To sew a manual buttonhole, use the repeat buttonhole function (21), to sew...
... buttonhole. Start sewing by pressing the foot control or start/stop button. You can repeat the buttonhole as many times as you have adjusted your button using the button ruler on the foot. The machine sews the bartack and the second column. The repeat function will also be completed automatically and the threads are aligned, press the reverse button to sew identical copies. Sewing mode 23 Manual buttonhole To sew a manual buttonhole, use the repeat buttonhole function (21), to sew...

Owner's Manual
Page 66
...;es without having to the left. Follow the directions included with your zipper. For all types of zippers it enters close to the edge of the zipper teeth by using one of the foot. • Lower the presser foot and while sewing, guide the fabric edge evenly into the scroll of the 37 needle positions available for the straight stitch. There is especially suitable for best results...
...;es without having to the left. Follow the directions included with your zipper. For all types of zippers it enters close to the edge of the zipper teeth by using one of the foot. • Lower the presser foot and while sewing, guide the fabric edge evenly into the scroll of the 37 needle positions available for the straight stitch. There is especially suitable for best results...
Owner's Manual
Page 83
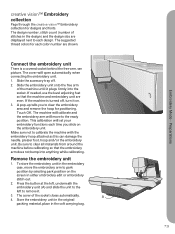
... open automatically when connecting the embroidery unit. 1. To store the embroidery unit in the embroidery case, move to calibrate the machine with the embroidery hoop attached as this can damage the needle, presser foot, hoop and/or the embroidery unit. If needed, use the level adjusting feet so that the embroidery arm does not bump into the socket. Store the embroidery unit in the original packing material, place in either embroidery edit or embroidery stitch...
... open automatically when connecting the embroidery unit. 1. To store the embroidery unit in the embroidery case, move to calibrate the machine with the embroidery hoop attached as this can damage the needle, presser foot, hoop and/or the embroidery unit. If needed, use the level adjusting feet so that the embroidery arm does not bump into the socket. Store the embroidery unit in the original packing material, place in either embroidery edit or embroidery stitch...

Owner's Manual
Page 133
... not work? Fabric does not move? Push bobbin winder lever to touch, turn the machine OFF and then ON again. The machine skips stitches Did you insert the needle properly? Is the correct presser foot used? Needle thread breaks Did you insert the needle properly? Are you using poor thread with your machine. Thread snips does not cut the thread? Remove stitch plate and clean lint from an authorized PFAFF® dealer. 11:3 Insert needle correctly as described in the Settings...
... not work? Fabric does not move? Push bobbin winder lever to touch, turn the machine OFF and then ON again. The machine skips stitches Did you insert the needle properly? Is the correct presser foot used? Needle thread breaks Did you insert the needle properly? Are you using poor thread with your machine. Thread snips does not cut the thread? Remove stitch plate and clean lint from an authorized PFAFF® dealer. 11:3 Insert needle correctly as described in the Settings...

Owner's Manual
Page 134
... needle thread tension and the threading. The machine does not feed or feeds irregularly Did you insert the bobbin properly? Non-original parts and accessories The warranty does not cover any defect or damage caused by your dealer. Is the stitch plate hole damaged? Attach a spool cap of lint? Wind a new bobbin. Remove the stitch plate and clean the feed dogs with your thread on a scrap of your sewing fabric and bring it is a great help to your local authorized PFAFF...
... needle thread tension and the threading. The machine does not feed or feeds irregularly Did you insert the bobbin properly? Non-original parts and accessories The warranty does not cover any defect or damage caused by your dealer. Is the stitch plate hole damaged? Attach a spool cap of lint? Wind a new bobbin. Remove the stitch plate and clean the feed dogs with your thread on a scrap of your sewing fabric and bring it is a great help to your local authorized PFAFF...

Owner's Manual
Page 135
... foot 3:8 Blindhem stitch 4:15 Bobbin empty 4:18, 9:11 Bobbin position 9:7 Bobbin thread breaks 11:4 Bobbin winding 2:7 Browse Files & Folders 10:3 Built-in designs 7:2 Buttonholes 4:12 Buttonhole slit length 4:10 Buttons and icons 2:15 Button stitch repetition 4:11 C Calibrate 3:12 Category 3:13 Center position 9:7 Change font 8:21 Change thread color 9:12 Changing the needle 2:11 Changing the presser foot 2:11 Check needle thread 4:18, 9:11 Cleaning the bobbin area 11:2 Cleaning the machine 11:2 Cleaning under the bobbin area 11:2 Color block sort 9:5 Color list...
... foot 3:8 Blindhem stitch 4:15 Bobbin empty 4:18, 9:11 Bobbin position 9:7 Bobbin thread breaks 11:4 Bobbin winding 2:7 Browse Files & Folders 10:3 Built-in designs 7:2 Buttonholes 4:12 Buttonhole slit length 4:10 Buttons and icons 2:15 Button stitch repetition 4:11 C Calibrate 3:12 Category 3:13 Center position 9:7 Change font 8:21 Change thread color 9:12 Changing the needle 2:11 Changing the presser foot 2:11 Check needle thread 4:18, 9:11 Cleaning the bobbin area 11:2 Cleaning the machine 11:2 Cleaning under the bobbin area 11:2 Color block sort 9:5 Color list...
Owner's Manual
Page 136
... 3:13 Insert a new stitch point 6:3 Insert a stitch or letter 5:3 Inserting the bobbin 2:8 Install hardware drivers and connect the embroidery machine 2:13 Installing your software 2:13 Intellectual Property 11:10 Invalid Àle type for this folder 10:8 L Language 3:12 List view 10:3 Load a design 8:2 Load a Àle 10:5 Load a font 8:3 Load a font from another location 8:21 Load a stitch 8:3 Load text to embroidery edit 8:21 Lock screen 3:12 Long touch 3:3 Lowering feed dogs...
... 3:13 Insert a new stitch point 6:3 Insert a stitch or letter 5:3 Inserting the bobbin 2:8 Install hardware drivers and connect the embroidery machine 2:13 Installing your software 2:13 Intellectual Property 11:10 Invalid Àle type for this folder 10:8 L Language 3:12 List view 10:3 Load a design 8:2 Load a Àle 10:5 Load a font 8:3 Load a font from another location 8:21 Load a stitch 8:3 Load text to embroidery edit 8:21 Lock screen 3:12 Long touch 3:3 Lowering feed dogs...

Owner's Manual
Page 137
... Needle thread breaks 11:3 Needle threader 2:5 Needle up/down and pivot toggle 2:15 Presser foot height embroidery 3:10 Presser foot pressure 3:10 Presser foot up and extra lift toggle 2:15 Q Quick help 3:13 R Raise and lower the presser foot 4:3 Rear side 1:9 Register immediately for these beneÀts 2:14 Remove hoop 8:22 Remove presser foot 2:11 Remove Sensormatic buttonhole foot 4:18 Remove the embroidery unit 7:3 Rename a Àle or folder 10:6 Repeat a manual buttonhole 4:13 Replace a stitch or letter 5:3 Replace Àle 8:22 Replacing the stitch plate...
... Needle thread breaks 11:3 Needle threader 2:5 Needle up/down and pivot toggle 2:15 Presser foot height embroidery 3:10 Presser foot pressure 3:10 Presser foot up and extra lift toggle 2:15 Q Quick help 3:13 R Raise and lower the presser foot 4:3 Rear side 1:9 Register immediately for these beneÀts 2:14 Remove hoop 8:22 Remove presser foot 2:11 Remove Sensormatic buttonhole foot 4:18 Remove the embroidery unit 7:3 Rename a Àle or folder 10:6 Repeat a manual buttonhole 4:13 Replace a stitch or letter 5:3 Replace Àle 8:22 Replacing the stitch plate...


