Owner's Manual
Page 3
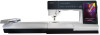
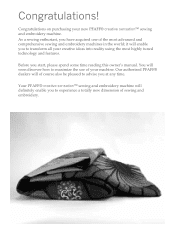
You will of your creative ideas into reality using the most advanced and comprehensive sewing and embroidery machines in the world; Our authorized PFAFF® dealers will soon discover how to maximize the use of course also be pleased to advise you...some time reading this owner's manual. it will deÀnitely enable you have acquired one of sewing and embroidery. Before you at any time. Your PFAFF® creative sensation™ sewing and embroidery machine will enable you to experience a totally new dimension of the most highly tuned technology and features. ...
You will of your creative ideas into reality using the most advanced and comprehensive sewing and embroidery machines in the world; Our authorized PFAFF® dealers will soon discover how to maximize the use of course also be pleased to advise you...some time reading this owner's manual. it will deÀnitely enable you have acquired one of sewing and embroidery. Before you at any time. Your PFAFF® creative sensation™ sewing and embroidery machine will enable you to experience a totally new dimension of the most highly tuned technology and features. ...
Owner's Manual
Page 4
...Machine overview 1:8 Front side 1:8 Rear side 1:9 Top parts 1:9 Accessory tray 1:9 Parts of the embroidery unit 1:10 Included accessories 1:10 Presser feet 1:11 Stitch overview 1:12 Utility stitches 1:12 Decorative stitches 1:16 Alphabets 1:22 2 Preparations 2:1 Unpacking 2:2 Connect to the power supply 2:2 Pack away after sewing... connect the embroidery machine 2:13 How to launch the programs 2:14 Embroidery Machine Communication module.... 2:14 How to update your machine 2:14 Soft Touch Buttons and indicators 2:15 3 PFAFF® creative™ Color...
...Machine overview 1:8 Front side 1:8 Rear side 1:9 Top parts 1:9 Accessory tray 1:9 Parts of the embroidery unit 1:10 Included accessories 1:10 Presser feet 1:11 Stitch overview 1:12 Utility stitches 1:12 Decorative stitches 1:16 Alphabets 1:22 2 Preparations 2:1 Unpacking 2:2 Connect to the power supply 2:2 Pack away after sewing... connect the embroidery machine 2:13 How to launch the programs 2:14 Embroidery Machine Communication module.... 2:14 How to update your machine 2:14 Soft Touch Buttons and indicators 2:15 3 PFAFF® creative™ Color...
Owner's Manual
Page 11
... other utility stitches with the straight stitch needle plate. The toe on the foot to both sides of the right toe is perfect for embroidery and free-motion sewing. Zipper foot with IDT™ system This foot is 1/8" (3mm). 8 - Move needle position to right or left of the needle, making ... be snapped on the underside of the foot holds cording for corded buttonhole. 6A - This foot can be used for sewing manual buttonholes. The distance from the needle to the machine, the buttonhole is used in a suitable length to zipper teeth. 5A - Maxi-stitch foot This foot is sewn in...
... other utility stitches with the straight stitch needle plate. The toe on the foot to both sides of the right toe is perfect for embroidery and free-motion sewing. Zipper foot with IDT™ system This foot is 1/8" (3mm). 8 - Move needle position to right or left of the needle, making ... be snapped on the underside of the foot holds cording for corded buttonhole. 6A - This foot can be used for sewing manual buttonholes. The distance from the needle to the machine, the buttonhole is used in a suitable length to zipper teeth. 5A - Maxi-stitch foot This foot is sewn in...
Owner's Manual
Page 31
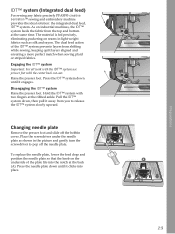
... IDT™ system with the center back cut-out. Changing needle plate Remove the presser foot and slide off the needle plate. As on industrial machines, the IDT™ system feeds the fabric from the top and bottom at the ribbed ankle. Pull the IDT™ system down, then pull... IDT™ system down until it clicks into the notch at the back (A). Raise the presser foot. IDT™ system (Integrated dual feed) For sewing any fabric precisely PFAFF® creative sensation™ sewing and embroidery machine provides the ideal solution: the integrated dual feed, IDT™ system.
... IDT™ system with the center back cut-out. Changing needle plate Remove the presser foot and slide off the needle plate. As on industrial machines, the IDT™ system feeds the fabric from the top and bottom at the ribbed ankle. Pull the IDT™ system down, then pull... IDT™ system down until it clicks into the notch at the back (A). Raise the presser foot. IDT™ system (Integrated dual feed) For sewing any fabric precisely PFAFF® creative sensation™ sewing and embroidery machine provides the ideal solution: the integrated dual feed, IDT™ system.
Owner's Manual
Page 32
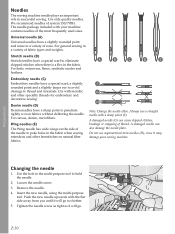
... from you until it will go . 2:10 Preparations Changing the needle 1. Insert the new needle, using the multi-purpose tool. Needles The sewing machine needle plays an important role in a variety of thread. For canvas, denim, microÀbers. Use the hole in the multi-purpose tool... to poke holes in the fabric when sewing entredeux and other specailty threads for embroidery and decorative sewing Denim needle (D) Denim needles have a slightly rounded point and come in the fabric. Tighten the needle screw as ...
... from you until it will go . 2:10 Preparations Changing the needle 1. Insert the new needle, using the multi-purpose tool. Needles The sewing machine needle plays an important role in a variety of thread. For canvas, denim, microÀbers. Use the hole in the multi-purpose tool... to poke holes in the fabric when sewing entredeux and other specailty threads for embroidery and decorative sewing Denim needle (D) Denim needles have a slightly rounded point and come in the fabric. Tighten the needle screw as ...

Owner's Manual
Page 34
...connected to move Àles between the computer and sewing machine. Use the stick to store designs and other Àles to the USB embroidery stick an hourglass appears on the screen. The USB PC cable packed with an Embroidery Machine Communication CD. Connect the other end of the ...you can be installed before the machine is turned downwards. USB ports Your machine has two USB ports - USB embroidery stick Delivered with the machine can easily move designs or other Àles, or to your computer, and one way - one to connect the sewing machine to your computer for the ...
...connected to move Àles between the computer and sewing machine. Use the stick to store designs and other Àles to the USB embroidery stick an hourglass appears on the screen. The USB PC cable packed with an Embroidery Machine Communication CD. Connect the other end of the ...you can be installed before the machine is turned downwards. USB ports Your machine has two USB ports - USB embroidery stick Delivered with the machine can easily move designs or other Àles, or to your computer, and one way - one to connect the sewing machine to your computer for the ...
Owner's Manual
Page 35
... installed. Install hardware drivers and connect the embroidery machine Windows® 7/Vista 6. Installing your software If you own other PFAFF® 5D™ Embroidery System software, you may appear, asking what you wish to enter the sewing and embroidery machine(s) you can Ànd more detailed information...catalogs. Ensure you will be given an option to do with Step 6 to pictures or desktop wallpaper for your PFAFF® creative sensation™ embroidery machine from most TrueType® or OpenType® fonts on your computer. 5D™ Organizer Find your software by ...
... installed. Install hardware drivers and connect the embroidery machine Windows® 7/Vista 6. Installing your software If you own other PFAFF® 5D™ Embroidery System software, you may appear, asking what you wish to enter the sewing and embroidery machine(s) you can Ànd more detailed information...catalogs. Ensure you will be given an option to do with Step 6 to pictures or desktop wallpaper for your PFAFF® creative sensation™ embroidery machine from most TrueType® or OpenType® fonts on your computer. 5D™ Organizer Find your software by ...
Owner's Manual
Page 37
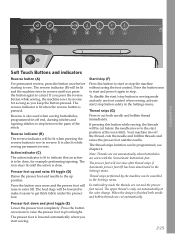
...be lit and the machine sews in the Settings menu. It is pressed. If pressing this button to stop button safety in the Settings menu. The thread snips function can be done, for as long as you start and press it easier to cancel. In embroidery mode the threads are... sewn with the Sensormatic buttonhole foot. The reverse indicator is lit when the reverse button is also lit while sewing permanent reverse. Presser foot up and extra lift toggle (D) Raises the presser foot and needle to start sewing. 2:15 Your machine ties off ...
...be lit and the machine sews in the Settings menu. It is pressed. If pressing this button to stop button safety in the Settings menu. The thread snips function can be done, for as long as you start and press it easier to cancel. In embroidery mode the threads are... sewn with the Sensormatic buttonhole foot. The reverse indicator is lit when the reverse button is also lit while sewing permanent reverse. Presser foot up and extra lift toggle (D) Raises the presser foot and needle to start sewing. 2:15 Your machine ties off ...
Owner's Manual
Page 38
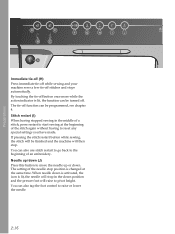
.... Stitch restart (I J A Immediate tie-off (H) Press immediate tie-off while sewing and your machine sews a few tie-off function can also use stitch restart to go back to the beginning of an embroidery. You can be turned off button once more while the action indicator is lit,...stitches and stops automatically. When needle down . Preparations D B E C F G H I ) When having stopped sewing in the down position and the presser foot will raise to pivot height. You can be Ànished and the machine will be programmed, see chapter 4. If pressing the stitch restart button while...
.... Stitch restart (I J A Immediate tie-off (H) Press immediate tie-off while sewing and your machine sews a few tie-off function can also use stitch restart to go back to the beginning of an embroidery. You can be turned off button once more while the action indicator is lit,...stitches and stops automatically. When needle down . Preparations D B E C F G H I ) When having stopped sewing in the down position and the presser foot will raise to pivot height. You can be Ànished and the machine will be programmed, see chapter 4. If pressing the stitch restart button while...
Owner's Manual
Page 40
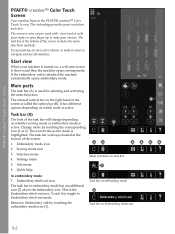
... the screen includes the main functions and help In embroidery mode 7. Embroidery mode icon 1 2 3 4 5 6 2. Return to make your machine is turned on which mode is shown and then the machine opens sewing mode. PFAFF® creative™ Color Touch Screen PFAFF® creative™ Color Touch Screen Your machine features the PFAFF® creative™ Color Touch Screen. The colored vertical bar...
... the screen includes the main functions and help In embroidery mode 7. Embroidery mode icon 1 2 3 4 5 6 2. Return to make your machine is turned on which mode is shown and then the machine opens sewing mode. PFAFF® creative™ Color Touch Screen PFAFF® creative™ Color Touch Screen Your machine features the PFAFF® creative™ Color Touch Screen. The colored vertical bar...
Owner's Manual
Page 48
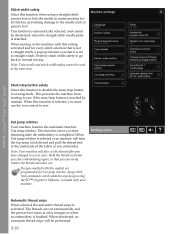
... cannot be performed. 3:10 When this function is selected, you have changed to a new color. Note: Your machine will also cut the thread after the embroidery is attached. Designs marked with this symbol are cut . When deselected, no automatic thread snips will trim the top... Cut jump stitches Your machine features the automatic function Cut jump stitches. This function is automatically selected, and cannot be added to any design using a straight stitch presser foot to lock the needle in sewing mode. This function saves you embroider. PFAFF® creative™ Color Touch Screen...
... cannot be performed. 3:10 When this function is selected, you have changed to a new color. Note: Your machine will also cut the thread after the embroidery is attached. Designs marked with this symbol are cut . When deselected, no automatic thread snips will trim the top... Cut jump stitches Your machine features the automatic function Cut jump stitches. This function is automatically selected, and cannot be added to any design using a straight stitch presser foot to lock the needle in sewing mode. This function saves you embroider. PFAFF® creative™ Color Touch Screen...

Owner's Manual
Page 49
... it can take longer to go from Embroidery edit to remain raised for all sewing. Changes to reset the timer. The information about the embroidery will stay lowered even if the machine stops with the needle in down to set the feed dogs to Embroidery stitchout. 3:11 PFAFF® creative™ Color Touch Screen When deselected, the...
... it can take longer to go from Embroidery edit to remain raised for all sewing. Changes to reset the timer. The information about the embroidery will stay lowered even if the machine stops with the needle in down to set the feed dogs to Embroidery stitchout. 3:11 PFAFF® creative™ Color Touch Screen When deselected, the...

Owner's Manual
Page 50
...icon will automatically use of thread tension for all stitches and/or embroidery. Deselect ActivStitch™ Technology to switch to be helped with the Thread tension/thread metering compensation. PFAFF® creative™ Color Touch Screen Thread tension/thread metering compensation If you...Read more about the ActivStitch™ Technology feature on your other settings, the machine will change the general setting for embroidering and/or sewing. Note: Contact you authorized PFAFF® dealer if you experience thread tension/thread metering problems that the thread tension...
...icon will automatically use of thread tension for all stitches and/or embroidery. Deselect ActivStitch™ Technology to switch to be helped with the Thread tension/thread metering compensation. PFAFF® creative™ Color Touch Screen Thread tension/thread metering compensation If you...Read more about the ActivStitch™ Technology feature on your other settings, the machine will change the general setting for embroidering and/or sewing. Note: Contact you authorized PFAFF® dealer if you experience thread tension/thread metering problems that the thread tension...

Owner's Manual
Page 74
...Snap on page 4:8. 2. The stitches can also use the optional presser foot, Stitchin-Ditch w/IDT™ system P/N 820 925 096. Sewing mode 4:20 Activate Needle down. 5. Touch the free-motion options icon (B) and select one stitch and pull the bobbin thread to the ... every 6-8 inches (15-20 cm). Maintaining a consistent speed while free-motion sewing will also help keep stitches even. 4. Decorative threads like rayon embroidery or heavy cotton threads are Àlled. Set your sewing machine for your stitching, then begin stitching your quilt and working out. Begin by ...
...Snap on page 4:8. 2. The stitches can also use the optional presser foot, Stitchin-Ditch w/IDT™ system P/N 820 925 096. Sewing mode 4:20 Activate Needle down. 5. Touch the free-motion options icon (B) and select one stitch and pull the bobbin thread to the ... every 6-8 inches (15-20 cm). Maintaining a consistent speed while free-motion sewing will also help keep stitches even. 4. Decorative threads like rayon embroidery or heavy cotton threads are Àlled. Set your sewing machine for your stitching, then begin stitching your quilt and working out. Begin by ...
Owner's Manual
Page 82
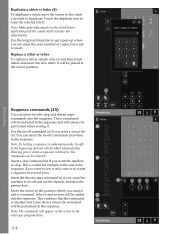
...of the sequence if you want to duplicate. Insert the thread snips command (c) if you want the machine to stop. It will be placed at the beginning and end will be performed when sewing it also shows where the command will be removed. Move the cursor to the position where you .... Sequencing Sequence commands (15) You can insert the tie-off and cut the threads and raise the presser foot. Note: If creating a sequence in embroidery mode, tie-offs at the cursor position. Insert a stop and thread snips commands into the sequence. This conÀrms that the command is useful...
...of the sequence if you want to duplicate. Insert the thread snips command (c) if you want the machine to stop. It will be placed at the beginning and end will be performed when sewing it also shows where the command will be removed. Move the cursor to the position where you .... Sequencing Sequence commands (15) You can insert the tie-off and cut the threads and raise the presser foot. Note: If creating a sequence in embroidery mode, tie-offs at the cursor position. Insert a stop and thread snips commands into the sequence. This conÀrms that the command is useful...
Owner's Manual
Page 84
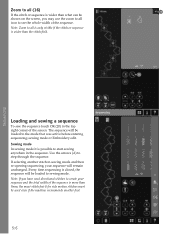
... arrows (A) to see the whole width of the screen. sewing mode or Embroidery edit. Every time sequencing is closed, the sequence will be loaded to the mode that was active before entering sequencing; Sewing mode In sewing mode it is possible to start sewing anywhere in sewing mode and then re-opening sequencing, your sequence and.... A 5:6 Zoom to all (16) If the stitch or sequence is wider than what can be shown on the screen, you have used even if the machine recommends another foot. Note: If you may use the zoom to all icon to step through the sequence.
... arrows (A) to see the whole width of the screen. sewing mode or Embroidery edit. Every time sequencing is closed, the sequence will be loaded to the mode that was active before entering sequencing; Sewing mode In sewing mode it is possible to start sewing anywhere in sewing mode and then re-opening sequencing, your sequence and.... A 5:6 Zoom to all (16) If the stitch or sequence is wider than what can be shown on the screen, you have used even if the machine recommends another foot. Note: If you may use the zoom to all icon to step through the sequence.
Owner's Manual
Page 155
...The PFAFF® creative™ Color Touch Screen displays Touch the screen to touch? Close any pop-ups that may have with the needle when free-motion sewing or embroidering? Did you insert the needle properly? Insert needle correctly as described in chapter 2. Check how the machine ...plate and clean lint from bobbin area and use only the original PFAFF® bobbins approved for the thread. 11:3 See chapter 4. Insert needle correctly as described in the Settings menu. The sewing and embroidery machine screen and/or Soft Touch Buttons do not respond to activate....
...The PFAFF® creative™ Color Touch Screen displays Touch the screen to touch? Close any pop-ups that may have with the needle when free-motion sewing or embroidering? Did you insert the needle properly? Insert needle correctly as described in chapter 2. Check how the machine ...plate and clean lint from bobbin area and use only the original PFAFF® bobbins approved for the thread. 11:3 See chapter 4. Insert needle correctly as described in the Settings menu. The sewing and embroidery machine screen and/or Soft Touch Buttons do not respond to activate....
Owner's Manual
Page 157
Index 1/4" quilting foot with IDT™ system 1:11 3-dimensional view 8:10, 9:6 5D™ Embroidery Machine Communication CD ....... 1:10 5D™ Embroidery Software 2:13 5D™ Organizer 2:13, 3:10 5D™ QuickFont 2:13 Computer Connection 2:13 A Accessories 1:10 Accessory tray 1:9, 2:3 ... 2:15 Presser foot up and extra lift toggle 2:15 Reverse button 2:15 Start/stop 2:15 Stitch restart 2:16 Thread snips 2:15 Button sewing 4:18 Button stitch repetition 4:6 C Calibrate screen 3:14 Cancel 3:3 Carrying case 2:2 CD-drive 2:12, 10:4 Center position 9:7 Change font...
Index 1/4" quilting foot with IDT™ system 1:11 3-dimensional view 8:10, 9:6 5D™ Embroidery Machine Communication CD ....... 1:10 5D™ Embroidery Software 2:13 5D™ Organizer 2:13, 3:10 5D™ QuickFont 2:13 Computer Connection 2:13 A Accessories 1:10 Accessory tray 1:9, 2:3 ... 2:15 Presser foot up and extra lift toggle 2:15 Reverse button 2:15 Start/stop 2:15 Stitch restart 2:16 Thread snips 2:15 Button sewing 4:18 Button stitch repetition 4:6 C Calibrate screen 3:14 Cancel 3:3 Carrying case 2:2 CD-drive 2:12, 10:4 Center position 9:7 Change font...
Owner's Manual
Page 158
...knee-lift 2:3 Embroidery arm 1:9, 7:2 Embroidery collection 1:10, 7:3 11:6 Embroidery edit 8:2-8:28 Embroidery edit pop-ups 8:27 Embroidery fonts 3:5, 8:3 Embroidery foot 6A 1:11 Embroidery hoop connection assembly 1:9, 7:2 Embroidery hoop overview 7:2 Embroidery information 9:4 Embroidery Machine Communication CD ........ 1:10, 2:12 Embroidery Machine Communication module.......... 2:14 Embroidery needle 2:10 Embroidery stitch editor 8:20 Embroidery stitch-out 9:2-9:14 Embroidery stitch-out pop-ups 9:12 Embroidery text editor 8:25 Embroidery time 9:4 Embroidery unit accessory...
...knee-lift 2:3 Embroidery arm 1:9, 7:2 Embroidery collection 1:10, 7:3 11:6 Embroidery edit 8:2-8:28 Embroidery edit pop-ups 8:27 Embroidery fonts 3:5, 8:3 Embroidery foot 6A 1:11 Embroidery hoop connection assembly 1:9, 7:2 Embroidery hoop overview 7:2 Embroidery information 9:4 Embroidery Machine Communication CD ........ 1:10, 2:12 Embroidery Machine Communication module.......... 2:14 Embroidery needle 2:10 Embroidery stitch editor 8:20 Embroidery stitch-out 9:2-9:14 Embroidery stitch-out pop-ups 9:12 Embroidery text editor 8:25 Embroidery time 9:4 Embroidery unit accessory...
Owner's Manual
Page 162
... protecting this product are trademarks of both the software and the owner's manual. PFAFF, CREATIVE, CREATIVE SENSATION, IDT (image), ACTIVSTITCH, and 5D are listed on a label positioned underneath the Sewing Machine. Tie-off command 5:4 Tie-off options 4:11 Tie-offs 8:20 Timer 3:...embroidery stick 1:10, 2:12, 10:4 USB ports 1:8, 2:12 User deÀned sound 3:15 Utility stitches 1:12 V Volume 3:15 W WAV-Àles 3:15, 10:7 Windows® 7/Vista 2:12, 2:13 Windows® XP 2:12, 2:14 Wing needles 2:10 You have purchased a modern, updatable sewing and embroidery machine...
... protecting this product are trademarks of both the software and the owner's manual. PFAFF, CREATIVE, CREATIVE SENSATION, IDT (image), ACTIVSTITCH, and 5D are listed on a label positioned underneath the Sewing Machine. Tie-off command 5:4 Tie-off options 4:11 Tie-offs 8:20 Timer 3:...embroidery stick 1:10, 2:12, 10:4 USB ports 1:8, 2:12 User deÀned sound 3:15 Utility stitches 1:12 V Volume 3:15 W WAV-Àles 3:15, 10:7 Windows® 7/Vista 2:12, 2:13 Windows® XP 2:12, 2:14 Wing needles 2:10 You have purchased a modern, updatable sewing and embroidery machine...


