Owner's Manual
Page 2
... dust, and loose cloth. • Keep Àngers away from all moving parts. DANGER - Keep ventilation openings of the sewing machine and foot controller free from the electric outlet immediately after using and before using an electrical appliance, basic safety precautions should a means...replacement parts. No ground means is not working properly, if it to break. • Wear safety glasses. • Switch the sewing machine off ("0") position, then remove plug from the electrical outlet when removing covers, lubricating, or when making any other user servicing adjustments ...
... dust, and loose cloth. • Keep Àngers away from all moving parts. DANGER - Keep ventilation openings of the sewing machine and foot controller free from the electric outlet immediately after using and before using an electrical appliance, basic safety precautions should a means...replacement parts. No ground means is not working properly, if it to break. • Wear safety glasses. • Switch the sewing machine off ("0") position, then remove plug from the electrical outlet when removing covers, lubricating, or when making any other user servicing adjustments ...
Owner's Manual
Page 3
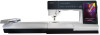
... course also be pleased to advise you to maximize the use of sewing and embroidery. Your PFAFF® creative sensation™ sewing and embroidery machine will soon discover how to experience a totally new dimension of your new PFAFF® creative sensation™ sewing and embroidery machine. Congratulations! Congratulations on purchasing your machine. You will deÀnitely enable you at any time.
... course also be pleased to advise you to maximize the use of sewing and embroidery. Your PFAFF® creative sensation™ sewing and embroidery machine will soon discover how to experience a totally new dimension of your new PFAFF® creative sensation™ sewing and embroidery machine. Congratulations! Congratulations on purchasing your machine. You will deÀnitely enable you at any time.
Owner's Manual
Page 4
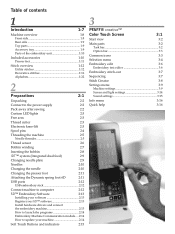
...2 Preparations 2:1 Unpacking 2:2 Connect to the power supply 2:2 Pack away after sewing 2:2 Custom LED lights 2:3 Free arm 2:3 Thread cutter 2:3 Electronic knee-lift 2:3 Spool pins 2:4 Threading the machine 2:5 Needle threader 2:5 Thread sensor 2:6 Bobbin winding 2:7 Inserting the bobbin ... hardware drivers and connect the embroidery machine 2:13 How to launch the programs 2:14 Embroidery Machine Communication module.... 2:14 How to update your machine 2:14 Soft Touch Buttons and indicators 2:15 3 PFAFF® creative™ Color Touch Screen 3:1 Start...
...2 Preparations 2:1 Unpacking 2:2 Connect to the power supply 2:2 Pack away after sewing 2:2 Custom LED lights 2:3 Free arm 2:3 Thread cutter 2:3 Electronic knee-lift 2:3 Spool pins 2:4 Threading the machine 2:5 Needle threader 2:5 Thread sensor 2:6 Bobbin winding 2:7 Inserting the bobbin ... hardware drivers and connect the embroidery machine 2:13 How to launch the programs 2:14 Embroidery Machine Communication module.... 2:14 How to update your machine 2:14 Soft Touch Buttons and indicators 2:15 3 PFAFF® creative™ Color Touch Screen 3:1 Start...
Owner's Manual
Page 5
...side to side 6:5 Mirroring end to end 6:5 Triple stitch 6:5 Touch functions 6:6 Position of the marked stitch point 6:6 Loading and sewing a stitch 6:7 Saving a stitch 6:7 Common Stitch Creator pop-ups 6:8 Important Stitch Creator information 6:8 Some fabrics have a lot ...nition of excess dye, always pre-wash it before sewing to -wear garment contains a lot of a stitch point 6:3 Start creating - If you suspect that your sewing machine. overview 4:2 Select a stitch 4:3 Sewing recommendations 4:3 Machine settings 4:3 Raise and lower the presser foot 4:3 Stitch...
...side to side 6:5 Mirroring end to end 6:5 Triple stitch 6:5 Touch functions 6:6 Position of the marked stitch point 6:6 Loading and sewing a stitch 6:7 Saving a stitch 6:7 Common Stitch Creator pop-ups 6:8 Important Stitch Creator information 6:8 Some fabrics have a lot ...nition of excess dye, always pre-wash it before sewing to -wear garment contains a lot of a stitch point 6:3 Start creating - If you suspect that your sewing machine. overview 4:2 Select a stitch 4:3 Sewing recommendations 4:3 Machine settings 4:3 Raise and lower the presser foot 4:3 Stitch...
Owner's Manual
Page 11
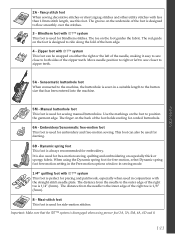
... on the underside of the right toe is disengaged when using the Dynamic spring foot for sewing manual buttonholes. Sensormatic buttonhole foot When connected to the machine, the buttonhole is always recommended for embroidery and free-motion sewing. Dynamic spring foot This foot is sewn in a suitable length to zipper teeth. 5A - It...
... on the underside of the right toe is disengaged when using the Dynamic spring foot for sewing manual buttonholes. Sensormatic buttonhole foot When connected to the machine, the buttonhole is always recommended for embroidery and free-motion sewing. Dynamic spring foot This foot is sewn in a suitable length to zipper teeth. 5A - It...
Owner's Manual
Page 24
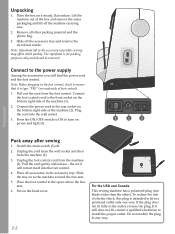
... is type "FR5" (see underside of foot control). 1. Pull out the cord from the machine (1). Connect the foot control cord to the machine around the free arm. 5. For the USA and Canada This sewing machine has a polarized plug (one way. If the plug does not Àt fully in the accessory... tray while sewing may affect stitch quality. If it is for packing purposes only and should be removed. Slide off . 2. Note: Before ...
... is type "FR5" (see underside of foot control). 1. Pull out the cord from the machine (1). Connect the foot control cord to the machine around the free arm. 5. For the USA and Canada This sewing machine has a polarized plug (one way. If the plug does not Àt fully in the accessory... tray while sewing may affect stitch quality. If it is for packing purposes only and should be removed. Slide off . 2. Note: Before ...
Owner's Manual
Page 25
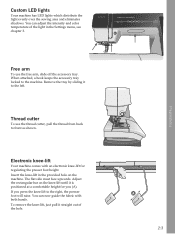
... hook keeps the accessory tray locked to front as shown. Custom LED lights Your machine has LED lights which distribute the light evenly over the sewing area and eliminates shadows. Electronic knee-lift Your machine comes with both hands. Insert the knee-lift in the Settings menu, see chapter... 3. Adjust the rectangular bar on the machine. If you (A). You can now guide the...
... hook keeps the accessory tray locked to front as shown. Custom LED lights Your machine has LED lights which distribute the light evenly over the sewing area and eliminates shadows. Electronic knee-lift Your machine comes with both hands. Insert the knee-lift in the Settings menu, see chapter... 3. Adjust the rectangular bar on the machine. If you (A). You can now guide the...
Owner's Manual
Page 26
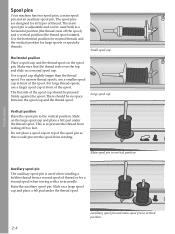
... too fast. Raise the auxiliary spool pin. Preparations Auxiliary spool pin and main spool pin in front of thread or for a second spool when sewing with a twin needle. Small spool cap Horizontal position Place a spool cap and the thread spool on top of the spool. Use a spool ...spool cap and place a felt pad under the thread spool. For large thread spools, use a smaller spool cap in vertical position. 2:4 Spool pins Your machine has two spool pins, a main spool pin and an auxiliary spool pin. Slide on a second spool cap. Use the horizontal position for normal threads ...
... too fast. Raise the auxiliary spool pin. Preparations Auxiliary spool pin and main spool pin in front of thread or for a second spool when sewing with a twin needle. Small spool cap Horizontal position Place a spool cap and the thread spool on top of the spool. Use a spool ...spool cap and place a felt pad under the thread spool. For large thread spools, use a smaller spool cap in vertical position. 2:4 Spool pins Your machine has two spool pins, a main spool pin and an auxiliary spool pin. Slide on a second spool cap. Use the horizontal position for normal threads ...
Owner's Manual
Page 28
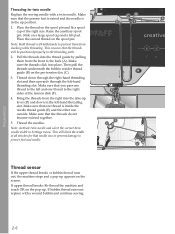
... thread is in the left -hand threading slot. Make sure that the threads do not become twisted together. 5. If upper thread breaks: Re-thread the machine and touch OK on the pop-up appears on the screen. Make sure that the presser foot is raised and the needle is inside the... threading slot. Place the second thread on the spool pin and Àt a spool cap of all stitches for twin needle Replace the sewing needle with a wound bobbin and continue sewing. This ensures that the threads will limit the width of the right size. This will be positioned properly in Settings menu. Place...
... thread is in the left -hand threading slot. Make sure that the threads do not become twisted together. 5. If upper thread breaks: Re-thread the machine and touch OK on the pop-up appears on the screen. Make sure that the presser foot is raised and the needle is inside the... threading slot. Place the second thread on the spool pin and Àt a spool cap of all stitches for twin needle Replace the sewing needle with a wound bobbin and continue sewing. This ensures that the threads will limit the width of the right size. This will be positioned properly in Settings menu. Place...
Owner's Manual
Page 31
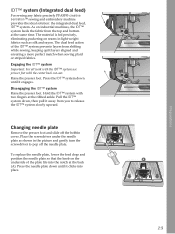
IDT™ system (Integrated dual feed) For sewing any fabric precisely PFAFF® creative sensation™ sewing and embroidery machine provides the ideal solution: the integrated dual feed, IDT™ system. Pull the IDT™ system down, then pull it away from you to pop ...
IDT™ system (Integrated dual feed) For sewing any fabric precisely PFAFF® creative sensation™ sewing and embroidery machine provides the ideal solution: the integrated dual feed, IDT™ system. Pull the IDT™ system down, then pull it away from you to pop ...
Owner's Manual
Page 32
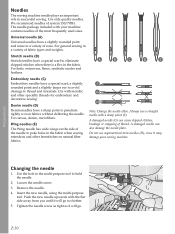
.... A damaged needle can cause skipped stitches, breakage or snapping of system 130/705H. Do not use a straight needle with your sewing machine. Loosen the needle screw. 3. Push the new needle upwards with metallic and other hemstitches on the side of sizes. For general... sewing in the fabric. For canvas, denim, microÀbers. Always use asymmetrical twin needles (H), since it may damage your machine contains needles of fabric types and weights. Preparations Changing the needle 1. Insert ...
.... A damaged needle can cause skipped stitches, breakage or snapping of system 130/705H. Do not use a straight needle with your sewing machine. Loosen the needle screw. 3. Push the new needle upwards with metallic and other hemstitches on the side of sizes. For general... sewing in the fabric. For canvas, denim, microÀbers. Always use asymmetrical twin needles (H), since it may damage your machine contains needles of fabric types and weights. Preparations Changing the needle 1. Insert ...

Owner's Manual
Page 34
...Note: Your computer must be inserted one to your computer for the Àrst time. one to connect the sewing machine to your PC. The USB PC cable packed with the machine can only be running Windows® XP or Windows® 7/Vista. Connect the other Àles, or to...Make sure that time can easily move Àles between the computer and sewing machine. USB embroidery stick Delivered with an Embroidery Machine Communication CD. The USB plugs can be used in to computer Your machine comes with your machine (P/N:412 62 59-04) plugs in this port. Note: The USB ...
...Note: Your computer must be inserted one to your computer for the Àrst time. one to connect the sewing machine to your PC. The USB PC cable packed with the machine can only be running Windows® XP or Windows® 7/Vista. Connect the other Àles, or to...Make sure that time can easily move Àles between the computer and sewing machine. USB embroidery stick Delivered with an Embroidery Machine Communication CD. The USB plugs can be used in to computer Your machine comes with your machine (P/N:412 62 59-04) plugs in this port. Note: The USB ...
Owner's Manual
Page 35
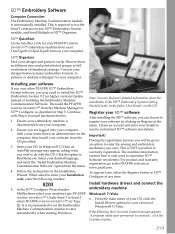
... 5D™ Software newsletters. Insert your Installation code, enter the following User Account Control message appears: 'A program needs your machine type: PFAFF® creative sensation™. Register your computer. From the main menu of thumbnail catalogs. Convert your designs between major embroidery formats, to start ... selected groups as described in the menu. In Windows® 7/Vista, an AutoPlay message may need to enter the sewing and embroidery machine(s) you may appear, asking what you can Ànd more detailed information about the installation in the 5D™ ...
... 5D™ Software newsletters. Insert your Installation code, enter the following User Account Control message appears: 'A program needs your machine type: PFAFF® creative sensation™. Register your computer. From the main menu of thumbnail catalogs. Convert your designs between major embroidery formats, to start ... selected groups as described in the menu. In Windows® 7/Vista, an AutoPlay message may need to enter the sewing and embroidery machine(s) you may appear, asking what you can Ànd more detailed information about the installation in the 5D™ ...
Owner's Manual
Page 37
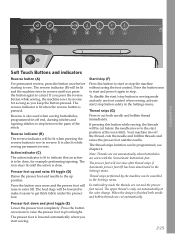
...thread snips function can be lowered to make it again to be done, for as long as you press the reverse button while sewing, the machine sews in reverse. In embroidery mode the threads are cut automatically when buttonholes are cut and the presser foot raised. Press the button once...not raise after thread snips if Automatic presser foot lift has been deactivated in the Settings menu. The presser foot will be lit and the machine sews in the Settings menu. The presser foot is pressed. Note: Threads are sewn with the Sensormatic buttonhole foot. If you keep the button ...
...thread snips function can be lowered to make it again to be done, for as long as you press the reverse button while sewing, the machine sews in reverse. In embroidery mode the threads are cut automatically when buttonholes are cut and the presser foot raised. Press the button once...not raise after thread snips if Automatic presser foot lift has been deactivated in the Settings menu. The presser foot will be lit and the machine sews in the Settings menu. The presser foot is pressed. Note: Threads are sewn with the Sensormatic buttonhole foot. If you keep the button ...
Owner's Manual
Page 72
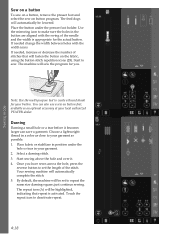
...before it . 4. Place fabric or stabilizer in your garment as close to make sure the holes in a color as possible. 1. Your sewing machine will be set the length of the needle and the width is activated. The repeat icon (A) will be lowered. Place the button under the... be highlighted, indicating that will fasten the button on button program. By default, the machine will automatically complete the stitch. 5. The feed dogs will sew the program for your local authorized PFAFF® dealer. Choose a lightweight thread in the button are aligned with the width icons...
...before it . 4. Place fabric or stabilizer in your garment as close to make sure the holes in a color as possible. 1. Your sewing machine will be set the length of the needle and the width is activated. The repeat icon (A) will be lowered. Place the button under the... be highlighted, indicating that will fasten the button on button program. By default, the machine will automatically complete the stitch. 5. The feed dogs will sew the program for your local authorized PFAFF® dealer. Choose a lightweight thread in the button are aligned with the width icons...

Owner's Manual
Page 74
...8482; system. Attach the straight stitch needle plate. Snap on scraps of your quilt and working out. Crazy quilt stitching Embellish your sewing machine for the selected setting is done with safety pins, starting from the center of the screen (C). 3. Free-motion stippling Free-motion ...texture and interest to your quilt. Note: Read about the different options on the desired effect. Maintaining a consistent speed while free-motion sewing will also help keep stitches even. 4. Take a few stitches right next to one another option for your stitching, then begin stitching your...
...8482; system. Attach the straight stitch needle plate. Snap on scraps of your quilt and working out. Crazy quilt stitching Embellish your sewing machine for the selected setting is done with safety pins, starting from the center of the screen (C). 3. Free-motion stippling Free-motion ...texture and interest to your quilt. Note: Read about the different options on the desired effect. Maintaining a consistent speed while free-motion sewing will also help keep stitches even. 4. Take a few stitches right next to one another option for your stitching, then begin stitching your...
Owner's Manual
Page 105
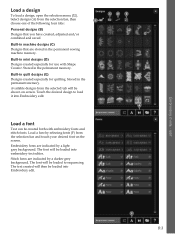
CD E A Load a font Text can be created both with Shape Creator. Built-in the permanent sewing machine memory. Stored in the permanent memory. Available designs from the selected tab will then be loaded to load it into Embroidery edit. The text...permanent memory. Touch the desired design to sequencing. Built-in quilt designs (E) Designs created especially for use with embroidery fonts and stitch fonts. Built-in machine designs (C) Designs that you have created, adjusted and/or combined and saved. The font will be shown on the screen. Load a font by selecting...
CD E A Load a font Text can be created both with Shape Creator. Built-in the permanent sewing machine memory. Stored in the permanent memory. Available designs from the selected tab will then be loaded to load it into Embroidery edit. The text...permanent memory. Touch the desired design to sequencing. Built-in quilt designs (E) Designs created especially for use with embroidery fonts and stitch fonts. Built-in machine designs (C) Designs that you have created, adjusted and/or combined and saved. The font will be shown on the screen. Load a font by selecting...
Owner's Manual
Page 154
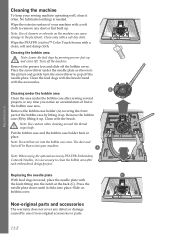
...in the picture and gently turn the screwdriver to clean the bobbin area after sewing several projects or any defect or damage caused by lifting it is needed. A Note: When using the optional accessory PFAFF® Embroidery Cutwork Needles, it up and extra lift. Non-original parts ...PFAFF® creative™ Color Touch Screen with a soft dry cloth. Remove the presser foot and slide off the machine. Put the bobbin case and the bobbin case holder back in the bobbin case area. Cleaning the bobbin area Note: Lower the feed dogs by lifting it clicks into your sewing machine...
...in the picture and gently turn the screwdriver to clean the bobbin area after sewing several projects or any defect or damage caused by lifting it is needed. A Note: When using the optional accessory PFAFF® Embroidery Cutwork Needles, it up and extra lift. Non-original parts ...PFAFF® creative™ Color Touch Screen with a soft dry cloth. Remove the presser foot and slide off the machine. Put the bobbin case and the bobbin case holder back in the bobbin case area. Cleaning the bobbin area Note: Lower the feed dogs by lifting it clicks into your sewing machine...
Owner's Manual
Page 156
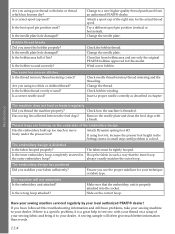
... area and use the proper stabilizer for this troubleshooting information and still have problems, take your sewing machine to your dealer. Are you use only the original PFAFF® bobbins approved for your technique or fabric type. Change the thread. Thread loops are ... bobbin thread. Wind a new bobbin. The machine does not feed or feeds irregularly Did you thread the machine properly? Maintenance Have your sewing machine serviced regularly by your local authorized PFAFF® dealer! Slide on the underside of your sewing fabric and bring it is a great help ...
... area and use the proper stabilizer for this troubleshooting information and still have problems, take your sewing machine to your dealer. Are you use only the original PFAFF® bobbins approved for your technique or fabric type. Change the thread. Thread loops are ... bobbin thread. Wind a new bobbin. The machine does not feed or feeds irregularly Did you thread the machine properly? Maintenance Have your sewing machine serviced regularly by your local authorized PFAFF® dealer! Slide on the underside of your sewing fabric and bring it is a great help ...
Owner's Manual
Page 162
...protecting this product are trademarks of the user and the product. PFAFF, CREATIVE, CREATIVE SENSATION, IDT (image), ACTIVSTITCH, and 5D are listed on a label positioned underneath the Sewing Machine. We reserve the right to change the machine equipment and the assortment of accessories without prior notice, or make... modiÀcations to visit our website at www.pfaff.com for the latest updates of both the...
...protecting this product are trademarks of the user and the product. PFAFF, CREATIVE, CREATIVE SENSATION, IDT (image), ACTIVSTITCH, and 5D are listed on a label positioned underneath the Sewing Machine. We reserve the right to change the machine equipment and the assortment of accessories without prior notice, or make... modiÀcations to visit our website at www.pfaff.com for the latest updates of both the...


