

Owner's Manual
Page 55
...For embroidering leather For embroidering circles The following pages contain application examples of cord and thicker yarns For sewing-on . Caution! For embroidery with round hole 98-694 873-00 98-694 422-00 For hemming edges For topstitching seams and sewing. Sewing feet (special... -00 For pintucks without cord. (needle size 80( The spaces in center needle position. Rolled hem foot 2 mm Needle plate with embroidery unit, Caution! Only use straight stitch in center needle position. For quilting and patchwork For sewing difficult to feed materials like leather. diam.6.5...
...For embroidering leather For embroidering circles The following pages contain application examples of cord and thicker yarns For sewing-on . Caution! For embroidery with round hole 98-694 873-00 98-694 422-00 For hemming edges For topstitching seams and sewing. Sewing feet (special... -00 For pintucks without cord. (needle size 80( The spaces in center needle position. Rolled hem foot 2 mm Needle plate with embroidery unit, Caution! Only use straight stitch in center needle position. For quilting and patchwork For sewing difficult to feed materials like leather. diam.6.5...
Owner's Manual
Page 75
I EOOO 11 I PFAFF I I I I I Instruction manual I I I I r. I PFAFF I I I Embroidery unit I 7560 I I I creatiVe 7560 I -- -
I EOOO 11 I PFAFF I I I I I Instruction manual I I I I r. I PFAFF I I I Embroidery unit I 7560 I I I creatiVe 7560 I -- -

Owner's Manual
Page 76
Parts of the "Creative Fantasy 7560" embroidery unit: 2 I. Embroidery unit vefaasy7 Creative Fantasy embroidery foot 7560 card box and ""8102"0"fraHmooep(o(pfrtaiomnea)l extra) L 1 2 3 CRMoeenlteanalescetrtailncegkvefprolfruogartftroaecrmhtohinveginmgthaetchhehionhoeopop(fr(afmraem) e) 4 Fastening unit to the clip for connecting machine the embroidery [ E 5 6 7 ERGneugliedaagesienstgrlieptvreafrcokrfoernrgeamgoinvgingthetheemebmrobirdoeidryeryunuitnit 8 2 engaging tracks 9 Tightening screw L 1 0 Creative Fantasy card box 11 Embroidery foot E C L
Parts of the "Creative Fantasy 7560" embroidery unit: 2 I. Embroidery unit vefaasy7 Creative Fantasy embroidery foot 7560 card box and ""8102"0"fraHmooep(o(pfrtaiomnea)l extra) L 1 2 3 CRMoeenlteanalescetrtailncegkvefprolfruogartftroaecrmhtohinveginmgthaetchhehionhoeopop(fr(afmraem) e) 4 Fastening unit to the clip for connecting machine the embroidery [ E 5 6 7 ERGneugliedaagesienstgrlieptvreafrcokrfoernrgeamgoinvgingthetheemebmrobirdoeidryeryunuitnit 8 2 engaging tracks 9 Tightening screw L 1 0 Creative Fantasy card box 11 Embroidery foot E C L

Owner's Manual
Page 77
...machine for is not subjected to clean the 2 C U) it is visible damage - Always store the Creative Fantasy card in the machine. 8. The embroidery unit corresponds to the EC-Directive No.: 89/336 EEC I The recommended environment is left unattended, the sewing....seeisn"gisnltdohweepes"neOwd.Kei.nn" gtkl"ye.yk,ey. 5. by it C., C C., 2. the embroidery unit This is disturbed - I Cleaning: To clean the housing use . Only original PFAFF parts may be disconnected from the power J 6. I Notes on safety C C ] 1. mechanical ...
...machine for is not subjected to clean the 2 C U) it is visible damage - Always store the Creative Fantasy card in the machine. 8. The embroidery unit corresponds to the EC-Directive No.: 89/336 EEC I The recommended environment is left unattended, the sewing....seeisn"gisnltdohweepes"neOwd.Kei.nn" gtkl"ye.yk,ey. 5. by it C., C C., 2. the embroidery unit This is disturbed - I Cleaning: To clean the housing use . Only original PFAFF parts may be disconnected from the power J 6. I Notes on safety C C ] 1. mechanical ...

Owner's Manual
Page 78
... segments. BIG hoop/frame "Creative Fantasy BIG" Bushing of the Creative 7560 CAP hoop/frame "Creative Fantasy CAP" Color change Combining patterns Creative Card, numbering/deleting Cursor keys Deleting a letter Deleting an entire pattern sequence of the motifs Embroidery foot, attaching Embroidery hoop/frame, inserting the fabric Embroidery Unit, Connecting/removing Embroidery/darning position Embroidery/multicolor Embroidery/single color Error messages in...
... segments. BIG hoop/frame "Creative Fantasy BIG" Bushing of the Creative 7560 CAP hoop/frame "Creative Fantasy CAP" Color change Combining patterns Creative Card, numbering/deleting Cursor keys Deleting a letter Deleting an entire pattern sequence of the motifs Embroidery foot, attaching Embroidery hoop/frame, inserting the fabric Embroidery Unit, Connecting/removing Embroidery/darning position Embroidery/multicolor Embroidery/single color Error messages in...

Owner's Manual
Page 79
... thread broken check Notes on safety Numbering Creative Fantasy Card Opening the M-memory Pattern Combinations Pattern mirror Pattern selection Pattern size/rotation Pattern/moving Placing the pattern in the frame Presser foot lifter Release key Richelieu work Rotating the pattern Sewing recommendations Sewing with the embroidery unit Spool holder Symbols in the display...
... thread broken check Notes on safety Numbering Creative Fantasy Card Opening the M-memory Pattern Combinations Pattern mirror Pattern selection Pattern size/rotation Pattern/moving Placing the pattern in the frame Presser foot lifter Release key Richelieu work Rotating the pattern Sewing recommendations Sewing with the embroidery unit Spool holder Symbols in the display...

Owner's Manual
Page 81
1 Technical section Connecting/removing the embrojde unit Changing the presser foot Connecting the Power cord and foot control Switching the machine Ofl Lowering the feed dog Inserting/removiflg the Creative Fantasy card Inserting/removing the hoop/frame in/from the embroide unit Bringing the presser foot to embroidery/darning Position Page 6 Page 6 Page 7 Page 7 Page 7 Page 7 Page 8 Page 8 C 0 4C., C) 0 Cu C, C Ca,) g0 g 0 Ea, & 0 0 2 Cxu C) 5 Cu Cl, 1-
1 Technical section Connecting/removing the embrojde unit Changing the presser foot Connecting the Power cord and foot control Switching the machine Ofl Lowering the feed dog Inserting/removiflg the Creative Fantasy card Inserting/removing the hoop/frame in/from the embroide unit Bringing the presser foot to embroidery/darning Position Page 6 Page 6 Page 7 Page 7 Page 7 Page 7 Page 8 Page 8 C 0 4C., C) 0 Cu C, C Ca,) g0 g 0 Ea, & 0 0 2 Cxu C) 5 Cu Cl, 1-

Owner's Manual
Page 82
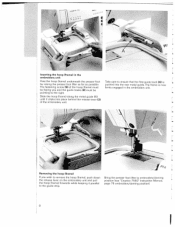
...to ensure that the guide fork is switched off and attach embroidery unit. r L L Connecting/removing the embroidery unit Bushing for connecting your Creative 7560. N L Tmrehaleecahesimenebkrewoyihd(i6ele)ryahnuodnlditipnuigsshrietinmpgaorvtahelledelubtnyoitptharewesasmyinafgcrhotimhneet.he Remove the presser foot ...etehctewloicbhekianlesedseubirpenelitanottghetahhtaeentlhdbdeutpshghaeuirniafdlgrleeeelo(-n5to) L L J L. Now insert an embroidery needle. 6 I the embroidery unit to /from the or remove the embroidery unit machine when the machine is lightly pushed against the...
...to ensure that the guide fork is switched off and attach embroidery unit. r L L Connecting/removing the embroidery unit Bushing for connecting your Creative 7560. N L Tmrehaleecahesimenebkrewoyihd(i6ele)ryahnuodnlditipnuigsshrietinmpgaorvtahelledelubtnyoitptharewesasmyinafgcrhotimhneet.he Remove the presser foot ...etehctewloicbhekianlesedseubirpenelitanottghetahhtaeentlhdbdeutpshghaeuirniafdlgrleeeelo(-n5to) L L J L. Now insert an embroidery needle. 6 I the embroidery unit to /from the or remove the embroidery unit machine when the machine is lightly pushed against the...
Owner's Manual
Page 84
...(2) of the hoop (frame) must be facing you wish to remove the hoop (frame), push down the release lever on the embroidery unit and pull the hoop (frame) forwards while keeping it clicks into the rear metal guide. Slide the hoop (frame) along the ...underneath the presser foot by raising the presser foot lifter as far as possible. Take care to embroidery/darning position (see "Creative 7560" Instruction Manual, page 76 embroidery/darning position). 8 7 Inserting the hoop (frame) in the embroidery unit. .,1 I / '1 Removing the hoop (frame) If you and the guide tracks (8) must ...
...(2) of the hoop (frame) must be facing you wish to remove the hoop (frame), push down the release lever on the embroidery unit and pull the hoop (frame) forwards while keeping it clicks into the rear metal guide. Slide the hoop (frame) along the ...underneath the presser foot by raising the presser foot lifter as far as possible. Take care to embroidery/darning position (see "Creative 7560" Instruction Manual, page 76 embroidery/darning position). 8 7 Inserting the hoop (frame) in the embroidery unit. .,1 I / '1 Removing the hoop (frame) If you and the guide tracks (8) must ...
Owner's Manual
Page 86
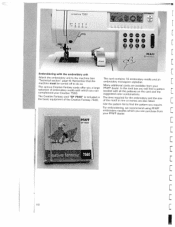
... in the basic equipment of the motif in mm or inches are available from T your Creative 7560. For embroidering, we recommend using PFAFF embroidery needles which you can complement your PFAFF dealer. L Use the pattern list to find the pattern you will find a pattern booklet... that the machine must be turned off to the machine (see "Technical section" page 6>. ____ creative 7560 •VV • V V. I I The various Creative Fantasy cards offer you a large selection of embroidery motifs with the embroidery unit [ Attach the embroidery unit to do so.
... in the basic equipment of the motif in mm or inches are available from T your Creative 7560. For embroidering, we recommend using PFAFF embroidery needles which you can complement your PFAFF dealer. L Use the pattern list to find the pattern you will find a pattern booklet... that the machine must be turned off to the machine (see "Technical section" page 6>. ____ creative 7560 •VV • V V. I I The various Creative Fantasy cards offer you a large selection of embroidery motifs with the embroidery unit [ Attach the embroidery unit to do so.

Owner's Manual
Page 89
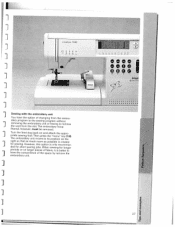
... select the pattern on a dark background which is The feed dog must be brought to the correct position. The embroidery frame normalizes, i.e. Bobbin thread is available as an optional extra from your PFAFF dealer. The 80 frame is low OK? If this is not the case, the machine stops after the foot... and bring sewing foot lifter to the middle of this pattern must be attached. We recommend using cotton thread with the embroidery unit. Lower the feed dog OK? At the same time the following • Lower feed dog message is not the case the machine does not start ...
... select the pattern on a dark background which is The feed dog must be brought to the correct position. The embroidery frame normalizes, i.e. Bobbin thread is available as an optional extra from your PFAFF dealer. The 80 frame is low OK? If this is not the case, the machine stops after the foot... and bring sewing foot lifter to the middle of this pattern must be attached. We recommend using cotton thread with the embroidery unit. Lower the feed dog OK? At the same time the following • Lower feed dog message is not the case the machine does not start ...

Owner's Manual
Page 90
...be embroidered on the outer frame. For very fine or materials which do not fit into the embroidery hoop There is unit It is facing forwards and the guide tracks (8) are on the right 14 been embroidered, can ... size automa Tip: also Every pattern suitable for each selected pattern. hThirdioooneoograpy,pc-iwhfsnrtigeaaebmvriiteeleitc.zoboegemrtetumtehnr-eedqnreudwranlipeitthlayatcthrhienetsghufelattebsfarairwbcrahiowcennaatyonedemthmebbroroide After the pattern has embroidery stabilizer it off. The right side of the fabric must be fitted and, thus, have no slack (e.g. can now...
...be embroidered on the outer frame. For very fine or materials which do not fit into the embroidery hoop There is unit It is facing forwards and the guide tracks (8) are on the right 14 been embroidered, can ... size automa Tip: also Every pattern suitable for each selected pattern. hThirdioooneoograpy,pc-iwhfsnrtigeaaebmvriiteeleitc.zoboegemrtetumtehnr-eedqnreudwranlipeitthlayatcthrhienetsghufelattebsfarairwbcrahiowcennaatyonedemthmebbroroide After the pattern has embroidery stabilizer it off. The right side of the fabric must be fitted and, thus, have no slack (e.g. can now...
Owner's Manual
Page 102
...(frame), however, must be removed. on larger pieces of fabric, it is better to j have the option of the space by remove the embroidery unit. 0 C) 2 LI •0 When sewing for longer periods or on the created j for short sewing jobs. j Turn the feed dog back... as much room as possible is only recommen ded for sewing. However, this option is appro key (1 8). creative 7560 CCCC ° / (1 (a ( (' ( ,;) Go PFAFI M.dfl,G,m,., Sewing with the embroidery unit You have the convenience of changing from the embro idery program to the sewing program without J removing the the ...
...(frame), however, must be removed. on larger pieces of fabric, it is better to j have the option of the space by remove the embroidery unit. 0 C) 2 LI •0 When sewing for longer periods or on the created j for short sewing jobs. j Turn the feed dog back... as much room as possible is only recommen ded for sewing. However, this option is appro key (1 8). creative 7560 CCCC ° / (1 (a ( (' ( ,;) Go PFAFI M.dfl,G,m,., Sewing with the embroidery unit You have the convenience of changing from the embro idery program to the sewing program without J removing the the ...
Owner's Manual
Page 144
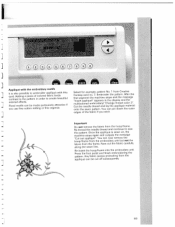
...subsequently. 69 Important Do not remove the fabric from Creative Fantasy card no. 7. Re-insert the hoop/frame into the embroidery unit Press the foot pedal and finish embroidering the pattern. You can now hoop/frame from the embroidery remove the unit but not the fabric from the appliqué ...the fabric if you use fine cotton netting or fine organza. Re-thread the needle thread and continue to embroider appliqué with the embroidery motifs It is sewn on, the machine stops again and outputs the message 'Cut out appliqué". Adding a contrast to create beautiful...
...subsequently. 69 Important Do not remove the fabric from Creative Fantasy card no. 7. Re-insert the hoop/frame into the embroidery unit Press the foot pedal and finish embroidering the pattern. You can now hoop/frame from the embroidery remove the unit but not the fabric from the appliqué ...the fabric if you use fine cotton netting or fine organza. Re-thread the needle thread and continue to embroider appliqué with the embroidery motifs It is sewn on, the machine stops again and outputs the message 'Cut out appliqué". Adding a contrast to create beautiful...

Owner's Manual
Page 146
Both the maxi stitches and the embroidery -J motifs of the embroidery unit can be pinned on top of the terry cloth fabric. I , If the terry cloth is too thick to the inside edge of embroidery fleece into the frame, fit f,.,. I a piece of the frame so that the machine doesn't embroider over them. When you have... purpose. Take care, however, that the pins are close to fit into the hoop/frame and glue the terry cloth fabric onto it with the Creative Fantasy - 7560.
Both the maxi stitches and the embroidery -J motifs of the embroidery unit can be pinned on top of the terry cloth fabric. I , If the terry cloth is too thick to the inside edge of embroidery fleece into the frame, fit f,.,. I a piece of the frame so that the machine doesn't embroider over them. When you have... purpose. Take care, however, that the pins are close to fit into the hoop/frame and glue the terry cloth fabric onto it with the Creative Fantasy - 7560.

Owner's Manual
Page 148
...being made in the leather. 73 unit so that the leather is too thick to be tightened since when to sew and, where possible, to avoid needle breakage and extra the needle can also use Filmoplast hoop and lay the extra leather over the embroidery adhesive backing (see page 72).... sew slow key (3) before starting fastening screws should be inserted into the idered onto cut-away stabilizer with the cut away stabilizer into the embroidery unit. On very thick and very stiff fabrics we recom From time to ensure that it into control when embroidering. You can more easily become...
...being made in the leather. 73 unit so that the leather is too thick to be tightened since when to sew and, where possible, to avoid needle breakage and extra the needle can also use Filmoplast hoop and lay the extra leather over the embroidery adhesive backing (see page 72).... sew slow key (3) before starting fastening screws should be inserted into the idered onto cut-away stabilizer with the cut away stabilizer into the embroidery unit. On very thick and very stiff fabrics we recom From time to ensure that it into control when embroidering. You can more easily become...

Owner's Manual
Page 154
It is of great help with the embroidery unit and can then be threaded as an optional extra from your sewing machine. 79 J jLY Spool holder "Creative Fantasy Color Changer The spool holder is available as wished on your PFAFF dealer and is particularly suitable for use with embroidery requiring frequent thread changes. Place the spools separately onto the spindles and pull the thread up to 10 spools. The needle thread required can hold up through the appropriate thread g u ide.
It is of great help with the embroidery unit and can then be threaded as an optional extra from your sewing machine. 79 J jLY Spool holder "Creative Fantasy Color Changer The spool holder is available as wished on your PFAFF dealer and is particularly suitable for use with embroidery requiring frequent thread changes. Place the spools separately onto the spindles and pull the thread up to 10 spools. The needle thread required can hold up through the appropriate thread g u ide.


