

Owner's Manual
Page 3
... loose cloth. 5. Never operate the sewing machine with same type rated 1 5 watts. 3. Never operate on a soft surface such as threading needle, changing needle, threading bobbin, or changing presser foot, etc. 1 6. Do not use out-of-doors. 7. Always unplug sewing machine from the electric outlet when removing covers, lubricating, or when making any opening. 6. SAVE THESE INSTRUCTIONS 1 DANGER To reducethe riskofelectricshock: 1. The sewing machine should always be adhered to be pulled into a tub or sink. Replace bulb with...
... loose cloth. 5. Never operate the sewing machine with same type rated 1 5 watts. 3. Never operate on a soft surface such as threading needle, changing needle, threading bobbin, or changing presser foot, etc. 1 6. Do not use out-of-doors. 7. Always unplug sewing machine from the electric outlet when removing covers, lubricating, or when making any opening. 6. SAVE THESE INSTRUCTIONS 1 DANGER To reducethe riskofelectricshock: 1. The sewing machine should always be adhered to be pulled into a tub or sink. Replace bulb with...
Owner's Manual
Page 5
... Free-hand quilt foot Fringefoot Functions when switching on Gathering Help, operational Hemstitching Hook cover Info Information Joined borders Knit-edge foot Lace trimmings Language selection Length and width adjustments Letters, changing the width Light bulb, changing Linen embroidery Lowering the feed dog M-memory Maintenance and trouble shooting Master switch Memory Mending stitch for Light-knits Menu Menu, Basic explanation Monograms Narrow edge foot Needle changing Needle chart Needle plate change Needle plate changer (Optional extra) Needle positions Needle thread tension Needle...
... Free-hand quilt foot Fringefoot Functions when switching on Gathering Help, operational Hemstitching Hook cover Info Information Joined borders Knit-edge foot Lace trimmings Language selection Length and width adjustments Letters, changing the width Light bulb, changing Linen embroidery Lowering the feed dog M-memory Maintenance and trouble shooting Master switch Memory Mending stitch for Light-knits Menu Menu, Basic explanation Monograms Narrow edge foot Needle changing Needle chart Needle plate change Needle plate changer (Optional extra) Needle positions Needle thread tension Needle...

Owner's Manual
Page 6
Index "Tacking" key Tacking stitch Technical section Thread cutter Thread tension Threading the needle thread Top cover Twin-needle cording foot Twin-needle embroidery Utility stitch programs Utility stitches Word sequence, creating in M-memory Work support Zigzag stitch Zippers, installing 36 69 14-27 25 21 23 14 11 4 1 38 8-9 67-85 54-5 6 16 70 84-85 7
Index "Tacking" key Tacking stitch Technical section Thread cutter Thread tension Threading the needle thread Top cover Twin-needle cording foot Twin-needle embroidery Utility stitch programs Utility stitches Word sequence, creating in M-memory Work support Zigzag stitch Zippers, installing 36 69 14-27 25 21 23 14 11 4 1 38 8-9 67-85 54-5 6 16 70 84-85 7

Owner's Manual
Page 7
... I I 'll" Program No. I - 'I - Also as a decorative button hole. 28 Round buttonhole For buttonholes on stretch materials. 7,5 For finishing and overedge seams. - 7,5 9 Zigzag stitch from right needle position Zigzag stitch from left needle position: press pattern mirror key.) 6 33 Light-knit fabric patching stitch 34 Open overlock stitch For sewing and patching light knitwear. For sewing elastic tape onto elastic materials, 23 Stretch triple elastic stitch e.g. sports and swim wear. (extremely elastic 6 seam for shiVrring and smockiVng. Description 18 Fancy...
... I I 'll" Program No. I - 'I - Also as a decorative button hole. 28 Round buttonhole For buttonholes on stretch materials. 7,5 For finishing and overedge seams. - 7,5 9 Zigzag stitch from right needle position Zigzag stitch from left needle position: press pattern mirror key.) 6 33 Light-knit fabric patching stitch 34 Open overlock stitch For sewing and patching light knitwear. For sewing elastic tape onto elastic materials, 23 Stretch triple elastic stitch e.g. sports and swim wear. (extremely elastic 6 seam for shiVrring and smockiVng. Description 18 Fancy...
Owner's Manual
Page 9
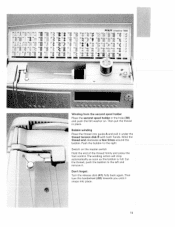
... 69 70 71 72 734. 74 PFAFF creative 7560 75Lr 75 77 75 95 79 55 81 82 96 2 83 84 80 97 A 861 z 87 88 55 90 98 9 914 92 9 94 99 Winding from the second spool holder Place the second spool holder in place. Don't forget: Turn ...thread firmly and press the foot control. Bobbin winding Place the thread into place. 19 The winding action will stop automatically as soon as the bobbin is full. Push the bobbin to the left and remove it under the thread tension disk B with both hands. Wind the thread end clockwise a few times around the bobbin. Cut the thread, push the bobbin...
... 69 70 71 72 734. 74 PFAFF creative 7560 75Lr 75 77 75 95 79 55 81 82 96 2 83 84 80 97 A 861 z 87 88 55 90 98 9 914 92 9 94 99 Winding from the second spool holder Place the second spool holder in place. Don't forget: Turn ...thread firmly and press the foot control. Bobbin winding Place the thread into place. 19 The winding action will stop automatically as soon as the bobbin is full. Push the bobbin to the left and remove it under the thread tension disk B with both hands. Wind the thread end clockwise a few times around the bobbin. Cut the thread, push the bobbin...

Owner's Manual
Page 16
.... To remove: Lower the sewing foot and set the needle at its highest point. Hold the needle and tighten the retaining screw (25) firmly. : Setting the needle thread tension Set the required needle thread tension with the help of the needle must face to be dropped. To do this, open the hook cover (49) and press slide (C) fully to 5, For embroidering and buttonhole sewing it goes. Now the feed dog is 4 to the right. Lowering the feed dog For certain sewing work...
.... To remove: Lower the sewing foot and set the needle at its highest point. Hold the needle and tighten the retaining screw (25) firmly. : Setting the needle thread tension Set the required needle thread tension with the help of the needle must face to be dropped. To do this, open the hook cover (49) and press slide (C) fully to 5, For embroidering and buttonhole sewing it goes. Now the feed dog is 4 to the right. Lowering the feed dog For certain sewing work...
Owner's Manual
Page 18
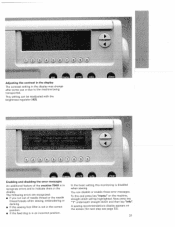
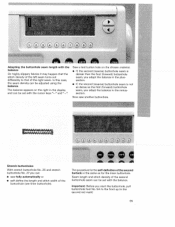
... display may change after some use or due to indicate them in the display. Enabling and disabling the error messages An additional feature of needle thread or the needle thread breaks when sewing, embroidering or darning. • If the sewing foot lifter is not in the correct position. • If the feed dog is disabled when sewing. Now press key "1" underneath straight stitch and then key "info". This setting can...
... display may change after some use or due to indicate them in the display. Enabling and disabling the error messages An additional feature of needle thread or the needle thread breaks when sewing, embroidering or darning. • If the sewing foot lifter is not in the correct position. • If the feed dog is disabled when sewing. Now press key "1" underneath straight stitch and then key "info". This setting can...
Owner's Manual
Page 25
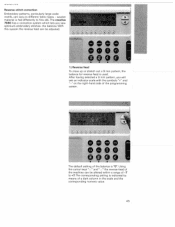
... a 9 mm pattern, you sew optimum embroidery stitches: the balance. y-----,- -- • Reverse stitch correction Embroidery patterns, particularly large-scale motifs, can be adjusted. With this system the reverse feed can be altered within a range of a dark column in the scale and the corresponding numeric value. 45 I 1) Reverse feed To close up or stretch out a 9 mm pattern, the balance for reverse feed is fed differently to +7. The creative 7560 has a correction...
... a 9 mm pattern, you sew optimum embroidery stitches: the balance. y-----,- -- • Reverse stitch correction Embroidery patterns, particularly large-scale motifs, can be adjusted. With this system the reverse feed can be altered within a range of a dark column in the scale and the corresponding numeric value. 45 I 1) Reverse feed To close up or stretch out a 9 mm pattern, the balance for reverse feed is fed differently to +7. The creative 7560 has a correction...

Owner's Manual
Page 37
... fabric layers from shifting, insert dress pins crosswise to finish the seam. Sew the first seam.When you have sewn the desired seam length, press the reverse key. Straight stitch Program 00 is in a zipper. For each time. • Lower the feed dog. • Place the fabric under the sewing foot. • Sew one stitch. Some sewing jobs can be increased up to 6 mm as you can select the creative 7560's 19 needle positions. Place the fabrics...
... fabric layers from shifting, insert dress pins crosswise to finish the seam. Sew the first seam.When you have sewn the desired seam length, press the reverse key. Straight stitch Program 00 is in a zipper. For each time. • Lower the feed dog. • Place the fabric under the sewing foot. • Sew one stitch. Some sewing jobs can be increased up to 6 mm as you can select the creative 7560's 19 needle positions. Place the fabrics...
Owner's Manual
Page 50
... the display and can be set with the cursor keys "-" and "-". Seam length and stitch density of the second buttonhole seam can be adjusted using the balance. In this case, the seam density can • sew fully automatically or • self-define the length and stitch width of the right seam. Stretch buttonholes With stretch buttonhole No. 26 and stretch buttonhole No. 27 you start the buttonhole, pull buttonhole foot No. 5A to the front...
... the display and can be set with the cursor keys "-" and "-". Seam length and stitch density of the second buttonhole seam can be adjusted using the balance. In this case, the seam density can • sew fully automatically or • self-define the length and stitch width of the right seam. Stretch buttonholes With stretch buttonhole No. 26 and stretch buttonhole No. 27 you start the buttonhole, pull buttonhole foot No. 5A to the front...

Owner's Manual
Page 51
... wish, you should be set using key"6' The stitch density cannot be altered for this length with the number keys 1-0. Caution: Before starting the buttonhole, pull buttonhole foot No. 5A forwards up to measure from the inside outwards towards the edge. q7 L The bartack can alter this buttonhole type. The sewing of 22 mm appears on the fabric first, making sure to the second...
... wish, you should be set using key"6' The stitch density cannot be altered for this length with the number keys 1-0. Caution: Before starting the buttonhole, pull buttonhole foot No. 5A forwards up to measure from the inside outwards towards the edge. q7 L The bartack can alter this buttonhole type. The sewing of 22 mm appears on the fabric first, making sure to the second...

Owner's Manual
Page 55
... Teflon ornamental stitch foot width up to 9 mm Part No. 93-042 941 -91 93-036 933-91 Sewing work For appliqué work Pintuck foot, 5 grooves (twin needle with needle gauge 1.6- 2.0; 1 30/705 H-ZWI) Pintuck foot, 7 grooves (twin needle with needle gauge 1.6-2.0; 1 30/705 H-ZW Cording tongue 12 pcs.( Pintuck foot Adjustable blind-stitch and overlock foot Fagot guide Finger guard Fringe foot Free-motion quilt foot 3rd thread spool holder to be placed on the pin Straight stitch foot with round needle hole 93-042...
... Teflon ornamental stitch foot width up to 9 mm Part No. 93-042 941 -91 93-036 933-91 Sewing work For appliqué work Pintuck foot, 5 grooves (twin needle with needle gauge 1.6- 2.0; 1 30/705 H-ZWI) Pintuck foot, 7 grooves (twin needle with needle gauge 1.6-2.0; 1 30/705 H-ZW Cording tongue 12 pcs.( Pintuck foot Adjustable blind-stitch and overlock foot Fagot guide Finger guard Fringe foot Free-motion quilt foot 3rd thread spool holder to be placed on the pin Straight stitch foot with round needle hole 93-042...

Owner's Manual
Page 56
... work support, so that the spaces between the needle plate and the sewing machine provides space for a twin needle (e.g. 130/705 H-ZWI; This thread must be fed under the detachable work without a cording tongue. • First remove the needle plate. • Thread the gimp thread upwards through the hole in one pintuck. Sewing with 5 grooves and the larger cording tongue. Program: 00 Stitch length: 25 Tension: 5 Tip: If you wish to its position...
... work support, so that the spaces between the needle plate and the sewing machine provides space for a twin needle (e.g. 130/705 H-ZWI; This thread must be fed under the detachable work without a cording tongue. • First remove the needle plate. • Thread the gimp thread upwards through the hole in one pintuck. Sewing with 5 grooves and the larger cording tongue. Program: 00 Stitch length: 25 Tension: 5 Tip: If you wish to its position...

Owner's Manual
Page 58
... Tension: 3-5 Note: Using the free-motion quilt foot, free motion embroidery work e.g. Free motion quilting is very suitable for free motion quilting. Free-motion quilt foot The free-motion quilt foot in combination with soft leather an embroidery needle. • Engage the Teflon foot. • Embroider the leather as it is to feed the material, which results in curved lines. Underside of 1/2 inch (12.7 mm) on the freemotion quilt foot. • Loosen the knurled screw on the sewing foot holder (27). • Press the free-motion quilt foot gently...
... Tension: 3-5 Note: Using the free-motion quilt foot, free motion embroidery work e.g. Free motion quilting is very suitable for free motion quilting. Free-motion quilt foot The free-motion quilt foot in combination with soft leather an embroidery needle. • Engage the Teflon foot. • Embroider the leather as it is to feed the material, which results in curved lines. Underside of 1/2 inch (12.7 mm) on the freemotion quilt foot. • Loosen the knurled screw on the sewing foot holder (27). • Press the free-motion quilt foot gently...
Owner's Manual
Page 64
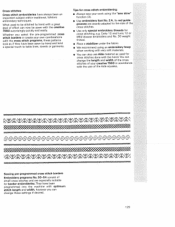
... create your own combinations with the cross stitch programs, these settings if desired. 125 Tips for cross stitch embroidering: • Always sew your creative 7560 in accordance with the size of small cross stitches and are exactly adapted to the size of effort can change the length and width of the cross stitches of your work using an embroidery hoop when working with very soft materials. • You...
... create your own combinations with the cross stitch programs, these settings if desired. 125 Tips for cross stitch embroidering: • Always sew your creative 7560 in accordance with the size of small cross stitches and are exactly adapted to the size of effort can change the length and width of the cross stitches of your work using an embroidery hoop when working with very soft materials. • You...

Owner's Manual
Page 66
... individual threads is very suitable. Embroidery and darning thread, particularly cotton, is the most suitable for very fine fabrics a normal sewing needle, size 80, is used. Only for hemstitching. r Hemstitching Everyone knows this technique - Use the hemstitching programs of your disposal and by changing the stitch lengths and widths, you need a hem-stitch needle. but only done by handl With the creative 7560, you can achieve new effects every time. For...
... individual threads is very suitable. Embroidery and darning thread, particularly cotton, is the most suitable for very fine fabrics a normal sewing needle, size 80, is used. Only for hemstitching. r Hemstitching Everyone knows this technique - Use the hemstitching programs of your disposal and by changing the stitch lengths and widths, you need a hem-stitch needle. but only done by handl With the creative 7560, you can achieve new effects every time. For...
Owner's Manual
Page 70
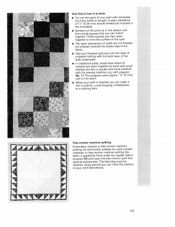
... practical with the sewing machine, e.g. p 1 37 Select program 00 and insert the free-motion quilt foot (special accessories).The feed dog must be included in the templates. • Spread out the parts as in the pattern and form small squares that you have made or bought. A seam allowance of your quilt with the back layer of the quilt underneath. • In traditional quilts, these three layers...
... practical with the sewing machine, e.g. p 1 37 Select program 00 and insert the free-motion quilt foot (special accessories).The feed dog must be included in the templates. • Spread out the parts as in the pattern and form small squares that you have made or bought. A seam allowance of your quilt with the back layer of the quilt underneath. • In traditional quilts, these three layers...

Owner's Manual
Page 73
... place. Changing the needle plate • Switch off the master switch. • Remove the needle plate and lower the feed dog. • Clean the feed dog and hook area with the brush. • Apply one drop of oil only to 1 5 hours of operation. The needle plate can now be oiled in other places. • Clean and oil the sewing machine every 10 to the hook as shown above . Cleaning the display When needed, clean the display, using a dry...
... place. Changing the needle plate • Switch off the master switch. • Remove the needle plate and lower the feed dog. • Clean the feed dog and hook area with the brush. • Apply one drop of oil only to 1 5 hours of operation. The needle plate can now be oiled in other places. • Clean and oil the sewing machine every 10 to the hook as shown above . Cleaning the display When needed, clean the display, using a dry...

Owner's Manual
Page 74
... or it fully in the hook race Remove loose thread and apply one drop of oil to the hook. 7. t wrong needle has been inserted. Correction: Use a larger needle. Use needle system Cat. The needle thread breaks For above or below the fabric. Adjust thread tension. Needle is too thick, slubbed or hard. The bobbin case is sewn unevenly The tension needs adjusting. See needle chart (Page 118/119). Seam is not properly inserted. Machine does not sew the entered program Switch...
... or it fully in the hook race Remove loose thread and apply one drop of oil to the hook. 7. t wrong needle has been inserted. Correction: Use a larger needle. Use needle system Cat. The needle thread breaks For above or below the fabric. Adjust thread tension. Needle is too thick, slubbed or hard. The bobbin case is sewn unevenly The tension needs adjusting. See needle chart (Page 118/119). Seam is not properly inserted. Machine does not sew the entered program Switch...

Owner's Manual
Page 89
... starting to embroider. it - - If this line. Now lower the feed dog and insert a full bobbin. Attach the embroidery foot and set the presser foot lifter to the middle of this is not the case, the machine stops after the foot pedal is low OK? Attach embroidery foot and bring sewing foot lifter to embroidery position ] Cover and insert frame "120" (or "80") This message appears on the machine with the 'esc" key and select a appears: new pattern. The embroidery...
... starting to embroider. it - - If this line. Now lower the feed dog and insert a full bobbin. Attach the embroidery foot and set the presser foot lifter to the middle of this is not the case, the machine stops after the foot pedal is low OK? Attach embroidery foot and bring sewing foot lifter to embroidery position ] Cover and insert frame "120" (or "80") This message appears on the machine with the 'esc" key and select a appears: new pattern. The embroidery...


