Owner's Manual
Page 2
.... DANGER - Always unplug this manual. To reduce the risk of electric shock: • A sewing machine should always be followed, including the following: Read all moving parts. Return the sewing machine to the nearest authorised dealer or service center for its intended use outdoors. • Do not operate where aerosol (spray) products...
.... DANGER - Always unplug this manual. To reduce the risk of electric shock: • A sewing machine should always be followed, including the following: Read all moving parts. Return the sewing machine to the nearest authorised dealer or service center for its intended use outdoors. • Do not operate where aerosol (spray) products...
Owner's Manual
Page 4
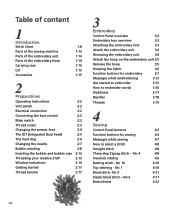
... blind stitch - No 6 4:11 Buttonholes 4:12 1:4 Table of content 1 Introduction Stitch Chart 1:8 Parts of the sewing machine 1:13 Parts of the embroidery unit 1:14 Parts of the embroidery hoop 1:14 Carrying case 1:15 Lid 1:15 Accessories 1:15 2 Preparations Operating Instructions ...2:5 The feed dog 2:6 Changing the needle 2:7 Bobbin winding 2:8 Inserting the bobbin and bobbin case 2:12 Threading your creative 2124 2:13 Window indications 2:16 Getting started 2:17 Thread tension 2:17 3 Embroidery Control Panel overview 3:2 Embroidery box overview 3:3...
... blind stitch - No 6 4:11 Buttonholes 4:12 1:4 Table of content 1 Introduction Stitch Chart 1:8 Parts of the sewing machine 1:13 Parts of the embroidery unit 1:14 Parts of the embroidery hoop 1:14 Carrying case 1:15 Lid 1:15 Accessories 1:15 2 Preparations Operating Instructions ...2:5 The feed dog 2:6 Changing the needle 2:7 Bobbin winding 2:8 Inserting the bobbin and bobbin case 2:12 Threading your creative 2124 2:13 Window indications 2:16 Getting started 2:17 Thread tension 2:17 3 Embroidery Control Panel overview 3:2 Embroidery box overview 3:3...
Owner's Manual
Page 13
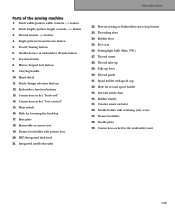
...length/pattern length controls, -/+ button 3. Sew slow button 8. Mirror/keypad lock button 9. Base plate 18. Removable accessory tray 19. Creative smart card slot 36. Connection socket for second spool holder 33. Needle down/cut embroidery threads button 7. Single pattern/monochrome button 5. ...socket, "lead cord" 14. Slide for lowering the feed dog 17. Lid with retaining (set) screw 37. Bobbin winder 35. PInretrpoadruacttioionns Parts of the sewing machine 1. Main switch 16. Free arm 26. Take up 29. Integrated needle threader 22. Thread tension, -/+ button ...
...length/pattern length controls, -/+ button 3. Sew slow button 8. Mirror/keypad lock button 9. Base plate 18. Removable accessory tray 19. Creative smart card slot 36. Connection socket for second spool holder 33. Needle down/cut embroidery threads button 7. Single pattern/monochrome button 5. ...socket, "lead cord" 14. Slide for lowering the feed dog 17. Lid with retaining (set) screw 37. Bobbin winder 35. PInretrpoadruacttioionns Parts of the sewing machine 1. Main switch 16. Free arm 26. Take up 29. Integrated needle threader 22. Thread tension, -/+ button ...
Owner's Manual
Page 14
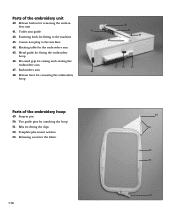
Snap-in pin 50. Template placement notches 53. Release lever for removing the embroidery hoop 48 45 47 46 44 41 42 43 40 Parts of the embroidery unit 40. Parts of the embroidery hoop 49. Under arm guide 42. Rotating table for the fabric 49 50 51 52 53 1:14 Retaining screw...
Snap-in pin 50. Template placement notches 53. Release lever for removing the embroidery hoop 48 45 47 46 44 41 42 43 40 Parts of the embroidery unit 40. Parts of the embroidery hoop 49. Under arm guide 42. Rotating table for the fabric 49 50 51 52 53 1:14 Retaining screw...
Owner's Manual
Page 16
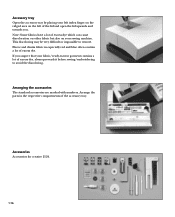
Arrange the parts in especially red and blue often contain a lot of excess dye. Accessories Accessories for creative 2124. 1:16 This discoloring may be very difficult or impossible to avoid the discoloring. Note: Some fabrics have a lot of excess dye which can ...
Arrange the parts in especially red and blue often contain a lot of excess dye. Accessories Accessories for creative 2124. 1:16 This discoloring may be very difficult or impossible to avoid the discoloring. Note: Some fabrics have a lot of excess dye which can ...
Owner's Manual
Page 22
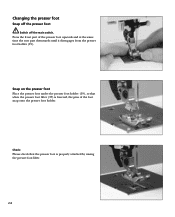
Changing the presser foot Snap off the presser foot Switch off the main switch. Press the front part of the foot snap onto the presser foot holder. Check: Please check that when the presser foot lifter (37) is properly attached by raising the presser foot lifter. 2:4 Snap on the presser foot Place the presser foot under the presser foot holder (19), so that the presser foot is lowered, the pins of the presser foot upwards and at the same time the rear part downwards until it disengages from the presser foot holder (19).
Changing the presser foot Snap off the presser foot Switch off the main switch. Press the front part of the foot snap onto the presser foot holder. Check: Please check that when the presser foot lifter (37) is properly attached by raising the presser foot lifter. 2:4 Snap on the presser foot Place the presser foot under the presser foot holder (19), so that the presser foot is lowered, the pins of the presser foot upwards and at the same time the rear part downwards until it disengages from the presser foot holder (19).
Owner's Manual
Page 68
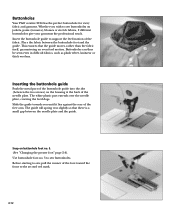
... of the fabric. Place the fabric between the needle plate and the guide. Buttonholes Your Pfaff creative 2124 has the perfect buttonhole for every fabric and garment. Inserting the buttonhole guide Push the metal part of the buttonhole guide into the slot (between the two arrows) on jackets, pants (trousers... Whether you until it lies against the rear of the needle plate. Before starting to the second red mark. 4:12 The white plastic part extends over the needle plate, covering the feed dogs. The guide will spring rear slightly so that the guide moves, rather than the ...
... of the fabric. Place the fabric between the needle plate and the guide. Buttonholes Your Pfaff creative 2124 has the perfect buttonhole for every fabric and garment. Inserting the buttonhole guide Push the metal part of the buttonhole guide into the slot (between the two arrows) on jackets, pants (trousers... Whether you until it lies against the rear of the needle plate. Before starting to the second red mark. 4:12 The white plastic part extends over the needle plate, covering the feed dogs. The guide will spring rear slightly so that the guide moves, rather than the ...
Owner's Manual
Page 79
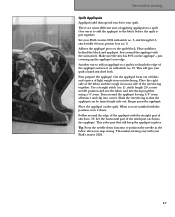
... edge. First prepare the appliqué. Place the appliqué on with stitch no . 2. This makes turning easy with your Pfaff creative 2124 with the straight part of light weight iron on interfacing. Sew around the edge of the appliqué with stitch no. 3, stitch length 0.5, stitch ... so that special touch for your quilt a hand stitcched look. When you stop sewing. Tip: Press the needle down . Set your Pfaff creative 2124. 5:7 Place stabilizer behind the block and appliqué. Trim around the appliqué leaving 1/8" seam allowance and clip into the appliqu&#...
... edge. First prepare the appliqué. Place the appliqué on with stitch no . 2. This makes turning easy with your Pfaff creative 2124 with the straight part of light weight iron on interfacing. Sew around the edge of the appliqué with stitch no. 3, stitch length 0.5, stitch ... so that special touch for your quilt a hand stitcched look. When you stop sewing. Tip: Press the needle down . Set your Pfaff creative 2124. 5:7 Place stabilizer behind the block and appliqué. Trim around the appliqué leaving 1/8" seam allowance and clip into the appliqu&#...
Owner's Manual
Page 92
...lint with difficulty There are lowered. Corrupt data. No data found. The machine does not find any designs to your Pfaff creative 2124 serviced regularly by use of the design number. This is important if there are seven different error messages that can appear while the machine.... 10 seconds. Switch off the main switch. This message will be red (Corrupt card) The design is shown instead of non-original accessories or parts. 6:5 When leaving the machine, even for a design. You need to bring your window: E1 is too big for service. This type of...
...lint with difficulty There are lowered. Corrupt data. No data found. The machine does not find any designs to your Pfaff creative 2124 serviced regularly by use of the design number. This is important if there are seven different error messages that can appear while the machine.... 10 seconds. Switch off the main switch. This message will be red (Corrupt card) The design is shown instead of non-original accessories or parts. 6:5 When leaving the machine, even for a design. You need to bring your window: E1 is too big for service. This type of...


