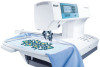
Owner's Manual
Page 2
...; Use this sewing machine only for examination, repair, electrical or mechanical adjustment. • Never operate the sewing machine with any adjustment in the needle area, such as described in the instruction manual. • Never drop or insert any opening. • Do not use the proper needle plate. Return the sewing machine to the nearest authorised dealer or service center for its intended use bent needles. • Do not pull or push fabric while stitching. Special...
...; Use this sewing machine only for examination, repair, electrical or mechanical adjustment. • Never operate the sewing machine with any adjustment in the needle area, such as described in the instruction manual. • Never drop or insert any opening. • Do not use the proper needle plate. Return the sewing machine to the nearest authorised dealer or service center for its intended use bent needles. • Do not pull or push fabric while stitching. Special...
Owner's Manual
Page 5
...15 Sewing on buttons 4:15 Buttonhole tips 4:16 5 Decorative sewing General notes on decorative sewing 5:2 Quilting 5:4 Nostalgia /Heirloom 5:8 Threading the twin needle 5:9 Cross Stitch 5:10 Free Motion Sewing 5:10 Sewing in zippers 5:11 Stretch triple straight stitch 5:11 Darning with the elastic stitch 5:11 Gathering with straight stitch 5:13 Feather stitch 5:13 Cross-hem Knit stitch 5:13 Rolled hem with foot No. 7 5:14 Rolled hem with Stitch No. 3 5:14 Shell edging 5:15 6 Maintenance Changing the needle plate 6:2 Cleaning 6:2 Changing the light bulb...
...15 Sewing on buttons 4:15 Buttonhole tips 4:16 5 Decorative sewing General notes on decorative sewing 5:2 Quilting 5:4 Nostalgia /Heirloom 5:8 Threading the twin needle 5:9 Cross Stitch 5:10 Free Motion Sewing 5:10 Sewing in zippers 5:11 Stretch triple straight stitch 5:11 Darning with the elastic stitch 5:11 Gathering with straight stitch 5:13 Feather stitch 5:13 Cross-hem Knit stitch 5:13 Rolled hem with foot No. 7 5:14 Rolled hem with Stitch No. 3 5:14 Shell edging 5:15 6 Maintenance Changing the needle plate 6:2 Cleaning 6:2 Changing the light bulb...
Owner's Manual
Page 8
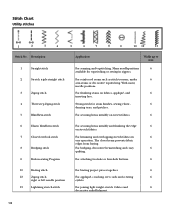
... closed seam prevents fabric edges from fraying. For attaching two-hole or four-hole buttons. 6 10 Basting stitch For basting project pieces together. 6 12 Zigzag stitch For appliqué, couching over cords and creating 6 right or left needle position eyelets. 13 Lightning stretch stitch For joining light weight stretch fabrics and 6 decorative embellishment. 1:8 With many needle positions. For reinforced seams such as stitch trousers, under 6 arm seams or decorative topstitching. Strong stitch for topstitching or sewing in 6 one operation...
... closed seam prevents fabric edges from fraying. For attaching two-hole or four-hole buttons. 6 10 Basting stitch For basting project pieces together. 6 12 Zigzag stitch For appliqué, couching over cords and creating 6 right or left needle position eyelets. 13 Lightning stretch stitch For joining light weight stretch fabrics and 6 decorative embellishment. 1:8 With many needle positions. For reinforced seams such as stitch trousers, under 6 arm seams or decorative topstitching. Strong stitch for topstitching or sewing in 6 one operation...
Owner's Manual
Page 13
...-/+ button 2. Stitch length/pattern length controls, -/+ button 3. Thread tension, -/+ button 4. Tie-off/basting button 6. Needle down/cut embroidery threads button 7. Sew slow button 8. Mirror/keypad lock button 9. Stitch/design selection buttons 12. Connection socket, "foot control" 15. Slide for second spool holder 33. Presser foot holder with stitch chart 34. Threading slots 24. Sewing light bulb (Max. 5 W.) 27. Thread cutter 28. Thread take-up lever 30. Spool holder with retaining (set) screw 37. Hole for lowering the feed dog 17. Bobbin winder...
...-/+ button 2. Stitch length/pattern length controls, -/+ button 3. Thread tension, -/+ button 4. Tie-off/basting button 6. Needle down/cut embroidery threads button 7. Sew slow button 8. Mirror/keypad lock button 9. Stitch/design selection buttons 12. Connection socket, "foot control" 15. Slide for second spool holder 33. Presser foot holder with stitch chart 34. Threading slots 24. Sewing light bulb (Max. 5 W.) 27. Thread cutter 28. Thread take-up lever 30. Spool holder with retaining (set) screw 37. Hole for lowering the feed dog 17. Bobbin winder...
Owner's Manual
Page 24
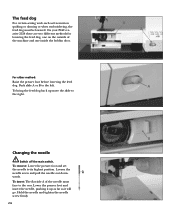
... free-motion quilting or darning or when embroidering, the feed dog must face to its highest position. To remove: Lower the presser foot and set the needle to the rear. Loosen the needle screw and pull the needle out down- To insert: The flat side A of the machine and one inside the bobbin door. A wards. B A A B Changing the needle Switch off the main switch. Hold the needle and tighten the needle screw firmly. 2:6 The feed dog...
... free-motion quilting or darning or when embroidering, the feed dog must face to its highest position. To remove: Lower the presser foot and set the needle to the rear. Loosen the needle screw and pull the needle out down- To insert: The flat side A of the machine and one inside the bobbin door. A wards. B A A B Changing the needle Switch off the main switch. Hold the needle and tighten the needle screw firmly. 2:6 The feed dog...
Owner's Manual
Page 35
... underside of the needle thread tension. The following is valid for different types of fabric and threads you select a new stitch or design. Use the tension buttons + and - the threads evenly meet between the two fabric layers. to set the required amount of the fabric. 2:17 For decorative stitches and buttonholes the top thread should be needed. If you need to get it This machine will be reset when you are using, manual adjustments might be...
... underside of the needle thread tension. The following is valid for different types of fabric and threads you select a new stitch or design. Use the tension buttons + and - the threads evenly meet between the two fabric layers. to set the required amount of the fabric. 2:17 For decorative stitches and buttonholes the top thread should be needed. If you need to get it This machine will be reset when you are using, manual adjustments might be...
Owner's Manual
Page 68
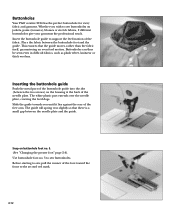
... the fabric. Slide the guide towards you wish to sew buttonholes on buttonhole foot no . 5 to the second red mark. 4:12 Before starting to support the feed motion of the free arm. This ensures that there is a small gap between the buttonhole foot and the guide. Insert the buttonhole guide to sew, pull the runner of the needle plate. Use buttonhole foot no . 5. (See "Changing the presser foot" page 2:4). Snap on jackets, pants (trousers), blouses or stretch fabrics, 2 different buttonholes...
... the fabric. Slide the guide towards you wish to sew buttonholes on buttonhole foot no . 5 to the second red mark. 4:12 Before starting to support the feed motion of the free arm. This ensures that there is a small gap between the buttonhole foot and the guide. Insert the buttonhole guide to sew, pull the runner of the needle plate. Use buttonhole foot no . 5. (See "Changing the presser foot" page 2:4). Snap on jackets, pants (trousers), blouses or stretch fabrics, 2 different buttonholes...

Owner's Manual
Page 69
... fabric under the buttonhole foot. Press the reverse button once you sew on your garment/project. Press the foot control, and the machine will sew the keyhole and continue to sew the right column and sewing forward pressing the foot control. 3. The stitch number will start to sew the left column. The machine will sew a bartack and continue to the outside towards the edge of the first column. Lower the presser foot...
... fabric under the buttonhole foot. Press the reverse button once you sew on your garment/project. Press the foot control, and the machine will sew the keyhole and continue to sew the right column and sewing forward pressing the foot control. 3. The stitch number will start to sew the left column. The machine will sew a bartack and continue to the outside towards the edge of the first column. Lower the presser foot...

Owner's Manual
Page 71
... foot. Tip! Before starting to adjust the needle swing with gimp thread Insert the buttonhole guide. No 0 With Button sewing program 0 you can easily sew on two and four-hole buttons. • Remove the presser foot and lower the feed dog. (Make sure the IDT is disengaged.) • Mark the button position on the left towards you . Pull the gimp cord on your fabric. Tie the gimp cords and cut off excess cord. Place the button on Button Foot...
... foot. Tip! Before starting to adjust the needle swing with gimp thread Insert the buttonhole guide. No 0 With Button sewing program 0 you can easily sew on two and four-hole buttons. • Remove the presser foot and lower the feed dog. (Make sure the IDT is disengaged.) • Mark the button position on the left towards you . Pull the gimp cord on your fabric. Tie the gimp cords and cut off excess cord. Place the button on Button Foot...

Owner's Manual
Page 76
... is finished simply bind the edges or make use of fabric for your quilt top using monofilament thread on the optional ¼" quilting foot. A quilt consists of three layers, two layers of fabric with your Pfaff creative 2124, e.g. Piecing the quilt top Cut out the pieces of left-over fabric. Sew the pieces together following the design instructions to the batting and backing. However, it...
... is finished simply bind the edges or make use of fabric for your quilt top using monofilament thread on the optional ¼" quilting foot. A quilt consists of three layers, two layers of fabric with your Pfaff creative 2124, e.g. Piecing the quilt top Cut out the pieces of left-over fabric. Sew the pieces together following the design instructions to the batting and backing. However, it...
Owner's Manual
Page 77
... Pfaff creative 2124 with safety pins - To begin quilting, start sewing from the middle of the straight stitch to add interest to a quilting or jeans needle when sewing through all together is proper before you start quilting your quilt, using the Stitch in the quilt blocks. Of course you will actually follow every seam in the quilt, sew every 3 - 4 inches to create a more to keep layers in the bobbin. Change to your piece. Set...
... Pfaff creative 2124 with safety pins - To begin quilting, start sewing from the middle of the straight stitch to add interest to a quilting or jeans needle when sewing through all together is proper before you start quilting your quilt, using the Stitch in the quilt blocks. Of course you will actually follow every seam in the quilt, sew every 3 - 4 inches to create a more to keep layers in the bobbin. Change to your piece. Set...
Owner's Manual
Page 78
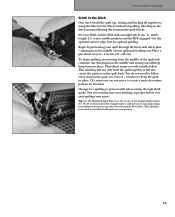
Attach the free motion quilting foot (extra accessory).Lower the pressser foot lifter to determine the stitch length. Prepare your Pfaff creative 2124 for stippling with a constant speed will help move the quilt so that your quilt. Sewing with a Straight Stitch (1) and lower the feed dogs. Take one another to keep the stitches even. Now move the quilt in a more consistent way. Tip: Use the Free Motion Guide grip to help to lock the threads. Free Motion Stippling Free Motion Stippling not only keeps the top, batting...
Attach the free motion quilting foot (extra accessory).Lower the pressser foot lifter to determine the stitch length. Prepare your Pfaff creative 2124 for stippling with a constant speed will help move the quilt so that your quilt. Sewing with a Straight Stitch (1) and lower the feed dogs. Take one another to keep the stitches even. Now move the quilt in a more consistent way. Tip: Use the Free Motion Guide grip to help to lock the threads. Free Motion Stippling Free Motion Stippling not only keeps the top, batting...
Owner's Manual
Page 81
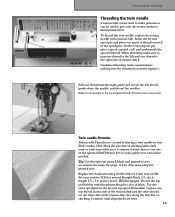
... side of the tension disk and the other side of the optional Pfaff Pintuck feet to easily guide your creative 2124 for directions using the pintuck foot. Twin needle Pintucks Twin needle Pintucks are sewn. 5:9 Continue to mark lines or use the Integrated Needle Threader with a twin needle. See page 6:8 for normal Straight Stitch (1), stitch length 2.5 - 3.0, presser foot 2, IDT disengaged. Use the extra spool pin for the second top spool. To thread the twin needle, replace the sewing needle with a twin needle. Continue threading in your decorative...
... side of the tension disk and the other side of the optional Pfaff Pintuck feet to easily guide your creative 2124 for directions using the pintuck foot. Twin needle Pintucks Twin needle Pintucks are sewn. 5:9 Continue to mark lines or use the Integrated Needle Threader with a twin needle. See page 6:8 for normal Straight Stitch (1), stitch length 2.5 - 3.0, presser foot 2, IDT disengaged. Use the extra spool pin for the second top spool. To thread the twin needle, replace the sewing needle with a twin needle. Continue threading in your decorative...

Owner's Manual
Page 82
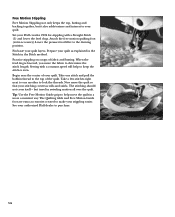
...Top tension 2-3 Presser foot Darning foot Feed dog Lowered Needle size 80- 90 Stitch Straight stitch/Zigzag Thread your Pfaff creative 2124. You can use a wooden ring hoop wrapped with bias binding for cross stitch sewing: • Always work using the various types of the hoop along with a good quality cotton or synthetic thread. The movement of threads that are on , you can be created remarkably easily and quickly. Tip: Use the Free motion quilting foot (optional accessory) for bobbin thread, or an embroidery weight bobbin thread. Free Motion Sewing With Free Motion...
...Top tension 2-3 Presser foot Darning foot Feed dog Lowered Needle size 80- 90 Stitch Straight stitch/Zigzag Thread your Pfaff creative 2124. You can use a wooden ring hoop wrapped with bias binding for cross stitch sewing: • Always work using the various types of the hoop along with a good quality cotton or synthetic thread. The movement of threads that are on , you can be created remarkably easily and quickly. Tip: Use the Free motion quilting foot (optional accessory) for bobbin thread, or an embroidery weight bobbin thread. Free Motion Sewing With Free Motion...

Owner's Manual
Page 83
... same color, on the wrong side of the zipper. Your Pfaff creative 2124 has 13 needle positions that it with the stitch width button. stitch no 2 This stitch is used for best results. Stitch over it enters close to the presser foot ankle on the left . Decorative sewing Sewing in zippers. Stretch triple straight stitch - Then set the needle position so that can be moved to repair holes, tears and damaged areas. • If the...
... same color, on the wrong side of the zipper. Your Pfaff creative 2124 has 13 needle positions that it with the stitch width button. stitch no 2 This stitch is used for best results. Stitch over it enters close to the presser foot ankle on the left . Decorative sewing Sewing in zippers. Stretch triple straight stitch - Then set the needle position so that can be moved to repair holes, tears and damaged areas. • If the...

Owner's Manual
Page 85
... the gathering threads. Feather stitch The feather stitch creates a hemstitching effect. Lower thread tension to the reverse side. • Stitch the hem from the right side of the fabric, making sure that the needle catches the fabric on the right and left sides. Tip: To make guiding the fabric easier, use a strong thread when gathering to the wrong side. • Place the fabric under the presser foot with straight stitch A straight stitch can be used for decorative hems. •...
... the gathering threads. Feather stitch The feather stitch creates a hemstitching effect. Lower thread tension to the reverse side. • Stitch the hem from the right side of the fabric, making sure that the needle catches the fabric on the right and left sides. Tip: To make guiding the fabric easier, use a strong thread when gathering to the wrong side. • Place the fabric under the presser foot with straight stitch A straight stitch can be used for decorative hems. •...

Owner's Manual
Page 91
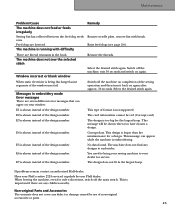
... highest position. This ensures that needle thread is not pushed fully in thread tension system. 6:4 Needle is threaded. Flat side facing the back. Use a larger needle. Insert different type of fabric. Only use good quality threads. Needle thread breaks See reasons above . Needle breaks off Needle is securely in . The seam is too tight. Only guide the fabric lightly. Do not wind thread by hand. Insert new needle and push fully in use. Thread tension is sewn unevenly The tension needs adjusting. Remedy Push needle fully...
... highest position. This ensures that needle thread is not pushed fully in thread tension system. 6:4 Needle is threaded. Flat side facing the back. Use a larger needle. Insert different type of fabric. Only use good quality threads. Needle thread breaks See reasons above . Needle breaks off Needle is securely in . The seam is too tight. Only guide the fabric lightly. Do not wind thread by hand. Insert new needle and push fully in use. Thread tension is sewn unevenly The tension needs adjusting. Remedy Push needle fully...
Owner's Manual
Page 92
... of the design number. This type of the design number. Have your Pfaff creative 2124 serviced regularly by use of the design number. Messages in the largest hoop. E3 is not supported The card information cannot be shown when you have chosen a design. Select the desired stitch again. Select the desired stitch again. E2 is important if there are lowered. Corrupt data. You need to bring your sewing machine to embroider. If problems remain...
... of the design number. This type of the design number. Have your Pfaff creative 2124 serviced regularly by use of the design number. Messages in the largest hoop. E3 is not supported The card information cannot be shown when you have chosen a design. Select the desired stitch again. Select the desired stitch again. E2 is important if there are lowered. Corrupt data. You need to bring your sewing machine to embroider. If problems remain...
Owner's Manual
Page 93
...4:12 1:11 Buttons, sewing on 4:15 C Carrying case 1:15 6:6 Changing a pattern Cleaning Closed overlock stitch Closed overlock with edge thread Color block Color change while embroidering Combined borders Combined borders with twin needle Connecting the foot control Control panel buttons embroidery sewing Creative smart card Cross hem knit stitch Cross-stitch Cut-Away stabilizer D Darning with elastic stitch position Decorative stitches Design length Design width Disengaging the IDT E Embroider designs words Embroider on small pieces of fabric Embroider on thin fabrics Embroider on terry...
...4:12 1:11 Buttons, sewing on 4:15 C Carrying case 1:15 6:6 Changing a pattern Cleaning Closed overlock stitch Closed overlock with edge thread Color block Color change while embroidering Combined borders Combined borders with twin needle Connecting the foot control Control panel buttons embroidery sewing Creative smart card Cross hem knit stitch Cross-stitch Cut-Away stabilizer D Darning with elastic stitch position Decorative stitches Design length Design width Disengaging the IDT E Embroider designs words Embroider on small pieces of fabric Embroider on thin fabrics Embroider on terry...
Owner's Manual
Page 95
P Parking position Patchwork Pattern length/pattern width Piecing the quilt top Positioning buttons Presser foot lifter 2:14 Presser foot, attach Q Quilt appliqués Quilting Quilt stitches R Raise the feed dog Raise the presserfoot Remove the embroidery unit Remove the hoop Reverse sewing button Rolled hem Rotating button S Select a design Select a stitch Sewing machine Sewing on buttons Shell edging Stabilizers Adhesive Cut-A-Away Heat-Away Iron-On Tear-away Wash-Away Start/stop 6:8 3:9 5:4 4:5 5:4 3:11 2:4 5:7 5:4-5:7 1:9 4:7 3:14 3:4 3:5 3:12, 4:4 5:14 3:9 3:11 4:8 1:12-1:13 4:15 5:15 ...
P Parking position Patchwork Pattern length/pattern width Piecing the quilt top Positioning buttons Presser foot lifter 2:14 Presser foot, attach Q Quilt appliqués Quilting Quilt stitches R Raise the feed dog Raise the presserfoot Remove the embroidery unit Remove the hoop Reverse sewing button Rolled hem Rotating button S Select a design Select a stitch Sewing machine Sewing on buttons Shell edging Stabilizers Adhesive Cut-A-Away Heat-Away Iron-On Tear-away Wash-Away Start/stop 6:8 3:9 5:4 4:5 5:4 3:11 2:4 5:7 5:4-5:7 1:9 4:7 3:14 3:4 3:5 3:12, 4:4 5:14 3:9 3:11 4:8 1:12-1:13 4:15 5:15 ...


