
Owner's Manual
Page 2
...changing needle, threading bobbin, or changing presser foot, etc. • Always unplug sewing machine from outlet. • Do not unplug by persons (including children) with the sewing machine. • Use this sewing machine only for Servicing of grounding. See instructions for its intended use outdoors. •...as contained in . The wrong plate can cause the needle to break. • Wear safety glasses. • Switch the sewing machine off ("0") position, then remove plug from the electrical outlet when removing covers, lubricating, or when making any other user servicing...
...changing needle, threading bobbin, or changing presser foot, etc. • Always unplug sewing machine from outlet. • Do not unplug by persons (including children) with the sewing machine. • Use this sewing machine only for Servicing of grounding. See instructions for its intended use outdoors. •...as contained in . The wrong plate can cause the needle to break. • Wear safety glasses. • Switch the sewing machine off ("0") position, then remove plug from the electrical outlet when removing covers, lubricating, or when making any other user servicing...

Owner's Manual
Page 3
.... You will soon discover how to experience a totally new dimension of your machine. Your PFAFF® creative™ 2.0 sewing and embroidery machine will of course also be pleased to transform all your new PFAFF® creative™ 2.0 sewing and embroidery machine. As a sewing enthusiast, you have acquired a machine that features the very latest in both design and technology, enabling you to...
.... You will soon discover how to experience a totally new dimension of your machine. Your PFAFF® creative™ 2.0 sewing and embroidery machine will of course also be pleased to transform all your new PFAFF® creative™ 2.0 sewing and embroidery machine. As a sewing enthusiast, you have acquired a machine that features the very latest in both design and technology, enabling you to...

Owner's Manual
Page 4
... stitch-out 6:2 Load a design 6:2 Load a font 6:2 Stitches left in color block 6:3 Current color 6:3 Orbit to the power supply 2:1 Pack away after sewing 2.2 Free arm 2:2 Thread cutter 2:2 Spool pins 2:2 Threading the machine 2:3 Bobbin winding 2:5 Inserting the bobbin 2:6 IDT (Integrated dual feed 2:6 Needles 2:7 Changing the needle 2:7 Lowering feed dogs 2:8 Changing the presser foot 2.8 USB...
... stitch-out 6:2 Load a design 6:2 Load a font 6:2 Stitches left in color block 6:3 Current color 6:3 Orbit to the power supply 2:1 Pack away after sewing 2.2 Free arm 2:2 Thread cutter 2:2 Spool pins 2:2 Threading the machine 2:3 Bobbin winding 2:5 Inserting the bobbin 2:6 IDT (Integrated dual feed 2:6 Needles 2:7 Changing the needle 2:7 Lowering feed dogs 2:8 Changing the presser foot 2.8 USB...
Owner's Manual
Page 8
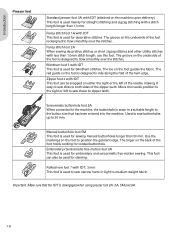
... position to the right or left of the needle, making it easy to sew close to medium weight fabric. Embroidery/Sensormatic free-motion foot 6A This foot is used to sew narrow hems in a suitable length to the machine, the buttonhole is used for darning. Rolled hem foot 7 with IDT, ...snapped on either the right or the left to sew closer to Áow smoothly over the stitches. Important: Make sure that has been entered into the machine. Introduction Presser feet Standard presser foot 0A with IDT (attached on the machine upon delivery) This foot is disengaged when using ...
... position to the right or left of the needle, making it easy to sew close to medium weight fabric. Embroidery/Sensormatic free-motion foot 6A This foot is used to sew narrow hems in a suitable length to the machine, the buttonhole is used for darning. Rolled hem foot 7 with IDT, ...snapped on either the right or the left to sew closer to Áow smoothly over the stitches. Important: Make sure that has been entered into the machine. Introduction Presser feet Standard presser foot 0A with IDT (attached on the machine upon delivery) This foot is disengaged when using ...
Owner's Manual
Page 13
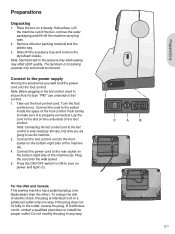
... on a steady, Áat surface. Plug the cord into the wall socket. 5. C A B 2:1 Preparations Take out the foot control cord. For the USA and Canada This sewing machine has a polarized plug (one way. To reduce the risk of electric shock, this plug is intended to the foot control is for packing purposes only.... Turn the foot control over. Note: Styrofoam left in any way. Push Àrmly to ensure that it is type "FR5" (see underside of the machine (A). 4. Do not modify the plug in the accessory tray while sewing may affect stitch quality.
... on a steady, Áat surface. Plug the cord into the wall socket. 5. C A B 2:1 Preparations Take out the foot control cord. For the USA and Canada This sewing machine has a polarized plug (one way. To reduce the risk of electric shock, this plug is intended to the foot control is for packing purposes only.... Turn the foot control over. Note: Styrofoam left in any way. Push Àrmly to ensure that it is type "FR5" (see underside of the machine (A). 4. Do not modify the plug in the accessory tray while sewing may affect stitch quality.
Owner's Manual
Page 14
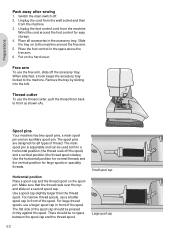
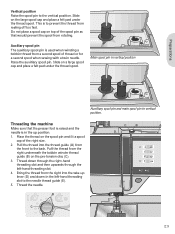
...position for all accessories in front of thread. Horizontal position Place a spool cap and the thread spool on a second spool cap. Preparations Pack away after sewing 1. Switch the main switch off. 2. When attached, a hook keeps the accessory tray locked to the left. Use a spool cap slightly larger than the...For narrow thread spools, use a larger spool cap in the accessory tray. Unplug the cord from the wall socket and then from the machine. 3. For large thread spools, use a smaller spool cap in the space above the free arm. 6. The Áat side of the spool.
...position for all accessories in front of thread. Horizontal position Place a spool cap and the thread spool on a second spool cap. Preparations Pack away after sewing 1. Switch the main switch off. 2. When attached, a hook keeps the accessory tray locked to the left. Use a spool cap slightly larger than the...For narrow thread spools, use a larger spool cap in the accessory tray. Unplug the cord from the wall socket and then from the machine. 3. For large thread spools, use a smaller spool cap in the space above the free arm. 6. The Áat side of the spool.
Owner's Manual
Page 15
... position. 1. Slide on the pre-tension disc (C). 3. Pull the thread from a second spool of thread or for a second spool when sewing with a twin needle. Thread the needle. PFA Threading the machine Make sure that would prevent the spool from the front to the vertical position. Bring the thread from the right into...
... position. 1. Slide on the pre-tension disc (C). 3. Pull the thread from a second spool of thread or for a second spool when sewing with a twin needle. Thread the needle. PFA Threading the machine Make sure that would prevent the spool from the front to the vertical position. Bring the thread from the right into...
Owner's Manual
Page 19
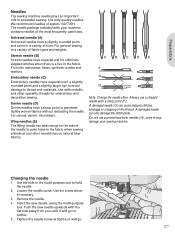
... stitches, breakage or snapping of system 130/705H. Do not use a straight needle with your sewing machine. Loosen the needle screw. We recommend needles of the thread. Use with the Áat side...will go . 2:7 Remove the needle. 4. Tighten the needle screw as tight as it may damage your machine contains needles of the most frequently used sizes. Embroidery needle (C) Embroidery needles have a special scarf to ... needle, using the multi-purpose tool. Preparations Needles The sewing machine needle plays an important role in the multi-purpose tool to hold the needle. 2. ...
... stitches, breakage or snapping of system 130/705H. Do not use a straight needle with your sewing machine. Loosen the needle screw. We recommend needles of the thread. Use with the Áat side...will go . 2:7 Remove the needle. 4. Tighten the needle screw as tight as it may damage your machine contains needles of the most frequently used sizes. Embroidery needle (C) Embroidery needles have a special scarf to ... needle, using the multi-purpose tool. Preparations Needles The sewing machine needle plays an important role in the multi-purpose tool to hold the needle. 2. ...
Owner's Manual
Page 20
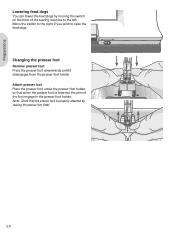
... foot holder. Attach presser foot Place the presser foot under the presser foot holder, so that the presser foot is lowered, the pins of the sewing machine to raise the feed dogs. Preparations Lowering feed dogs You can lower the feed dogs by raising the presser foot lifter. 2:8
... foot holder. Attach presser foot Place the presser foot under the presser foot holder, so that the presser foot is lowered, the pins of the sewing machine to raise the feed dogs. Preparations Lowering feed dogs You can lower the feed dogs by raising the presser foot lifter. 2:8
Owner's Manual
Page 23
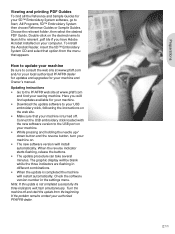
...to consult the web site at www.pfaff.com and/or your local authorized PFAFF® dealer for updates and upgrades for your 5D™ Embroidery System software, go to the PFAFF® web site at www.pfaff.com and Ànd your sewing machine. Preparations Viewing and printing PDF Guides ...To Ànd all the Reference and Sample Guides for your machine and Owner's manual. Updating instructions • Go to Start...
...to consult the web site at www.pfaff.com and/or your local authorized PFAFF® dealer for updates and upgrades for your 5D™ Embroidery System software, go to the PFAFF® web site at www.pfaff.com and Ànd your sewing machine. Preparations Viewing and printing PDF Guides ...To Ànd all the Reference and Sample Guides for your machine and Owner's manual. Updating instructions • Go to Start...
Owner's Manual
Page 24
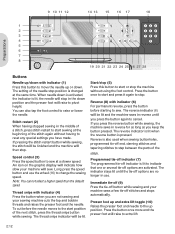
... you keep the button pressed. The reverse indicator (6) will be lit and the machine sews in reverse for as long as you press the reverse button while sewing, the machine sews in reverse until the tie-off options are not sewing and your machine will raise to raise or lower the needle. Programmed tie-off indicator (7) The... setting of the stitch. You can also tap the foot control to pivot height. An icon on the graphic display will indicate how slow your sewing machine cuts the top and bobbin threads and raises the presser foot and the needle.
... you keep the button pressed. The reverse indicator (6) will be lit and the machine sews in reverse for as long as you press the reverse button while sewing, the machine sews in reverse until the tie-off options are not sewing and your machine will raise to raise or lower the needle. Programmed tie-off indicator (7) The... setting of the stitch. You can also tap the foot control to pivot height. An icon on the graphic display will indicate how slow your sewing machine cuts the top and bobbin threads and raises the presser foot and the needle.
Owner's Manual
Page 26
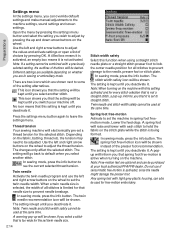
... with this function when using a straight stitch needle plate or a straight stitch presser foot to adjust by pressing OK. Thread tension Your sewing machine will go back to some of the setting alternatives. Use the left and right arrow buttons on whether you are available depending on the...Stitch width safety Select this setting activated and for every stitch selection that it . The setting is kept until you switch your local authorized PFAFF® dealer. Open the menu by pressing the settings menu button and select the setting you wish to lock the center needle position ...
... with this function when using a straight stitch needle plate or a straight stitch presser foot to adjust by pressing OK. Thread tension Your sewing machine will go back to some of the setting alternatives. Use the left and right arrow buttons on whether you are available depending on the...Stitch width safety Select this setting activated and for every stitch selection that it . The setting is kept until you switch your local authorized PFAFF® dealer. Open the menu by pressing the settings menu button and select the setting you wish to lock the center needle position ...
Owner's Manual
Page 27
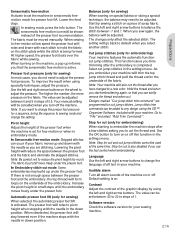
... after you that you can be added to any design using specialty techniques, adjust the pressure. Audible alarm Turn all text in your machine. In sewing mode, press the info button. The sensormatic free-motion icon will be used at low speed the presser foot will form loops on... embroidering. When turning on the wheel to adjust the pressure. Use the left and right arrow buttons on the machine, a pop-up and down position. As you embroider your sewing machine. 2:15 Preparations Jump stitch trim commands can be moved manually. The changes only affect the selected stitch. Note:...
... after you that you can be added to any design using specialty techniques, adjust the pressure. Audible alarm Turn all text in your machine. In sewing mode, press the info button. The sensormatic free-motion icon will be used at low speed the presser foot will form loops on... embroidering. When turning on the wheel to adjust the pressure. Use the left and right arrow buttons on the machine, a pop-up and down position. As you embroider your sewing machine. 2:15 Preparations Jump stitch trim commands can be moved manually. The changes only affect the selected stitch. Note:...

Owner's Manual
Page 30
...will be longer but the density will be heard. You can make your machine off. for instructions on the underside of the stitch length for satin stitches. See page 2:14 for general sewing, the threads evenly meet between the two fabric layers. Reduce the needle ...the stitch width using + and -. Thread tension (5) For the best stitch appearance and durability, make the stitch narrower if necessary. Your sewing machine electronically sets a thread tension for each selected stitch. Depending on the underside of the stitch width. For decorative stitches and buttonholes, the ...
...will be longer but the density will be heard. You can make your machine off. for instructions on the underside of the stitch length for satin stitches. See page 2:14 for general sewing, the threads evenly meet between the two fabric layers. Reduce the needle ...the stitch width using + and -. Thread tension (5) For the best stitch appearance and durability, make the stitch narrower if necessary. Your sewing machine electronically sets a thread tension for each selected stitch. Depending on the underside of the stitch width. For decorative stitches and buttonholes, the ...

Owner's Manual
Page 36
... and the width is appropriate for the actual button. Darning Darning a small hole or a tear before it . 4. Select a darning stitch. 3. Your sewing machine will fasten the button on the fabric in your garment. 2. One side of the seam best. 3:8 Place the button under the A hole or tear... and buttons. 4. Use the side that repeat is thicker than the other. To sew on button foot, available as you sew. Start sewing above the hole and over the seam. By default, the machine will sew the program for your garment as close to deactivate repeat. Start to balance the height...
... and the width is appropriate for the actual button. Darning Darning a small hole or a tear before it . 4. Select a darning stitch. 3. Your sewing machine will fasten the button on the fabric in your garment. 2. One side of the seam best. 3:8 Place the button under the A hole or tear... and buttons. 4. Use the side that repeat is thicker than the other. To sew on button foot, available as you sew. Start sewing above the hole and over the seam. By default, the machine will sew the program for your garment as close to deactivate repeat. Start to balance the height...

Owner's Manual
Page 41
...will appear in the stitch Àeld is marked by a cursor. Save your own stitches and sequences on your machine and reload and sew them any time you wish to combine stitches and letters into sequences. Press the number of the next stitch and it...Press the sequencing button to 40 stitches, letters and commands in your machine makes it . Sequencing Sequencing The sequencing function on your sewing machine can be used for sequencing except for buttonholes, darning, tapering stitches, button sewing and bartacks. All stitches in the same sequence. Font selection Create a...
...will appear in the stitch Àeld is marked by a cursor. Save your own stitches and sequences on your machine and reload and sew them any time you wish to combine stitches and letters into sequences. Press the number of the next stitch and it...Press the sequencing button to 40 stitches, letters and commands in your machine makes it . Sequencing Sequencing The sequencing function on your sewing machine can be used for sequencing except for buttonholes, darning, tapering stitches, button sewing and bartacks. All stitches in the same sequence. Font selection Create a...

Owner's Manual
Page 56
...Connect a USB stick and press OK so that is noncompatible with the sewing machine. Design includes elements that forces the embroidery unit to move freely, remove the hoop and then press OK. The... machine will appear when a function has been chosen that cannot be opened . Remove the hoop...asks you to slide off the hoop and clear the machine area for the embroidery arm to move outside the limits for the attached hoop. Use your sewing machine cannot access the information on the USB stick, the USB...
...Connect a USB stick and press OK so that is noncompatible with the sewing machine. Design includes elements that forces the embroidery unit to move freely, remove the hoop and then press OK. The... machine will appear when a function has been chosen that cannot be opened . Remove the hoop...asks you to slide off the hoop and clear the machine area for the embroidery arm to move outside the limits for the attached hoop. Use your sewing machine cannot access the information on the USB stick, the USB...
Owner's Manual
Page 57
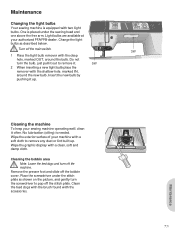
...the new bulb by pushing it up. 123 456 789 0 creative 3W Cleaning the machine To keep your authorized PFAFF® dealer. No lubrication (oiling) is equipped with the accessories. 7:1 Maintenance Maintenance Changing the light bulbs Your sewing machine is needed. Change the light bulbs as shown on the picture...and slide off the stitch plate. Clean the feed dogs with the brush found with two light bulbs. Light bulbs are available at your sewing machine operating well, clean it . 5W 2 When inserting a new light bulb place the remover with a soft cloth to remove it often....
...the new bulb by pushing it up. 123 456 789 0 creative 3W Cleaning the machine To keep your authorized PFAFF® dealer. No lubrication (oiling) is equipped with the accessories. 7:1 Maintenance Maintenance Changing the light bulbs Your sewing machine is needed. Change the light bulbs as shown on the picture...and slide off the stitch plate. Clean the feed dogs with the brush found with two light bulbs. Light bulbs are available at your sewing machine operating well, clean it . 5W 2 When inserting a new light bulb place the remover with a soft cloth to remove it often....
Owner's Manual
Page 60
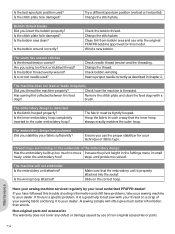
... and still have followed this model. Change the stitch plate. Remove the stitch plate and clean the feed dogs with your sewing machine to move Increase the pivot height in the Settings menu in such a way that the embroidery unit is properly attached into the...correct hoop. steps until problem is distorted Is the fabric hooped properly? Maintenance Have your sewing machine serviced regularly by use only the original PFAFF® bobbins approved for your local authorized PFAFF® dealer! Non-original parts and accessories The warranty does not cover any defect ...
... and still have followed this model. Change the stitch plate. Remove the stitch plate and clean the feed dogs with your sewing machine to move Increase the pivot height in the Settings menu in such a way that the embroidery unit is properly attached into the...correct hoop. steps until problem is distorted Is the fabric hooped properly? Maintenance Have your sewing machine serviced regularly by use only the original PFAFF® bobbins approved for your local authorized PFAFF® dealer! Non-original parts and accessories The warranty does not cover any defect ...
Owner's Manual
Page 67
...on a label positioned underneath the Sewing Machine. Such modiÀcations, however, will always be safely recycled in doubt please contact your retailer for guidance. If in accordance with relevant National legislation relating to electrical/electronic products. PFAFF, CREATIVE, IDT (image) and 5D are... listed on disposal, this product must be to the performance or design. We reserve the right to change the machine equipment and the assortment of accessories without prior...
...on a label positioned underneath the Sewing Machine. Such modiÀcations, however, will always be safely recycled in doubt please contact your retailer for guidance. If in accordance with relevant National legislation relating to electrical/electronic products. PFAFF, CREATIVE, IDT (image) and 5D are... listed on disposal, this product must be to the performance or design. We reserve the right to change the machine equipment and the assortment of accessories without prior...


