
Owner's Manual
Page 2
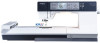
... as threading needle, changing needle, threading bobbin, or changing presser foot, etc. • Always unplug sewing machine from outlet. • Do not unplug by persons (including children) with IEC/EN 60335-2-28 and UL1594. Replacement parts for its intended use outdoors. • Do not operate where aerosol (spray) products are provided instead of lint, dust, and loose cloth. • Keep Àngers away from all controls to break...
... as threading needle, changing needle, threading bobbin, or changing presser foot, etc. • Always unplug sewing machine from outlet. • Do not unplug by persons (including children) with IEC/EN 60335-2-28 and UL1594. Replacement parts for its intended use outdoors. • Do not operate where aerosol (spray) products are provided instead of lint, dust, and loose cloth. • Keep Àngers away from all controls to break...

Owner's Manual
Page 4
... Pack away after sewing 2.2 Free arm 2:2 Thread cutter 2:2 Spool pins 2:2 Threading the machine 2:3 Bobbin winding 2:5 Inserting the bobbin 2:6 IDT (Integrated dual feed 2:6 Needles 2:7 Changing the needle 2:7 Lowering feed dogs 2:8 Changing the presser foot 2.8 USB port 2:9 5D™ Embroidery Software 2:10 Buttons 2:12 Settings menu 2:14 3 Sewing 3:1 Sewing mode - overview 3:1 Select a stitch 3:1 Sewing recommendations 3:1 Stitch adjustments 3:2 Mirroring 3:3 Tie-off options 3:3 Tapering program 3:4 Speed control 3:4 Personal stitches 3:5 Sewing techniques...
... Pack away after sewing 2.2 Free arm 2:2 Thread cutter 2:2 Spool pins 2:2 Threading the machine 2:3 Bobbin winding 2:5 Inserting the bobbin 2:6 IDT (Integrated dual feed 2:6 Needles 2:7 Changing the needle 2:7 Lowering feed dogs 2:8 Changing the presser foot 2.8 USB port 2:9 5D™ Embroidery Software 2:10 Buttons 2:12 Settings menu 2:14 3 Sewing 3:1 Sewing mode - overview 3:1 Select a stitch 3:1 Sewing recommendations 3:1 Stitch adjustments 3:2 Mirroring 3:3 Tie-off options 3:3 Tapering program 3:4 Speed control 3:4 Personal stitches 3:5 Sewing techniques...

Owner's Manual
Page 5
... thread guide 9. Stitch plate 10. Presser foot bar and presser foot holder 14. Main switch, connectors for lowering the feed dogs Top parts 19. Bobbin thread guides 23. Threading slots 3. Light bulbs 6. Bobbin cover 11. Slide for power cord and foot control 18. Spool pin 28. Handwheel 17. Bobbin winder thread guide 21. Spool caps 27. Thread cutter 4. Needle bar 8. Buttons and graphic display 16. Bobbin winder lever and bobbin spindle 25. Auxiliary spool pin 26. Sensormatic buttonhole foot socket 5. Built-in needle threader 7. Thread guide 22. Bobbin thread cutter...
... thread guide 9. Stitch plate 10. Presser foot bar and presser foot holder 14. Main switch, connectors for lowering the feed dogs Top parts 19. Bobbin thread guides 23. Threading slots 3. Light bulbs 6. Bobbin cover 11. Slide for power cord and foot control 18. Spool pin 28. Handwheel 17. Bobbin winder thread guide 21. Spool caps 27. Thread cutter 4. Needle bar 8. Buttons and graphic display 16. Bobbin winder lever and bobbin spindle 25. Auxiliary spool pin 26. Sensormatic buttonhole foot socket 5. Built-in needle threader 7. Thread guide 22. Bobbin thread cutter...
Owner's Manual
Page 8
... hem edge. Manual buttonhole foot 5M This foot is used for embroidery and sensormatic free-motion sewing. Embroidery/Sensormatic free-motion foot 6A This foot is used for corded buttonhole. Fancy stitch foot 2A When sewing decorative stitches or short zigzag stitches and other utility stitches with IDT This foot can also be snapped on the foot guides the fabric. Sensormatic buttonhole foot 5A When connected to the machine, the buttonhole is used for decorative stitches. Use the markings on the foot to 50 mm. Introduction Presser feet Standard presser foot...
... hem edge. Manual buttonhole foot 5M This foot is used for embroidery and sensormatic free-motion sewing. Embroidery/Sensormatic free-motion foot 6A This foot is used for corded buttonhole. Fancy stitch foot 2A When sewing decorative stitches or short zigzag stitches and other utility stitches with IDT This foot can also be snapped on the foot guides the fabric. Sensormatic buttonhole foot 5A When connected to the machine, the buttonhole is used for decorative stitches. Use the markings on the foot to 50 mm. Introduction Presser feet Standard presser foot...
Owner's Manual
Page 9
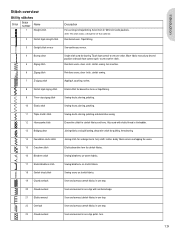
... seams. 15 Crosshem stitch Elastic decorative hem for basting. Topstitching. 3 Straight stitch reverse Sew continuous reverse. 4 Basting stitch 5 Zigzag stitch 6 Zigzag stitch Single stitch used with reinforced edge. 21 Elastic overcast Seam and overcast stretch fabrics in one step. 22 Overlock Seam and overcast stretch fabrics in one step. 23 Closed overlock Seam and overcast in one stitch. Reinforce seams, clean Ànish, stretch sewing, lace insertion. Introduction Stitch overview Utility stitches Stitch Stitch number Name 1 Straight stitch 2 Stretch...
... seams. 15 Crosshem stitch Elastic decorative hem for basting. Topstitching. 3 Straight stitch reverse Sew continuous reverse. 4 Basting stitch 5 Zigzag stitch 6 Zigzag stitch Single stitch used with reinforced edge. 21 Elastic overcast Seam and overcast stretch fabrics in one step. 22 Overlock Seam and overcast stretch fabrics in one step. 23 Closed overlock Seam and overcast in one stitch. Reinforce seams, clean Ànish, stretch sewing, lace insertion. Introduction Stitch overview Utility stitches Stitch Stitch number Name 1 Straight stitch 2 Stretch...
Owner's Manual
Page 16
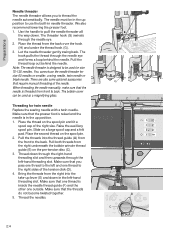
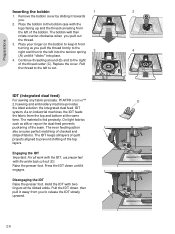
... the thread guide (A) from the right into the take-up lever (E) and down through the right-hand threading slot and then upwards through the needle eye. 2. Thread down in the up position. 1. Make sure that require manual threading of the tension disk (D). 4. We also recommend lowering the presser foot. 1. Make sure that the needle is in needle threader. Bring the threads from the front to use the needle threader for twin needle Replace the sewing needle with a twin needle...
... the thread guide (A) from the right into the take-up lever (E) and down through the right-hand threading slot and then upwards through the needle eye. 2. Thread down in the up position. 1. Make sure that require manual threading of the tension disk (D). 4. We also recommend lowering the presser foot. 1. Make sure that the needle is in needle threader. Bring the threads from the front to use the needle threader for twin needle Replace the sewing needle with a twin needle...

Owner's Manual
Page 17
... the bobbin winder thread guide (B) and then through the needle if using the bobbin thread cutter (E). The pop-up from the inside the pre-tension device for this model. 2. Remove the bobbin and cut the thread using a metal presser foot. Preparations C Bobbin winding Winding from front to back. Slide a spool cap tightly against the spool. 3. Thread through the hole in the bobbin (D) from the needle, under the presser foot, upward through the left-hand threading slot and through the needle Make...
... the bobbin winder thread guide (B) and then through the needle if using the bobbin thread cutter (E). The pop-up from the inside the pre-tension device for this model. 2. Remove the bobbin and cut the thread using a metal presser foot. Preparations C Bobbin winding Winding from front to back. Slide a spool cap tightly against the spool. 3. Thread through the hole in the bobbin (D) from the needle, under the presser foot, upward through the left-hand threading slot and through the needle Make...
Owner's Manual
Page 18
... IDT keeps all work with the IDT, use presser feet with two Àngers at the same time. Pull the IDT down until it away from turning as silk or rayon the dual feed prevents puckering of the bobbin. Place your Ànger on industrial machines, the IDT feeds the fabric from the left of the seam. Remove the bobbin cover by sliding it engages...
... IDT keeps all work with the IDT, use presser feet with two Àngers at the same time. Pull the IDT down until it away from turning as silk or rayon the dual feed prevents puckering of the bobbin. Place your Ànger on industrial machines, the IDT feeds the fabric from the left of the seam. Remove the bobbin cover by sliding it engages...
Owner's Manual
Page 19
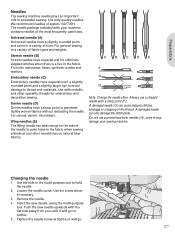
... of sizes. Stretch needle (B) Stretch needles have a sharp point to eliminate skipped stitches when there is a Áex in the fabric. A damaged needle (G) can also damage the stitch plate. Changing the needle 1. Loosen the needle screw. Use with your sewing machine. Always use asymmetrical twin needles (H), since it may damage your machine contains needles of fabric types and weights. Use the screw driver if necessary. 3. Push the new needle upwards with a sharp point (F). We recommend needles of the thread. A B C D E F G H Note: Change the needle...
... of sizes. Stretch needle (B) Stretch needles have a sharp point to eliminate skipped stitches when there is a Áex in the fabric. A damaged needle (G) can also damage the stitch plate. Changing the needle 1. Loosen the needle screw. Use with your sewing machine. Always use asymmetrical twin needles (H), since it may damage your machine contains needles of fabric types and weights. Use the screw driver if necessary. 3. Push the new needle upwards with a sharp point (F). We recommend needles of the thread. A B C D E F G H Note: Change the needle...
Owner's Manual
Page 23
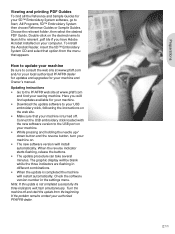
... Guides for your machine and Owner's manual. Connect the USB embroidery stick loaded with the new software version to the USB port on your machine. • While pressing and holding the needle up/ down button and the reverse button, turn your machine on. • The new software version will Ànd updates available for your machine. • Download the update software to your USB embroidery stick, following the instructions on the desired name to the PFAFF...
... Guides for your machine and Owner's manual. Connect the USB embroidery stick loaded with the new software version to the USB port on your machine. • While pressing and holding the needle up/ down button and the reverse button, turn your machine on. • The new software version will Ànd updates available for your machine. • Download the update software to your USB embroidery stick, following the instructions on the desired name to the PFAFF...
Owner's Manual
Page 24
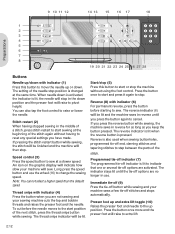
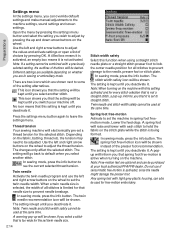
... and bobbin threads and raises the presser foot and the needle. Thread snips with indicator (1) Press this button to start and press it again to start position of a stitch, press stitch restart to stop position is also used when sewing buttonholes, programmed tie-off end, darning stitches and tapering stitches to the up position. If you press the reverse button while sewing, the machine sews in the middle of the next stitch, press the thread snips button while sewing. Stitch...
... and bobbin threads and raises the presser foot and the needle. Thread snips with indicator (1) Press this button to start and press it again to start position of a stitch, press stitch restart to stop position is also used when sewing buttonholes, programmed tie-off end, darning stitches and tapering stitches to the up position. If you press the reverse button while sewing, the machine sews in the middle of the next stitch, press the thread snips button while sewing. Stitch...
Owner's Manual
Page 26
... button. Note: Twin needle and stitch width safety cannot be kept until you deactivate it . A spring foot will go back to default when you select a stitch that is too wide for the set twin needle size. 2:14 Stitch width safety Select this function when using a straight stitch needle plate or a straight stitch presser foot to lock the center needle position for all stitches is limited for free-motion embroidery. Press the settings menu button again to see the current selected thread tension. Use...
... button. Note: Twin needle and stitch width safety cannot be kept until you deactivate it . A spring foot will go back to default when you select a stitch that is too wide for the set twin needle size. 2:14 Stitch width safety Select this function when using a straight stitch needle plate or a straight stitch presser foot to lock the center needle position for all stitches is limited for free-motion embroidery. Press the settings menu button again to see the current selected thread tension. Use...
Owner's Manual
Page 27
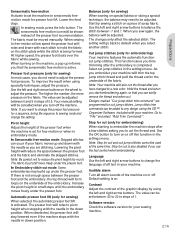
... to adjust the pressure. Stop for your machine. Default setting is set for sewing) When sewing on special fabrics or doing a special technique, the balance may build up and down position. In Sensormatic free-motion mode: Skipped stitches can be used at low speed the presser foot will trim the top jump stitch thread and pull the thread end to the underside of scrap fabric. Contrast Adjust the contrast of the embroidery. Software...
... to adjust the pressure. Stop for your machine. Default setting is set for sewing) When sewing on special fabrics or doing a special technique, the balance may build up and down position. In Sensormatic free-motion mode: Skipped stitches can be used at low speed the presser foot will trim the top jump stitch thread and pull the thread end to the underside of scrap fabric. Contrast Adjust the contrast of the embroidery. Software...

Owner's Manual
Page 29
... where you adjust the settings of the direct selection buttons, you select that stitch number immediately. Sewing mode - Stitch width/stitch positioning 4 4. Stitch length/density 5. Use the up . Thread tension value Note: All symbols and options will not be selected as a stitch. Sewing Sewing Sewing mode is the Àrst view on the graphic display after you turn on the wheel to step between stitches. overview 1. Stitch Àeld 1 3 2 3. Feed dog/IDT recommendation...
... where you adjust the settings of the direct selection buttons, you select that stitch number immediately. Sewing mode - Stitch width/stitch positioning 4 4. Stitch length/density 5. Use the up . Thread tension value Note: All symbols and options will not be selected as a stitch. Sewing Sewing Sewing mode is the Àrst view on the graphic display after you turn on the wheel to step between stitches. overview 1. Stitch Àeld 1 3 2 3. Feed dog/IDT recommendation...

Owner's Manual
Page 30
... when using a stitch that is desired. Now the stitch length + and - The changed . Your sewing machine electronically sets a thread tension for satin stitches. See page 2:14 for instructions on the top side of the stitch length for the selected stitch. Stitch density (4) Press the alternatives button to show the density setting instead of the fabric, the needle thread tension is correctly adjusted, i.e. If you have selected a buttonhole, the graphic display will by default show the stitch 1 positioning...
... when using a stitch that is desired. Now the stitch length + and - The changed . Your sewing machine electronically sets a thread tension for satin stitches. See page 2:14 for instructions on the top side of the stitch length for the selected stitch. Stitch density (4) Press the alternatives button to show the density setting instead of the fabric, the needle thread tension is correctly adjusted, i.e. If you have selected a buttonhole, the graphic display will by default show the stitch 1 positioning...

Owner's Manual
Page 38
... you until the needle is attached on the right side, the needle must only be moved to the teeth of the 37 needle positions available for the straight stitch. Rolled hem Use the rolled hem foot 7 to the presser foot bar on lighter stretch fabrics such as lingerie nylon. 3:10 Lower the presser foot and while sewing, guide the fabric edge evenly into the scroll of the rolled hem foot opening. The zipper foot 4 can be moved...
... you until the needle is attached on the right side, the needle must only be moved to the teeth of the 37 needle positions available for the straight stitch. Rolled hem Use the rolled hem foot 7 to the presser foot bar on lighter stretch fabrics such as lingerie nylon. 3:10 Lower the presser foot and while sewing, guide the fabric edge evenly into the scroll of the rolled hem foot opening. The zipper foot 4 can be moved...
Owner's Manual
Page 59
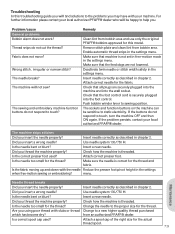
... presser foot used ? Is the fabric moving up and down with slubs or thread Change to a new higher quality thread purchased which has become dry? Maintenance Needle thread breaks Did you insert a wrong needle? Did you insert the needle properly? Use needle system 130/750 H. Problem/cause General problems Bobbin alarm does not work? Fabric does not move? Remedy Clean lint from bobbin area and use only the original PFAFF® bobbins approved for the thread? Make sure that the foot control cord...
... presser foot used ? Is the fabric moving up and down with slubs or thread Change to a new higher quality thread purchased which has become dry? Maintenance Needle thread breaks Did you insert a wrong needle? Did you insert the needle properly? Use needle system 130/750 H. Problem/cause General problems Bobbin alarm does not work? Fabric does not move? Remedy Clean lint from bobbin area and use only the original PFAFF® bobbins approved for the thread? Make sure that the foot control cord...
Owner's Manual
Page 60
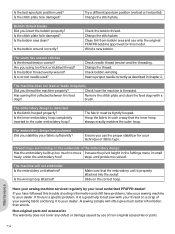
... wrong hoop attached? If you thread the machine properly? Wind a new bobbin. The machine does not feed or feeds irregularly Did you have problems, take your sewing machine to your dealer. The embroidery design is threaded. The fabric must be tightly hooped. Make sure that the inner hoop always exactly matches the outer hoop. Is the best spool pin position used ? Is the bobbin area clean? steps until problem is a great help to test sew with a brush. Change the stitch plate. Is the stitch plate hole...
... wrong hoop attached? If you thread the machine properly? Wind a new bobbin. The machine does not feed or feeds irregularly Did you have problems, take your sewing machine to your dealer. The embroidery design is threaded. The fabric must be tightly hooped. Make sure that the inner hoop always exactly matches the outer hoop. Is the best spool pin position used ? Is the bobbin area clean? steps until problem is a great help to test sew with a brush. Change the stitch plate. Is the stitch plate hole...
Owner's Manual
Page 61
...2:15 Automatic presser foot lift 2:15 Automatic thread tension 2:14, 3:2 Auxiliary spool pin 2:3 B Balance 2:15 Basting 6:5 Blindhem stitch 3:9 Bobbin, insert 2:6 Bobbin position 6:4 Bobbin winding 2:5 Winding from horizontal position 2:5 Winding through the needle 2:5 Button, sew on 3:8 Buttonholes 3:6 Buttonhole with gimp thread 3:7 Manual buttonhole 3:7 Sensormatic buttonhole 3:6 Buttons 2:12 C Calibrate 5:2, 6:8 Changing the light bulbs 7:1 Changing the needle 2:7 Changing the presser foot 2:8 Cleaning 7:1 Clear button 2:13 Color list 6:1 Connect the embroidery unit...
...2:15 Automatic presser foot lift 2:15 Automatic thread tension 2:14, 3:2 Auxiliary spool pin 2:3 B Balance 2:15 Basting 6:5 Blindhem stitch 3:9 Bobbin, insert 2:6 Bobbin position 6:4 Bobbin winding 2:5 Winding from horizontal position 2:5 Winding through the needle 2:5 Button, sew on 3:8 Buttonholes 3:6 Buttonhole with gimp thread 3:7 Manual buttonhole 3:7 Sensormatic buttonhole 3:6 Buttons 2:12 C Calibrate 5:2, 6:8 Changing the light bulbs 7:1 Changing the needle 2:7 Changing the presser foot 2:8 Cleaning 7:1 Clear button 2:13 Color list 6:1 Connect the embroidery unit...
Owner's Manual
Page 62
... P Pack away after sewing 2:2 Park position 6:4 Personal stitches 3:5 Pivot height embroidery 2:15 Pop-ups Embroidering 6:8 Sewing 3:11 Power supply 2:1 Presser feet 1:8 Presser foot, change 2:8 Presser foot, lower 2:13 Presser foot pressure 2:15 Presser foot, raise 2:12, 2:15 Program a sequence 4:1 Programmed tie-off indicator 2:12, 3:3 7:6 Q Quilt stitches 1:10 Quilting 3:9 R Raise the presser foot 2:12, 2:15 Remove the embroidery unit 5:2 Replacing the stitch plate 7:2 Reverse button 2:12 Reverse indicator 2:12 Rolled hem 3:10 Rotate 6:7 S Safety instructions 2 Save...
... P Pack away after sewing 2:2 Park position 6:4 Personal stitches 3:5 Pivot height embroidery 2:15 Pop-ups Embroidering 6:8 Sewing 3:11 Power supply 2:1 Presser feet 1:8 Presser foot, change 2:8 Presser foot, lower 2:13 Presser foot pressure 2:15 Presser foot, raise 2:12, 2:15 Program a sequence 4:1 Programmed tie-off indicator 2:12, 3:3 7:6 Q Quilt stitches 1:10 Quilting 3:9 R Raise the presser foot 2:12, 2:15 Remove the embroidery unit 5:2 Replacing the stitch plate 7:2 Reverse button 2:12 Reverse indicator 2:12 Rolled hem 3:10 Rotate 6:7 S Safety instructions 2 Save...


