
Owner's Manual
Page 2
...Changing the needle 27 Changing the sewing foot 30 Checking the bobbin thread tension 8 Checking the needle thread tension 14 Cleaning and oiling 31 Creative computer keyboard 19 D Detachable work support and accessories Drawing up the bobbin thread Dual feed 28, 29 12 16 E Electrical connection 2, F Foot...Lowering the feed dog 27 N Needle position left, right 20, 78. 79 p Pattern mirroring 24 Pattern-start setting 25 Placing spool of thread on pin 9 Presser bar litter 13 Program selection 20 R Replacing the fuse 32 S Safety rules, on fold-out page, and on ...
...Changing the needle 27 Changing the sewing foot 30 Checking the bobbin thread tension 8 Checking the needle thread tension 14 Cleaning and oiling 31 Creative computer keyboard 19 D Detachable work support and accessories Drawing up the bobbin thread Dual feed 28, 29 12 16 E Electrical connection 2, F Foot...Lowering the feed dog 27 N Needle position left, right 20, 78. 79 p Pattern mirroring 24 Pattern-start setting 25 Placing spool of thread on pin 9 Presser bar litter 13 Program selection 20 R Replacing the fuse 32 S Safety rules, on fold-out page, and on ...

Owner's Manual
Page 3
.... Always unplug before cleaning. ?. Never operate this sewing machine. Do not unplug by or near children. 2. Use needles recommended by the manufacturer as threading needle, changing needle, threading bobbin, or changing presser foot, etc. 16. Do not use only. It may be left unattended when plugged in the needle area, such as...
.... Always unplug before cleaning. ?. Never operate this sewing machine. Do not unplug by or near children. 2. Use needles recommended by the manufacturer as threading needle, changing needle, threading bobbin, or changing presser foot, etc. 16. Do not use only. It may be left unattended when plugged in the needle area, such as...

Owner's Manual
Page 5
... work support with accessory box and compartment 109 Needle plate 110 Sewing foot holder with sewing foot 111 Needle holder with retaining screw 112 Bobbin thread monitor light 113 "Needle down" key 114 Sew slow" key 115 'Reverse' key 116 "Tie-off/buttonhole/single pattern" key 117 Presser bar... Free arm cover, enclosing sewing hook 128 Free arm 129 Threader 130 Sewing light 131 Threading slots 132 Needle thread tension 133 Bobbin winder thread guide 134 Take-up lever 135 Dual feed 136 Bobbin winder thread guide (swing-out) 137 Spool holder with unreeling disc 138 Second spool holder (swing-up...
... work support with accessory box and compartment 109 Needle plate 110 Sewing foot holder with sewing foot 111 Needle holder with retaining screw 112 Bobbin thread monitor light 113 "Needle down" key 114 Sew slow" key 115 'Reverse' key 116 "Tie-off/buttonhole/single pattern" key 117 Presser bar... Free arm cover, enclosing sewing hook 128 Free arm 129 Threader 130 Sewing light 131 Threading slots 132 Needle thread tension 133 Bobbin winder thread guide 134 Take-up lever 135 Dual feed 136 Bobbin winder thread guide (swing-out) 137 Spool holder with unreeling disc 138 Second spool holder (swing-up...

Owner's Manual
Page 9
Swing the second thread spool holder towards you. Push a spool of thread and the small unreeling disc C onto the holder. I Disengaging the sewing mechanism: Hold the hand wheel steady and turn it until pin A engages in slot B. 4Place the bobbin on winder 121 and N turn knob 103 towards the back.
Swing the second thread spool holder towards you. Push a spool of thread and the small unreeling disc C onto the holder. I Disengaging the sewing mechanism: Hold the hand wheel steady and turn it until pin A engages in slot B. 4Place the bobbin on winder 121 and N turn knob 103 towards the back.

Owner's Manual
Page 10
... selected and when it is begun, a program between 00 and 50 must point to winder 121 and wind a few turns on master switch. Lead the thread to the right of the spool holder. When winding from a second spool: Switch on the bobbin clockwise. Push the bobbin to the left, remove it...: Hold the wheel firmly, turn disc 103 towards the back, then turn the hand forward until it from the winder spindle, and cut the thread. Pull the thread through guide 133, then into bobbin winder tension A and around guide lug B. Push the full bobbin to the right. Before winding is empty. Swing...
... selected and when it is begun, a program between 00 and 50 must point to winder 121 and wind a few turns on master switch. Lead the thread to the right of the spool holder. When winding from a second spool: Switch on the bobbin clockwise. Push the bobbin to the left, remove it...: Hold the wheel firmly, turn disc 103 towards the back, then turn the hand forward until it from the winder spindle, and cut the thread. Pull the thread through guide 133, then into bobbin winder tension A and around guide lug B. Push the full bobbin to the right. Before winding is empty. Swing...

Owner's Manual
Page 11
... back, then turn the hand wheel forward until it is begun, a program between 00 and 50 must be selected. Swing bobbin winder thread guide 136 forward. Draw the needle thread under the sewing foot, to wind the bobbin when the MEM memory is ',elected and when it snaps in. Wind a low turns... bobbin to the right. Important: It is not possible to the right, and through the needle )nIy with the needle ti "up" position. Winding through thread guide 136 (into slot A md around lug B, see illustr.). Raise the sewing foot with metal sewing tootl witch on the bobbin and push the latter...
... back, then turn the hand wheel forward until it is begun, a program between 00 and 50 must be selected. Swing bobbin winder thread guide 136 forward. Draw the needle thread under the sewing foot, to wind the bobbin when the MEM memory is ',elected and when it snaps in. Wind a low turns... bobbin to the right. Important: It is not possible to the right, and through the needle )nIy with the needle ti "up" position. Winding through thread guide 136 (into slot A md around lug B, see illustr.). Raise the sewing foot with metal sewing tootl witch on the bobbin and push the latter...

Owner's Manual
Page 12
Draw the thread into slot B and into eye C. 4Checking the bobbin thread tension: With a brief, sharp upward movement of your hand the bobbin must gra dually slip downwards. (Turn screw 0 to the right for stronger tension and b the left for weaker tension). 4 inserting the bobbin: insert bobbin sc that thread unwinds towards the back (A).
Draw the thread into slot B and into eye C. 4Checking the bobbin thread tension: With a brief, sharp upward movement of your hand the bobbin must gra dually slip downwards. (Turn screw 0 to the right for stronger tension and b the left for weaker tension). 4 inserting the bobbin: insert bobbin sc that thread unwinds towards the back (A).

Owner's Manual
Page 13
Raise latch A and push the bobbin case onto stud B as far as it will go, making sure cutout C points upwards. \ 4 Placing spool of thread on pin: Pace the small or medium-size unreeling disc D in front of small spools, and the large disc E in front of large spools. 4 N Inserting the bobbin case: Switch off master switch 107.
Raise latch A and push the bobbin case onto stud B as far as it will go, making sure cutout C points upwards. \ 4 Placing spool of thread on pin: Pace the small or medium-size unreeling disc D in front of small spools, and the large disc E in front of large spools. 4 N Inserting the bobbin case: Switch off master switch 107.

Owner's Manual
Page 14
Upper threading: Switch off master switch 107. Pull threader 129 fully down. Draw the thread into slot A, to the left past guide C, from below into slot B and takeup lever 134 (see arrows), then back into slot B and into the right thread guide on the needle holder. Place the needle thread behind hook D and hold it there. With the needle in its top position, raise the sewmg foot.
Upper threading: Switch off master switch 107. Pull threader 129 fully down. Draw the thread into slot A, to the left past guide C, from below into slot B and takeup lever 134 (see arrows), then back into slot B and into the right thread guide on the needle holder. Place the needle thread behind hook D and hold it there. With the needle in its top position, raise the sewmg foot.

Owner's Manual
Page 15
Swing threader back, release thread at same time and let threader move back up Then pull the thread fully through Swing threader in to needle. Place thread into hook E.
Swing threader back, release thread at same time and let threader move back up Then pull the thread fully through Swing threader in to needle. Place thread into hook E.

Owner's Manual
Page 18
... right. Setting 3 is essential for sewing buttonholes. Needle thread tension 132 A = Setting mark. The needle- The bobbin thread tension has been correctly set a wide zigzag stitch. The threads must only be turned minimally. \' Checking the needle thread tension: Normal setting is between 3 and 5. and bobbin thread tensions must be in the middle of the bobbin...
... right. Setting 3 is essential for sewing buttonholes. Needle thread tension 132 A = Setting mark. The needle- The bobbin thread tension has been correctly set a wide zigzag stitch. The threads must only be turned minimally. \' Checking the needle thread tension: Normal setting is between 3 and 5. and bobbin thread tensions must be in the middle of the bobbin...

Owner's Manual
Page 19
Remove the fabric at the rear. 4 Thread cutter 141: Pull the threads N through in the direcfion of the arrow. 15 4 Raise presser bar litter 118.
Remove the fabric at the rear. 4 Thread cutter 141: Pull the threads N through in the direcfion of the arrow. 15 4 Raise presser bar litter 118.

Owner's Manual
Page 22
..."Sew slow" key 115 "Reverse" key 116 "Tie-off/buttonhole/single pattern" key N Electronic bobbin thread monitor: Bobbin thread monitor light 112 starts to determine and memorize the seam length. Then the light goes out, Button hole:... cator light goes on , key 116 serves to flash when the bobbin thread is always retained at half its up . Function keys of the electronic system Description on the following pages.... 112 Bobbin thread monitor light 113 "Needle down in the fabric when the machine stops. When you press...
..."Sew slow" key 115 "Reverse" key 116 "Tie-off/buttonhole/single pattern" key N Electronic bobbin thread monitor: Bobbin thread monitor light 112 starts to determine and memorize the seam length. Then the light goes out, Button hole:... cator light goes on , key 116 serves to flash when the bobbin thread is always retained at half its up . Function keys of the electronic system Description on the following pages.... 112 Bobbin thread monitor light 113 "Needle down in the fabric when the machine stops. When you press...
Owner's Manual
Page 35
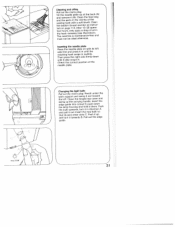
.... After 15-20 opera tion hours, only apply a drop of the needle plate. 4 Changing the light bulb: N Pull out the mains plug. Clean the bobbin thread monitor as instruc ted on with a soft brush. Insert the edge guide into cutout D, push down until it in until the retaining hook snaps in...
.... After 15-20 opera tion hours, only apply a drop of the needle plate. 4 Changing the light bulb: N Pull out the mains plug. Clean the bobbin thread monitor as instruc ted on with a soft brush. Insert the edge guide into cutout D, push down until it in until the retaining hook snaps in...

Owner's Manual
Page 41
rnamental seams on leather 53 F vercasting stitch 91 (verlock stitch with edge thread effect 92 attern mirroring 64 F ogram possibilities 38 F rogramming letters and numbers 66 F rogramming names together with embroidery itches 70, 71 ogramming the ...ewing on buttons 62 89 89 73 67 68 107, 108 66 106 Shell edging Shirring with elastic thread Shirring with shirring foot Shirring with straight stitch Single patterns Smocking with elastic thread Spacing between words Straight stitch Stretch triple straight stitch Stretch triple zigzag stitch T Tailors tacks Tips for embroidering...
rnamental seams on leather 53 F vercasting stitch 91 (verlock stitch with edge thread effect 92 attern mirroring 64 F ogram possibilities 38 F rogramming letters and numbers 66 F rogramming names together with embroidery itches 70, 71 ogramming the ...ewing on buttons 62 89 89 73 67 68 107, 108 66 106 Shell edging Shirring with elastic thread Shirring with shirring foot Shirring with straight stitch Single patterns Smocking with elastic thread Spacing between words Straight stitch Stretch triple straight stitch Stretch triple zigzag stitch T Tailors tacks Tips for embroidering...

Owner's Manual
Page 43
g. 0 Ordinary sewing foot 39 The individual symbols stand for: prog e. g. straight stitch 00 Dual feed engaged or Dual feed disengaged Recommended needle thread tension, e, g. 3- 5 Recommended sewing foot, e. prog 00 I - 'ag 3-5 - normai sewing foot Machine settings recommended jTtsohehbewesinbmigollxaufcsoahtorbiatnotbeevedesstoeensvttueitinrhtygeeddffreooeslrclcoortwhimpeitnmirgoeenspnpadoegfecedttishveecaonssdneewtwaitiinhnngges job.
g. 0 Ordinary sewing foot 39 The individual symbols stand for: prog e. g. straight stitch 00 Dual feed engaged or Dual feed disengaged Recommended needle thread tension, e, g. 3- 5 Recommended sewing foot, e. prog 00 I - 'ag 3-5 - normai sewing foot Machine settings recommended jTtsohehbewesinbmigollxaufcsoahtorbiatnotbeevedesstoeensvttueitinrhtygeeddffreooeslrclcoortwhimpeitnmirgoeenspnpadoegfecedttishveecaonssdneewtwaitiinhnngges job.

Owner's Manual
Page 44
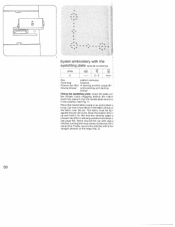
... Multi-colour embroidery These multi-colour embroidery possibilities se limits to your Pfaff Creative. Carried out with tracing paper. Transfer the pattern onto the face side of tr fabric with gr: devotion to 2.5 mm. E 04 43 44 46 1-i 3+ j 2 Sewing thread: Embroidery thread Motif 1 is made your imagination. First workstep: stems • Program 04 •...
... Multi-colour embroidery These multi-colour embroidery possibilities se limits to your Pfaff Creative. Carried out with tracing paper. Transfer the pattern onto the face side of tr fabric with gr: devotion to 2.5 mm. E 04 43 44 46 1-i 3+ j 2 Sewing thread: Embroidery thread Motif 1 is made your imagination. First workstep: stems • Program 04 •...

Owner's Manual
Page 48
... centre motif. • Then sew along the pre traced line. Try the pattern out on each reel pin ard secure it in the usual way, threading each needle sepa rately. Sewing fancy seams with the correspondiflg unreeling disc. For sewing, use two reels of... thread of the program selected. Place one thread to the right ard the other to the pattern length of differe't colours. See page 56. JJ 41 33 36 - 3-5 2 When tracing the scallops make ...
... centre motif. • Then sew along the pre traced line. Try the pattern out on each reel pin ard secure it in the usual way, threading each needle sepa rately. Sewing fancy seams with the correspondiflg unreeling disc. For sewing, use two reels of... thread of the program selected. Place one thread to the right ard the other to the pattern length of differe't colours. See page 56. JJ 41 33 36 - 3-5 2 When tracing the scallops make ...

Owner's Manual
Page 49
.... Trace the monogram on terry cloth, pin the paper pattern onto the fabric and sew along the traced outlines with the embroidery foot r prog Thread: embroidering/darning thread Clear-lined block letters or monograms made by combining different ornamental patterns can be sewn without any difficulty. To sew monograms on paper first...
.... Trace the monogram on terry cloth, pin the paper pattern onto the fabric and sew along the traced outlines with the embroidery foot r prog Thread: embroidering/darning thread Clear-lined block letters or monograms made by combining different ornamental patterns can be sewn without any difficulty. To sew monograms on paper first...
Owner's Manual
Page 56
... or two fibres in an embroideri i. Finally, secure the stitches with a few stitches (pIaci q presser bar lifter in darning position (page 9l Sewing thread: embroidering and darning thread Fitting the eyeletting plate: insert the plate w ti the double catch engaging behind the midh tooth row, place it over the pin. The fabric...
... or two fibres in an embroideri i. Finally, secure the stitches with a few stitches (pIaci q presser bar lifter in darning position (page 9l Sewing thread: embroidering and darning thread Fitting the eyeletting plate: insert the plate w ti the double catch engaging behind the midh tooth row, place it over the pin. The fabric...


