

Owner's Manual
Page 5
... IN A SAFE PLACE Do not unplug by or near children. 2. Always use bent or blunt needles. Always unplug before cleaning. 2. Switch the sewing machine off ("0") position, then remove plug from the electric outlet when removing covers, lubrica ting, or when making any other liquid. Do not allow to...relamping. Keep fingers away from all controls to persons: 1. Do not pull or push fabric while stitching. Great care is necessary when this sewing machine is used or where oxygen is being used by pulling on cord. Only use only. To unplug, hold the plug, not the cord...
... IN A SAFE PLACE Do not unplug by or near children. 2. Always use bent or blunt needles. Always unplug before cleaning. 2. Switch the sewing machine off ("0") position, then remove plug from the electric outlet when removing covers, lubrica ting, or when making any other liquid. Do not allow to...relamping. Keep fingers away from all controls to persons: 1. Do not pull or push fabric while stitching. Great care is necessary when this sewing machine is used or where oxygen is being used by pulling on cord. Only use only. To unplug, hold the plug, not the cord...

Owner's Manual
Page 6
...chine by a PFAFF mechanic. 5. Cleaning Housing and display: To clean the housing, use a dry, clean and soft cloth that is brought into opera tion as indicated on a firm and even surface. Never use a soft cloth with regard to use the sewing machine if: - ... can re pair. This the exclusive responsibility of electric shock, do not open the machine. This sewing machine is designated for another pur pose than that it is a machine for domestic sewing machines according to : dust, severe dampness, direct sunlight, static electricity, heat-producing objects, corrosive ...
...chine by a PFAFF mechanic. 5. Cleaning Housing and display: To clean the housing, use a dry, clean and soft cloth that is brought into opera tion as indicated on a firm and even surface. Never use a soft cloth with regard to use the sewing machine if: - ... can re pair. This the exclusive responsibility of electric shock, do not open the machine. This sewing machine is designated for another pur pose than that it is a machine for domestic sewing machines according to : dust, severe dampness, direct sunlight, static electricity, heat-producing objects, corrosive ...
Owner's Manual
Page 7
Your PFAFF coverlock features the very latest in its stride and will sew for you many enjoyable hours creating your machine can go amiss. They are happy to be of time to study the instruc tion manual nothing can do and put it is to use . ... PFAFF dealer. So now let's get started! It is certainly time well spent, since it to full use as this instruction manual is the only way to -date sewing Congratulations! If you now take any help or advice. Simple, up-to find out just what your very own fashion ideas. 3 Your new coverlock 4772...
Your PFAFF coverlock features the very latest in its stride and will sew for you many enjoyable hours creating your machine can go amiss. They are happy to be of time to study the instruc tion manual nothing can do and put it is to use . ... PFAFF dealer. So now let's get started! It is certainly time well spent, since it to full use as this instruction manual is the only way to -date sewing Congratulations! If you now take any help or advice. Simple, up-to find out just what your very own fashion ideas. 3 Your new coverlock 4772...
Owner's Manual
Page 8
...25 Blade guard 32 Changing a spool on a threaded machine 20 Chainstitch looper (violet), threading 16, 17 Converter, attaching 24 Cover stitch, important notes on sewing 34, 35 Cover stitch and 2-thread chainstitch, setting the machine 30 - 33 Differential feed 28, 29 Edge guide ...35 Foot control, connecting 7 Free arm 27 Light bulb (sewing lamp), changing 58 Looper cover 8 Lower blade, changing 57 Lower overedge looper (yellow), threading 14, 15 Lubricating the machine 56 Machine cover 6 Maintenance 56 - 58 Master switch 7 Needle changing aid 11...
...25 Blade guard 32 Changing a spool on a threaded machine 20 Chainstitch looper (violet), threading 16, 17 Converter, attaching 24 Cover stitch, important notes on sewing 34, 35 Cover stitch and 2-thread chainstitch, setting the machine 30 - 33 Differential feed 28, 29 Edge guide ...35 Foot control, connecting 7 Free arm 27 Light bulb (sewing lamp), changing 58 Looper cover 8 Lower blade, changing 57 Lower overedge looper (yellow), threading 14, 15 Lubricating the machine 56 Machine cover 6 Maintenance 56 - 58 Master switch 7 Needle changing aid 11...
Owner's Manual
Page 11
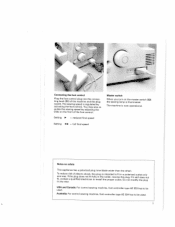
... by activating the foot control. Canada: For control sewing machine, foot controller type AE 033 has to be Australia: For control sewing machine, foot controller type AE 034 has to be used . The machine is regulated by adjusting the slide on safety This appliance has a polarized plug (one blade wider than the other), fToiniotn,earcneowydnawutyaca...
... by activating the foot control. Canada: For control sewing machine, foot controller type AE 033 has to be Australia: For control sewing machine, foot controller type AE 034 has to be used . The machine is regulated by adjusting the slide on safety This appliance has a polarized plug (one blade wider than the other), fToiniotn,earcneowydnawutyaca...

Owner's Manual
Page 12
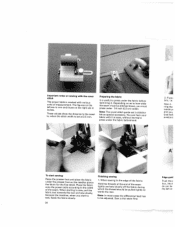
Trimming waste container Insert the upper latches of the trimming waste container (38) into place in the reverse order. Apply pressure to the lower part of the con tainer until the lower latches click into the upper slot of the looper cover. Looper cover Push the looper cover To remove the trimming waste container, re peat this procedure in the lower slots of the hook cover 18).
Trimming waste container Insert the upper latches of the trimming waste container (38) into place in the reverse order. Apply pressure to the lower part of the con tainer until the lower latches click into the upper slot of the looper cover. Looper cover Push the looper cover To remove the trimming waste container, re peat this procedure in the lower slots of the hook cover 18).

Owner's Manual
Page 31
...The free arm is level with close-knit fabrics, set the ad justment knob to the left. For most sewing work support (12) for se wing tubular items such as desired from F (4 1 mm> to the right... until it adjustment knob (35). Insert the article over the free arm. Sewing with the free arm Detach the work support Pull the detachable work , the stitch length ad justment knob ...should be set as trouser legs and sleeves. When working with the machine cover, then slide it to 4 mm by turning stitch length it locks into posi tion. 27...
...The free arm is level with close-knit fabrics, set the ad justment knob to the left. For most sewing work support (12) for se wing tubular items such as desired from F (4 1 mm> to the right... until it adjustment knob (35). Insert the article over the free arm. Sewing with the free arm Detach the work support Pull the detachable work , the stitch length ad justment knob ...should be set as trouser legs and sleeves. When working with the machine cover, then slide it to 4 mm by turning stitch length it locks into posi tion. 27...
Owner's Manual
Page 38
...box, into de can hem your fabric with it . Depending on as special accessory. Important notes on the right are in mm and those on sewing with various units of the seam. The figures on the left or I A 2. These values show the distance to press under 1/4 inch (0.5 ...for the first stitch. When starting to sew, pull the fabric taut towards the rear and sew slowly, because the machine, when you bric, i.e. Sew a trial seam first. Note: In most cases the differential feed has to sew, feeds the fabric slowly. 34 Finishing sewing 1. Note: The cover-stitch guide set ...
...box, into de can hem your fabric with it . Depending on as special accessory. Important notes on the right are in mm and those on sewing with various units of the seam. The figures on the left or I A 2. These values show the distance to press under 1/4 inch (0.5 ...for the first stitch. When starting to sew, pull the fabric taut towards the rear and sew slowly, because the machine, when you bric, i.e. Sew a trial seam first. Note: In most cases the differential feed has to sew, feeds the fabric slowly. 34 Finishing sewing 1. Note: The cover-stitch guide set ...

Owner's Manual
Page 60
...power Remove the trimming waste box and open the looper cover. Lubricate the point shown above with alcohol. One or two drops of PFAFF sewing machine oil are manu factured from special materials and do not require any waste thread from time to time with the oil provided in ...the accessory box every time you clean the machine. All other parts are sufficient. Disengage the upper blade and remove the presser foot and the needle plate. Machine maintenance Cleaning the machine Switch off the electrical power Move the upper overedge looper into its highest...
...power Remove the trimming waste box and open the looper cover. Lubricate the point shown above with alcohol. One or two drops of PFAFF sewing machine oil are manu factured from special materials and do not require any waste thread from time to time with the oil provided in ...the accessory box every time you clean the machine. All other parts are sufficient. Disengage the upper blade and remove the presser foot and the needle plate. Machine maintenance Cleaning the machine Switch off the electrical power Move the upper overedge looper into its highest...

Owner's Manual
Page 64
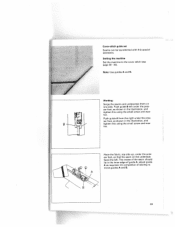
Blindstitch foot The blindstitch foot is trimmer' serged and "blind" stitched in a single (Jr ration. 1 2 Setting the machine Remove the left needle. Now fold the seam onc again outwards so that the folded seam part lies beneath edge guide 2. Working: Raise the needle ...to its uppermost posi1io and insert the blindstitch foot. Position the seam under th sewing foot so that the edge protrudr approx, 1 cm. Crease 4 nrrer thereby, run along the edge 2 of the gur Loosen retaining screw 1 and adjust edge guide...
Blindstitch foot The blindstitch foot is trimmer' serged and "blind" stitched in a single (Jr ration. 1 2 Setting the machine Remove the left needle. Now fold the seam onc again outwards so that the folded seam part lies beneath edge guide 2. Working: Raise the needle ...to its uppermost posi1io and insert the blindstitch foot. Position the seam under th sewing foot so that the edge protrudr approx, 1 cm. Crease 4 nrrer thereby, run along the edge 2 of the gur Loosen retaining screw 1 and adjust edge guide...

Owner's Manual
Page 65
... to the cover stitch (see page 30 - 33). Note: Use guide C and D. The hemmed seam is in guide D, the crease is in guide C. Setting the machine Set the machine to the width of the needle pla te should flush. Sew the seam and on completion remove guides C and D. 61
... to the cover stitch (see page 30 - 33). Note: Use guide C and D. The hemmed seam is in guide D, the crease is in guide C. Setting the machine Set the machine to the width of the needle pla te should flush. Sew the seam and on completion remove guides C and D. 61
Owner's Manual
Page 67
... can be top-stitched with this using the small screw and was her . The crease of the seam should lie in the inner edge of sewing re move guides A and B. 63 Working: Serge the seams and underpress them on the underside faces the left under the pres ser foot, as shown... in the illustration, and B tighten this using the small screw and was her . Setting the machine Set the machine to the cover stitch (see page 30 - 33>. Push guide B left . On completion of guide A, adjust guide A as shown in the illustration, and tighten...
... can be top-stitched with this using the small screw and was her . The crease of the seam should lie in the inner edge of sewing re move guides A and B. 63 Working: Serge the seams and underpress them on the underside faces the left under the pres ser foot, as shown... in the illustration, and B tighten this using the small screw and was her . Setting the machine Set the machine to the cover stitch (see page 30 - 33>. Push guide B left . On completion of guide A, adjust guide A as shown in the illustration, and tighten...
Owner's Manual
Page 68
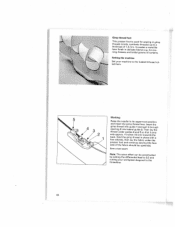
...and pull it proj ects approx. 4 inches (10 cm) towards the back. Setting the machine Set your workpiece diagonal to the threadline. 64 Then lay the thread under the presser foot and continue sewing (the face side of the fabric should be accentuated by setting the differential feed to 0.5 ...and cutting your machine to its uppermost position and insert the gimp thread foot. It creates a wavelike hem...
...and pull it proj ects approx. 4 inches (10 cm) towards the back. Setting the machine Set your workpiece diagonal to the threadline. 64 Then lay the thread under the presser foot and continue sewing (the face side of the fabric should be accentuated by setting the differential feed to 0.5 ...and cutting your machine to its uppermost position and insert the gimp thread foot. It creates a wavelike hem...

Owner's Manual
Page 69
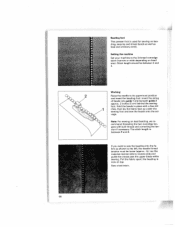
... needle to the 4-thread overedge seam. Elastic tape foot This presser foot is used for sewing on the elastic tape and thus the greater the gat her effect. Setting the machine Set your machine's elastic (expandable) stitches (see illustration>. Insert elastic tape 4 into opening 2 and pull... it protrudes approx. 4 in stretch fabrics. Sew a test seam. shoulder seams> in ches (10 cm) behind the...
... needle to the 4-thread overedge seam. Elastic tape foot This presser foot is used for sewing on the elastic tape and thus the greater the gat her effect. Setting the machine Set your machine's elastic (expandable) stitches (see illustration>. Insert elastic tape 4 into opening 2 and pull... it protrudes approx. 4 in stretch fabrics. Sew a test seam. shoulder seams> in ches (10 cm) behind the...

Owner's Manual
Page 70
... and insert the fabric ply to be chan ged by adjusting the differential feed. 66 Lo wer the presser foot and sew the two fabric plies together. Note: The degree of shirring can be shirred (face side up). Working: Raise the needle to 2.0. Shirring foot The ... for chil dren's wear, as well as attaching gathered valances for curtains, table linen or tiered skirts. It is automatically gathered. Setting the machine Set your machine to the 4-thread overedge seam and the differential feed to its uppermost position and insert the shirring foot. Insert the second fabric ply (face...
... and insert the fabric ply to be chan ged by adjusting the differential feed. 66 Lo wer the presser foot and sew the two fabric plies together. Note: The degree of shirring can be shirred (face side up). Working: Raise the needle to 2.0. Shirring foot The ... for chil dren's wear, as well as attaching gathered valances for curtains, table linen or tiered skirts. It is automatically gathered. Setting the machine Set your machine to the 4-thread overedge seam and the differential feed to its uppermost position and insert the shirring foot. Insert the second fabric ply (face...
Owner's Manual
Page 72
...two overedge loo pers with a few stit ches, then lay the fabric face up under the sewing foot and sew the beads onto the sel vage. Pull the fabric apart; Setting the machine Set your machine to the 3-thread overedge seam (narrow or wide depending on bead size> Stitch length should ...be between F and 2. If you wish to sew the beading into guide 1 and beneath guide 2 approx. 2 inches (5 cm) behind the sewing foot. Insert the string of beads...
...two overedge loo pers with a few stit ches, then lay the fabric face up under the sewing foot and sew the beads onto the sel vage. Pull the fabric apart; Setting the machine Set your machine to the 3-thread overedge seam (narrow or wide depending on bead size> Stitch length should ...be between F and 2. If you wish to sew the beading into guide 1 and beneath guide 2 approx. 2 inches (5 cm) behind the sewing foot. Insert the string of beads...

Owner's Manual
Page 73
...from the accessories to loo sen screw 1 and adjust guide 2 so that the needle penetrates the lace as close to sew lace and wide bands together or onto another workpiece. When sewing two lace workpieces together, the two halves must be guided flush along edge guide 3. 69 Tighten screw 1. Working: ...stitch length bet ween F and 2. lay the lace onto the fabric, face side to face side, at a distance of 1.5 to 2.0 cm (depending on . Setting the machine Set your machine to its uppermost position and insert the lace sewing foot. Lace foot The lace foot enables you to the edge as possible.
...from the accessories to loo sen screw 1 and adjust guide 2 so that the needle penetrates the lace as close to sew lace and wide bands together or onto another workpiece. When sewing two lace workpieces together, the two halves must be guided flush along edge guide 3. 69 Tighten screw 1. Working: ...stitch length bet ween F and 2. lay the lace onto the fabric, face side to face side, at a distance of 1.5 to 2.0 cm (depending on . Setting the machine Set your machine to its uppermost position and insert the lace sewing foot. Lace foot The lace foot enables you to the edge as possible.

Owner's Manual
Page 78
no. 2002 80/11, 90/14 2, 3, 4, 5 300 x 285 x 275 mm 6.5 kg Specifcations: Maximum sewing speed Seam width Stitch length Presser foot Lubrification Presser foot height Overedge stroke Needle system Needle size Number of threads Dimensions (width x hight x depth) Weight Packing contents 1 machine 1 foot control 1 instruction manual/guarantee card 1 trimming waste box 1 machine cover 74 1300 stitches/mm. 3 - 6.7 mm F (= 1 mm) - 4 mm exchangeable manual 4.5 mm 1.5 mm EL X 705, cat.
no. 2002 80/11, 90/14 2, 3, 4, 5 300 x 285 x 275 mm 6.5 kg Specifcations: Maximum sewing speed Seam width Stitch length Presser foot Lubrification Presser foot height Overedge stroke Needle system Needle size Number of threads Dimensions (width x hight x depth) Weight Packing contents 1 machine 1 foot control 1 instruction manual/guarantee card 1 trimming waste box 1 machine cover 74 1300 stitches/mm. 3 - 6.7 mm F (= 1 mm) - 4 mm exchangeable manual 4.5 mm 1.5 mm EL X 705, cat.


