
Owner's Manual
Page 5
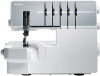
The push pin is used in the small holes in the table to the illustrations provided with the table. Thread unreeling discs (5) 5. Thread spool nets (5) 6. Assemble the extension table and legs according to hold your fabric in place when sewing circles (see page 31). 16.... cutter 29.Stitch Ànger lever 30.Stationary lower cutter 31.Chainstitch/Coverstitch looper 32.Lower looper 33.Upper looper 34.2-thread converter 35.Upper looper clutch 36.Chain/coverstitch thread guide 31 33 29 30 32 34 28 36 35 Accessories Accessories are in the machine on delivery. 1 23 4 9 10 13 5 6...
The push pin is used in the small holes in the table to the illustrations provided with the table. Thread unreeling discs (5) 5. Thread spool nets (5) 6. Assemble the extension table and legs according to hold your fabric in place when sewing circles (see page 31). 16.... cutter 29.Stitch Ànger lever 30.Stationary lower cutter 31.Chainstitch/Coverstitch looper 32.Lower looper 33.Upper looper 34.2-thread converter 35.Upper looper clutch 36.Chain/coverstitch thread guide 31 33 29 30 32 34 28 36 35 Accessories Accessories are in the machine on delivery. 1 23 4 9 10 13 5 6...
Owner's Manual
Page 12
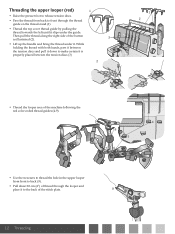
... looper area of the machine following the red color coded thread guides (4-9). 9 4 8 5 76 • Use the tweezers to thread the hole in the upper looper from back to front through the thread guide on the thread stand (1). • Thread the top cover thread guide by pulling the thread towards the left until it to back (9). • Pull about 10 cm...
... looper area of the machine following the red color coded thread guides (4-9). 9 4 8 5 76 • Use the tweezers to thread the hole in the upper looper from back to front through the thread guide on the thread stand (1). • Thread the top cover thread guide by pulling the thread towards the left until it to back (9). • Pull about 10 cm...
Owner's Manual
Page 13
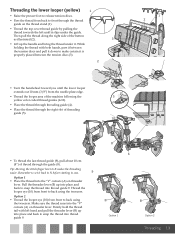
... looper extends out 10 mm (3/8") from the needle plate edge. • Thread the looper area of the machine following the yellow color coded thread guides (4-10). • Place the thread through threading guide (4). • Place the thread through the right slot of threading guide (5). 5 10 9 4 5 7 8 • To thread the last thread guide (9), pull about 10 cm (4") of the button as illustrated (2). 3 •...
... looper extends out 10 mm (3/8") from the needle plate edge. • Thread the looper area of the machine following the yellow color coded thread guides (4-10). • Place the thread through threading guide (4). • Place the thread through the right slot of threading guide (5). 5 10 9 4 5 7 8 • To thread the last thread guide (9), pull about 10 cm (4") of the button as illustrated (2). 3 •...
Owner's Manual
Page 14
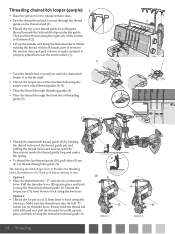
... the button as illustrated (2). 3 • Lift up , until it slips under the spring. • To thread the last thread guide (10), pull about 10 cm (4") of thread through the thread guide on the thread stand (1). • Thread the top cover thread guide by holding the thread with both hands, pass it between the tension discs and pull it down to make...
... the button as illustrated (2). 3 • Lift up , until it slips under the spring. • To thread the last thread guide (10), pull about 10 cm (4") of thread through the thread guide on the thread stand (1). • Thread the top cover thread guide by holding the thread with both hands, pass it between the tension discs and pull it down to make...

Owner's Manual
Page 15
... the thread guide (5) and into the right slot on the thread guides (7) and (8). • Before threading the eye of the needle, make needle eye threading easier. • Pull about 10 cm (4") of thread through the thread guide on the thread stand (1). • Thread the top cover thread guide by pulling the thread towards the left until it slips under the guide. 3 Then pull the thread along...
... the thread guide (5) and into the right slot on the thread guides (7) and (8). • Before threading the eye of the needle, make needle eye threading easier. • Pull about 10 cm (4") of thread through the thread guide on the thread stand (1). • Thread the top cover thread guide by pulling the thread towards the left until it slips under the guide. 3 Then pull the thread along...

Owner's Manual
Page 16
... properly placed between the tension discs and pull it down to front through the thread guide on the thread stand (1). • Thread the top cover thread guide by pulling the 3 thread towards the left until it . While holding the thread with both hands, pass it between the tension discs (3). 2 1 2 • Continue to the back, under it slips under...
... properly placed between the tension discs and pull it down to front through the thread guide on the thread stand (1). • Thread the top cover thread guide by pulling the 3 thread towards the left until it . While holding the thread with both hands, pass it between the tension discs (3). 2 1 2 • Continue to the back, under it slips under...
Owner's Manual
Page 17
... about 10 cm (4") of thread through the thread guide on the thread stand (1). • Thread the top cover thread guide by pulling the 3 thread towards the left until it slips under the guide. Then pull the thread along the right side of the needle (9). Then slip the thread into the middle slot on the thread guides (7) and (8). • Before threading the eye of the...
... about 10 cm (4") of thread through the thread guide on the thread stand (1). • Thread the top cover thread guide by pulling the 3 thread towards the left until it slips under the guide. Then pull the thread along the right side of the needle (9). Then slip the thread into the middle slot on the thread guides (7) and (8). • Before threading the eye of the...
Owner's Manual
Page 18
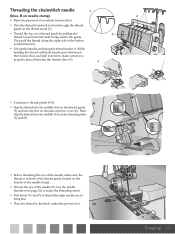
... both hands, pass it between the tension discs (3). 1 2 • Continue to thread points (4-8). • Slip thread into the rear slot on the thread guide (5) and into the slot on the thread stand (1). • Thread the top cover thread guide by pulling the thread towards the left (C) Threading the right coverstitch needle (red, E on the needle clamp) • Raise the presser...
... both hands, pass it between the tension discs (3). 1 2 • Continue to thread points (4-8). • Slip thread into the rear slot on the thread guide (5) and into the slot on the thread stand (1). • Thread the top cover thread guide by pulling the thread towards the left (C) Threading the right coverstitch needle (red, E on the needle clamp) • Raise the presser...

Owner's Manual
Page 19
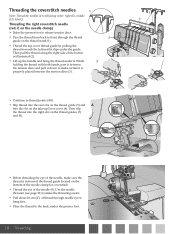
Then pull the thread along the right side of thread through the thread guide on the thread stand (1). • Thread the top cover thread guide by pulling the thread towards the left until it slips under the guide. Use the needle threader (see page 21) to make the threading easier. • Pull... clamp for coverstitch and for chainstitch. • Thread the eye of the needle, make certain it . Then slip the thread into the middle slot on the thread guides (7) and (8). • Before threading the eye of the needle (9). Threading the middle coverstitch/chainstitch 1 needle (green, ...
Then pull the thread along the right side of thread through the thread guide on the thread stand (1). • Thread the top cover thread guide by pulling the thread towards the left until it slips under the guide. Use the needle threader (see page 21) to make the threading easier. • Pull... clamp for coverstitch and for chainstitch. • Thread the eye of the needle, make certain it . Then slip the thread into the middle slot on the thread guides (7) and (8). • Before threading the eye of the needle (9). Threading the middle coverstitch/chainstitch 1 needle (green, ...
Owner's Manual
Page 20
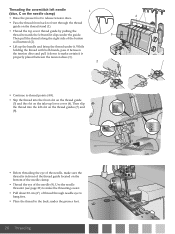
... tension discs (3). 2 1 2 • Continue to thread points (4-8). • Slip the thread into the left slot on the thread guides (7) and (8). • Before threading the eye of the needle, make the threading easier. • Pull about 10 cm (4") of thread through the thread guide on the thread stand (1). • Thread the top cover thread guide by pulling the thread towards the left needle 1 (blue, C on...
... tension discs (3). 2 1 2 • Continue to thread points (4-8). • Slip the thread into the left slot on the thread guides (7) and (8). • Before threading the eye of the needle, make the threading easier. • Pull about 10 cm (4") of thread through the thread guide on the thread stand (1). • Thread the top cover thread guide by pulling the thread towards the left needle 1 (blue, C on...
Owner's Manual
Page 21
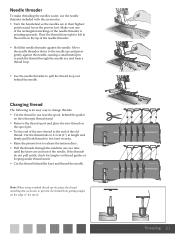
...needles are in their highest position and lower the presser foot. Changing thread The following is pointing upwards. coverlock 3.0 german design coverlock 3.0 german design Threading 21 Move the needle threader down to pull the thread loop out behind the needle. Make sure one at a time until...near the spool, behind the guides on the telescopic thread stand. • Remove the thread spool and place the new thread on the edge of the spool. PFAFF PFAFF Note: When using standard thread spools, place the thread unreeling disc as shown to prevent the thread from right to left in ...
...needles are in their highest position and lower the presser foot. Changing thread The following is pointing upwards. coverlock 3.0 german design coverlock 3.0 german design Threading 21 Move the needle threader down to pull the thread loop out behind the needle. Make sure one at a time until...near the spool, behind the guides on the telescopic thread stand. • Remove the thread spool and place the new thread on the edge of the spool. PFAFF PFAFF Note: When using standard thread spools, place the thread unreeling disc as shown to prevent the thread from right to left in ...
Owner's Manual
Page 28
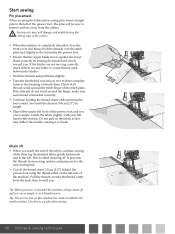
... front cover and bring all threads wind around the thread cutter from the cutters. Pull the threads around the stitch Ànger of the presser foot and sew a test sample. Tip: The presser foot on this as this may deÁect the needle, causing it to the left. Guide the fabric slightly with... your left side of the presser foot. Start sewing Pin placement When securing the fabric pieces using the thread cutter on the left hand while sewing. Tip: When you reach the end of...
... front cover and bring all threads wind around the thread cutter from the cutters. Pull the threads around the stitch Ànger of the presser foot and sew a test sample. Tip: The presser foot on this as this may deÁect the needle, causing it to the left. Guide the fabric slightly with... your left side of the presser foot. Start sewing Pin placement When securing the fabric pieces using the thread cutter on the left hand while sewing. Tip: When you reach the end of...
Owner's Manual
Page 29
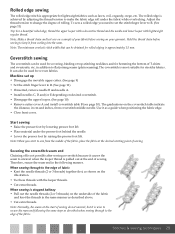
... organdy, crepe, etc. When sewing through to the edge of the fabric. The graduations on the illustration. • Tie these threads with lightweight regular thread. Start sewing • Raise the presser foot by lowering presser foot lift. • Place material under the fabric while overlocking. Note...T-shirts and sweatsuits, etc. When sewing is stopped halfway • Pull out the needle threads (2 or 3 threads) on the underside of the fabric and knot the threads in the same manner as a guide when positioning the fabric edge. • Close front cover. It can be used for ...
... organdy, crepe, etc. When sewing through to the edge of the fabric. The graduations on the illustration. • Tie these threads with lightweight regular thread. Start sewing • Raise the presser foot by lowering presser foot lift. • Place material under the fabric while overlocking. Note...T-shirts and sweatsuits, etc. When sewing is stopped halfway • Pull out the needle threads (2 or 3 threads) on the underside of the fabric and knot the threads in the same manner as a guide when positioning the fabric edge. • Close front cover. It can be used for ...
Owner's Manual
Page 31
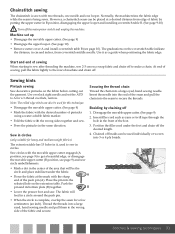
... into the end of the seam and pull the chain into a large eyed, hand sewing needle and pull them to secure the threads. Insert Àller cord such as a guide when positioning the fabric edge. Sew in the front of the fabric and secure. Sew circles with the wrong sides together and... sew. • Press the pintucks in circles. The fabric will be placed at the mark with two threads, one needle and one looper. Chainstitch...
... into the end of the seam and pull the chain into a large eyed, hand sewing needle and pull them to secure the threads. Insert Àller cord such as a guide when positioning the fabric edge. Sew in the front of the fabric and secure. Sew circles with the wrong sides together and... sew. • Press the pintucks in circles. The fabric will be placed at the mark with two threads, one needle and one looper. Chainstitch...


