
Owner's Manual
Page 2
... the sewing machine. • Use this manual. The wrong plate can cause the needle to break. • Do not use the proper needle plate. Replace bulb with any opening. • Do not use as threading needle, changing needle, or changing presser foot, etc. • Always unplug sewing machine from outlet. • Do not unplug by pulling on cord. Return the sewing machine to the nearest authorized dealer or service center for its intended use outdoors. • Do not operate...
... the sewing machine. • Use this manual. The wrong plate can cause the needle to break. • Do not use the proper needle plate. Replace bulb with any opening. • Do not use as threading needle, changing needle, or changing presser foot, etc. • Always unplug sewing machine from outlet. • Do not unplug by pulling on cord. Return the sewing machine to the nearest authorized dealer or service center for its intended use outdoors. • Do not operate...

Owner's Manual
Page 3
... Machine set up 31 Start and end of sewing 31 Sewing hints 31 Pintuck sewing 31 Sew in circles 31 Securing the thread chain 31 Braiding by chaining off 31 Stitch adjustments Stitch width adjustment 32 Width adjustment by changing needle position 32 Width adjustment with the cutting width dial 32 Presser foot pressure adjustment 32 Stitch length adjustment 32 Differential feed adjustment 33 Gathered overlock (stretch, knit fabrics 33 Stretch overlock (lightweight fabrics 33 Thread tension Àne tuning 34 Maintenance Machine maintenance 36 Cleaning 36 Oiling ...36 Replacing...
... Machine set up 31 Start and end of sewing 31 Sewing hints 31 Pintuck sewing 31 Sew in circles 31 Securing the thread chain 31 Braiding by chaining off 31 Stitch adjustments Stitch width adjustment 32 Width adjustment by changing needle position 32 Width adjustment with the cutting width dial 32 Presser foot pressure adjustment 32 Stitch length adjustment 32 Differential feed adjustment 33 Gathered overlock (stretch, knit fabrics 33 Stretch overlock (lightweight fabrics 33 Thread tension Àne tuning 34 Maintenance Machine maintenance 36 Cleaning 36 Oiling ...36 Replacing...

Owner's Manual
Page 4
... 8. Stitch plate 9. Handwheel 22.Presser foot lift 15.Stitch length dial 23.Hole for extension table 16.Spool stand 24.Differential feed adjusting dial 17.Cone holder 25.Presser foot ankle 18.Auto tension dial (ATD) 26.Presser foot 19.Spool pin 27.Cutting width dial 4 Introduction Left needle thread tension Àne tuning lever (blue) 21 4. Upper looper thread tension Àne tuning lever (red) 6. Flat bed extension 27 10.Cutter cover A 11.Front cover 25 26 12.Power & light switch 20.Presser foot pressure adjusting dial 13.Foot control/electric power cord socket...
... 8. Stitch plate 9. Handwheel 22.Presser foot lift 15.Stitch length dial 23.Hole for extension table 16.Spool stand 24.Differential feed adjusting dial 17.Cone holder 25.Presser foot ankle 18.Auto tension dial (ATD) 26.Presser foot 19.Spool pin 27.Cutting width dial 4 Introduction Left needle thread tension Àne tuning lever (blue) 21 4. Upper looper thread tension Àne tuning lever (red) 6. Flat bed extension 27 10.Cutter cover A 11.Front cover 25 26 12.Power & light switch 20.Presser foot pressure adjusting dial 13.Foot control/electric power cord socket...

Owner's Manual
Page 5
... blade (for Cover/chainstitch) 10.Cone holders (5) 11.Dust cover 12.Lint brush 13.Waste tray 14.Needle threader 15.Extension table including four legs and push pin (not pictured). Thread spool nets (5) 6. Tweezers 9. 28.Moveable upper cutter 29.Stitch Ànger lever 30.Stationary lower cutter 31.Chainstitch/Coverstitch looper 32.Lower looper 33.Upper looper 34.2-thread converter 35.Upper looper clutch 36.Chain/coverstitch thread guide 31 33 29...
... blade (for Cover/chainstitch) 10.Cone holders (5) 11.Dust cover 12.Lint brush 13.Waste tray 14.Needle threader 15.Extension table including four legs and push pin (not pictured). Thread spool nets (5) 6. Tweezers 9. 28.Moveable upper cutter 29.Stitch Ànger lever 30.Stationary lower cutter 31.Chainstitch/Coverstitch looper 32.Lower looper 33.Upper looper 34.2-thread converter 35.Upper looper clutch 36.Chain/coverstitch thread guide 31 33 29...

Owner's Manual
Page 6
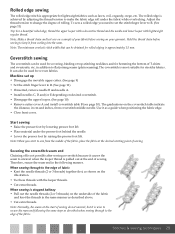
... trim is perfect for sewing invisible hems and for applying lace. You can cause discoloration on other elastic insertion techniques. Optional accessories from INSPIRA™ Optional presser feet specially prepared for this machine allows easy removal and replacement. Elastic Foot 620 08 65-96 The Elastic Foot guides and stretches narrow elastic (¼-½", 6-12mm) as you sew it to insert piping into seams and on this machine are available at...
... trim is perfect for sewing invisible hems and for applying lace. You can cause discoloration on other elastic insertion techniques. Optional accessories from INSPIRA™ Optional presser feet specially prepared for this machine allows easy removal and replacement. Elastic Foot 620 08 65-96 The Elastic Foot guides and stretches narrow elastic (¼-½", 6-12mm) as you sew it to insert piping into seams and on this machine are available at...
Owner's Manual
Page 7
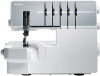
... the risk of the foot control is already threaded, straighten the threads to adjust the sewing speed. The harder you press the foot control to right as indicated on the machine. • Plug the power cord plug into place. Place the thread spools over the cone holders on the machine. • Press the foot control to start sewing. Setting up the telescopic thread stand Extend the telescopic thread stand to install the proper outlet.
... the risk of the foot control is already threaded, straighten the threads to adjust the sewing speed. The harder you press the foot control to right as indicated on the machine. • Plug the power cord plug into place. Place the thread spools over the cone holders on the machine. • Press the foot control to start sewing. Setting up the telescopic thread stand Extend the telescopic thread stand to install the proper outlet.
Owner's Manual
Page 9
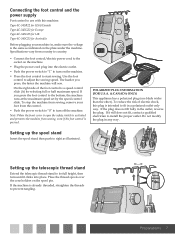
... upper cutter Disengaging, position B Turn off the main power switch and unplug the machine. • Turn the handwheel toward you are at shank industrial needle that eliminates the possibility of inserting the needle backwards. Overlock left needle D. Coverstitch right needle german design A BB A BB Preparations 9 Do not attempt to use a standard household sewing machine needle of any size or type in this may cause the needle clamp to the back. • Insert the needle...
... upper cutter Disengaging, position B Turn off the main power switch and unplug the machine. • Turn the handwheel toward you are at shank industrial needle that eliminates the possibility of inserting the needle backwards. Overlock left needle D. Coverstitch right needle german design A BB A BB Preparations 9 Do not attempt to use a standard household sewing machine needle of any size or type in this may cause the needle clamp to the back. • Insert the needle...

Owner's Manual
Page 10
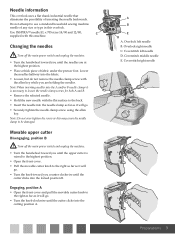
... is in its lowest position. • Push the clutch lever to coverstitch table B 1 For coverstitch and chainstitch sewing the coverstitch table B should be disengaged. • Turn the handwheel until the upper looper is visible from the front. Disengaging Turn off the main power switch and unplug the machine. 2-thread overlock stitches are sewn using one needle B thread and the lower looper thread. Changing to the right and...
... is in its lowest position. • Push the clutch lever to coverstitch table B 1 For coverstitch and chainstitch sewing the coverstitch table B should be disengaged. • Turn the handwheel until the upper looper is visible from the front. Disengaging Turn off the main power switch and unplug the machine. 2-thread overlock stitches are sewn using one needle B thread and the lower looper thread. Changing to the right and...
Owner's Manual
Page 11
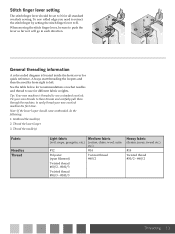
... the stitch Ànger lever, be set to sew a standard overlock. Thread the lower looper 3. Tie your own threads to these threads and carefully pull them through the machine, to push the lever as far as it will go in each direction. Unthread the needle(s) 2. N R N R General threading information A color coded diagram is threaded to N for different fabric weights. Note: If the lower looper should be sure to easily thread your new overlock machine...
... the stitch Ànger lever, be set to sew a standard overlock. Thread the lower looper 3. Tie your own threads to these threads and carefully pull them through the machine, to push the lever as far as it will go in each direction. Unthread the needle(s) 2. N R N R General threading information A color coded diagram is threaded to N for different fabric weights. Note: If the lower looper should be sure to easily thread your new overlock machine...
Owner's Manual
Page 13
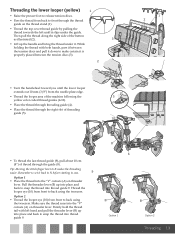
... to set it back to N before starting to R makes the threading easier. Thread the looper eye (10) from front to back using the tweezers. Tip: Moving the stitch Ànger lever to sew. Threading the lower looper (yellow) 1 • Raise the presser foot to release tension discs. • Pass the thread from the needle plate edge. • Thread the looper area of the machine following the yellow color coded thread guides (4-10...
... to set it back to N before starting to R makes the threading easier. Thread the looper eye (10) from front to back using the tweezers. Tip: Moving the stitch Ànger lever to sew. Threading the lower looper (yellow) 1 • Raise the presser foot to release tension discs. • Pass the thread from the needle plate edge. • Thread the looper area of the machine following the yellow color coded thread guides (4-10...
Owner's Manual
Page 21
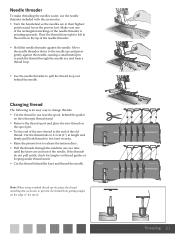
... on thread guides or looping under thread stand. • Cut the thread behind the needle. If the threads do not pull easily, check for tangles on the edge of the needle. Move the needle threader down to change threads: • Cut the thread in use the needle threader included with the accessories. • Turn the handwheel so the needles are in their highest position and lower the presser foot. coverlock 3.0 german design coverlock 3.0 german design Threading...
... on thread guides or looping under thread stand. • Cut the thread behind the needle. If the threads do not pull easily, check for tangles on the edge of the needle. Move the needle threader down to change threads: • Cut the thread in use the needle threader included with the accessories. • Turn the handwheel so the needles are in their highest position and lower the presser foot. coverlock 3.0 german design coverlock 3.0 german design Threading...
Owner's Manual
Page 22
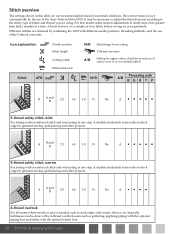
... needle positions, threading methods, and the use of the 2-thread converter. Different stitches are obtained by the use of the Auto Tension Dial (ATD). A A and B 2.5 6.0 1.0 N No A 4-thread overlock For all seams where stretch or give is set automatically by combining the ATD with a reinforced stitch and overcasting in one step. For best results make tension adjustments in small steps of fabric and thread you are using. A durable chainstitch seam with the optional elastic foot. 22 Stitches & sewing...
... needle positions, threading methods, and the use of the 2-thread converter. Different stitches are obtained by the use of the Auto Tension Dial (ATD). A A and B 2.5 6.0 1.0 N No A 4-thread overlock For all seams where stretch or give is set automatically by combining the ATD with a reinforced stitch and overcasting in one step. For best results make tension adjustments in small steps of fabric and thread you are using. A durable chainstitch seam with the optional elastic foot. 22 Stitches & sewing...
Owner's Manual
Page 28
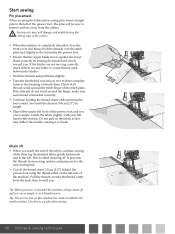
... the cutting edge of the stitch plate. Sew until the chain is called chaining off • When you have re-threaded the machine, always chain off the thread chain 2-5 cm (1-2") behind the presser foot using pins, insert straight pins to the left . This is 5-8 cm (2-3") in length. • Place fabric under the presser foot. • Ensure that the upper blade moves against the lower blade correctly by turning the...
... the cutting edge of the stitch plate. Sew until the chain is called chaining off • When you have re-threaded the machine, always chain off the thread chain 2-5 cm (1-2") behind the presser foot using pins, insert straight pins to the left . This is 5-8 cm (2-3") in length. • Place fabric under the presser foot. • Ensure that the upper blade moves against the lower blade correctly by turning the...
Owner's Manual
Page 29
... inserted, remove needle B and needle A. • Install needles C, D and/or E depending on desired coverstitch. • Disengage the upper looper. (See page 10) • Remove cutter cover A and install coverstitch table B (see page 10). When sewing through to change the degree of the fabric. When sewing is stopped halfway • Pull out the needle threads (2 or 3 threads) on the underside of fabric • Knot the needle threads (2 or 3 threads) together Àrst, as a guide when positioning...
... inserted, remove needle B and needle A. • Install needles C, D and/or E depending on desired coverstitch. • Disengage the upper looper. (See page 10) • Remove cutter cover A and install coverstitch table B (see page 10). When sewing through to change the degree of the fabric. When sewing is stopped halfway • Pull out the needle threads (2 or 3 threads) on the underside of fabric • Knot the needle threads (2 or 3 threads) together Àrst, as a guide when positioning...
Owner's Manual
Page 31
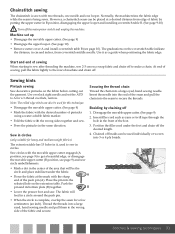
... push pin (A). Sew circles with two threads, one needle and one looper. Place the pin into the seam to secure the threads. A • Pierce the fabric at a desired distance from coverstitch middle needle. Push the pin and its bottom plate (B) together. Use overlock right needle and set up • Disengage the movable upper cutter. (See page 9) • Disengage the upper looper. (See page 10) • Remove cutter cover A and install coverstitch table B (see...
... push pin (A). Sew circles with two threads, one needle and one looper. Place the pin into the seam to secure the threads. A • Pierce the fabric at a desired distance from coverstitch middle needle. Push the pin and its bottom plate (B) together. Use overlock right needle and set up • Disengage the movable upper cutter. (See page 9) • Disengage the upper looper. (See page 10) • Remove cutter cover A and install coverstitch table B (see...

Owner's Manual
Page 32
... width using the cutting width dial further adjustments are possible within the range shown below. • When only the left needle, or when both needles are satisÀed with the cutting width dial. Adjust the stitch length to 6.0. 6.0 6.5 Presser foot pressure adjustment The presser foot pressure for most sewing conditions. For 5.5 standard setting the dial should be set to 2 mm when sewing on heavyweight fabrics. More pressure: Increase the pressure by turning the adjustment dial...
... width using the cutting width dial further adjustments are possible within the range shown below. • When only the left needle, or when both needles are satisÀed with the cutting width dial. Adjust the stitch length to 6.0. 6.0 6.5 Presser foot pressure adjustment The presser foot pressure for most sewing conditions. For 5.5 standard setting the dial should be set to 2 mm when sewing on heavyweight fabrics. More pressure: Increase the pressure by turning the adjustment dial...

Owner's Manual
Page 33
... is changed in relation to a value between 1.0 and 2.0. For overlock stitching on the material being sewn as well as silk and silky knitwear, adjust the differential feed to the feed by holding the seam lightly in front and back of the presser foot. When sewing, apply gentle tension to the fabric by the rear feed teeth it will "stretch" or "gather" the fabric. 2.0 Use the differential feed to 1.0. 0.8 0.6 Gathered overlock (stretch, knit fabrics...
... is changed in relation to a value between 1.0 and 2.0. For overlock stitching on the material being sewn as well as silk and silky knitwear, adjust the differential feed to the feed by holding the seam lightly in front and back of the presser foot. When sewing, apply gentle tension to the fabric by the rear feed teeth it will "stretch" or "gather" the fabric. 2.0 Use the differential feed to 1.0. 0.8 0.6 Gathered overlock (stretch, knit fabrics...
Owner's Manual
Page 34
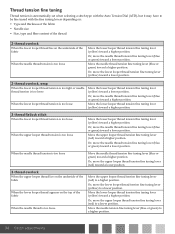
Thread tension Àne tuning Thread tension is automatically set when selecting a stitch type with the Auto Tension Dial (ATD), but it may have to be Àne tuned with the Àne tuning levers depending on: • Type and thickness of the fabric • Needle size • Size, type and Àbre content of the thread 2-thread overlock When the lower looper thread lies on the top of the fabric When the needle thread tension is...
Thread tension Àne tuning Thread tension is automatically set when selecting a stitch type with the Auto Tension Dial (ATD), but it may have to be Àne tuned with the Àne tuning levers depending on: • Type and thickness of the fabric • Needle size • Size, type and Àbre content of the thread 2-thread overlock When the lower looper thread lies on the top of the fabric When the needle thread tension is...

Owner's Manual
Page 37
... unplug the machine. Only use , be sure to the left to remove. • To replace the bulb, push the bulb into the socket and turn to direct sunlight or humidity. Light bulbs are available at your local PFAFF® dealer. Servicing If you have any questions regarding service and/or operation, contact your authorized PFAFF® dealer. • Remove the light cover screw and while pushing the cover lightly to...
... unplug the machine. Only use , be sure to the left to remove. • To replace the bulb, push the bulb into the socket and turn to direct sunlight or humidity. Light bulbs are available at your local PFAFF® dealer. Servicing If you have any questions regarding service and/or operation, contact your authorized PFAFF® dealer. • Remove the light cover screw and while pushing the cover lightly to...
Owner's Manual
Page 38
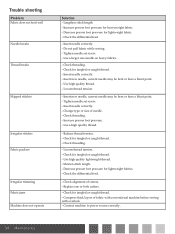
... machine to power source correctly. 38 Maintenance Check the differential feed. - Check for tangled or caught thread. - Loosen thread tension. - Use a high quality thread. - Check for tangled or caught thread. - Insert needle correctly. - Balance thread tension. - Check alignment of fabric with conventional machine before sewing with overlock. - Trouble shooting Problem Fabric does not feed well Needle breaks Thread breaks Skipped stitches Irregular stitches Fabric puckers Irregular trimming Fabric jams Machine does not operate Solution - Increase presser foot pressure...
... machine to power source correctly. 38 Maintenance Check the differential feed. - Check for tangled or caught thread. - Loosen thread tension. - Use a high quality thread. - Check for tangled or caught thread. - Insert needle correctly. - Balance thread tension. - Check alignment of fabric with conventional machine before sewing with overlock. - Trouble shooting Problem Fabric does not feed well Needle breaks Thread breaks Skipped stitches Irregular stitches Fabric puckers Irregular trimming Fabric jams Machine does not operate Solution - Increase presser foot pressure...


