
Owner's Manual
Page 2
...sewing machine off ("0") position, then remove plug from outlet. • Do not unplug by pulling on cord. It may deÁect the needle causing it has been dropped or damaged, or dropped into any opening. • Do not use outdoors. • Do not operate where aerosol ...where oxygen is being administrated. • To disconnect, turn all controls to the off ("0") when making any adjustment in the needle area, such as threading needle, changing needle, or changing presser foot, etc. • Always unplug sewing machine from the electrical outlet when removing covers, lubricating, or when...
...sewing machine off ("0") position, then remove plug from outlet. • Do not unplug by pulling on cord. It may deÁect the needle causing it has been dropped or damaged, or dropped into any opening. • Do not use outdoors. • Do not operate where aerosol ...where oxygen is being administrated. • To disconnect, turn all controls to the off ("0") when making any adjustment in the needle area, such as threading needle, changing needle, or changing presser foot, etc. • Always unplug sewing machine from the electrical outlet when removing covers, lubricating, or when...

Owner's Manual
Page 3
...thread stand 7 Front cover 8 Open ...8 Close...8 Attaching the waste tray 8 Presser foot lift 8 Changing the presser foot 8 Needle information 9 Changing the needles 9 Movable upper cutter 9 Disengaging, position B 9 Engaging, position A 9 2-thread overlock converter 10 Engaging 10 Disengaging 10 ...looper (yellow 13 Threading chainstitch looper (purple 14 Threading the right needle 15 Threading the left needle 16 Threading the chainstitch needle 17 Threading the coverstitch needles 18 Needle threader 21 Changing thread 21 Stitches & Sewing techniques Stitch overview 22 ...
...thread stand 7 Front cover 8 Open ...8 Close...8 Attaching the waste tray 8 Presser foot lift 8 Changing the presser foot 8 Needle information 9 Changing the needles 9 Movable upper cutter 9 Disengaging, position B 9 Engaging, position A 9 2-thread overlock converter 10 Engaging 10 Disengaging 10 ...looper (yellow 13 Threading chainstitch looper (purple 14 Threading the right needle 15 Threading the left needle 16 Threading the chainstitch needle 17 Threading the coverstitch needles 18 Needle threader 21 Changing thread 21 Stitches & Sewing techniques Stitch overview 22 ...

Owner's Manual
Page 4
Parts of the machine 34 5 6 7 2 1 19 18 17 16 98 15 14 10 11 12 13 PFAFF coverlock 3.0 german design 1. Left needle thread tension Àne tuning lever (blue) 21 4. Chainstitch looper thread tension Àne tuning lever (purple) 24 8. Stitch plate 9. Handwheel ...dial 17.Cone holder 25.Presser foot ankle 18.Auto tension dial (ATD) 26.Presser foot 19.Spool pin 27.Cutting width dial 4 Introduction Right needle thread tension Àne tuning lever (green) 22 5. Upper looper thread tension Àne tuning lever (red) 6. Lower looper thread tension ...
Parts of the machine 34 5 6 7 2 1 19 18 17 16 98 15 14 10 11 12 13 PFAFF coverlock 3.0 german design 1. Left needle thread tension Àne tuning lever (blue) 21 4. Chainstitch looper thread tension Àne tuning lever (purple) 24 8. Stitch plate 9. Handwheel ...dial 17.Cone holder 25.Presser foot ankle 18.Auto tension dial (ATD) 26.Presser foot 19.Spool pin 27.Cutting width dial 4 Introduction Right needle thread tension Àne tuning lever (green) 22 5. Upper looper thread tension Àne tuning lever (red) 6. Lower looper thread tension ...

Owner's Manual
Page 5
... 14 Introduction 5 The push pin is used in the small holes in the table to the illustrations provided with the table. Oiler 7. Tweezers 9. Two needles, size #14/90, are contained in the accessory box. 1. Coverstitch table B (for the movable upper cutter) 4. 28.Moveable upper cutter 29.Stitch... 29 30 32 34 28 36 35 Accessories Accessories are in place when sewing circles (see page 31). 16.Needle pack (not pictured) system ELx705 including three needles, size #14/90 and two needles, size #12/80. Accessory box 2. Thread spool nets (5) 6. Knife blade (for Cover/chainstitch) 10.Cone ...
... 14 Introduction 5 The push pin is used in the small holes in the table to the illustrations provided with the table. Oiler 7. Tweezers 9. Two needles, size #14/90, are contained in the accessory box. 1. Coverstitch table B (for the movable upper cutter) 4. 28.Moveable upper cutter 29.Stitch... 29 30 32 34 28 36 35 Accessories Accessories are in place when sewing circles (see page 31). 16.Needle pack (not pictured) system ELx705 including three needles, size #14/90 and two needles, size #12/80. Accessory box 2. Thread spool nets (5) 6. Knife blade (for Cover/chainstitch) 10.Cone ...
Owner's Manual
Page 8
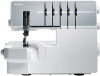
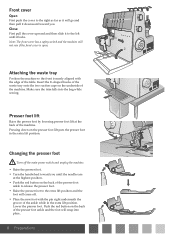
... suction cups on the back of the presser foot ankle to release the presser foot. • Raise the presser foot to the left until the needles are at the back of the machine. Front cover Open First push the cover to the right as far as it will go and then...
... suction cups on the back of the presser foot ankle to release the presser foot. • Raise the presser foot to the left until the needles are at the back of the machine. Front cover Open First push the cover to the right as far as it will go and then...
Owner's Manual
Page 9
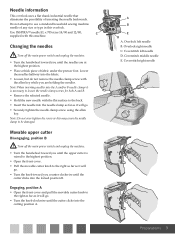
... 12/80, C supplied with the allen key while you until the cutter clicks into the fabric. • Loosen, but do not remove the needle clamp screw with this machine. Engaging, position A • Open the front cover and pull the movable cutter knob to the right as far as... it will go . • Securely tighten the needle clamp screw using the allen key. Overlock right needle C. Coverstitch right needle german design A BB A BB Preparations 9 Movable upper cutter Disengaging, position B Turn off the main power switch and ...
... 12/80, C supplied with the allen key while you until the cutter clicks into the fabric. • Loosen, but do not remove the needle clamp screw with this machine. Engaging, position A • Open the front cover and pull the movable cutter knob to the right as far as... it will go . • Securely tighten the needle clamp screw using the allen key. Overlock right needle C. Coverstitch right needle german design A BB A BB Preparations 9 Movable upper cutter Disengaging, position B Turn off the main power switch and ...

Owner's Manual
Page 10
... (A) from the eye (B) of the upper looper. Disengaging Turn off the main power switch and unplug the machine. 2-thread overlock stitches are sewn using one needle B thread and the lower looper thread. Changing to coverstitch table B 1 For coverstitch and chainstitch sewing the coverstitch table B should be attached to release the cutter...
... (A) from the eye (B) of the upper looper. Disengaging Turn off the main power switch and unplug the machine. 2-thread overlock stitches are sewn using one needle B thread and the lower looper thread. Changing to coverstitch table B 1 For coverstitch and chainstitch sewing the coverstitch table B should be attached to release the cutter...
Owner's Manual
Page 11
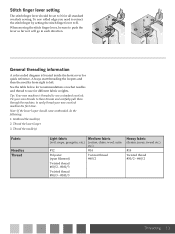
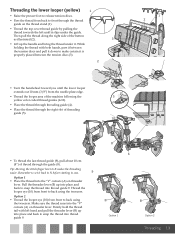
... setting the stitch Ànger lever to left. N R N R General threading information A color coded diagram is threaded to sew a standard overlock. Thread the needle(s) Fabric Needles Thread Light fabric (voil, crepe, georgette, etc.) #12 Polyester (spun Àlament) Twisted thread #60/2 - #100/3 Twisted thread #80/3 - #100... thread your new overlock machine the Àrst time. Thread the lower looper 3. Always start threading the loopers and then the needles from right to R. Tie your own threads to these threads and carefully pull them through the machine, to N for all standard...
... setting the stitch Ànger lever to left. N R N R General threading information A color coded diagram is threaded to sew a standard overlock. Thread the needle(s) Fabric Needles Thread Light fabric (voil, crepe, georgette, etc.) #12 Polyester (spun Àlament) Twisted thread #60/2 - #100/3 Twisted thread #80/3 - #100... thread your new overlock machine the Àrst time. Thread the lower looper 3. Always start threading the loopers and then the needles from right to R. Tie your own threads to these threads and carefully pull them through the machine, to N for all standard...
Owner's Manual
Page 13
... back to N before starting to R makes the threading easier. While holding the thread with left until the lower looper extends out 10 mm (3/8") from the needle plate edge. • Thread the looper area of the machine following the yellow color coded thread guides (4-10). • Place the thread through threading guide...
... back to N before starting to R makes the threading easier. While holding the thread with left until the lower looper extends out 10 mm (3/8") from the needle plate edge. • Thread the looper area of the machine following the yellow color coded thread guides (4-10). • Place the thread through threading guide...

Owner's Manual
Page 15
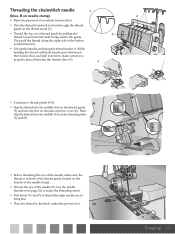
... to the back, under it. Then slip the thread into the right slot on the thread guides (7) and (8). • Before threading the eye of the needle, make certain it down to thread points (4-8). • Slip the thread into the rear slot on the thread guide (5) and into the slot on the... bottom of the needle clamp. • Thread the eye of the button as illustrated (2). • Lift up lever cover (6). While holding the thread with both hands, pass it between...
... to the back, under it. Then slip the thread into the right slot on the thread guides (7) and (8). • Before threading the eye of the needle, make certain it down to thread points (4-8). • Slip the thread into the rear slot on the thread guide (5) and into the slot on the... bottom of the needle clamp. • Thread the eye of the button as illustrated (2). • Lift up lever cover (6). While holding the thread with both hands, pass it between...

Owner's Manual
Page 16
... properly placed between the tension discs and pull it down to make certain it is behind the thread guide located on the bottom of the needle clamp. • Thread the eye of the button as illustrated (2). • Lift up lever cover (6). Then slip the thread into the middle ...; Thread the top cover thread guide by pulling the 3 thread towards the left until it . Then pull the thread along the right side of the needle (9). While holding the thread with both hands, pass it between the tension discs (3). 2 1 2 • Continue to thread points (4-8). • Slip the thread into...
... properly placed between the tension discs and pull it down to make certain it is behind the thread guide located on the bottom of the needle clamp. • Thread the eye of the button as illustrated (2). • Lift up lever cover (6). Then slip the thread into the middle ...; Thread the top cover thread guide by pulling the 3 thread towards the left until it . Then pull the thread along the right side of the needle (9). While holding the thread with both hands, pass it between the tension discs (3). 2 1 2 • Continue to thread points (4-8). • Slip the thread into...
Owner's Manual
Page 17
...left until it . Then slip the thread into the middle slot on the thread guides (7) and (8). • Before threading the eye of the needle, make the threading easier. • Pull about 10 cm (4") of the button as illustrated (2). • Lift up lever cover (6). Threading the chainstitch...; Raise the presser foot to release tension discs. • Pass the thread from back to front through needle eye to hang free. • Place the thread to the back, under the guide. Use the needle threader (see page 21) to make sure the thread is properly placed between the tension discs (3). 2 ...
...left until it . Then slip the thread into the middle slot on the thread guides (7) and (8). • Before threading the eye of the needle, make the threading easier. • Pull about 10 cm (4") of the button as illustrated (2). • Lift up lever cover (6). Threading the chainstitch...; Raise the presser foot to release tension discs. • Pass the thread from back to front through needle eye to hang free. • Place the thread to the back, under the guide. Use the needle threader (see page 21) to make sure the thread is properly placed between the tension discs (3). 2 ...
Owner's Manual
Page 18
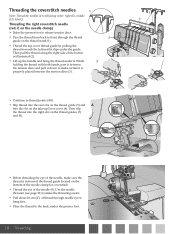
...on the thread guides (7) and (8). 6 4 5 7 8 9 • Before threading the eye of the needle, make sure the thread is in to following order: right (E), middle (D), left (C) Threading the right coverstitch needle (red, E on the needle clamp) • Raise the presser foot to release tension discs. • Pass the thread from back... by pulling the thread towards the left until it down to make the threading easier. • Pull about 10 cm (4") of thread through needle eye to hang free. • Place the thread to the back, under the guide. Then slip the thread into the slot on the ...
...on the thread guides (7) and (8). 6 4 5 7 8 9 • Before threading the eye of the needle, make sure the thread is in to following order: right (E), middle (D), left (C) Threading the right coverstitch needle (red, E on the needle clamp) • Raise the presser foot to release tension discs. • Pass the thread from back... by pulling the thread towards the left until it down to make the threading easier. • Pull about 10 cm (4") of thread through needle eye to hang free. • Place the thread to the back, under the guide. Then slip the thread into the slot on the ...

Owner's Manual
Page 19
... into the slot on the thread stand (1). • Thread the top cover thread guide by pulling the thread towards the left until it . Use the needle threader (see page 21) to make sure the thread is properly placed between the tension discs and pull it down to make certain it is... in front of the thread guide located on the bottom of the needle clamp for coverstitch and for chainstitch. • Thread the eye of thread through the thread guide on the take-up the handle and bring the...
... into the slot on the thread stand (1). • Thread the top cover thread guide by pulling the thread towards the left until it . Use the needle threader (see page 21) to make sure the thread is properly placed between the tension discs and pull it down to make certain it is... in front of the thread guide located on the bottom of the needle clamp for coverstitch and for chainstitch. • Thread the eye of thread through the thread guide on the take-up the handle and bring the...
Owner's Manual
Page 20
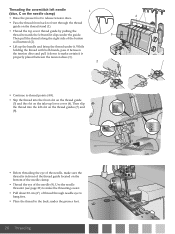
... certain it is in front of the thread guide located on the bottom of the needle clamp. • Thread the eye of the needle (9). Threading the coverstitch left needle 1 (blue, C on the needle clamp) • Raise the presser foot to release tension discs. • Pass the thread from back to ... top cover thread guide by pulling the thread towards the left slot on the thread guides (7) and (8). • Before threading the eye of thread through needle eye to hang free. • Place the thread to the back, under the presser foot. 20 Threading 6 4 5 7 8 9 9 While holding the thread with ...
... certain it is in front of the thread guide located on the bottom of the needle clamp. • Thread the eye of the needle (9). Threading the coverstitch left needle 1 (blue, C on the needle clamp) • Raise the presser foot to release tension discs. • Pass the thread from back to ... top cover thread guide by pulling the thread towards the left slot on the thread guides (7) and (8). • Before threading the eye of thread through needle eye to hang free. • Place the thread to the back, under the presser foot. 20 Threading 6 4 5 7 8 9 9 While holding the thread with ...
Owner's Manual
Page 21
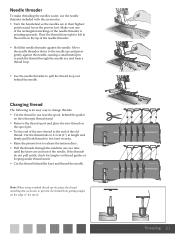
... markings of the old thread. coverlock 3.0 german design coverlock 3.0 german design Threading 21 If the threads do not pull easily, check for tangles on thread guides or looping under thread stand. • Cut the thread behind the needle. PFAFF PFAFF Note: When using standard thread spools..., place the thread unreeling disc as shown to release the tension discs. • Pull the threads through the needle eye and form a thread loop. • Use the needle threader to pull the thread ...
... markings of the old thread. coverlock 3.0 german design coverlock 3.0 german design Threading 21 If the threads do not pull easily, check for tangles on thread guides or looping under thread stand. • Cut the thread behind the needle. PFAFF PFAFF Note: When using standard thread spools..., place the thread unreeling disc as shown to release the tension discs. • Pull the threads through the needle eye and form a thread loop. • Use the needle threader to pull the thread ...
Owner's Manual
Page 22
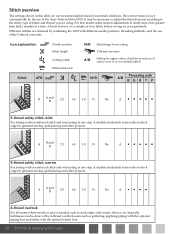
...adjust the thread tension according to the stitch, type of no greater than half a number at a time. Icon explanation: AB C DE Needle position Stitch length Cutting width Differential feed Stitch ATD A B C DE N/R A/B Stitch Ànger lever setting 2-thread converter Setting for ...the Auto Tension Dial (ATD). The correct tension is needed, such as gathering, applying piping with the optional piping foot and elastic with different needle positions, threading methods, and the use of the 2-thread converter. A A and B 2.5 6.0 1.0 N No A 4-thread overlock For ...
...adjust the thread tension according to the stitch, type of no greater than half a number at a time. Icon explanation: AB C DE Needle position Stitch length Cutting width Differential feed Stitch ATD A B C DE N/R A/B Stitch Ànger lever setting 2-thread converter Setting for ...the Auto Tension Dial (ATD). The correct tension is needed, such as gathering, applying piping with the optional piping foot and elastic with different needle positions, threading methods, and the use of the 2-thread converter. A A and B 2.5 6.0 1.0 N No A 4-thread overlock For ...
Owner's Manual
Page 23
Converter required. Use different colors in the needle. Popular for creating decorative tucks. I A and D 2.5 6.0 1.0 N Yes A 4-thread safety stitch, wide For joining with reinforced stitch and overcasting in one step. Stitch ATD A B C DE N/R Threading ...
Converter required. Use different colors in the needle. Popular for creating decorative tucks. I A and D 2.5 6.0 1.0 N Yes A 4-thread safety stitch, wide For joining with reinforced stitch and overcasting in one step. Stitch ATD A B C DE N/R Threading ...

Owner's Manual
Page 25
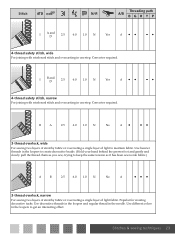
..., narrow For overcasting a single layer of light to medium weight fabrics. Converter required. For a beautiful rolled edge, thread the looper with decorative thread and the needle and lower looper with lightweight regular thread. Read more on silky scarves, pillow rufÁes and napkins. Read more on page 29. * Not recommended...
..., narrow For overcasting a single layer of light to medium weight fabrics. Converter required. For a beautiful rolled edge, thread the looper with decorative thread and the needle and lower looper with lightweight regular thread. Read more on silky scarves, pillow rufÁes and napkins. Read more on page 29. * Not recommended...
Owner's Manual
Page 28
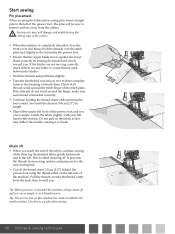
... a thread chain. Tip: When you . Start sewing Pin placement When securing the fabric pieces using the thread cutter on this may deÁect the needle, causing it to break. (25--38")cm Chain off . If the threads do not wind around the stitch Ànger of the machine. Use this... as this machine has marks to indicate the needle position. If the blades are not moving correctly, check if there are away from coming undone and prepares for the next sewing task. • Cut...
... a thread chain. Tip: When you . Start sewing Pin placement When securing the fabric pieces using the thread cutter on this may deÁect the needle, causing it to break. (25--38")cm Chain off . If the threads do not wind around the stitch Ànger of the machine. Use this... as this machine has marks to indicate the needle position. If the blades are not moving correctly, check if there are away from coming undone and prepares for the next sewing task. • Cut...

