
Features and Benefits
Page 1
... & Benefits PFAFF® ambition™ 620 ® PFAFF®ambition™620 FEATURES AND BENEFITS TOP FIVE FEATURES The Original IDT ™ System 1 Original since 1968. stitch accessories to 7mm. 5 Speed Slider Adjust sewing speed on the screen. unique embellishments, stitched perfectly up or down in the fabric for even more Limits stitch width to automatically adjust the stitch appliqué and more. Elongation Thread Snips Lengthen satin stitches and entire stitch will...
... & Benefits PFAFF® ambition™ 620 ® PFAFF®ambition™620 FEATURES AND BENEFITS TOP FIVE FEATURES The Original IDT ™ System 1 Original since 1968. stitch accessories to 7mm. 5 Speed Slider Adjust sewing speed on the screen. unique embellishments, stitched perfectly up or down in the fabric for even more Limits stitch width to automatically adjust the stitch appliqué and more. Elongation Thread Snips Lengthen satin stitches and entire stitch will...

Features and Benefits
Page 2
... in Needle Threader Makes threading easy and reduces eye strain. Start/Stop Button Sew without the foot control - PFAFF, AMBITION, and IDT are trademarks of your sewing machine when transporting it . ITEM NUMBER: 471057126 Features & Benefits PFAFF® ambition™ 620 and lower-case letters, for free-motion quilting, thread painting or darning. Inch/cm Ruler On The Accessory Tray Convenient measuring directly on the graphic display. Accessory Feet Included 6 different presser feet for topstitching, edge stitching, under stitching, stitching-in the bobbin area...
... in Needle Threader Makes threading easy and reduces eye strain. Start/Stop Button Sew without the foot control - PFAFF, AMBITION, and IDT are trademarks of your sewing machine when transporting it . ITEM NUMBER: 471057126 Features & Benefits PFAFF® ambition™ 620 and lower-case letters, for free-motion quilting, thread painting or darning. Inch/cm Ruler On The Accessory Tray Convenient measuring directly on the graphic display. Accessory Feet Included 6 different presser feet for topstitching, edge stitching, under stitching, stitching-in the bobbin area...

Manual
Page 2
... user servicing adjustments mentioned in this manual. • Never operate this household sewing machine. IMPORTANT SAFETY INSTRUCTIONS When using this sewing machine if it has a damaged cord or plug, if it is not working properly, if it is wet. Always unplug this sewing machine from outlet. • Do not unplug by the manufacturer as threading needle, changing needle, threading bobbin, or changing presser foot, etc. • Never drop or insert any other objects on cord. Return the sewing machine...
... user servicing adjustments mentioned in this manual. • Never operate this household sewing machine. IMPORTANT SAFETY INSTRUCTIONS When using this sewing machine if it has a damaged cord or plug, if it is not working properly, if it is wet. Always unplug this sewing machine from outlet. • Do not unplug by the manufacturer as threading needle, changing needle, threading bobbin, or changing presser foot, etc. • Never drop or insert any other objects on cord. Return the sewing machine...
Manual
Page 4
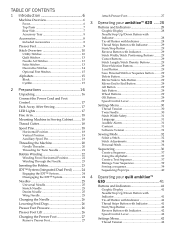
... Connect the Power Cord and Foot Control 17 Pack Away After Sewing 17 LED Lights 17 OK Button 29 Speed Control Lever 29 Settings Menu 30 Thread Tension 30 Twin Needle 30 Free Arm 18 Stitch Width Safety 31 Mounting Machine in Sewing Cabinet .........18 Language 31 Thread Cutter 18 Spool Pins 18 Horizontal Position 18 Vertical Position 19 Auxiliary Spool Pin 19 Threading the Machine 20 Needle Threader 20 Threading for Twin Needle 21 Bobbin Winding 22 Winding From Horizontal Position 22 Winding Through the Needle 23 Inserting the Bobbin 23 Audible...
... Connect the Power Cord and Foot Control 17 Pack Away After Sewing 17 LED Lights 17 OK Button 29 Speed Control Lever 29 Settings Menu 30 Thread Tension 30 Twin Needle 30 Free Arm 18 Stitch Width Safety 31 Mounting Machine in Sewing Cabinet .........18 Language 31 Thread Cutter 18 Spool Pins 18 Horizontal Position 18 Vertical Position 19 Auxiliary Spool Pin 19 Threading the Machine 20 Needle Threader 20 Threading for Twin Needle 21 Bobbin Winding 22 Winding From Horizontal Position 22 Winding Through the Needle 23 Inserting the Bobbin 23 Audible...
Manual
Page 5
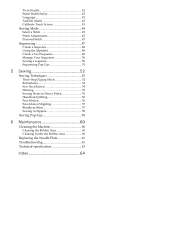
... Your Sequences 50 Sewing a sequence 50 Sequencing Pop-Ups 51 5 Sewing 52 Sewing Techniques 52 Three-Step Zigzag Stitch 52 Buttonholes 52 Sew On a Button 54 Darning 55 Sewing Hems in Heavy Fabric 55 Handlook Quilting 56 Free-Motion 56 Free-Motion Stippling 57 Blindhem Stitch 57 Sewing in Zippers 58 Sewing Pop-Ups 58 6 Maintenance 60 Cleaning the Machine 60 Cleaning the Bobbin Area 60 Cleaning Under the Bobbin Area 60 Replacing the Needle Plate 61 Troubleshooting 61 Technical specification 63 Index...
... Your Sequences 50 Sewing a sequence 50 Sequencing Pop-Ups 51 5 Sewing 52 Sewing Techniques 52 Three-Step Zigzag Stitch 52 Buttonholes 52 Sew On a Button 54 Darning 55 Sewing Hems in Heavy Fabric 55 Handlook Quilting 56 Free-Motion 56 Free-Motion Stippling 57 Blindhem Stitch 57 Sewing in Zippers 58 Sewing Pop-Ups 58 6 Maintenance 60 Cleaning the Machine 60 Cleaning the Bobbin Area 60 Cleaning Under the Bobbin Area 60 Replacing the Needle Plate 61 Troubleshooting 61 Technical specification 63 Index...
Manual
Page 7
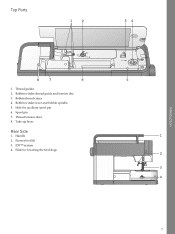
Bobbin winder lever and bobbin spindle 5. Thread guides 2. Bobbin thread cutter 4. Hole for lowering the feed dogs 7 Bobbin winder thread guide and tension disc 3. Thread tension discs 8. IDT™ system 4. Handle 2. Spool pin 7. Presser foot lift 3. Introduction Top Parts 1. Take-up lever Rear Side 1. Slide for auxiliary spool pin 6.
Bobbin winder lever and bobbin spindle 5. Thread guides 2. Bobbin thread cutter 4. Hole for lowering the feed dogs 7 Bobbin winder thread guide and tension disc 3. Thread tension discs 8. IDT™ system 4. Handle 2. Spool pin 7. Presser foot lift 3. Introduction Top Parts 1. Take-up lever Rear Side 1. Slide for auxiliary spool pin 6.
Manual
Page 9
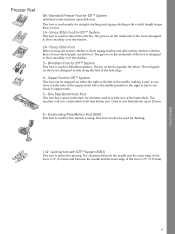
... zipper teeth. One Step Buttonhole Foot This foot has a space in the back for a button used for decorative stitches. Move the needle position to the right or left of the needle, making it easy to sew close to flow smoothly over the stitches. 2A - Introduction 9 Embroidery/Free-Motion Foot (630) This foot is used to set the size of the foot is designed to both sides of the hem edge. 4 - The groove on the foot guides...
... zipper teeth. One Step Buttonhole Foot This foot has a space in the back for a button used for decorative stitches. Move the needle position to the right or left of the needle, making it easy to sew close to flow smoothly over the stitches. 2A - Introduction 9 Embroidery/Free-Motion Foot (630) This foot is used to set the size of the foot is designed to both sides of the hem edge. 4 - The groove on the foot guides...
Manual
Page 10
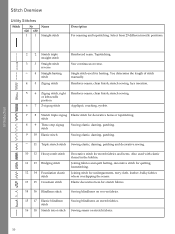
.... or left needle position 6 7 Z-zigzag stitch Appliqué, couching, eyelets. 7 8 Stretch triple zigzag Elastic stitch for basting. Stitch Overview Utility Stitches Stitch № 620 630 11 Name Straight stitch Description For seaming and topstitching. Reinforce seams, clean finish, stretch sewing, lace insertion. 5 6 Zigzag stitch, right Reinforce seams, clean finish, stretch sewing. Sew continuous reverse. Single stitch used with elastic thread in the bobbin. 11 13 Bridging stitch Joining fabrics and quilt batting, decorative stitch for quilting, hemstitching. 12...
.... or left needle position 6 7 Z-zigzag stitch Appliqué, couching, eyelets. 7 8 Stretch triple zigzag Elastic stitch for basting. Stitch Overview Utility Stitches Stitch № 620 630 11 Name Straight stitch Description For seaming and topstitching. Reinforce seams, clean finish, stretch sewing, lace insertion. 5 6 Zigzag stitch, right Reinforce seams, clean finish, stretch sewing. Sew continuous reverse. Single stitch used with elastic thread in the bobbin. 11 13 Bridging stitch Joining fabrics and quilt batting, decorative stitch for quilting, hemstitching. 12...
Manual
Page 20
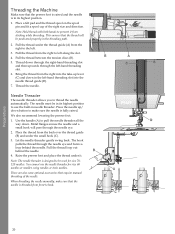
... highest position. 1. Use the handle (A) to pull the needle threader all the way down button to make sure that the needle is designed to be used for size 60 needles or smaller, wing needles or twin needles. Let the needle threader gently swing back. There are also some optional accessories that require manual threading of the right size and direction. Thread the needle. We also recommend lowering the presser foot. 1. Metal flanges encase the needle and a small hook...
... highest position. 1. Use the handle (A) to pull the needle threader all the way down button to make sure that the needle is designed to be used for size 60 needles or smaller, wing needles or twin needles. Let the needle threader gently swing back. There are also some optional accessories that require manual threading of the right size and direction. Thread the needle. We also recommend lowering the presser foot. 1. Metal flanges encase the needle and a small hook...
Manual
Page 21
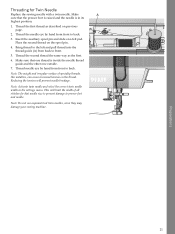
... all stitches for Twin Needle Replace the sewing needle with a twin needle. Make sure that the presser foot is raised and the needle is inside the needle thread guide and the other one thread is in the settings menu. Note: Do not use asymmetrical twin needles, since they may damage your sewing machine. 21 Thread the first thread as the first. 6. Insert the auxiliary spool pin and slide on the thread. Note: Activate twin needle and select the correct twin needle width...
... all stitches for Twin Needle Replace the sewing needle with a twin needle. Make sure that the presser foot is raised and the needle is inside the needle thread guide and the other one thread is in the settings menu. Note: Do not use asymmetrical twin needles, since they may damage your sewing machine. 21 Thread the first thread as the first. 6. Insert the auxiliary spool pin and slide on the thread. Note: Activate twin needle and select the correct twin needle width...
Manual
Page 29
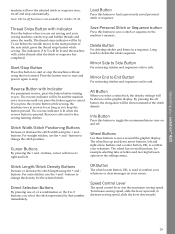
... of the stitch density. buttons to change the density for as long as you are not sewing and your ambition™ 620 machine will sew the selected stitch or sequence once, tie-off . Long touch to side. buttons to change the stitch position. Stitch Length/Stitch Density Buttons Increase or decrease the stitch length using the + and buttons. For satin stitches, use the + and - Speed Control Lever The speed control lever sets the maximum sewing speed. Load Button Press this button to save a stitch or sequence...
... of the stitch density. buttons to change the density for as long as you are not sewing and your ambition™ 620 machine will sew the selected stitch or sequence once, tie-off . Long touch to side. buttons to change the stitch position. Stitch Length/Stitch Density Buttons Increase or decrease the stitch length using the + and buttons. For satin stitches, use the + and - Speed Control Lever The speed control lever sets the maximum sewing speed. Load Button Press this button to save a stitch or sequence...
Manual
Page 33
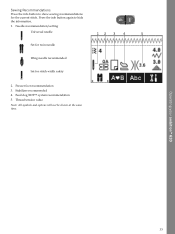
Operating your ambition™ 620 Sewing Recommendations Press the info button to hide the information. 1. Press the info button again to show sewing recommendations for stitch width safety 2. Needle recommendation/setting Universal needle Set for twin needle Wing needle recommended Set for the current stitch. Stabilizer recommended 4. Thread tension value Note: All symbols and options will not be shown at the same time. 33 Feed dog/IDT™ system recommendation 5. Presser foot recommendation 3.
Operating your ambition™ 620 Sewing Recommendations Press the info button to hide the information. 1. Press the info button again to show sewing recommendations for stitch width safety 2. Needle recommendation/setting Universal needle Set for twin needle Wing needle recommended Set for the current stitch. Stabilizer recommended 4. Thread tension value Note: All symbols and options will not be shown at the same time. 33 Feed dog/IDT™ system recommendation 5. Presser foot recommendation 3.
Manual
Page 41
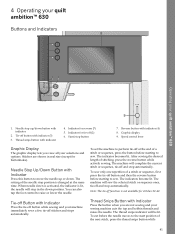
4 Operating your quilt ambition™ 630 Buttons and Indicators Operating your selections and options. Indicator for reverse (7) 5. Needle Stop Up/Down Button with indicator (5) 3. To set the machine to perform tie-off button and then the reverse button before starting to sew. After sewing the desired length of a stitch or sequence, press the button before starting to the start position of a stitch or sequence, first press the tie-off at the same time. The machine will...
4 Operating your quilt ambition™ 630 Buttons and Indicators Operating your selections and options. Indicator for reverse (7) 5. Needle Stop Up/Down Button with indicator (5) 3. To set the machine to perform tie-off button and then the reverse button before starting to sew. After sewing the desired length of a stitch or sequence, press the button before starting to the start position of a stitch or sequence, first press the tie-off at the same time. The machine will...
Manual
Page 42
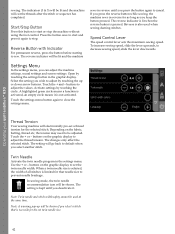
... a stitch that needle size to adjust by touching the settings button in reverse until you can adjust the machine settings, sound settings and screen settings. Touch the + or - To increase sewing speed, slide the lever upwards, to sew. Settings Menu In the settings menu, you deactivate it. Touch the settings menu button again to be used when sewing darning stitches. buttons on the graphic display to adjust the thread tension. buttons on the graphic display to set twin needle size. 42 When a twin needle size is...
... a stitch that needle size to adjust by touching the settings button in reverse until you can adjust the machine settings, sound settings and screen settings. Touch the + or - To increase sewing speed, slide the lever upwards, to sew. Settings Menu In the settings menu, you deactivate it. Touch the settings menu button again to be used when sewing darning stitches. buttons on the graphic display to adjust the thread tension. buttons on the graphic display to set twin needle size. 42 When a twin needle size is...
Manual
Page 44
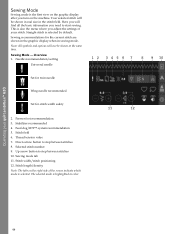
... stitches 10. Stitch length/density Note: The tabs on the right side of your quilt ambition™ 630 Sewing Mode Sewing mode is selected. Sewing mode tab 11. Stitch width/stitch positioning 12. Operating your stitch. Overview 1. Needle recommendation/setting Universal needle Set for twin needle Wing needle recommended Set for the current stitch are shown in the graphic display when in sewing mode. Stabilizer recommended 4. Feed dog/IDT™ system recommendation 5. Thread tension value 7. Down arrow button...
... stitches 10. Stitch length/density Note: The tabs on the right side of your quilt ambition™ 630 Sewing Mode Sewing mode is selected. Sewing mode tab 11. Stitch width/stitch positioning 12. Operating your stitch. Overview 1. Needle recommendation/setting Universal needle Set for twin needle Wing needle recommended Set for the current stitch are shown in the graphic display when in sewing mode. Stabilizer recommended 4. Feed dog/IDT™ system recommendation 5. Thread tension value 7. Down arrow button...
Manual
Page 56
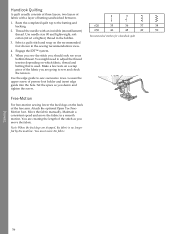
... screw. Move the fabric manually. Note: When the feed dogs are creating the length of the free arm. Engage the IDT™ system. 5. Make a few tests on the back of the stitch as you are going to adjust the thread tension depending on the recommended foot shown in the sewing recommendations view. 4. Sewing 56 Baste the completed quilt top to sew successive rows. Thread the needle with a layer of presser foot holder and insert edge guide...
... screw. Move the fabric manually. Note: When the feed dogs are creating the length of the free arm. Engage the IDT™ system. 5. Make a few tests on the back of the stitch as you are going to adjust the thread tension depending on the recommended foot shown in the sewing recommendations view. 4. Sewing 56 Baste the completed quilt top to sew successive rows. Thread the needle with a layer of presser foot holder and insert edge guide...
Manual
Page 61
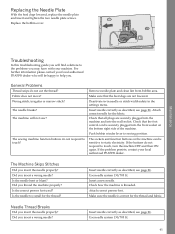
... correct presser foot used? Insert needle correctly as described, see page 26. Is the needle too small for the fabric. Needle Thread Breaks Did you insert the needle properly? Deactivate twin needle or stitch width safety in the settings menu. Use needle system 130/705 H. Use needle system 130/705 H. 61 Did you may have with your local authorized PFAFF® dealer. Maintenance Troubleshooting In this troubleshooting guide you will find solutions to help you. Remove needle plate and clean...
... correct presser foot used? Insert needle correctly as described, see page 26. Is the needle too small for the fabric. Needle Thread Breaks Did you insert the needle properly? Deactivate twin needle or stitch width safety in the settings menu. Use needle system 130/705 H. Use needle system 130/705 H. 61 Did you may have with your local authorized PFAFF® dealer. Maintenance Troubleshooting In this troubleshooting guide you will find solutions to help you. Remove needle plate and clean...
Manual
Page 62
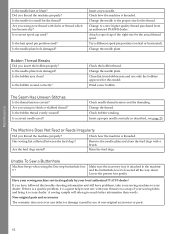
... best spool pin position used? Insert a new needle. Change the needle to the proper size for this trouble shooting information and still have problems, take your sewing machine to test sew with a brush. Change the needle plate. Clean lint from an authorized PFAFF® dealer. Unable To Sew a Buttonhole Machine beeps when using poor thread with slubs or thread which has become dry? If you using the One step buttonhole foot 5? Non-original parts and accessories The warranty does not cover any...
... best spool pin position used? Insert a new needle. Change the needle to the proper size for this trouble shooting information and still have problems, take your sewing machine to test sew with a brush. Change the needle plate. Clean lint from an authorized PFAFF® dealer. Unable To Sew a Buttonhole Machine beeps when using poor thread with slubs or thread which has become dry? If you using the One step buttonhole foot 5? Non-original parts and accessories The warranty does not cover any...
Manual
Page 64
... A Accessories 8 Accessory Tray 8 Adjust Text and Stitches 38, 49 Alphabet Mode, Sequencing 37, 48 Alphabets 15 Alt Button 29 Attach Presser Foot 27 Audible Alarm 31, 43 Auxiliary Spool Pin 19 F Free Arm 18 Front 6 G General Problems 61 Graphic Display 28, 41 B basting 57 Blindhem Stitch 57 Block 15 Bobbin Thread Breaks 62 Bobbin Winding 22 Buttonholes 52 C Calibrate Touch Screen 43 Changing the Needle 26 Changing the Presser Foot 27 Cleaning the Bobbin Area 60 Cleaning the Machine 60 Cleaning...
... A Accessories 8 Accessory Tray 8 Adjust Text and Stitches 38, 49 Alphabet Mode, Sequencing 37, 48 Alphabets 15 Alt Button 29 Attach Presser Foot 27 Audible Alarm 31, 43 Auxiliary Spool Pin 19 F Free Arm 18 Front 6 G General Problems 61 Graphic Display 28, 41 B basting 57 Blindhem Stitch 57 Block 15 Bobbin Thread Breaks 62 Bobbin Winding 22 Buttonholes 52 C Calibrate Touch Screen 43 Changing the Needle 26 Changing the Presser Foot 27 Cleaning the Bobbin Area 60 Cleaning the Machine 60 Cleaning...
Manual
Page 65
... ambition™ 620 28 Operating your quilt ambition™ 630 41 Optional Feet Stitches 15 Overwrite Personal Stitch 36, 47 P Pack Away After Sewing 17 Personal Stitch 36, 47 Presser Feet 9 Presser Foot Lift 26 Presser Foot Pressure 26 Stitch Width/Stitch Positioning 29, 34, 45 T The Machine Does Not Feed or Feeds Irregularly ........ 62 The Machine Skips Stitches 61 The Seam Has Uneven Stitches 62 Thread Cutter 18 Thread Snips Button with Indicator 29, 41 Thread Tension 30, 35, 42, 46 Threading for Twin Needle...
... ambition™ 620 28 Operating your quilt ambition™ 630 41 Optional Feet Stitches 15 Overwrite Personal Stitch 36, 47 P Pack Away After Sewing 17 Personal Stitch 36, 47 Presser Feet 9 Presser Foot Lift 26 Presser Foot Pressure 26 Stitch Width/Stitch Positioning 29, 34, 45 T The Machine Does Not Feed or Feeds Irregularly ........ 62 The Machine Skips Stitches 61 The Seam Has Uneven Stitches 62 Thread Cutter 18 Thread Snips Button with Indicator 29, 41 Thread Tension 30, 35, 42, 46 Threading for Twin Needle...


