Features and Benefits
Page 1
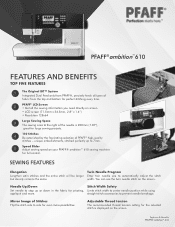
....5mm x 34.5mm, 2.8" x 1.4") • Resolution 128x64 3 Large Sewing Space The sewing area to side for pivoting, Limits stitch width to 7mm. straight stitch accessories to automatically adjust the stitch but density remains the same. unique embellishments, stitched perfectly up or down in the fabric for even more . Needle Up/Down Stitch Width Safety Set needle to stop up to center needle position while using appliqué and more possibilities.
....5mm x 34.5mm, 2.8" x 1.4") • Resolution 128x64 3 Large Sewing Space The sewing area to side for pivoting, Limits stitch width to 7mm. straight stitch accessories to automatically adjust the stitch but density remains the same. unique embellishments, stitched perfectly up or down in the fabric for even more . Needle Up/Down Stitch Width Safety Set needle to stop up to center needle position while using appliqué and more possibilities.
Features and Benefits
Page 2
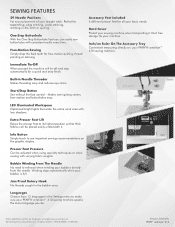
... the Settings menu to its highest position so that thick fabrics can easily sew buttonholes with consistent results every time. Start/Stop Button Sew without the foot control - Winding stops automatically when your sewing machine when transporting it . Languages Choose from the needle. Perfect for a quick and easy finish. Extra Presser Foot Lift Raises the presser foot to make sure your PFAFF® ambition™ 610 sewing machine. Hard Cover Protect your bobbin is full. Dust free storage for your bobbins directly...
... the Settings menu to its highest position so that thick fabrics can easily sew buttonholes with consistent results every time. Start/Stop Button Sew without the foot control - Winding stops automatically when your sewing machine when transporting it . Languages Choose from the needle. Perfect for a quick and easy finish. Extra Presser Foot Lift Raises the presser foot to make sure your PFAFF® ambition™ 610 sewing machine. Hard Cover Protect your bobbin is full. Dust free storage for your bobbins directly...

Manual
Page 2
... threading needle, changing needle, threading bobbin, or changing presser foot, etc. • Never drop or insert any other objects on cord. Keep the instructions at a suitable place close to be followed, including the following: Read all instructions before using and before cleaning, removing covers, lubricating or when making any adjustment in this manual. • Never operate this manual. The electrical socket, to the off ("0") position, then remove plug from the electric outlet immediately after using this sewing machine...
... threading needle, changing needle, threading bobbin, or changing presser foot, etc. • Never drop or insert any other objects on cord. Keep the instructions at a suitable place close to be followed, including the following: Read all instructions before using and before cleaning, removing covers, lubricating or when making any adjustment in this manual. • Never operate this manual. The electrical socket, to the off ("0") position, then remove plug from the electric outlet immediately after using this sewing machine...

Manual
Page 4
...a Button 32 Darning 33 Sewing Hems in Heavy Fabric 33 Handlook Quilting 33 Free-Motion 34 Free-Motion Stippling 34 Blindhem Stitch 35 Sewing in Zippers 35 Sewing Pop-Ups 36 Universal Needle 21 4 Maintenance 37 Stretch Needle 21 Denim Needle 21 Wing Needle 21 Cleaning the Machine 37 Cleaning the Bobbin Area 37 Cleaning Under the Bobbin Area 37 Changing the Needle 22 Replacing the Needle Plate 38 Lowering Feed Dogs 22 Troubleshooting 38 Presser Foot Pressure 22 Technical specification 40 Presser Foot Lift 22 Changing the Presser Foot 23 Remove Presser Foot 23...
...a Button 32 Darning 33 Sewing Hems in Heavy Fabric 33 Handlook Quilting 33 Free-Motion 34 Free-Motion Stippling 34 Blindhem Stitch 35 Sewing in Zippers 35 Sewing Pop-Ups 36 Universal Needle 21 4 Maintenance 37 Stretch Needle 21 Denim Needle 21 Wing Needle 21 Cleaning the Machine 37 Cleaning the Bobbin Area 37 Cleaning Under the Bobbin Area 37 Changing the Needle 22 Replacing the Needle Plate 38 Lowering Feed Dogs 22 Troubleshooting 38 Presser Foot Pressure 22 Technical specification 40 Presser Foot Lift 22 Changing the Presser Foot 23 Remove Presser Foot 23...

Manual
Page 6
Bobbin winder lever and bobbin spindle 5. Bobbin thread cutter 4. Thread tension dial 8. Handle 2. Bobbin winder thread guide and tension disc 3. Thread guides 2. Take-up lever Rear Side 1. Introduction Top Parts 1. Presser foot lift 3. Spool pin 7. Slide for auxiliary spool pin 6. Thread tension discs 9. Hole for lowering the feed dogs 6 IDT™ system 4.
Bobbin winder lever and bobbin spindle 5. Bobbin thread cutter 4. Thread tension dial 8. Handle 2. Bobbin winder thread guide and tension disc 3. Thread guides 2. Take-up lever Rear Side 1. Introduction Top Parts 1. Presser foot lift 3. Spool pin 7. Slide for auxiliary spool pin 6. Thread tension discs 9. Hole for lowering the feed dogs 6 IDT™ system 4.

Manual
Page 8
... mm. Presser Feet 5 OA -Standard Presser Foot for IDT™ System (attached on the machine upon delivery) This foot is used mainly for straight stitching and zigzag stitching with less than 1.0 mm. 1A - The red guide on the foot guides the fabric. The groove on the underside of the hem edge. 4 - Fancy Stitch Foot When sewing decorative stitches or short zigzag stitches and other utility stitches with a stitch length longer than 1.0 mm stitch length, use this foot. Move the needle position to...
... mm. Presser Feet 5 OA -Standard Presser Foot for IDT™ System (attached on the machine upon delivery) This foot is used mainly for straight stitching and zigzag stitching with less than 1.0 mm. 1A - The red guide on the foot guides the fabric. The groove on the underside of the hem edge. 4 - Fancy Stitch Foot When sewing decorative stitches or short zigzag stitches and other utility stitches with a stitch length longer than 1.0 mm stitch length, use this foot. Move the needle position to...

Manual
Page 9
... the bobbin. Sewing elastic, darning, patching. Decorative stitch for stretch fabrics and hems. Also used with elastic thread in one step, patch, hem. 18 Linen buttonhole Buttonhole for blouses, shirts and linen. 19 Standard buttonhole Basic buttonhole for blouses, shirts and jackets. stitch 3 Zigzag stitch Reinforce seams, clean finish, stretch sewing, lace insertion. 4 Zigzag stitch, right or Reinforce seams, clean finish, stretch sewing. Joining stitch for undergarments, terry cloth, leather, bulky fabrics where overlapping the seams. Elastic decorative hem for pillow cases...
... the bobbin. Sewing elastic, darning, patching. Decorative stitch for stretch fabrics and hems. Also used with elastic thread in one step, patch, hem. 18 Linen buttonhole Buttonhole for blouses, shirts and linen. 19 Standard buttonhole Basic buttonhole for blouses, shirts and jackets. stitch 3 Zigzag stitch Reinforce seams, clean finish, stretch sewing, lace insertion. 4 Zigzag stitch, right or Reinforce seams, clean finish, stretch sewing. Joining stitch for undergarments, terry cloth, leather, bulky fabrics where overlapping the seams. Elastic decorative hem for pillow cases...

Manual
Page 16
... manual threading of the right size and direction. Press the needle up lever (C) and down through the right-hand threading slot and then upwards through the needle eye. 2. Let the needle threader gently swing back. Note: The needle threader is designed to be in its highest position. 1. The needle must be used for size 60 needles or smaller, wing needles or twin needles. Pull the thread from the right to use the needle threader for size...
... manual threading of the right size and direction. Press the needle up lever (C) and down through the right-hand threading slot and then upwards through the needle eye. 2. Let the needle threader gently swing back. Note: The needle threader is designed to be in its highest position. 1. The needle must be used for size 60 needles or smaller, wing needles or twin needles. Pull the thread from the right to use the needle threader for size...

Manual
Page 17
... spool pin and slide on the spool pin. 4. Reducing the tension will limit the width of specialty threads, like metallics, can cause increased tension on previous page. 2. Make sure that the presser foot is raised and the needle is inside the needle thread guide and the other one outside. 7. Make sure that one thread is in the settings menu. This will prevent needle breakage. Note: Do not use asymmetrical twin needles...
... spool pin and slide on the spool pin. 4. Reducing the tension will limit the width of specialty threads, like metallics, can cause increased tension on previous page. 2. Make sure that the presser foot is raised and the needle is inside the needle thread guide and the other one outside. 7. Make sure that one thread is in the settings menu. This will prevent needle breakage. Note: Do not use asymmetrical twin needles...

Manual
Page 22
..., or when sewing on heavy fabric or several layers of the free arm to place the fabric underneath the presser foot. For heavy fabric, turn the dial to adjust the presser foot pressure. Loosen the needle screw. Push the new needle upwards with the presser foot lift (A). Move the switch to the right if you do not need to a lower number. Insert the new needle, using the multi-purpose tool. Lowering Feed Dogs You can lower the feed dogs by moving the...
..., or when sewing on heavy fabric or several layers of the free arm to place the fabric underneath the presser foot. For heavy fabric, turn the dial to adjust the presser foot pressure. Loosen the needle screw. Push the new needle upwards with the presser foot lift (A). Move the switch to the right if you do not need to a lower number. Insert the new needle, using the multi-purpose tool. Lowering Feed Dogs You can lower the feed dogs by moving the...

Manual
Page 24
... at the same time. Press the button once to start or stop automatically. Start/stop . To set the machine to stop button 6. Reverse Button with Indicator Press this button to move the needle up /down is activated, the indicator is changed at the end of stitching, press the reverse button while actively sewing. Mirror side to raise or lower the needle. Graphic display 12. Wheel buttons 16. Speed control lever Graphic Display The...
... at the same time. Press the button once to start or stop automatically. Start/stop . To set the machine to stop button 6. Reverse Button with Indicator Press this button to move the needle up /down is activated, the indicator is changed at the end of stitching, press the reverse button while actively sewing. Mirror side to raise or lower the needle. Graphic display 12. Wheel buttons 16. Speed control lever Graphic Display The...

Manual
Page 28
... show sewing recommendations for stitch width safety 2. Straight stitch is the first view on the machine. Sewing Recommendations Press the info button to start sewing. Needle recommendation/setting Universal needle Set for twin needle Wing needle recommended Set for the current stitch. Here you turn on the graphic display after you will be selected as a stitch. Stitch width/stitch positioning 4. Use the up . This is also the menu where you select that stitch number immediately. Feed dog...
... show sewing recommendations for stitch width safety 2. Straight stitch is the first view on the machine. Sewing Recommendations Press the info button to start sewing. Needle recommendation/setting Universal needle Set for twin needle Wing needle recommended Set for the current stitch. Here you turn on the graphic display after you will be selected as a stitch. Stitch width/stitch positioning 4. Use the up . This is also the menu where you select that stitch number immediately. Feed dog...

Manual
Page 31
... fabric and garments. Three-step zigzag stitch Sewing Mode 31 Look at the stitch table on your project under the foot. 4. Attach buttonhole foot 5 and pull out the button holder plate (C). Lower the buttonhole lever (A) all the way forward. 7. The fabric should be sewn. Hold the end of the presser foot to sew if the buttonhole lever is aligned with the center of the buttonhole foot. 6. The buttonholes are specially adjusted for different kinds of the buttonhole. 3. Buttonholes Your machine's buttonholes...
... fabric and garments. Three-step zigzag stitch Sewing Mode 31 Look at the stitch table on your project under the foot. 4. Attach buttonhole foot 5 and pull out the button holder plate (C). Lower the buttonhole lever (A) all the way forward. 7. The fabric should be sewn. Hold the end of the presser foot to sew if the buttonhole lever is aligned with the center of the buttonhole foot. 6. The buttonholes are specially adjusted for different kinds of the buttonhole. 3. Buttonholes Your machine's buttonholes...

Manual
Page 32
... the presser foot holder. You can also use a sew-on button foot, available as an optional accessory at the front of the needle and thread cord ends into a large needle, pull to sew. When the buttonhole is appropriate for your local authorized PFAFF® dealer. Cross the cord in front of the foot. 2. Use the mirroring function to create a thread shank for the actual button. The machine will fasten the button on a button, remove the presser foot...
... the presser foot holder. You can also use a sew-on button foot, available as an optional accessory at the front of the needle and thread cord ends into a large needle, pull to sew. When the buttonhole is appropriate for your local authorized PFAFF® dealer. Cross the cord in front of the foot. 2. Use the mirroring function to create a thread shank for the actual button. The machine will fasten the button on a button, remove the presser foot...
Manual
Page 33
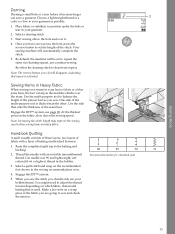
... your bobbin thread. Engage the IDT™ system. 5. Make a few tests on the recommended foot shown in heavy fabric. Start sewing above the hole and over the seam. Re-select the darning stitch to set to sew and check the tension. Sewing Hems in Heavy Fabric When sewing over seams in your garment as possible. 1. Handlook Quilting A quilt usually consists of three layers, two layers of fabric with an invisible (monofilament) thread. Use needle size 90...
... your bobbin thread. Engage the IDT™ system. 5. Make a few tests on the recommended foot shown in heavy fabric. Start sewing above the hole and over the seam. Re-select the darning stitch to set to sew and check the tension. Sewing Hems in Heavy Fabric When sewing over seams in your garment as possible. 1. Handlook Quilting A quilt usually consists of three layers, two layers of fabric with an invisible (monofilament) thread. Use needle size 90...
Manual
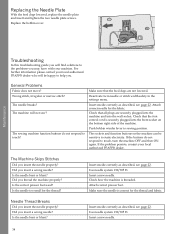
Page 38
... the correct presser foot used? Use needle system 130/705 H. Make sure the needle is threaded. Insert a new needle. 38 Replace the bobbin cover. Wrong stitch, irregular or narrow stitch? Deactivate twin needle or stitch width safety in the settings menu. Attach correct needle for the thread? Check that the feed dogs are securely plugged into the machine and into the front socket on the machine can be happy to static electricity. The sockets and function buttons on...
... the correct presser foot used? Use needle system 130/705 H. Make sure the needle is threaded. Insert a new needle. 38 Replace the bobbin cover. Wrong stitch, irregular or narrow stitch? Deactivate twin needle or stitch width safety in the settings menu. Attach correct needle for the thread? Check that the feed dogs are securely plugged into the machine and into the front socket on the machine can be happy to static electricity. The sockets and function buttons on...
Manual
Page 39
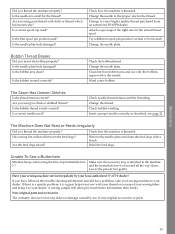
... machine and the buttonhole lever is attached to the proper size for this trouble shooting information and still have followed this model. Try a different spool pin position (vertical or horizontal). Clean lint from an authorized PFAFF® dealer. Is a correct needle used ? Is the best spool pin position used ? Is the needle plate hole damaged? Have your sewing machine serviced regularly by use only the bobbins approved for the thread. Bobbin Thread Breaks Did you thread the machine properly? Wind a new bobbin. The Machine Does Not Feed...
... machine and the buttonhole lever is attached to the proper size for this trouble shooting information and still have followed this model. Try a different spool pin position (vertical or horizontal). Clean lint from an authorized PFAFF® dealer. Is a correct needle used ? Is the best spool pin position used ? Is the needle plate hole damaged? Have your sewing machine serviced regularly by use only the bobbins approved for the thread. Bobbin Thread Breaks Did you thread the machine properly? Wind a new bobbin. The Machine Does Not Feed...
Manual
Page 40
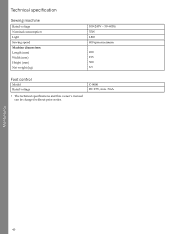
C-9000 DC 15V, max. 3mA Maintenance 40 Technical specification Sewing machine Rated voltage Nominal consumption Light Sewing speed Machine dimensions: Length (mm) Width (mm) Height (mm) Net weight (kg) 100-240V ~ 50-60Hz 55W LED 800 rpm maximum 480 193 300 8.5 Foot control Model Rated voltage • The technical specifications and this owner's manual can be changed without prior notice.
C-9000 DC 15V, max. 3mA Maintenance 40 Technical specification Sewing machine Rated voltage Nominal consumption Light Sewing speed Machine dimensions: Length (mm) Width (mm) Height (mm) Net weight (kg) 100-240V ~ 50-60Hz 55W LED 800 rpm maximum 480 193 300 8.5 Foot control Model Rated voltage • The technical specifications and this owner's manual can be changed without prior notice.

Manual
Page 41
... H Handlook Quilting 33 Horizontal Position 15 B basting 34 Blindhem Stitch 35 Bobbin Thread Breaks 39 Bobbin Winding 18 Buttonholes 31 Buttons and Indicators 24 C Changing the Needle 22 Changing the Presser Foot 23 Cleaning the Bobbin Area 37 Cleaning the Machine 37 Cleaning Under the Bobbin Area 37 Connect the Power Cord and Foot Control 13 Contrast 27 Corded Buttonhole 32 I IDT™ system 20, 28, 33 Info Button 25 Inserting the Bobbin 19 L Language 26 LED Lights 14 Lowering Feed Dogs 22 M Machine Overview 5 Maintenance 37...
... H Handlook Quilting 33 Horizontal Position 15 B basting 34 Blindhem Stitch 35 Bobbin Thread Breaks 39 Bobbin Winding 18 Buttonholes 31 Buttons and Indicators 24 C Changing the Needle 22 Changing the Presser Foot 23 Cleaning the Bobbin Area 37 Cleaning the Machine 37 Cleaning Under the Bobbin Area 37 Connect the Power Cord and Foot Control 13 Contrast 27 Corded Buttonhole 32 I IDT™ system 20, 28, 33 Info Button 25 Inserting the Bobbin 19 L Language 26 LED Lights 14 Lowering Feed Dogs 22 M Machine Overview 5 Maintenance 37...

Manual
Page 42
... Presser Foot 23 Replacing the Needle Plate 38 Reverse Button with Indicator 24 W Wheel Buttons 25 Winding From Horizontal Position 18 Winding Through the Needle 19 S Satin Stitches 11 Select a Stitch 28 Settings Menu 25-26 Sew On a Button 32 Sewing Hems in Heavy Fabric 33 Sewing in Zippers 35 Sewing Pop-Ups 36 Sewing Recommendations 28 Sewing Techniques 31 Speed Control Lever 25 Spool Pins 15 Start/Stop Button 24 Stitch Adjustments 29 Stitch Length/Stitch Density 25, 29 Stitch Overview 9 Stitch Width Safety 26 Stitch Width/Stitch Positioning 25, 29 T The Machine...
... Presser Foot 23 Replacing the Needle Plate 38 Reverse Button with Indicator 24 W Wheel Buttons 25 Winding From Horizontal Position 18 Winding Through the Needle 19 S Satin Stitches 11 Select a Stitch 28 Settings Menu 25-26 Sew On a Button 32 Sewing Hems in Heavy Fabric 33 Sewing in Zippers 35 Sewing Pop-Ups 36 Sewing Recommendations 28 Sewing Techniques 31 Speed Control Lever 25 Spool Pins 15 Start/Stop Button 24 Stitch Adjustments 29 Stitch Length/Stitch Density 25, 29 Stitch Overview 9 Stitch Width Safety 26 Stitch Width/Stitch Positioning 25, 29 T The Machine...


