

Owner's Manual
Page 4
...) Stitch length knob (12) Connection socket "foot control" (model 6232) (13) Base plate (14) Detachable work support (15) Sewing foot holder with sewing foot (16) Needle threader (17) Threading slit (18) Needle thread tension (19) Take-up lever (20) Presser bar lifter (21) Key for "reverse sewing" (22) Needle holder with fixing screw (23) IDT System/Integrated Dual Transport (top feed) (24) Reel holder with unwinding disk (25) Second spare reel holder (26) Lid with program table (27) Bobbin winder (28) Hook cover (behind it- hook) (29) Free arm...
...) Stitch length knob (12) Connection socket "foot control" (model 6232) (13) Base plate (14) Detachable work support (15) Sewing foot holder with sewing foot (16) Needle threader (17) Threading slit (18) Needle thread tension (19) Take-up lever (20) Presser bar lifter (21) Key for "reverse sewing" (22) Needle holder with fixing screw (23) IDT System/Integrated Dual Transport (top feed) (24) Reel holder with unwinding disk (25) Second spare reel holder (26) Lid with program table (27) Bobbin winder (28) Hook cover (behind it- hook) (29) Free arm...

Owner's Manual
Page 5
... be blocked. 10. Never operate the sewing machine with same type rated 1 5 Waifs. 3. DANGER To reduce the risk of lint, dust, and loose cloth. 5. It may be used by the manufacturer only. 14. Use this sewing machine is designed and manufactured for a sewing machine that has fallen into water or other user servicing adjustments mentioned in a safe place This sewing machine is used as threading needle, changing needle, threading bobbin, or changing presser foot, etc. 1 6. Do not...
... be blocked. 10. Never operate the sewing machine with same type rated 1 5 Waifs. 3. DANGER To reduce the risk of lint, dust, and loose cloth. 5. It may be used by the manufacturer only. 14. Use this sewing machine is designed and manufactured for a sewing machine that has fallen into water or other user servicing adjustments mentioned in a safe place This sewing machine is used as threading needle, changing needle, threading bobbin, or changing presser foot, etc. 1 6. Do not...

Owner's Manual
Page 8
...233; Appliqué foot Cording foot Blind stitch Borders Decorative stitches Dual fabric feed Threading the needle thread Gathering with elastic thread Elastic stitch Elastic stitches Electrical connection Thread trimmer Thread tension Feather stitch Sewing on patches Fringe foot Free arm Function keys Foot control Placing sewing thread on spool holder Straight stitch Closed overlock stitch Handwheel release disc Main switch Tacking Hemstitch seam Integrated Dual Transport ltop feed) Lap-feller Sewing on sewing Sewing light Threading the sewing machine Trouble-shooting Sewing tables Setting...
...233; Appliqué foot Cording foot Blind stitch Borders Decorative stitches Dual fabric feed Threading the needle thread Gathering with elastic thread Elastic stitch Elastic stitches Electrical connection Thread trimmer Thread tension Feather stitch Sewing on patches Fringe foot Free arm Function keys Foot control Placing sewing thread on spool holder Straight stitch Closed overlock stitch Handwheel release disc Main switch Tacking Hemstitch seam Integrated Dual Transport ltop feed) Lap-feller Sewing on sewing Sewing light Threading the sewing machine Trouble-shooting Sewing tables Setting...

Owner's Manual
Page 9
... position Cleaning and oiling Sewing on zippers Richelieu Repairing tears Stabilizing edges Reverse sewing Hemming with a dense zigzag stitch. Changing the needle plate Decorative stitches Embroidering with the twin needle Bias-tape binder Notes on safety Smocking Special accessories table Inserting lace Winding the bobbin Bobbin case Winding through the needle Winding from the second spooi holder Selecting stitch width Stitch density Stitch length adjustment button . Needle thread tension Top feed (Integrated Dual Transport) Oiling the sewing machine Open overlock...
... position Cleaning and oiling Sewing on zippers Richelieu Repairing tears Stabilizing edges Reverse sewing Hemming with a dense zigzag stitch. Changing the needle plate Decorative stitches Embroidering with the twin needle Bias-tape binder Notes on safety Smocking Special accessories table Inserting lace Winding the bobbin Bobbin case Winding through the needle Winding from the second spooi holder Selecting stitch width Stitch density Stitch length adjustment button . Needle thread tension Top feed (Integrated Dual Transport) Oiling the sewing machine Open overlock...

Owner's Manual
Page 10
...right needle position For all sewing and top-stitching operations which require a left needle position Straight stitch: For all straight stitching and top-stitching positions. Zigzag stitch: For serging, appliqué, tapering, eyelet embroidery and cording work . 6 Stitch width knob set at 0 Zigzag stitch, stitch width knob set at 0.5 - 5 1 with zigzag A traditional decorative stitch e.g. Central needle position (for embroidering blouses or table linens. E Greek stitch with up to 15 needle positions For serging and appliqué. D Blind stitch with zigzag (elastic...
...right needle position For all sewing and top-stitching operations which require a left needle position Straight stitch: For all straight stitching and top-stitching positions. Zigzag stitch: For serging, appliqué, tapering, eyelet embroidery and cording work . 6 Stitch width knob set at 0 Zigzag stitch, stitch width knob set at 0.5 - 5 1 with zigzag A traditional decorative stitch e.g. Central needle position (for embroidering blouses or table linens. E Greek stitch with up to 15 needle positions For serging and appliqué. D Blind stitch with zigzag (elastic...

Owner's Manual
Page 24
... pull case hand Adjusting the setting: Turn setting screw C to the right - Turn setting screw the bobbin thread C just tension a little to the left very slightly the bobbin thread tension becomes - Inserting the bobbin case Lift cover F hook pin D the bobbin and slide the bobbin case onto the as far as it Check: When you pull turn clockwise. Check: Pull the bobbin case must slip downwards movement. thread and The bobbin must not thread fall ut sharply. Opening...
... pull case hand Adjusting the setting: Turn setting screw C to the right - Turn setting screw the bobbin thread C just tension a little to the left very slightly the bobbin thread tension becomes - Inserting the bobbin case Lift cover F hook pin D the bobbin and slide the bobbin case onto the as far as it Check: When you pull turn clockwise. Check: Pull the bobbin case must slip downwards movement. thread and The bobbin must not thread fall ut sharply. Opening...

Owner's Manual
Page 31
... sewing foot and set the needle at its highest point. Lower the sewing foot and insert the needle, pushing it up as far as it is dropped. 27 For embroidering, darning and buttonhole sewing it goes. Now the feed dog is between 2 and 3. II / \\ B I Setting the needle thread tension Set the required needle thread tension (18) with the help of the needle must face to the right. The normal setting for sewing is 4 to be dropped. Now loosen the fixing screw...
... sewing foot and set the needle at its highest point. Lower the sewing foot and insert the needle, pushing it up as far as it is dropped. 27 For embroidering, darning and buttonhole sewing it goes. Now the feed dog is between 2 and 3. II / \\ B I Setting the needle thread tension Set the required needle thread tension (18) with the help of the needle must face to the right. The normal setting for sewing is 4 to be dropped. Now loosen the fixing screw...

Owner's Manual
Page 32
... can adjust the stitch length infinitely oe ween 0 and 6 mm by turning the point mer king on the colored background you must turn the dial to the required 4ength. 4 4 Between the numbers 0 and 1 you turn the stitch length adjustment knob (11) as far as the reverse sewing key (21) is the opti mum stitch density for sewing buttonholes and embroidering. PFAFF tiptronk H 1q Reverse sewing The machine sews in...
... can adjust the stitch length infinitely oe ween 0 and 6 mm by turning the point mer king on the colored background you must turn the dial to the required 4ength. 4 4 Between the numbers 0 and 1 you turn the stitch length adjustment knob (11) as far as the reverse sewing key (21) is the opti mum stitch density for sewing buttonholes and embroidering. PFAFF tiptronk H 1q Reverse sewing The machine sews in...

Owner's Manual
Page 33
PFAFF tiptronic 6232 - Select the desired stretch stitch by pressing the corresponding key. Only models 6232 and 6152 have already been activated. I Setting stretch stitches All the stitches with models 6152 and 6232, the fancy stitch knob (7) must be switched off, i.e. i.e. Important: When sewing with utility stitches with a colored background are additionally illustrated on the lighted display. turned to sew. The stitch combinations which are possible with all of...
PFAFF tiptronic 6232 - Select the desired stretch stitch by pressing the corresponding key. Only models 6232 and 6152 have already been activated. I Setting stretch stitches All the stitches with models 6152 and 6232, the fancy stitch knob (7) must be switched off, i.e. i.e. Important: When sewing with utility stitches with a colored background are additionally illustrated on the lighted display. turned to sew. The stitch combinations which are possible with all of...
Owner's Manual
Page 39
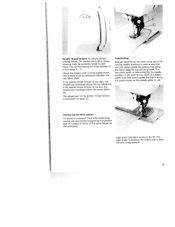
... Straight stitch G can always guide the sewing foot along the guide marks on the needle plate, or use / Sewing aid for thick seams To ensure a consistent feed when beginning sewing we recommend supporting the presser A foot on page 20. If you can be interlaced between the two fabric plies. Check the tension with fixing screw F. 35 The adjustment of the bobbin thread tension is too low, the threads are interlaced above the top fabric ply. The threads...
... Straight stitch G can always guide the sewing foot along the guide marks on the needle plate, or use / Sewing aid for thick seams To ensure a consistent feed when beginning sewing we recommend supporting the presser A foot on page 20. If you can be interlaced between the two fabric plies. Check the tension with fixing screw F. 35 The adjustment of the bobbin thread tension is too low, the threads are interlaced above the top fabric ply. The threads...

Owner's Manual
Page 40
... the fabric layers from shifting, insert dress pins crosswise to press the foot control each further stitch you have to the basting position. Sew one stitch. Please ensure that the needle is the basic straight stitch. prog I t t j 0 t ke 3 3 To - The stitch length can be lowered. It is easier to baste with long straight stitches (6 mm). In this as many times as required. Reooat this case the bottom feed need to the rear. - Light fabrics are...
... the fabric layers from shifting, insert dress pins crosswise to press the foot control each further stitch you have to the basting position. Sew one stitch. Please ensure that the needle is the basic straight stitch. prog I t t j 0 t ke 3 3 To - The stitch length can be lowered. It is easier to baste with long straight stitches (6 mm). In this as many times as required. Reooat this case the bottom feed need to the rear. - Light fabrics are...

Owner's Manual
Page 47
... Stretch 1 • 3-5 jO/1/3l b Stretch - Remember' If, when overlock stitching with this stitch. J3-5 0/3 ::::.;. ;:' - *- 4- :- -'--.. You can also be joi ned effortlessly with sewing foot No. 3, you can especially sew jersey quality perfectly. TIP: Ensure that the needle does not strike the bar of the needle, not to add a woolen thread under light tension. 43 Other wise the needle will break. TIP: To prevent the seam from stretching while sewing...
... Stretch 1 • 3-5 jO/1/3l b Stretch - Remember' If, when overlock stitching with this stitch. J3-5 0/3 ::::.;. ;:' - *- 4- :- -'--.. You can also be joi ned effortlessly with sewing foot No. 3, you can especially sew jersey quality perfectly. TIP: Ensure that the needle does not strike the bar of the needle, not to add a woolen thread under light tension. 43 Other wise the needle will break. TIP: To prevent the seam from stretching while sewing...

Owner's Manual
Page 71
Set needle thread tension to ,,buttonhole", select zigzag stitch 0, set stitch length to the contures of the flower with the width knob (34) during sewing. - Floral embroidery For this flower arrangement, only a dense zig zag stitch was used in the material. - Regulate the stitch width according to ,,buttonhole". -Flowers: Select center needle position CZ and embroider individual pedals. Draw the contures of the leaf until the needle is posi tioned in combination with a self...
Set needle thread tension to ,,buttonhole", select zigzag stitch 0, set stitch length to the contures of the flower with the width knob (34) during sewing. - Floral embroidery For this flower arrangement, only a dense zig zag stitch was used in the material. - Regulate the stitch width according to ,,buttonhole". -Flowers: Select center needle position CZ and embroider individual pedals. Draw the contures of the leaf until the needle is posi tioned in combination with a self...

Owner's Manual
Page 78
Sewing feet (normal accessories) 0 Standard presser foot Part No. 98-694 81 6-00 (models 6122-6232) Part No. 96-694 847-00 (model 6112) 1 Fancy-stitch foot (for top feed) Part No. 98-694 814-00 (models 61 22-8232) 1 Clear view foot (fancy-stitch foot not suitable for top feed) Part No. 98-694 864-0 1 (models 6122-6232) 3 Blind stitch and overlock foot Part No. 98-694 890-00 (models 6122 6232) Part No. 98-694 845-00 (model 6112) 4 Zipper- and edge-stitching foot Part No. 98-694 884-00 (models 6122-6232) Part No. 98-694 843-00 (model 6112) 74
Sewing feet (normal accessories) 0 Standard presser foot Part No. 98-694 81 6-00 (models 6122-6232) Part No. 96-694 847-00 (model 6112) 1 Fancy-stitch foot (for top feed) Part No. 98-694 814-00 (models 61 22-8232) 1 Clear view foot (fancy-stitch foot not suitable for top feed) Part No. 98-694 864-0 1 (models 6122-6232) 3 Blind stitch and overlock foot Part No. 98-694 890-00 (models 6122 6232) Part No. 98-694 845-00 (model 6112) 4 Zipper- and edge-stitching foot Part No. 98-694 884-00 (models 6122-6232) Part No. 98-694 843-00 (model 6112) 74

Owner's Manual
Page 80
...,.) Sewing feet (special accessory) for top feed) Herner (no. Appliqué foot 93-042 941-91 For applique work Open appliqué foot Bias tape binder (remove foot holder) 93-036 931-91 98-053 484-91 For binding edges with bias tape Cording foot, 5 grooves (twin needle with needle spacing 1.6 to 2.0> Cording foot, 7 grooves (twin needle with needle spacing 1.6 to 2.0) 93-042 950-91 93-042 953-9 1 For cording work - suit. Only use straight stitch in center needle position For...
...,.) Sewing feet (special accessory) for top feed) Herner (no. Appliqué foot 93-042 941-91 For applique work Open appliqué foot Bias tape binder (remove foot holder) 93-036 931-91 98-053 484-91 For binding edges with bias tape Cording foot, 5 grooves (twin needle with needle spacing 1.6 to 2.0> Cording foot, 7 grooves (twin needle with needle spacing 1.6 to 2.0) 93-042 950-91 93-042 953-9 1 For cording work - suit. Only use straight stitch in center needle position For...

Owner's Manual
Page 81
... sewing foot holder. Overlap the raw edge of the lap-felling foot. Engage the gathering foot by about ito 1.5 cm. - Lap-feller Gathering foot Lap-feller seams are not only ornamental but strong too. The fabric must be made quickly and easily with straight stitch. - Pull the two fabric plies apart during sewing. The fabric parts lie face side to reverse side. - Disengage the gathering foot by adjusting the needle thread tension and the stitch length...
... sewing foot holder. Overlap the raw edge of the lap-felling foot. Engage the gathering foot by about ito 1.5 cm. - Lap-feller Gathering foot Lap-feller seams are not only ornamental but strong too. The fabric must be made quickly and easily with straight stitch. - Pull the two fabric plies apart during sewing. The fabric parts lie face side to reverse side. - Disengage the gathering foot by adjusting the needle thread tension and the stitch length...

Owner's Manual
Page 82
...'swsicaiwtnshedeoawurlitignchaagntnytwebpcoehrllognebiinvqlseeu.mneUsaonfotdrnceaordfcrialdtboiiortnhingciasnlcgsaluonaconhkd with a twin needle - (1.6 or 2 mm). page 64). - more prominent. To do this case, however, do not use a cording tongue. Engage the cording foot. - Replace the needle with cording. Thread the the needle gimp plate thread through the hole from below to make tension quite the seam more volume. 78 Thread up with two needle threads (see - While sewing the cording pull the material lightly - Now tight set (at the needle thread about 5), to...
...'swsicaiwtnshedeoawurlitignchaagntnytwebpcoehrllognebiinvqlseeu.mneUsaonfotdrnceaordfcrialdtboiiortnhingciasnlcgsaluonaconhkd with a twin needle - (1.6 or 2 mm). page 64). - more prominent. To do this case, however, do not use a cording tongue. Engage the cording foot. - Replace the needle with cording. Thread the the needle gimp plate thread through the hole from below to make tension quite the seam more volume. 78 Thread up with two needle threads (see - While sewing the cording pull the material lightly - Now tight set (at the needle thread about 5), to...

Owner's Manual
Page 88
... screwdriver into the opening and take the needle plate out. Then apply a drop of oil every 15 to 20 hours of a small screwdriver into the left opening between needle plate and sewing machine. Push the point of operation) to apply the oil in place. Clean the feed dog and hook area with a longer service life. Removal: - You can see where to the hook. Replacing - Twist it needs. A Cleaning and oiling Switch off the...
... screwdriver into the opening and take the needle plate out. Then apply a drop of oil every 15 to 20 hours of a small screwdriver into the left opening between needle plate and sewing machine. Push the point of operation) to apply the oil in place. Clean the feed dog and hook area with a longer service life. Removal: - You can see where to the hook. Replacing - Twist it needs. A Cleaning and oiling Switch off the...
Owner's Manual
Page 91
... note: Before you replace sewing feet or needles, you leave the machine, even for thread. 2. Feed dog is important it on through the winding tension. The wrong needle is bent. Needle is inserted. Only use good threads. Trouble-shooting Problem: 1. Machine is too thick. Thread is running with difficulty There are nearby. 88 Seam is not properly inserted. Remove the threads and apply one drop of fabric. Insert a new needle. The bobbin case is sewn unevenly The tension needs adjusting. Thread bunching at right...
... note: Before you replace sewing feet or needles, you leave the machine, even for thread. 2. Feed dog is important it on through the winding tension. The wrong needle is bent. Needle is inserted. Only use good threads. Trouble-shooting Problem: 1. Machine is too thick. Thread is running with difficulty There are nearby. 88 Seam is not properly inserted. Remove the threads and apply one drop of fabric. Insert a new needle. The bobbin case is sewn unevenly The tension needs adjusting. Thread bunching at right...

Owner's Manual
Page 92
...) Free arm (30) Thread trimmer (31) Sewing lamp (max. 15 watt) (32) Thread guide (33) Needle plate (34) Stitch width knob (35) Needle position knob Parts of the sewing machine (Models 6122 and 6112) (4) Carrying handie (5) Handwheel (6) Handwheel release disk (8) Main switch (9) Connection socket "foot control with mains cord" (10) Touch controls (11) Stitch length knob (13) Base plate (14) Detachable work support (15) Sewing foot holder with sewing foot (16) Needle threader (Model 6122) (17) Threading slit (18) Needle thread tension (19) Take-up lever (20) Presser bar...
...) Free arm (30) Thread trimmer (31) Sewing lamp (max. 15 watt) (32) Thread guide (33) Needle plate (34) Stitch width knob (35) Needle position knob Parts of the sewing machine (Models 6122 and 6112) (4) Carrying handie (5) Handwheel (6) Handwheel release disk (8) Main switch (9) Connection socket "foot control with mains cord" (10) Touch controls (11) Stitch length knob (13) Base plate (14) Detachable work support (15) Sewing foot holder with sewing foot (16) Needle threader (Model 6122) (17) Threading slit (18) Needle thread tension (19) Take-up lever (20) Presser bar...


