
Owner's Manual
Page 2
...if it has a damaged cord or plug, if it is not working properly, if it to break. 7. Never operate this sewing machine. Switch the sewing machine off ("O") when making any other user servicing adjustments mentioned in the instruction manual. 11.Never drop or insert any opening. 12.Do... as threading the needle, changing the needle, threading the bobbin, changing the presser foot or changing the light. 10.Always unplug sewing machine from the electrical outlet when removing covers, lubricating, or when making any air openings blocked. Keep fingers away from the electrical outlet...
...if it has a damaged cord or plug, if it is not working properly, if it to break. 7. Never operate this sewing machine. Switch the sewing machine off ("O") when making any other user servicing adjustments mentioned in the instruction manual. 11.Never drop or insert any opening. 12.Do... as threading the needle, changing the needle, threading the bobbin, changing the presser foot or changing the light. 10.Always unplug sewing machine from the electrical outlet when removing covers, lubricating, or when making any air openings blocked. Keep fingers away from the electrical outlet...

Owner's Manual
Page 3
... on the needle while sewing. When storing this operation manual to inspect and adjust the machine yourself. Do not drop or hit the machine. 4. up lever, needle or other hot objects. 2. Remember to clean the machine. Do not use . Maintaining the machine. Plug the machine directly into the wall....or removing the needle or any assemblies, the presser feet, needle or other parts. A power failure occurs during use or store the machine near a space heater, iron, halogen lamp, or other moving parts. 2. Always consult this operation manual when replacing or installing any other...
... on the needle while sewing. When storing this operation manual to inspect and adjust the machine yourself. Do not drop or hit the machine. 4. up lever, needle or other hot objects. 2. Remember to clean the machine. Do not use . Maintaining the machine. Plug the machine directly into the wall....or removing the needle or any assemblies, the presser feet, needle or other parts. A power failure occurs during use or store the machine near a space heater, iron, halogen lamp, or other moving parts. 2. Always consult this operation manual when replacing or installing any other...
Owner's Manual
Page 6
... TECHNIQUES CORDING...69 Single cording...69 Triple cording...69 FAGOTING...70 GATHERING ...71-72 SATIN STITCH SEWING ...73 SCALLOP STITCH ...74 Scallop hem...74 Scallop edging...74 SMOCKING ...75 TWIN NEEDLE SEWING ...76-77 DECORATIVE STITCHES ELONGATION...78 MIRROR IMAGE ...79 MEMORY FUNCTION...80-83 Combining stitches or... animation message display 86 Warning beeping sound ...87 Beeping sound ...87 MAINTENANCE ...88-89 Cleaning the LCD screen ...88 Cleaning the sewing machine surface 88 Cleaning the hook ...88-89 TROUBLESHOOTING ...90-91 STITCH REFERENCE CHART...92-103 5 INSTRUCTIONS
... TECHNIQUES CORDING...69 Single cording...69 Triple cording...69 FAGOTING...70 GATHERING ...71-72 SATIN STITCH SEWING ...73 SCALLOP STITCH ...74 Scallop hem...74 Scallop edging...74 SMOCKING ...75 TWIN NEEDLE SEWING ...76-77 DECORATIVE STITCHES ELONGATION...78 MIRROR IMAGE ...79 MEMORY FUNCTION...80-83 Combining stitches or... animation message display 86 Warning beeping sound ...87 Beeping sound ...87 MAINTENANCE ...88-89 Cleaning the LCD screen ...88 Cleaning the sewing machine surface 88 Cleaning the hook ...88-89 TROUBLESHOOTING ...90-91 STITCH REFERENCE CHART...92-103 5 INSTRUCTIONS
Owner's Manual
Page 8
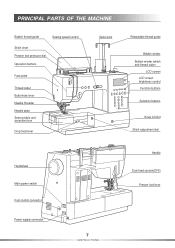
PRINCIPAL PARTS OF THE MACHINE Bobbin thread guide Sewing speed control Stitch chart Presser foot pressure dial Operation buttons Face plate Thread cutter Buttonhole lever Needle threader Needle plate Sewing table and accessory box Drop feed lever Spool pins Retractable thread guide Bobbin winder Bobbin winder switch and thread cutter LCD screen LCD screen brightness control Function buttons Selection buttons Knee Lift slot Stitch adjustment dial Handwheel Main power switch Foot control connector Power supply connector 7 INSTRUCTIONS Handle Dual feed system(DFS) Presser foot lever
PRINCIPAL PARTS OF THE MACHINE Bobbin thread guide Sewing speed control Stitch chart Presser foot pressure dial Operation buttons Face plate Thread cutter Buttonhole lever Needle threader Needle plate Sewing table and accessory box Drop feed lever Spool pins Retractable thread guide Bobbin winder Bobbin winder switch and thread cutter LCD screen LCD screen brightness control Function buttons Selection buttons Knee Lift slot Stitch adjustment dial Handwheel Main power switch Foot control connector Power supply connector 7 INSTRUCTIONS Handle Dual feed system(DFS) Presser foot lever
Owner's Manual
Page 9
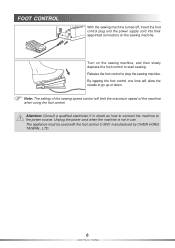
... using the foot control. Attention: Consult a qualified electrician if in use. FOOT CONTROL With the sewing machine turned off, insert the foot control plug and the power supply cord into their appointed connectors on the sewing machine, and then slowly depress the foot control to go up or down. The appliance must be used...
... using the foot control. Attention: Consult a qualified electrician if in use. FOOT CONTROL With the sewing machine turned off, insert the foot control plug and the power supply cord into their appointed connectors on the sewing machine, and then slowly depress the foot control to go up or down. The appliance must be used...
Owner's Manual
Page 10
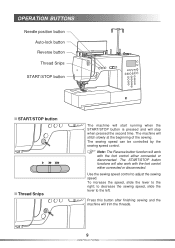
... connected or disconnected. Use the sewing speed control to the right; The START/STOP button functions will stop when pressed the second time. Press this button after finishing sewing and the machine will stitch slowly at the beginning of the sewing. The machine will trim the threads. 9... INSTRUCTIONS to decrease the sewing speed, slide the lever to the left. OPERATION BUTTONS Needle position ...
... connected or disconnected. Use the sewing speed control to the right; The START/STOP button functions will stop when pressed the second time. Press this button after finishing sewing and the machine will stitch slowly at the beginning of the sewing. The machine will trim the threads. 9... INSTRUCTIONS to decrease the sewing speed, slide the lever to the left. OPERATION BUTTONS Needle position ...
Owner's Manual
Page 11
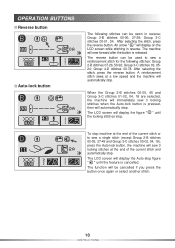
...the locking stitches stop. When the Group 2-B stitches 00-05, 45 and Group 3-C stitches 01-02, 04, 18 are selected, the machine will immediately sew 3 locking stitches when the Auto-lock button is cancelled. Group 3-C stitches 00-01, 04. The reverse button can be sewn in reverse....0524; Group 4-D stitches 00-78. A reinforcement stitch sews at a low speed and the machine will sew 3 locking stitches at the end of the current stitch and automatically stop . To stop machine at the end of the current stitch or to sew a reinforcement stitch for the following stitches can be used ...
...the locking stitches stop. When the Group 2-B stitches 00-05, 45 and Group 3-C stitches 01-02, 04, 18 are selected, the machine will immediately sew 3 locking stitches when the Auto-lock button is cancelled. Group 3-C stitches 00-01, 04. The reverse button can be sewn in reverse....0524; Group 4-D stitches 00-78. A reinforcement stitch sews at a low speed and the machine will sew 3 locking stitches at the end of the current stitch and automatically stop . To stop machine at the end of the current stitch or to sew a reinforcement stitch for the following stitches can be used ...
Owner's Manual
Page 12
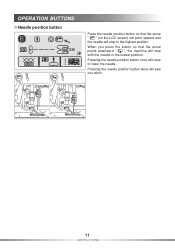
Pressing the needle position button twice will raise or lower the needle. Pressing the needle position button once will sew one stitch. 11 INSTRUCTIONS OPERATION BUTTONS Needle position button Press the needle position button so that the arrow points downward " ", the machine will stop in the lowest position. When you press the button so that the arrow " " (on the LCD screen) will point upward and the needle will stop with the needle in the highest position.
Pressing the needle position button twice will raise or lower the needle. Pressing the needle position button once will sew one stitch. 11 INSTRUCTIONS OPERATION BUTTONS Needle position button Press the needle position button so that the arrow points downward " ", the machine will stop in the lowest position. When you press the button so that the arrow " " (on the LCD screen) will point upward and the needle will stop with the needle in the highest position.
Owner's Manual
Page 16
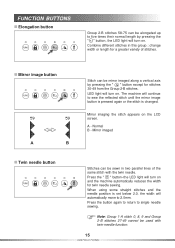
Combine different stitches in two parallel lines of stitches. When using some straight stitches and the needle position is changed. The machine will continue to sew the reflected stitch until the mirror image button is pressed again or the stitch is set below 2.0, the width will turn on ...;the LED light will turn on . Mirror image button A B Stitch can be used with the twin needle. Mirror imaging the stitch appears on and the machine automatically reduces the width for stitches 30-49 from the Group 2-B stitches. A - Note: Group 1-A stitch 0, 8, 9 and Group 2-B stitches 27-49 ...
Combine different stitches in two parallel lines of stitches. When using some straight stitches and the needle position is changed. The machine will continue to sew the reflected stitch until the mirror image button is pressed again or the stitch is set below 2.0, the width will turn on ...;the LED light will turn on . Mirror image button A B Stitch can be used with the twin needle. Mirror imaging the stitch appears on and the machine automatically reduces the width for stitches 30-49 from the Group 2-B stitches. A - Note: Group 1-A stitch 0, 8, 9 and Group 2-B stitches 27-49 ...

Owner's Manual
Page 20
... procedure to turn off . 1. Make sure the machine is not sewing. 2. Press the left side of the main power switch on . In addition, before transporting the machine to another location, be sure to correctly operate the machine. 19 GETTING READY Note: If a power outage occurs while the machine is being operated, turn it off . 3. The...
... procedure to turn off . 1. Make sure the machine is not sewing. 2. Press the left side of the main power switch on . In addition, before transporting the machine to another location, be sure to correctly operate the machine. 19 GETTING READY Note: If a power outage occurs while the machine is being operated, turn it off . 3. The...
Owner's Manual
Page 25
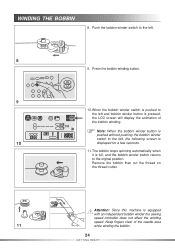
... READY Press the bobbin winding button. 9 10.When the bobbin winder switch is pushed to the orginal position. Attention: Since this machine is equipped with an independent bobbin winder the sewing speed controller does not effect the winding speed. Remove the bobbin then cut the thread on the thread cutter. WINDING THE...
... READY Press the bobbin winding button. 9 10.When the bobbin winder switch is pushed to the orginal position. Attention: Since this machine is equipped with an independent bobbin winder the sewing speed controller does not effect the winding speed. Remove the bobbin then cut the thread on the thread cutter. WINDING THE...
Owner's Manual
Page 49
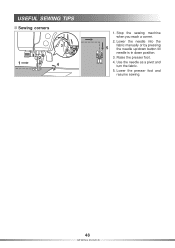
Raise the presser foot. 4. USEFUL SEWING TIPS Sewing corners 3 1. Lower the needle into the 5 fabric manually or by pressing the needle up/down button till needle is in down position. 3. Use the needle as a pivot and turn the fabric. 5. Lower the presser foot and resume sewing. 48 SEWING BASICS Stop the sewing machine when you reach a corner. 2.
Raise the presser foot. 4. USEFUL SEWING TIPS Sewing corners 3 1. Lower the needle into the 5 fabric manually or by pressing the needle up/down button till needle is in down position. 3. Use the needle as a pivot and turn the fabric. 5. Lower the presser foot and resume sewing. 48 SEWING BASICS Stop the sewing machine when you reach a corner. 2.
Owner's Manual
Page 50
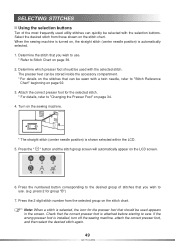
...stitches that can quickly be used with the selection buttons. press 2 for the selected stitch. * For details, refer to Stitch Chart on the sewing machine. * The straight stitch (center needle position) is automatically selected. 1. Check that should be used appears in the screen. Press the " "... 5. Note: When a stitch is selected, the icon for the presser foot that the correct presser foot is installed, turn off the sewing machine, attach the correct presser foot, and then select the desired stitch again. 49 STITCHES Attach the correct presser foot for group "B") 7. Press...
...stitches that can quickly be used with the selection buttons. press 2 for the selected stitch. * For details, refer to Stitch Chart on the sewing machine. * The straight stitch (center needle position) is automatically selected. 1. Check that should be used appears in the screen. Press the " "... 5. Note: When a stitch is selected, the icon for the presser foot that the correct presser foot is installed, turn off the sewing machine, attach the correct presser foot, and then select the desired stitch again. 49 STITCHES Attach the correct presser foot for group "B") 7. Press...
Owner's Manual
Page 81
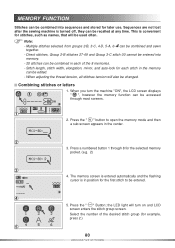
Sequences are not lost after the sewing machine is turned off, they can be combined and sewn together. - Note: - can be recalled at any time. Direct stitches, Group 2-B stitches 27-49 and Group 3-C ... into sequences and stored for the selected memory pocket. (e.g. 2) 3 4. Combining stitches or letters 1. Press a numbered button 1 through most screens. 1 2. the LED light will turn the machine "ON", the LCD screen displays " ", however the memory function can be accessed through 8 for later use. Select the number of the desired stitch group (for...
Sequences are not lost after the sewing machine is turned off, they can be combined and sewn together. - Note: - can be recalled at any time. Direct stitches, Group 2-B stitches 27-49 and Group 3-C ... into sequences and stored for the selected memory pocket. (e.g. 2) 3 4. Combining stitches or letters 1. Press a numbered button 1 through most screens. 1 2. the LED light will turn the machine "ON", the LCD screen displays " ", however the memory function can be accessed through 8 for later use. Select the number of the desired stitch group (for...
Owner's Manual
Page 84
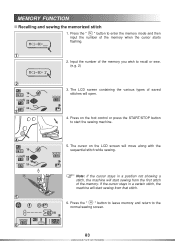
... the number of the memory you wish to start the sewing machine. 4 5. Note: If the cursor stays in a certain stitch, the machine will move along with the sequential stitch while sewing. Press on the LCD screen will start sewing from that stitch. 5 6. Press the " " button to ...containing the various types of saved stitches will start sewing from the first stitch of the memory when the cursor starts flashing. 1 2. MEMORY FUNCTION Recalling and sewing the memorized stitch 1. If the cursor stays in a position not showing a stitch, the machine will open. 3 4. Press the " " ...
... the number of the memory you wish to start the sewing machine. 4 5. Note: If the cursor stays in a certain stitch, the machine will move along with the sequential stitch while sewing. Press on the LCD screen will start sewing from that stitch. 5 6. Press the " " button to ...containing the various types of saved stitches will start sewing from the first stitch of the memory when the cursor starts flashing. 1 2. MEMORY FUNCTION Recalling and sewing the memorized stitch 1. If the cursor stays in a position not showing a stitch, the machine will open. 3 4. Press the " " ...
Owner's Manual
Page 85
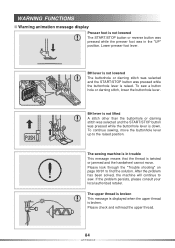
...Trouble shooting" on page 90/91 to sew. BH lever is not lowered The buttonhole or darning stitch was selected and the START/STOP button was pressed while the buttonhole lever is down. After the problem has been solved, the machine will continue to find the solution. Please...upper thread is twisted or jammed and the handwheel cannot move the buttonhole lever up to the raised position. To continue sewing, move . Lower presser foot lever. The sewing machine is in the "UP" position. If the problem persists, please consult your local authorized retailer. WARNING FUNCTIONS Warning ...
...Trouble shooting" on page 90/91 to sew. BH lever is not lowered The buttonhole or darning stitch was selected and the START/STOP button was pressed while the buttonhole lever is down. After the problem has been solved, the machine will continue to find the solution. Please...upper thread is twisted or jammed and the handwheel cannot move the buttonhole lever up to the raised position. To continue sewing, move . Lower presser foot lever. The sewing machine is in the "UP" position. If the problem persists, please consult your local authorized retailer. WARNING FUNCTIONS Warning ...
Owner's Manual
Page 88
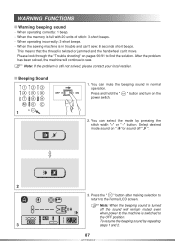
...retailer. Note: If the problem is twisted or jammed and the handwheel can select the mode by repeating 3 steps 1 and 2. 87 APPENDIX You can 't sew: 8 seconds short beeps. You can 't move. Note: When the beeping sound is turned off " ". 2 3. WARNING FUNCTIONS Warning beeping sound - ... normal LCD screen. After the problem has been solved, the machine will remain muted even when power to the machine is switched to find the solution. Press the " " button after making selection to return to sew. When the sewing machine is full with 20 units of stitch: 3-short beeps. -...
...retailer. Note: If the problem is twisted or jammed and the handwheel can select the mode by repeating 3 steps 1 and 2. 87 APPENDIX You can 't sew: 8 seconds short beeps. You can 't move. Note: When the beeping sound is turned off " ". 2 3. WARNING FUNCTIONS Warning beeping sound - ... normal LCD screen. After the problem has been solved, the machine will remain muted even when power to the machine is switched to find the solution. Press the " " button after making selection to return to sew. When the sewing machine is full with 20 units of stitch: 3-short beeps. -...
Owner's Manual
Page 89
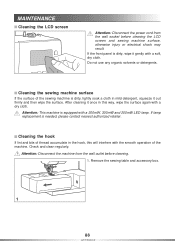
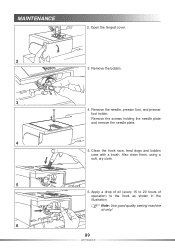
... out firmly and then wipe the surface. Cleaning the sewing machine surface If the surface of the sewing machine is equipped with the smooth operation of thread accumulate in the hook, this way, wipe the surface again with a soft, dry cloth. Remove the sewing table and accessory box. 1 88 APPENDIX Cleaning the ...with a dry cloth. MAINTENANCE Cleaning the LCD screen Attention: Disconnect the power cord from the wall outlet before cleaning the LCD screen and sewing machine surface, otherwise injury or electrical shock may result. Do not use any organic solvents or detergents.
... out firmly and then wipe the surface. Cleaning the sewing machine surface If the surface of the sewing machine is equipped with the smooth operation of thread accumulate in the hook, this way, wipe the surface again with a soft, dry cloth. Remove the sewing table and accessory box. 1 88 APPENDIX Cleaning the ...with a dry cloth. MAINTENANCE Cleaning the LCD screen Attention: Disconnect the power cord from the wall outlet before cleaning the LCD screen and sewing machine surface, otherwise injury or electrical shock may result. Do not use any organic solvents or detergents.
Owner's Manual
Page 90
Remove the bobbin. 3 4. Clean the hook race, feed dogs and bobbin case with a brush. Also clean them, using a soft, dry cloth. 5 6. Remove the needle, presser foot, and presser foot holder. MAINTENANCE 2. Remove the screws holding the needle plate and remove the needle plate. 4 5. Open the hinged cover. 2 3. Apply a drop of oil (every 15 to 20 hours of operation) to the hook as shown in the illustration. Note: Use good quality sewing machine oil only! 6 89 APPENDIX
Remove the bobbin. 3 4. Clean the hook race, feed dogs and bobbin case with a brush. Also clean them, using a soft, dry cloth. 5 6. Remove the needle, presser foot, and presser foot holder. MAINTENANCE 2. Remove the screws holding the needle plate and remove the needle plate. 4 5. Open the hinged cover. 2 3. Apply a drop of oil (every 15 to 20 hours of operation) to the hook as shown in the illustration. Note: Use good quality sewing machine oil only! 6 89 APPENDIX
Owner's Manual
Page 92
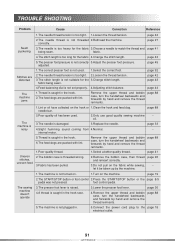
... 4.Change the stitch length. needle bar. page 88 The machine is not used . 2.Only use good quality sewing machine -- page 41 2.Remove the bobbin case, then thread page 26 and reinsert correctly. 3.Do not pull on the machine. internal motor. 5.Thread is not turned on. 1.Turn ... from 4.Normal. -- page 88 Uneven stitches, uneven feed 1.Poor quality thread. 2.The bobbin case is not threaded 2.Rethread the machine. page 19 The sewing machine doesn't operate 2.The START/STOP button or foot control 2.Press the START/STOP button or the page 8/9 pedal was not pressed....
... 4.Change the stitch length. needle bar. page 88 The machine is not used . 2.Only use good quality sewing machine -- page 41 2.Remove the bobbin case, then thread page 26 and reinsert correctly. 3.Do not pull on the machine. internal motor. 5.Thread is not turned on. 1.Turn ... from 4.Normal. -- page 88 Uneven stitches, uneven feed 1.Poor quality thread. 2.The bobbin case is not threaded 2.Rethread the machine. page 19 The sewing machine doesn't operate 2.The START/STOP button or foot control 2.Press the START/STOP button or the page 8/9 pedal was not pressed....


